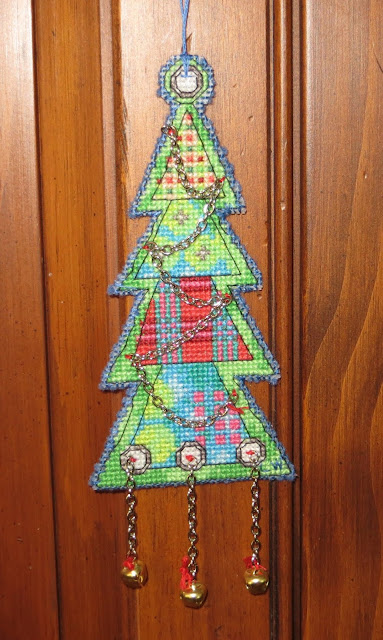
Now I know this won't come as any surprise to any of you but I was immediately drawn to the "joy" ornament in the "Jingle Bell Ornaments" kit by Dimensions. As you know, I just can't resist any ornament with my Mom's name one it. But, when I looked at the "Jingle Bell Ornaments" kit by Dimensions further I thought how pretty they were and how wonderful they would look on my pencil Christmas tree.
They looked pretty simple and easy to me. Based on previous experience I knew they would take a while to do due to the black highlighting and due to the embellishments so I was prepared for that.

The "Jingle Bell Ornaments" ornament kit contained the presorted thread, #14 plastic canvas, linked chain, jingle bells, needle and instructions. The pattern uses full counted cross-stitch and outline stitching for emphasis and depth.
I have worked with the #14 plastic canvas before without a problem. Generally, it is flexible enough to just hold it in your hands but also rigid enough to allow you to cross-stitch it without any problem. However, I found with this kit and the size of the ornaments, in particular, that the 14-count plastic canvas was just too big to hold in my hands and cross-stitch at the same time. I had to cut the canvas.

The chart was 13 3/4" by 10 1/4" and had five ornaments of different sizes. The intent was to cross-stitch the plastic canvas from the left to the right. However, I don't like doing that as you have to cut your threads when you cut the ornaments out at the end and then you have to glue the loose ends to the back of the canvas. So, I decided to cut the plastic canvas into five pieces beforehand as it would make it easier to cross-stitch each of the ornaments and there would be no messy and time consuming gluing of the loose thread ends.
Unlike the previous ornaments I had done which were the same size each of these ornaments was a different size. So, I had to count along the plastic canvas and mark where the ornament sides were before I could cut the plastic canvas.
The pattern came with starting, stitching and finishing instructions as well as a sample of the stitches required and a color chart with color coded symbols. The symbols on the keys and chart were basically easy to read and follow.
As was the case with previous Dimensions kits the thread sorter was poorly designed. The embroidery threads were glued to two foam backed strips of cardboard that had a picture of the color of the thread and it's number. In order to get to the individual threads you had to separate threads from the foam back. Very quickly the threads separated from their section and then you no longer knew what the thread number was to tie to your symbols & legends.
Instead of designing my own thread sorter this time I decided to punch a whole at the top of each color on the thread sorter and cut one strand of 6 threads for that color as needed, tying the extra cut threads to the hole I had punched above that color. That way I wouldn't have a problem identifying my threads with the chart. Just below the hole I added the respective color coded cross-stitch symbol. This kit could be much improved if a different thread sorter with respective #'s and color coded symbols was provided.
Short of changing the thread sorter all together to make things even easier for the user the color symbol should at the very least have been shown on the thread sorter strip of cardboard as well. That way you would only need to use the thread sorter strip of cardboard to follow your chart.

The instructions called for leaving certain sections of the plastic canvas bare in the areas where the hanger would be places or where you were to insert the chain links. I don't like leaving any area of the plastic canvas bare as I think it makes the ornament look unfinished so I decided to cross-stitch those sections with 2 strands of the white floss.
Instead of following the directions for finishing these ornaments with the hangers, jingle bells, and chain links, which I found very confusing, I opted instead to tack the jingle bells and chain links to the front of the ornaments with the floss and to finish the backs with felt.

Once I had finished cross-stitching my ornaments I cut the plastic canvas close to the sides of the ornaments according to the finishing instructions. I don't like leaving the ornaments with the back threads showing so I always opt to finish the back of my ornaments with felt. This time I decided to use blue felt.
I rubbed Glue Stic on the back of my ornaments and then glued a rectangle piece of blue felt to the back. Once the felt was glued on I cut the blue felt in the same shape as the ornament and then stitched the plastic canvas to the blue felt along the sides of each ornament with two strands of blue embroidery floss. Instead of following the instructions for creating cording I created a hanger for the top of each ornament that didn't have a chain hanger with two strands of the blue embroidery floss.

I was happy with the way my "Jingle Bell Ornaments" came out and know they're going to look wonderful on my pencil tree.

No comments:
Post a Comment