Showing posts with label woodcrafts. Show all posts

Wednesday, August 11, 2021

How I Made My Mermaid Collage Shadowbox Picture


Since making my mixed media summer themed paper dolls and art pictures with sponge painted backgrounds I decided to try something a little different.  

I had bought some adorable summer themed scrapbook papers at Scrapbook.com, ASCsupplies shop on Etsy, and ScrapLifeShop on Etsy. 


One of the paper sets I bought at Scrapbook.com was "Reminisce - Mermaid's Tale Collection - 12 x 12 Collection Kit."  Since blue is my favorite color I couldn't help but fall in love with the blue mermaid. I knew I had to create something using her.


So, I decided to take a 6" by 6" unfinished wood shadow box and turn it into a picture that I could hang on my wall.  Instead of creating a mixed media collage picture within the shadow box I decided to create the collage on the back side of the shadowbox and hang it on the wall like a cube.

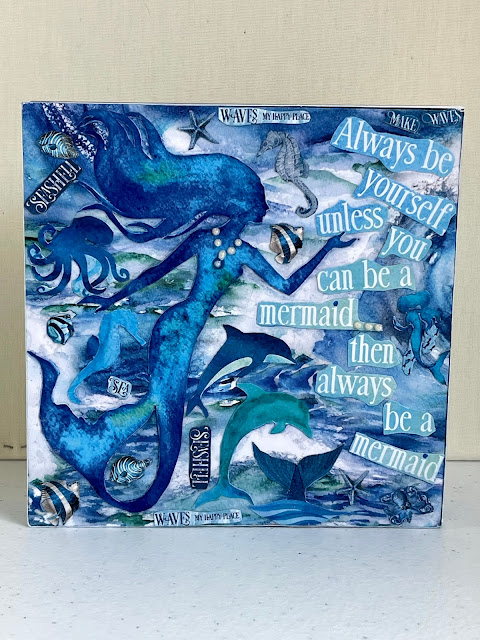
I wanted to utilize the sides of the cube for some of the sayings that I liked and decided to use a paper that had an abstract summer themed blue wave design that I liked and the sayings pasted in the centers of each side.


Unlike most of the mixed media collage pictures I've created I decided not to sponge paint the background.  The kit had some beautiful blue, teal and white wave paper that I loved and wanted to use for the background.

Before doing anything with the unfinished wood cube I sized the papers I wanted to use for the backside and sides so they would be perfectly sized for the cube and aligned with each other.  Where needed I used a Friskars paper cutter to get my edges perfectly straight.

I cut out the mermaid that I wanted to use and cut out the images and sayings that I thought would be perfect for this collage picture.  I wanted the mermaid to be the main focal point with the saying: "Always be yourself unless you can be a mermaid... then always be a mermaid."  

First I applied Mod Podge to the back of the wave paper I wanted to use for the background on the backside of the cube and then pasted it to the cube.  I did the same for the papers I wanted to use for the four sides.  

After testing the placement of the images I had cut out I brushed Mod Podge on the backs of the scrapbook images I had cut out and then pasted them on my collage.  When it was dry, I brushed matte medium on the backside and sides.  After everthing was dried I hung it on the wall.

I loved how it turned out and it is now hanging in my bathroom along with the other summer themed pictures I made.


I also found two beach themed scrapbook papers from the "Beyond the Sea Collection - 6 x 6 Paper Pad" I had bought at Scrapbook.com that I thought would be perfect for two other 6" by 6" wood summer themed cubes I wanted to make.


Unlike my mermaid collage I just wanted to use the two 6" by 6" scrapbook papers just the way they were as I loved the watercolor images.  I wanted to use one for the bathroom and use one on top of the desk I had in my kitchen. 

Once again, before doing anything with the unfinished wood cube I sized the papers I wanted to use for the backside so they would be perfectly sized for the backside of the cube.  Where needed I used a Friskars paper cutter to get my edges perfectly straight.

Like the mermaid collage I was going to use the backside of the 6" by 6" shadowbox wood cube.  Instead of collaging the sides I decided to leave them plain. So, I just painted the sides and front of the cube with white acrylic paint.  I only used one layer as I wanted the white to be lightly layered on the sides.

After pasting the two images to the backside of their respective cube with mod podge I let them dry.  Then I brushed matte medium on the sides and front of each cube.  After letting them thoroughly dry I placed one on my bathroom wall and one on the top of the desk.  Perfect!

Over the years I've made many holiday and seasonal themed pieces.  Mainly for the fall season and all the holidays that occur between October - December.  I only had a few summer ones so I was pleased that this summer I was finely able to create some more for this season.  

I definitely think I have enough now.  

Then again, I never have enough - do I......LOL

Please respect My Terms of Use:  All patterns, e-patterns, printables, e-printables, e-books, graphics, tutorials, how-to's, articles and other e-products © 2004-2023 Linda Walsh Originals-Designs by Linda Walsh. All rights reserved. Commercial selling or reselling by any means prohibited without the written consent of Linda Walsh.

Patterns, e-patterns, printables, e-printables, e-books, graphics, tutorials, how-to's, articles and other e-products are for personal use only. You may not modify, photocopy, download, upload, post, transmit, display, perform, publish, license, reprint, create derivative works from, mass duplicate, re-sell, digitize, and reproduce in any other form (print, digital or electric) or commercially apply, embed, share, Email, or redistribution in any other means. Use of any of the above is prohibited without the written permission of Linda Walsh.

However, you may link to my website(s)/blog(s) and the individual page(s)/blog post(s) (including 1 picture) but do not copy, reprint or duplicate my website(s)/blog(s) or individual page(s)/post(s ) without my permission.

Items made from Linda Walsh Originals E-Patterns and E-Books are intended for personal use for fun or small scale personal and business profit as long as you credit us with the design. Large scale commercial use (i.e. mass production) of items made from Linda Walsh Originals E-Patterns are by permission only.

Please see my Terms and Conditions for additional information.

Copyright © 2004 - 2023 - All Rights Reserved - Written By Linda Walsh of Linda Walsh Originals and Linda's Blog. Linda is a doll maker and doll pattern designer.

Friday, March 19, 2021

How I Made My Lacy Mixed Media Victorian Collage Stump Art Doll Free Tutorial


I fell in love with mixed media art dolls several years ago after taking online courses at Artful Gathering.  I loved those classes as I learned so much and they really had a delightful effect on my
 creative soul. 


When I first started creating my Victorian "Lady" dolls I decided to make them stump dolls as I wanted to focus on their outfits.  So, it's totally understandable that after falling in love with mixed media art dolls, I would experiment with mixed media stump dolls as well.  

Well, experiment I did! The Lucy, Lacy, and Lilly dolls, shown above, are a trio of "stump doll" sisters who are as different as they are beautiful.


 Lucy, who is on the left in the pictures above, is a delicate flower who has an over abundance of compassion.  Lacy, who is on the right in the pictures above, is whimsical and flirtatious while Lilly, who is in the middle in the pictures above, is a deep thinker who cares about everyone and everything.

They are mixed media Victorian collage stump art dolls that I made back in September of 2014. 

I had so much fun making these mixed media stump art dolls I thought you might like to know how I made them. So, I decided to create a free tutorial on how I made Lacy.  

I hope my free tutorial inspires you to create a mixed media stump art doll of your own.


Lacy - 4 1/2" x 6" x 3/4" Handmade Mixed Media Victorian Collage Stump Art Doll

Lacy is a 4 1/2" x 6" x 3/4" mixed media Victorian stump wood doll with a paper face, sponge painted wood body, paper collage and embellished outfit. Her fabric gathered and covered bamboo bonnet with paper floral and silk floral embellishments is fastened with a purple check ribbon that is tied in a bow under her chin. Her sides and back are sponge painted and her outfit  is an embellished paper collage dress with a two tier cape with raised black dots. White lace trim adorned with a beautiful pearl and silk ribbon flower is wrapped around her neck.

Her beautiful brown thick alpaca yarn hair from Rock Garden Alpacas Fiber is wrapped in a bun. A bouquet of flowers and butterfly add charm to her collage outfit.

Supplies Needed:

3/4" wood pine - 6" by 6" by 3/4"
Acrylic Paint - Dark Green, Light Teal Green, Yellow, Coral, Pink
Low Temperature Hot Glue Gun and Hot Glue Sticks
Various Mixed Media and Scrapbook Papers - Lilac, Light Teal Green, Silver and Other Colors
Victorian Lady Graphic Image For Face
Victorian Graphic Image Paper Embellishments For Front of Body
3/8" Purple and White Checkered Decorative Ribbon Trim - 30" Long For Bonnet Tie
Blush for Cheeks - Coral Color
4” Bamboo Hat
Purple Fabric - 12”Square For Bonnet
1/2” Scalloped White Lace Trim - 12” Long For Neck Line
1” Cream Colored Ribbon & Bead Embellishment For Under The Neck Decoration
1” Lilac Paper Flowers - 3 For Bonnet Decorations 
1/2” Silk Ribbon and Flower Trim For Bonnet Decoration - 12” Long
Light Brown Alpaca Handspun Yarn For Hair
Metallic Marker - Silver
Puffy Paint - Black
Sandpaper
ModPodge
Liquitex Matte Medium
Paint Brushes
Lead Pencil
Stabilo Pencil - Black (for shading)
Tortillions (for blending stabilo lines)
Band-saw and Table Saw to Cut The Wood
Paper Towel
Small Nail Files or Emery Boards
Scissors
Sea Sponges
Small Wallpaper Roller
Pencil
Black Micron Markers
Decorative Paper Edger Scissors

Instructions:


1) Using the paper body template example and measurements from Diagram #1 draw a body template on a white piece of paper with the lead pencil.  Adjust as necessary so your measurements match the ones in the Paper Body Template Example - Diagram #1.

2) Highlight the outside edges with the black micron markers and then cut the paper body template outside the black marker edge lines.

3) Cut a piece of 3/4 " pine 6" by 6" square with the table saw.

4) Center the paper body template on the 6" by 6" wood square and draw along the outside edge with the lead pencil.  


5)  Cut the wood body out along the outside edges with the band saw. Your wood body and wood body measurements should be similar to the wood body example shown in Diagram #2 and be able to stand evenly.

6) Sand all edges of the wood body so they are smooth to the touch.  Make sure the sanding doesn't affect the ability of the wood body to stand evenly.

7) Once you're satisfied with the sanding wipe all the edges and sides down with a wet piece of paper towel.


8)  Paint the front (except the head area which you need to leave bare), sides, bottom and the back of the wood body with the dark green acrylic paint (See Diagram #3).


9)  Using the sea sponges paint the sides and the back of the wood body with the light teal, green, yellow, coral, pink and then dark green acrylic paint (See Diagram #4). 


10) Your sponge painted areas should look similar to the pictures above.

11)  Apply Liquitex matte medium to the front (except the head area which you should leave bare), sides, and back of the wood body to seal your painted areas.  Let dry completely


12) Cut a piece of scrapbook paper to fit the front area of the front side leaving the head area bare (as shown in Diagram #5) and making sure the edges slightly overhang the side and bottom edges.

13) Apply ModPodge to the front side of the wood body (leaving the head area bare) with a brush.

14)  Position the front piece on the front side of the wood body and press down until it is firmly in place.  Roll it with the small wallpaper roller until it is securely in place and adheres to the front side.

15)  Gently sand the side and bottom edges of the scrapbook paper with the small nail files or emery boards until they are flush and smooth with the sides.

16) Apply a thin layer of the ModPodge to the scrapbook paper piece on the front of the wood body.


17) Cut a piece of the scrapbook paper for the left vest using the shapes shown in Diagram #6 making sure the side edges slightly overhang the side edges of the wood body by 1/32" and that the bottom edge is cut with the decorative paper edger scissors for the scalloped edge.

18) Apply ModPodge to the back side of the left side of the vest with a brush.

19)  Position the left side of the vest scrapbook paper piece on the left front side of the wood body and press down until it is firmly in place.  Roll it with the small wallpaper roller until it is securely in place and adheres to the front side. Make sure the left side of the vest piece slightly overhangs the left side of the wood body by about 1/32".

20)  Gently sand the left side of the vest scrapbook paper piece with the small nail files or emery boards until it is flush and smooth with the side wood. 

21) Apply a thin layer of the ModPodge to the scrapbook paper piece on the front of the wood body.


22) Cut a piece of the scrapbook paper for the right vest using the shapes shown in Diagram #7 making sure the side edges slightly overhang the side edges of the wood body by 1/32" and that the bottom edge is cut with the decorative paper edger scissors for the scalloped edge.

23) Apply ModPodge to the back side of the right side of the vest with a brush.

24)  Position the right side of the vest scrapbook paper piece on the right front side of the wood body and press down until it is firmly in place.  Roll it with the small wallpaper roller until it is securely in place and adheres to the front side. Make sure the right side of the vest piece slightly overhangs the right side of the wood body by about 1/32".

25)  Gently sand the right side of the vest scrapbook paper piece with the small nail files or emery boards until it is flush and smooth with the side wood. 

26) Apply a thin layer of the ModPodge to the scrapbook paper piece on the front of the wood body.


27) For the face you may need to re-size and re-print the image you will be using several times before you are able to get the right proportions for the round section of the front of the head which you have left bare until now.

28)  Apply ModPodge to the area where the face will be placed.

29)  Position the face on the wood body as shown in Diagram #8 above and press down until it is firmly in place.  Roll it with the small wallpaper roller until it is securely in place and adheres to the front side. 

30)  Gently sand the face paper piece along the round edges with the small nail files or emery boards until it is flush and smooth with the head wood. 

31) Apply a thin layer of the ModPodge to the scrapbook face paper piece on the front of the wood body.


32) Cut a piece of the 1/2” scalloped white lace trim to fit around the neck edge overlapping by 1/2” in the back (See Diagram #9).

33) Glue the lace trim around the neck edge overlapping 1/2” in the back with the hot glue and making sure the top edge of the lace trim covers the neck edge of the face graphic and is positioned just under the chin of the face graphic (See Diagram #9).


34) The lace trim around the neck should look similar to the pictures shown above.


35) Glue the 1” cream colored ribbon & bead embellishment in the center front of the body just under the neck edge and on top of the lace trim that you just glued around the neck with the hot glue See Diagram #10). 
 
36) For the hair you want to use the light brown alpaca handspun yarn and will be unwinding some of the yarn to frame the face, You will also be using the woven yarn to cover the sides, top and back of the head and creating a bun on the back of the head.

37) To frame the face cut several pieces of the yarn about 3/4” long and then separate the weave so the yarn is like roving.


38)  Apply hot glue to the wood side of the head on the bottom of the right side up to the right side of the face graphic and then apply one of your 3/4” pieces of separated yarn so it adheres to the head (See Diagram #11).

39)  Work your way up the head gluing the 3/4” pieces from the right hand side across the forehead to the left hand side making sure the sides and edges of the face graphic are covered (See Diagram #11).

40) Fluff the ends of the yarn roving so the hair looks natural and flyaway and only the face itself on the graphic is showing (See Diagram #11).


41) Now you want to cover the back, sides, and top of the head with rows of the yarn glued simultaneously one row after the other starting at the back bottom nape of the neck as shown in Diagram #12 and working your way from the right hand side up the back and side of the head to the top center back of the head making sure the whole area is firmly glued and covered (See Diagram #12).

42)  Cut a long piece of the yarn and hot glue it to the the back bottom nape of the neck as shown in Diagram #12 and while gluing as you go work your way from the right hand side up the back and side of the head to the top center back of the head making sure the whole area is firmly glued and covered (See Diagram #12).


43) After the face is framed and the back, sides and top of the head are covered with the yarn you want to glue more yarn to the back of the head to create the effect of a bun on the back of the head (See Diagram #13).

44) Cut another really long piece of the yarn and starting at the center back of the head start gluing and apply the yarn in a tight counter-clockwise direction until the whole back of the head is covered with a bun  See Diagram #13).

45) Finish gluing the bun at the top of the head (See Diagram #13).


46) Before you put the bonnet on Lacy you want to add the finishing embellishments to the front of the body.

47) Cut two Victorian graphic images out of the paper for the lower front of the body (See Diagram #14). For my Lacy this was a cluster of flowers and a butterfly.

48) Apply ModPodge to the back side of the flower cluster and press down until it is firmly in place (See Diagram #14).  Apply ModPodge to the back side of the blue butterfly overlapping the flower cluster  and press down until it is firmly in place (See Diagram #14).

49) Roll the flower cluster and butterfly paper embellishments with the small wallpaper roller until they are securely in place and adhere to the front side. 

50) Apply a thin layer of the ModPodge to the flower cluster and butterfly on the front of the wood body. 


51) Use the black stabilo pencil to shade the edges of the flower cluster and butterfly, as shown in Diagram #15 above and then blend the stabilo lines with the Tortillions. 

52) Make sure the blending around the tie is pleasing to the eye.  If need be add more shading with the black stabilo pencil and blend again.


53) Use the black puffy paint to add black dots to the center of the scalloped loops on the bottom edge of both sides of the vest making sure they are pleasant to the eye (See Diagram #16).  Let dry.

54) Use the metallic silver marker to draw a  silver line under the bottom edge of both sides of the vest (See Diagram #16).


55) You want to add a decorated hat to the top of Lacy’s head using the 4” bamboo hat.

56) Position the bamboo hat in the center of the wrong side (WS) of the 12” purple fabric.    

57) Using the bamboo hat as a guide cut a 7” purple fabric circle around the bamboo hat.  

58) Remove the hat and then apply a little hot glue to the top center of the bamboo hat (See Diagram #17). 


58) Turn the bamboo hat upside down in the center of the wrong side (WS) of the purple hat and hot glue it in place (See Diagram #18).


 59) Now you want to glue the purple fabric edges inside the hat pulling the fabric edges tightly against the brim edge of the hat and overlapping all along the edges.  

60)  Apply hot glue to the wrong side (WS) edge of the fabric and pulling the right side (RS) of the fabric tightly against the brim edge of the hat glue the edge of the wrong side (WS) of the fabric to the inside of the hat (See Diagram #19).


61) Continue gluing the wrong side (WS) of the fabric edges to the inside of the hat overlapping the fabric around the round brim of the hat creating folds in the fabric as you move along the brim edge (See Diagram #20).  

62) Continue in this manner until you reach your starting point making sure the fabric is tight against the brim edge of the hat and the fabric edges are all hot glued inside the hat (See Diagram #20).


63) Cut a piece of the 1/2” silk ribbon and flower trim to fit around the bottom of the hat cap and glue it in place with the hot glue (See Diagram #21). 


64) Glue the three paper flowers evenly around the hat on top of the 1/2” silk ribbon and flower trim with hot glue (See Diagram #22). 

65) Hot glue the center point of the 3/8" purple and white checkered decorative ribbon trim  to the center inside of the hat (See Diagram #22).

66) Apply hot glue all inside the cap of the hat and glue the hat to the top of Lacy's head (See Diagram #22).  


67) Tie the ribbon in a bow on the right side and then trim the excess ribbon ends (See Diagram #23).

68) Congratulations! Lacy is done.


I also created a free e-book for you showing how I made Lacy.  Enjoy!


To view and download my Lacy free E-Book please CLICK HERE. You'll be brought to Google Drive where you can view my free e-book. Then just download my free .pdf e-book by clicking on the down arrow in the top center.  

For more information on all my free e-patterns, e-printables and e-books please CLICK HERE.

Copyright © 2004 - 2023 - All Rights Reserved - Designed and Written By Linda Walsh


Please respect My Terms of Use:  All patterns, e-patterns, printables, e-printables, e-books, graphics, tutorials, how-to's, articles and other e-products © 2004-2023 Linda Walsh Originals-Designs by Linda Walsh. All rights reserved. Commercial selling or reselling by any means prohibited without the written consent of Linda Walsh.

Patterns, e-patterns, printables, e-printables, e-books, graphics, tutorials, how-to's, articles and other e-products are for personal use only. You may not modify, photocopy, download, upload, post, transmit, display, perform, publish, license, reprint, create derivative works from, mass duplicate, re-sell, digitize, and reproduce in any other form (print, digital or electric) or commercially apply, embed, share, Email, or redistribution in any other means. Use of any of the above is prohibited without the written permission of Linda Walsh.

However, you may link to my website(s)/blog(s) and the individual page(s)/blog post(s) (including 1 picture) but do not copy, reprint or duplicate my website(s)/blog(s) or individual page(s)/post(s ) without my permission.

Items made from Linda Walsh Originals E-Patterns are intended for personal use for fun or small scale personal and business profit as long as you credit us with the design. Large scale commercial use (i.e. mass production) of items made from Linda Walsh Originals E-Patterns are by permission only.

Please see my Terms and Conditions for additional information.

Copyright © 2004 - 2023 - All Rights Reserved - Written By Linda Walsh of Linda Walsh Originals and Linda's Blog. Linda is a doll maker and doll pattern designer.

Friday, October 16, 2020

How I Made My Harold Mixed Media Shelf Sitter Scarecrow Stump Doll


For me I just LOVE the fall decorating season.  One of my reasons is because I just love scarecrows and have made many over the years.  So, when I got a chance to make some paper-clay and wood mixed media shelf sitter scarecrows several years ago I jumped right in and made two.


Harold, pictured on the left, and Hank, pictured on the right in the picture above are a pair of scarecrows that are a little apprehensive as to what they are supposed to do in the field.  They know they're there to scare the crows, but are unsure as to how to do it.  After all they don't want to be mean.

Harold and Hank are 4" x 5 1/2" x 3/4" mixed media Victorian scarecrow wood dolls with paper-clay painted faces with brushed brown cheeks.  Their sides and back are sponge painted and their outfits are a multi-layer embellished paper collage with paper center band and black raised dots.  Paper patches add charm to their collage outfits.  Their wild raffia hair is barely controlled under their straw hat.    An orange bow is tied under their necks.

Right now Harold is sitting on my family room fireplace mantle.  He's seems so pleased with himself there.

I loved making my two mixed media scarecrows so much I thought you might like to know how I made my Harold Mixed Media Collage Shelf Sitter Scarecrow Doll so you could make one of your own.  Here’s how:


Supplies Needed:

3/4" wood pine - 7" by 7" by 3/4"
Paper Clay
Acrylic Paint - Black, Orange, Dark Taupe, White, Dark Brown, Dark Flesh, Peach, Pink
Paper Clay Sculpting Tools
Sandpaper
Low Temperature Hot Glue Gun and Hot Glue Sticks
Various Scrapbook Papers - Brown (Textured), Fall Plaid, Fall Striped, and Orange Scrapbook Papers
1/8" Orange Decorative Ribbon Trim - 18" Long
Blush for Cheeks - Dark Rust Color and Black
Micron Markers - Black of Various Widths
Puffy Paint - Black
ModPodge
Liquitex Matte Medium
Paint Brushes
Paper Sheets - Flesh Colored and White
Lead Pencil
Stabilo Pencil - Brown (for shading)
Tortillons (for blending stabilo lines)
Band-saw and Table Saw to Cut The Wood
Paper Towel
Small Nail Files or Emery Boards
Scissors
Sea Sponges
Small Wallpaper Roller
Wood Glue
Wax Paper
Thin Raffia Strips
Straw Raffia Hat - 3” Round
Gold Glitter Paint

Harold 4" x 5 1/2" x 3/4" Handmade Mixed Media Victorian Collage Shelf Scarecrow Doll With Paper-clay Face

Harold is a 4" x 5 1/2" x 3/4" mixed media Victorian scarecrow wood doll with paper-clay painted faces with brushed brown cheeks.  His sides and back are sponge painted and his outfit are a multi-layer embellished paper collage with paper center band and black raised dots.  Paper patches add charm to his collage outfit.  His wild raffia hair is barely controlled under his straw hat.    An orange bow is tied under his neck.


1) Using the paper body template example and measurements from Diagram #1 above draw a body template on a white piece of paper with the lead pencil.  Adjust as necessary so your measurements match the ones in the Paper Body Template Example - Diagram #1 above.

2) Highlight the outside edges with the black micron markers and then cut the paper body template outside the black marker edge lines.

3) Cut a piece of 3/4 " pine 7" by 7" square with the table saw.

4) Center the paper body template on the 7" by 7" wood square and draw along the outside edge with the lead pencil. 


5)  Cut the wood body out along the outside edges with the band saw. Your wood body and wood body measurements should be similar to the wood body example shown in Diagram #2 above and be able to stand evenly.

6) Sand all edges of the wood body so they are smooth to the touch.  Make sure the sanding doesn't affect the ability of the wood body to stand evenly.

7) Once you're satisfied with the sanding wipe all the edges and sides down with a wet piece of paper towel.


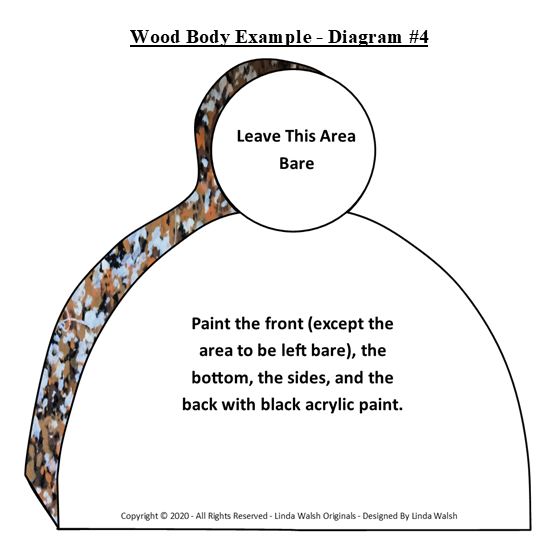
8)  Paint the front (except the head area which you need to leave bare), sides, bottom and the back of the wood body with the black acrylic paint.  See Diagram #3 above.

9)  Using the sea sponges paint the sides and the back of the wood body with the peach, orange, dark taupe, dark brown, and white acrylic paint.  See Diagram #4 above.

10) Your sponge painted areas should look similar to the pictures above.

11)  Apply Liquitex matte medium to the front (except the head area which you should leave bare), sides, and back of the wood body to seal your sponge painted areas.  Let dry completely.


12) Cut a piece of the fall plaid scrapbook paper to fit the front area of the front side leaving the head area bare (as shown in Diagram #5 above) and making sure the edges slightly overhang the side and bottom edges by 1/32”.

13) Apply ModPodge to the front side of the wood body (leaving the head area bare) with a brush.

14)  Position the front piece on the front side of the wood body and press down until it is firmly in place.  

15)  Roll it with the small wallpaper roller until it is securely in place and adheres to the front side.

16)  Gently sand the side and bottom edges of the fall plaid scrapbook paper with the small nail files or emery boards until they are flush and smooth with the sides.

17) Apply a thin layer of the ModPodge to the fall plaid scrapbook piece on the front of the wood body to seal it in place.

18) Cut a piece of the fall striped scrapbook paper for the center strip using the shape shown in Diagram #6 above.  Cut the bottom edge with the scissors making sure the bottom edge slightly overhang the bottom edge of the wood body by 1/32".   Cut the top edge curved so it aligns with the head area that you are leaving bare, as shown in Diagram #6 above.

19) Apply ModPodge to the back side of the center strip.

20)  Position the center strip piece on the front side of the wood body and press down until it is firmly in place.  

21)  Roll it with the small wallpaper roller until it is securely in place and adheres to the front side. 

22)  Gently sand the bottom edge of the center strip piece with the small nail files or emery boards until it is flush and smooth with the bottom edge pf the wood piece.

23) Apply a thin layer of the ModPodge to the center strip piece on the front of the wood body to seal it in place.


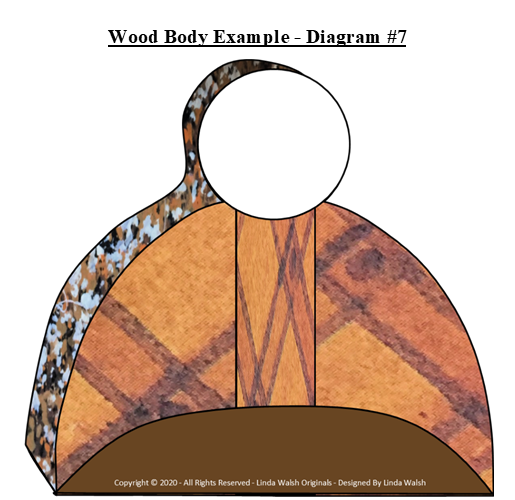
24) Cut a piece of the brown textured scrapbook paper for the pants using the scissors in the shape shown in Diagram #7 above making sure the bottom edge of the pants overhangs the bottom edge of the wood body by 1/32”.

25) Apply ModPodge to the back side of the pants.

26)  Position the pants piece on the front side of the wood body and press down until it is firmly in place.  

27)  Roll it with the small wallpaper roller until it is securely in place and adheres to the front side. 

28)  Gently sand the bottom side of the pants piece with the small nail files or emery boards until they are flush and smooth with the bottom side of the wood body.

29) Apply a thin layer of the ModPodge to the pants piece on the front of the wood body to seal it in place.


30) Using the hands example from Diagram #8 above draw the hands for the scarecrow on the flesh colored paper sheet making sure your hands will be sized correctly for your scarecrow piece.


31) Using the shirt sleeves example from Diagram #9 above draw the shirt sleeves for the scarecrow out of the fall plaid scrapbook paper making sure your shirt sleeves will be sized correctly for your scarecrow piece.


32) Apply ModPodge to the top front side of each of the hands that will be positioned under the bottom of the sleeves with a brush, as shown in Diagram #10 above and then position them there.

33) Apply ModPodge to the back side of the combined sleeve and hand pieces.


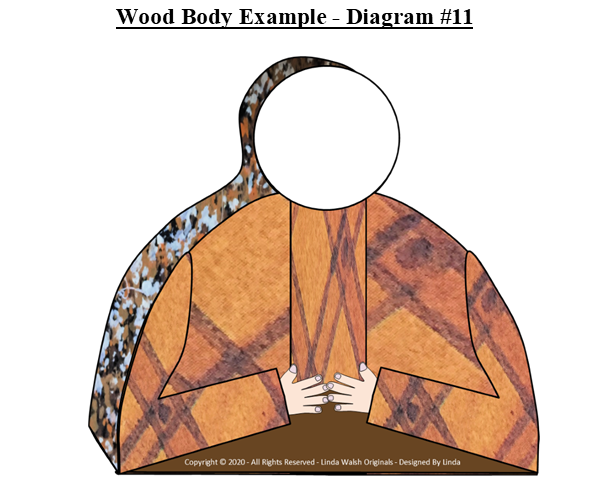
34)  Position the sleeves and hands pieces on the front of the body as shown in Diagram #11 above and press down until they are firmly in place.  

35) Roll them with the small wallpaper roller until they are securely in place and adhere to the front of the shirt.

36) Apply a thin layer of the ModPodge to the sleeve and hand pieces on the front of the wood body to seal them in place.


37) Cut 2 small square and 2 small rectangle pieces of the orange scrapbook paper for the shirt patches, as shown in Diagram #12 above.  

38) Apply ModPodge to the back side of each patch piece with a brush.

39)  Position the patches on the front of the doll as shown in Diagram #12 above and press down until they are firmly in place.  

40)  Roll them with the small wallpaper roller until they are securely in place and adhere to the shirt.

41) Apply a thin layer of the ModPodge to the patch pieces on the front of the wood body to seal them in place.

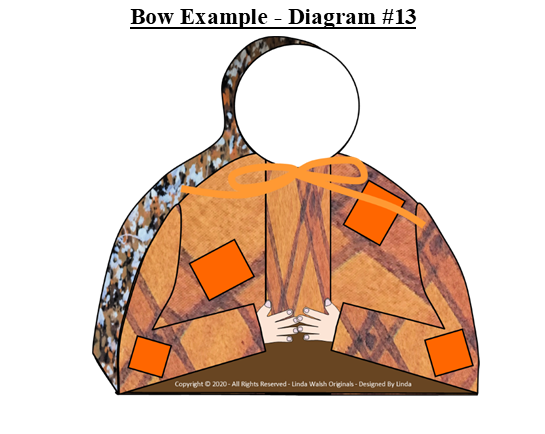
42)  Cut a piece of the 1/8” orange ribbon trim 12" long.  Form into a bow and using the hot glue, adhere the center of the bow just under the chin and in the middle of the center srrip, as shown in the Diagram #13 above.

43)  Using the paper clay sculpting tools, cut a 2” by 2” by 1” deep rectangle of the paper clay out to fit the face area of the scarecrow.

44) Roll the paper clay rectangle with your hands into a flat round shape about 1/4 inch deep that will fit the head area of the scarecrow.

45) Lie your paper clay round flat piece on a piece of wax paper until you add the nose and cheeks. 

46) Using the paper clay sculpting tools cut a small piece of the paper clay and roll it into a 1/2” long by 1/4” wide  by 1/2” deep tube.

47) When you’re satisfied with the length of the tube cut it in half with the sculpting tools so it is only 1/2” long by 1/4” wide by 1/4” deep

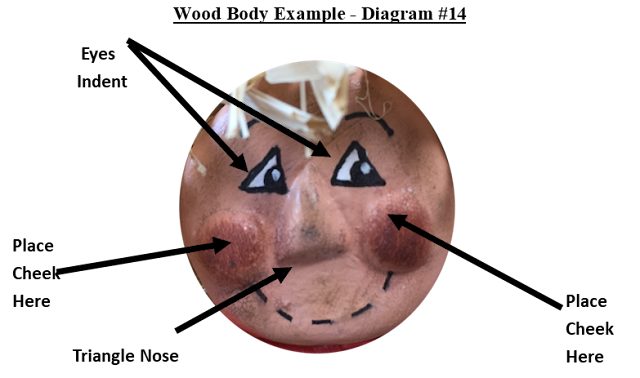
 48)  Use the sculpting tools and cut a triangle out of the rectangle piece, as shown on Diagram #14.

49)  Gently press the triangle nose on the head and using the paper clay sculpting tools blend the paper clay nose edges into the center of the head until you have a smooth intersection and no evidence of two separate pieces of paper clay, as shown in Diagram #14.  


50)  Using the paper clay sculpting tools cut a small piece of the paper clay and roll it into a 1/4” round ball and then cut the ball in half to form two cheeks.

51)  Gently press the two cheek pieces on the head and using the paper clay sculpting tools blend the paper clay cheek edges on each side of the nose until you have a smooth intersection and no evidence of two separate pieces of paper clay, as shown in Diagram #14.  

52)  Use your fingers and the paper clay sculpting tools to create two small  indent sections for the eyes just above  the left and right sides of the nose, as shown in Diagram #14.

53)  Leave the paper clay head on the wax paper until it is dry.  

54)  When the head is completely dry use the paper clay sculpting tools to adjust or remove any excess clay bits there might be on the front of the head.  There may or may not be some there.

55)  When the head  is completely dry look for any cracks on the paper clay.  If there are any fill the cracks in with a tiny piece of paper clay making sure it fills the crack but doesn't interfere with the smooth side of the head.  Let dry completely.

56)  Lightly sand the head with the sand paper until the edges, back, and face are smooth.  Make sure the back of the head still lies flat.

57)  Paint the front and sides of the head with the dark flesh acrylic paint leaving the back bare, as shown in Diagram #15.

58) Brush some of the Liquitex matte medium on the front and side of the head and nose to secure the dark flesh paint, as shown in Diagram #15 and let dry completely.


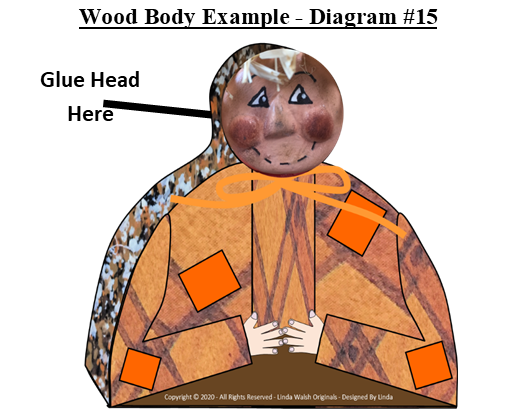
59) Apply the wood glue to the back of the head and position the head the wood body as shown in Diagram #15 above.  Press down firmly to make sure the face lies flat and adheres to the wood.  Remove any excess glue along the sides with a wet paper towel.

60)  Let dry until the head is securely set. 


61)  Using the black micron marker drawn the dashed mouth on the scarecrow face, as shown in Diagram #16.  

62)  Using the black micron marker drawn the two triangle eyes on the scarecrow face, as shown in Diagram #16.  

63)  Using the black micron marker drawn the two black pupils for the eyes on the scarecrow face, as shown in Diagram #16.  

64)  Apply a small amount of the dark rust colored blush to the cheeks, as shown in Diagram #16.

65)  Apply black blush to the nose and all around the head, as shown in Diagram #16.


66)  To make the hair you are going to use loops of the thin raffia, strips glued all over the head, as shown in the picture above.


67)  The easiest way to do this is to loop the raffia around 4 fingers 4 – 5 times (See Diagram #17).  

68)  Take the loops off the hand and, holding the center-point, wrap 2-3 times tightly, knot to secure and then tie it off (See Diagram #17).   

69)  Hot glue the center-point of the loops all over the head, as shown in Diagram #17.


70) Apply glue to the inside of the 3” round raffia straw hat and affix it to the top and back of the scarecrow’s head, as shown in the pictures above.  


71The scarecrow, his hat and his raffia hair should look as shown in the picture above


72)  Use the brown stabilo pencil to shade the edges of all the arm sleeves, sleeve edges, and sides of the center strip,  as shown in Diagram #18 above.

73) Blend all the stabilo lines with the Tortillions.

74) Make sure the blending is pleasing to the eye.  If need be add more shading with the brown stabilo pencil and blend again.


75)  Use the black puffy paint to draw the black thread lines on the four shirt patches, as shown in Diagram #19, and let them dry.

76)  Use the black puffy paint to draw the black button dots on the center strip of the shirt, as shown in Diagram #19, and let them dry.

77)  Use the gold glitter paint to draw a splash of glitter on the bottom edge of the shirt, as shown in Diagram #19, and let it dry.

78)  Add pink acrylic paint to the fingernails of the fingers, as shown in Diagram #19 and let them dry. 

Congratulations! Your mixed media scarecrow doll is done.


I also created a free e-book for you showing how I made my Harold mixed media collage self sitter scarecrow doll.

To view and download my free e-book please CLICK HERE. You'll be brought to Google Drive where you can view my free e-book. Then just download my free .pdf e-book by clicking on the down arrow in the top center.

For more information on all my free e-patterns, e-printables and e-books please CLICK HERE.

Copyright © 2004 - 2023 - All Rights Reserved - Designed and Written By Linda Walsh

Please respect My Terms of Use:  All patterns, e-patterns, printables, e-printables, e-books, graphics, tutorials, how-to's, articles and other e-products © 2004-2023 Linda Walsh Originals-Designs by Linda Walsh. All rights reserved. Commercial selling or reselling by any means prohibited without the written consent of Linda Walsh.

Patterns, e-patterns, printables, e-printables, e-books, graphics, tutorials, how-to's, articles and other e-products are for personal use only. You may not modify, photocopy, download, upload, post, transmit, display, perform, publish, license, reprint, create derivative works from, mass duplicate, re-sell, digitize, and reproduce in any other form (print, digital or electric) or commercially apply, embed, share, Email, or redistribution in any other means. Use of any of the above is prohibited without the written permission of Linda Walsh.

However, you may link to my website(s)/blog(s) and the individual page(s)/blog post(s) (including 1 picture) but do not copy, reprint or duplicate my website(s)/blog(s) or individual page(s)/post(s ) without my permission.

Items made from Linda Walsh Originals E-Patterns are intended for personal use for fun or small scale personal and business profit as long as you credit us with the design. Large scale commercial use (i.e. mass production) of items made from Linda Walsh Originals E-Patterns are by permission only.

Please see my Terms and Conditions for additional information.

Copyright © 2004 - 2023 - All Rights Reserved - Written By Linda Walsh of Linda Walsh Originals and Linda's Blog. Linda is a doll maker and doll pattern designer.