You can make all sorts of Halloween creatures out of cloth, wood, cloth and wood, paper, clay, needle-craft, etc. I love them all but have a fondness for witches.
Several years ago, when I was doing a little cleaning of my craft area, I found some 3/4" wood shelf sitter shapes that my husband had cut out for me a years before. I had intended to make a painted figure of some sort out of them.
Well, in looking at the wood I thought they might make perfect mixed media shelf sitter witches with paper-clay faces and collage outfits. So, I decided to make two of them, which are shown below.
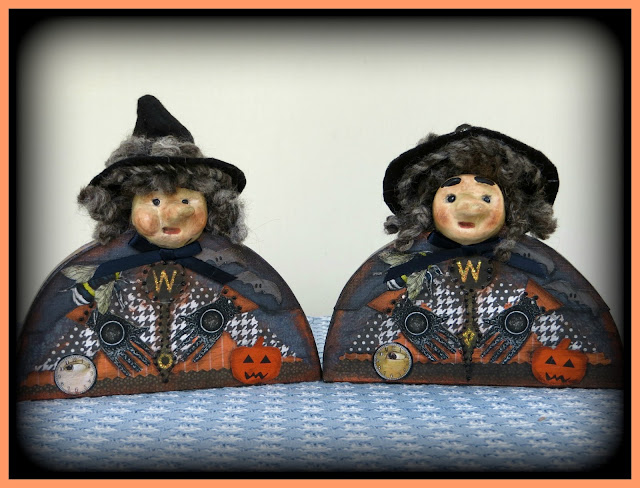
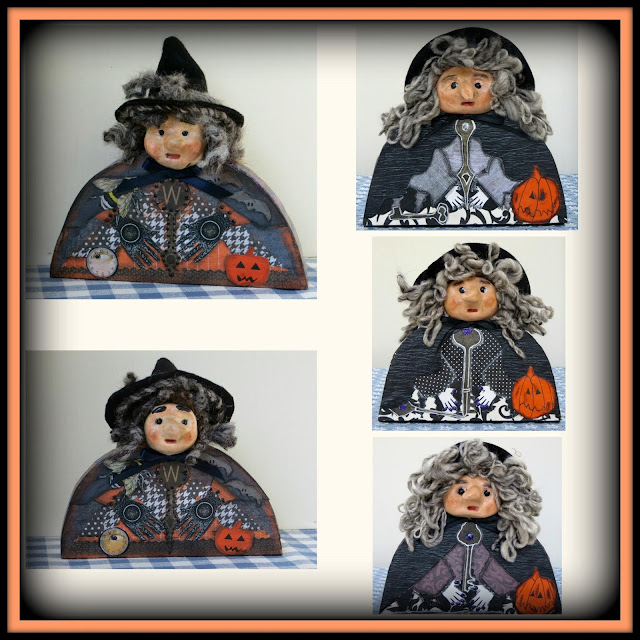
Hildegarde Brie, who is pictured on the left in the picture above, and her twin sister, Hildegarde Ann, who is pictured on the right in the picture above, can hardly wait for Halloween. Not because they love scaring people. but because they're good witches and love handing candy out to all the trick-or-treaters. In fact, they're known in their neighborhood for having the best candy.
Both Hildegarde Ann and Hildegarde Brie are 6 1/2" x 6 1/2" x 3/4" mixed media shelf sitter wood dolls with painted paper-clay faces with black bead eyes, sponge painted wood bodies and paper collage embellished outfits. Their sides and back are sponge painted in their favorite Halloween colors and their outfits are embellished paper collages adorned with a jack-o-lanterns, clocks, bats, scary insects, raised dots and ribbon bows. Their gray thick alpaca yarn hair is from my sister's alpaca Masquerade's Rock Garden Alpacas fiber and is barely controlled under their witches hats. Masquerade's yarn is also wrapped around the band of their witches hats and adorns the brim of the underside of their witches hats.
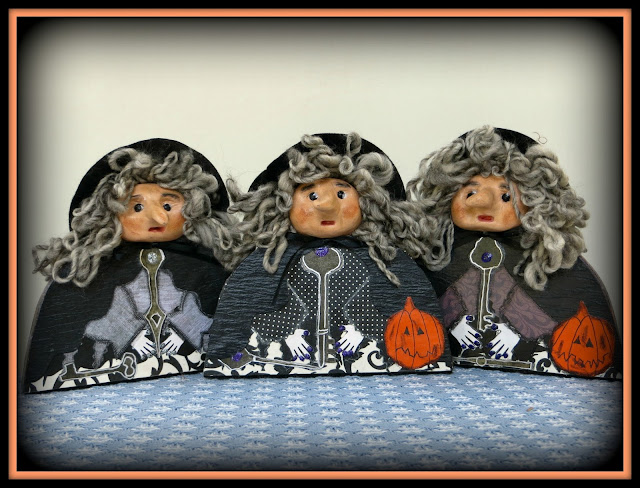
I had so much fun making Hildegarde Ann and Hildegarde Brie that I decided to make three more and this time decided to make a trio of mixed media Victorian collage shelf sitter witches.
Hazel, Hazlett, and Harem are a trio of witches are as ugly as they are confused.
Halloween is coming up and they have lost their witches brew recipe. They've looked everywhere and cannot find it. Without it Halloween will just not be the same. Can you help them?
Hazel, pictured in the center, Hazlett, pictured on the right, and Harem, pictured on the left, are 6" x 6" x 3/4" mixed media Victorian witch wood dolls with painted paper-clay faces with black bead eyes, red painted mouths, rosy blushed cheeks, glitter painted finger nails, sponge painted wood bodies, paper collage and embellished outfits. Their sides and back are sponge painted and their outfits are multi-layer embellished paper collages with black paper capes tied with ribbon bows under their necks. Their light gray curly alpaca yarn hair from Rock Garden Alpacas Fiber is barely controlled under their witches hats. Paper jack-o-lanterns with painted faces and swords and key steam-punk paper images add charm to their collage outfits.
It's almost time for the witches to come out and they can hardly wait.
I loved making all my mixed media witches so much I thought you might like to know how I made my Harem Mixed Media Collage Shelf Sitter Witch so you could make one of your own. Here’s how:
Supplies Needed:
3/4" wood pine - 8" by 8" by 3/4"
Paper Clay
Acrylic Paint - Black, Orange, Dark Purple, Lilac, Pink, Dark Flesh
Paper Clay Sculpting Tools
Sandpaper
Low Temperature Hot Glue Gun and Hot Glue Sticks
1/4” Black Beads or Round Buttons - 2
Various Scrapbook Papers - Black (Solid), Black (Textured), Gray, Lilac, Black/White and Other Colors
Orange Scrapbook Paper
1/8" Black Decorative Ribbon Trim - 18" Long
Blush for Cheeks - Dark Brown Color
Micron Markers - Black and Silver of Various Widths
Metallic Paint - Shiny Silver
ModPodge
Liquitex Matte Medium
Paint Brushes
White Paper Sheets
Lead Pencil
Stabilo Pencil - Black (for shading)
Tortillons (for blending stabilo lines)
Band-saw and Table Saw to Cut The Wood
Paper Towel
Small Nail Files or Emery Boards
Decorative Edge Cutting Scissors
Scissors
Sea Sponges
Small Wallpaper Roller
Wood Glue
Wax Paper
Thick Loopy Alpaca Yarn or Other Loopy Yarn
Felt Witch’s Hat - 4”
Round
Silver Glitter Paint
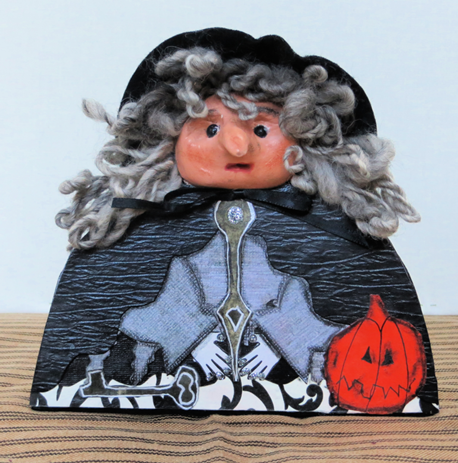
Harem 6" x 6" x 3/4" Handmade Mixed Media Victorian Collage Shelf Sitter Witch Doll With Paper-clay Face
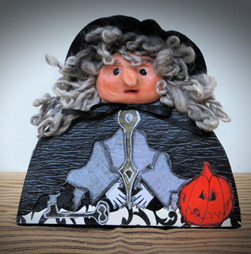
Harem is a 6" x 6" x 3/4" mixed media Victorian witch wood doll with a painted paper-clay face with black bead eyes, red painted mouth, rosy blushed cheeks, glitter painted finger nails, sponge painted wood body, paper collage and embellished outfit. Her sides and back are sponge painted and her outfit is a multi-layer embellished paper collage with black paper cape tied with a ribbon bow under her neck. Her light gray curly alpaca yarn hair from Rock Garden Alpacas Fiber is barely controlled under her witches hat. A paper jack-o-lantern with painted face and sword and key steam-punk paper image add charm to her collage outfit.
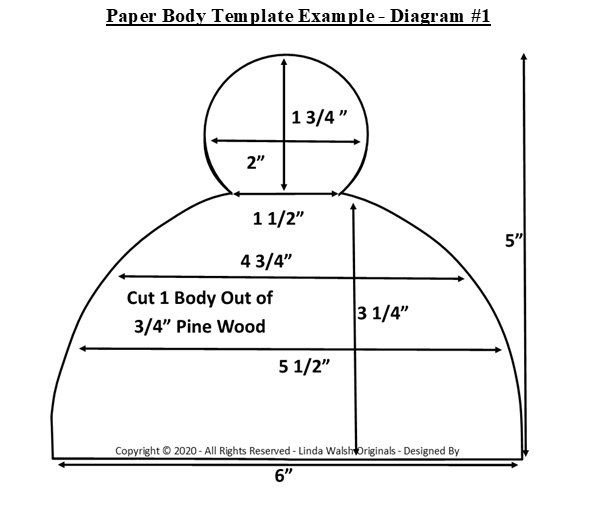
1) Using the paper body template example and measurements from Diagram #1 above draw a body template on a white piece of paper with the lead pencil. Adjust as necessary so your measurements match the ones in the Paper Body Template Example - Diagram #1 above.
2) Highlight the outside edges with the black micron markers and then cut the paper body template outside the black marker edge lines.
3) Cut a piece of 3/4 " pine 8" by 8" square with the table saw.
4) Center the paper body template on the 8" by 8" wood square and draw along the outside edge with the lead pencil.
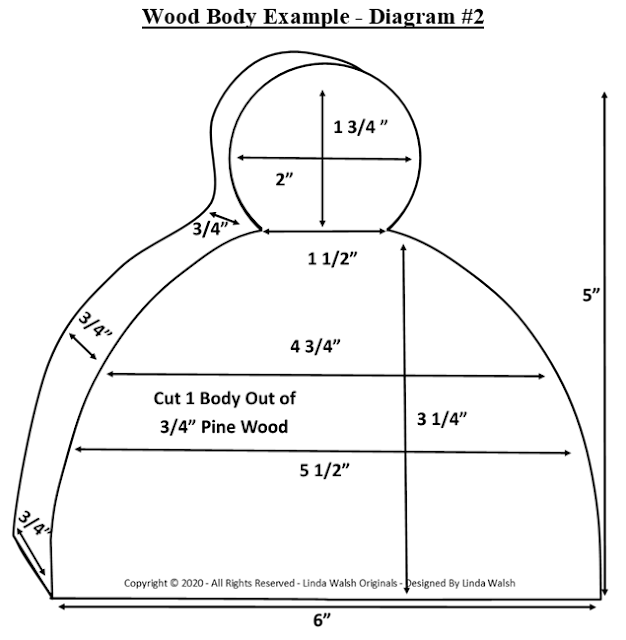
5) Cut the wood body out along the outside edges with the band saw. Your wood body and wood body measurements should be similar to the wood body example shown in Diagram #2 above and be able to stand evenly.
6) Sand all edges of the wood body so they are smooth to the touch. Make sure the sanding doesn't affect the ability of the wood body to stand evenly.
7) Once you're satisfied with the sanding wipe all the edges and sides down with a wet piece of paper towel.
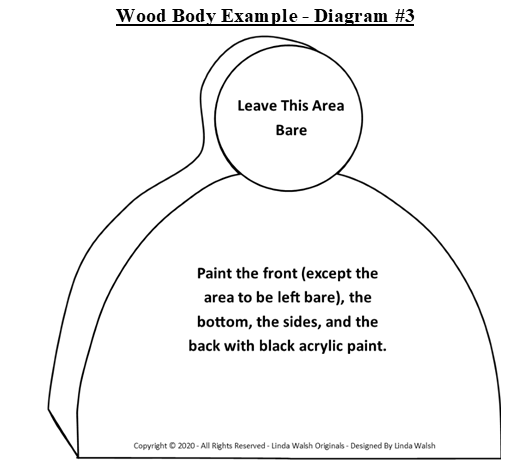
8) Paint the front (except the head area which you need to leave bare), sides, bottom and the back of the wood body with the black acrylic paint. See Diagram #3 above.
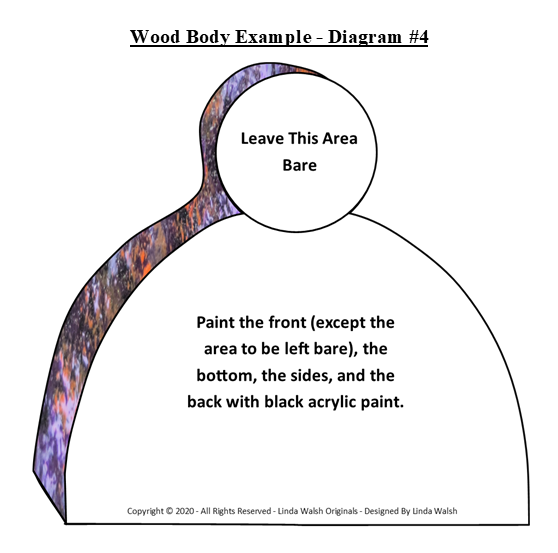
9) Using the sea sponges paint the sides and the back of the wood body with the lilac, dark purple and then orange acrylic paint. See Diagram #4 above.
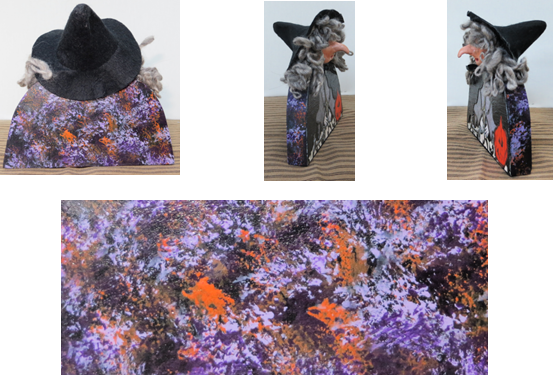
10) Your sponge painted areas should look similar to the pictures above.
11) Apply Liquitex matte medium to the front (except the head area which you should leave bare), sides, and back of the wood body to seal your painted areas. Let dry completely.
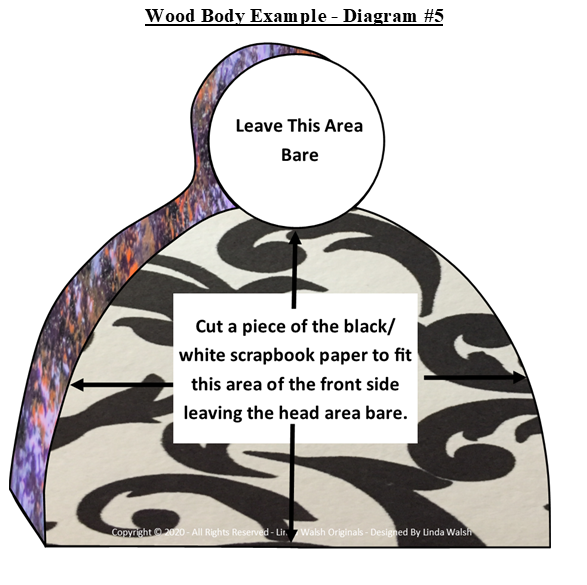
12) Cut a piece of black and white scrapbook paper to fit the front area of the front side leaving the head area bare (as shown in Diagram #5 above) and making sure the edges slightly overhang the side and bottom edges.
13) Apply ModPodge to the front side of the wood body (leaving the head area bare) with a brush.
14) Position the front piece on the front side of the wood body and press down until it is firmly in place.
15) Roll it with the small wallpaper roller until it is securely in place and adheres to the front side.
16) Gently sand the side and bottom edges of the black and white scrapbook paper with the small nail files or emery boards until they are flush and smooth with the sides.
17) Apply a thin layer of the ModPodge to the black and white scrapbook piece on the front of the wood body to seal it in place.
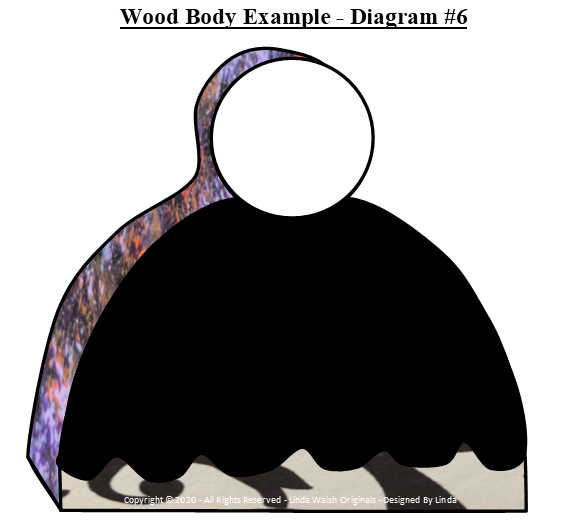
18) Cut a piece of the solid black scrapbook paper for the overdress using the shapes shown in Diagram #6 above. Cut the side edges with the regular scissors making sure the side edges slightly overhang the side edges of the wood body by 1/32". Cut the bottom of the overdress with the Decorative Edge Cutting Scissors in a scalloped pattern as shown above.
19) Apply ModPodge to the back side of the overdress.
20) Position the solid black scrapbook overdress piece on the front side of the wood body and press down until it is firmly in place.
21) Roll it with the small wallpaper roller until it is securely in place and adheres to the front side.
22) Gently sand the sides of the overdress scrapbook paper piece with the small nail files or emery boards until they are flush and smooth with the sides.
23) Apply a thin layer of the ModPodge to the solid black scrapbook piece on the front of the wood body to seal it in place.
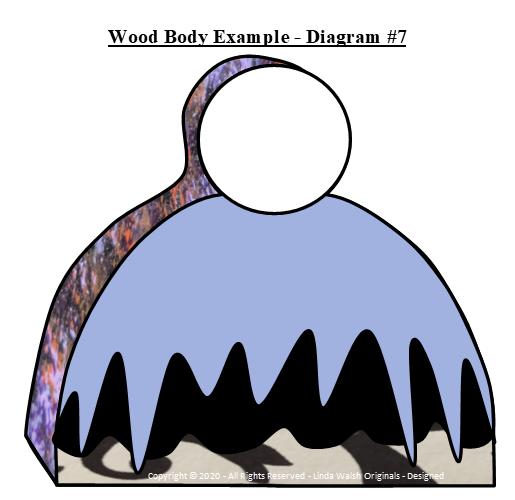
24) Cut a piece of the lilac scrapbook paper for the jacket using the regular scissors in the shape shown in Diagram #7 above making sure you cut long ragged sections for the bottom of the jacket making sure the side edges slightly overhang the side edges of the wood body by 1/32.
25) Apply ModPodge to the back side of the jacket.
26) Position the lilac jacket piece on the front side of the wood body and press down until it is firmly in place.
27) Roll it with the small wallpaper roller until it is securely in place and adheres to the front side.
28) Gently sand the sides of the lilac jacket piece with the small nail files or emery boards until they are flush and smooth with the sides.
29) Apply a thin layer of the ModPodge to the lilac jacket piece on the front of the wood body to seal it in place.

30) Using the hands example from Diagram #8 above draw the hands for the witch making sure your hands will be sized correctly for your witch piece.

31) Using the jacket sleeves example from Diagram #9 above draw the jacket sleeves for the witch out of the lilac scrapbook paper making sure your jacket sleeves will be sized correctly for your witch piece.
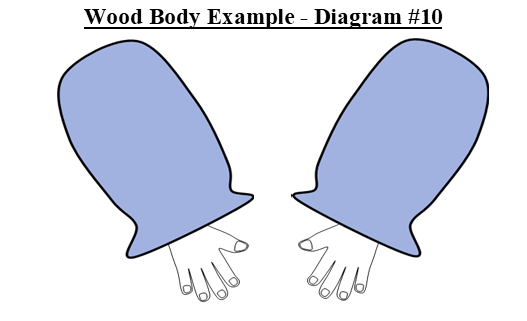
32) Apply ModPodge to the top front side of each of the hands that will be positioned under the bottom of the sleeves with a brush, as shown in Diagram #10 above and then positioned them there.
33) Apply ModPodge to the back side of the combined sleeve and hand pieces.
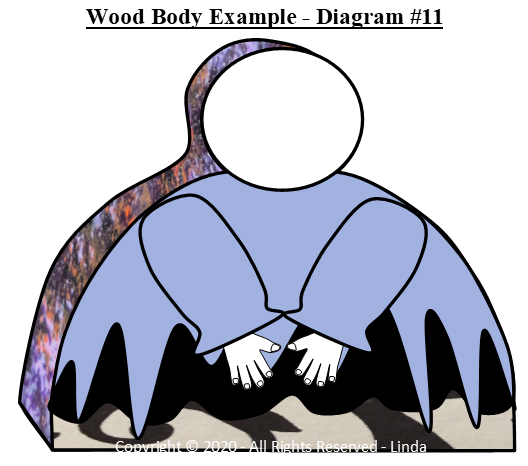
34) Position the sleeves and hands pieces on the front of the body as shown in Diagram #11 above and press down until they are firmly in place.
35) Roll them with the small wallpaper roller until they are securely in place and adhere to the front of the jacket.
36) Apply a thin layer of the ModPodge to the sleeve and pieces on the front of the wood body to seal them in place.

37) Cut a piece of the textured scrapbook paper for the black cape using the shapes shown in Diagram #12 above. Cut the side edges with the regular scissors making sure the side edges slightly overhang the side edges of the wood body by 1/32". Cut the front edges of the cape with the Decorative Edge Cutting Scissors in a scalloped pattern as shown above.
38) Apply ModPodge to the back side of the cape with a brush.
39) Position the cape piece on the front of the doll as shown in Diagram #12 above and press down until it is firmly in place.
40) Roll it with the small wallpaper roller until it is securely in place and adheres to the jacket.
41) Gently sand the side and bottom edges of the cape piece with the small nail files or emery boards until they are flush and smooth with the sides.
42) Apply a thin layer of the ModPodge to the cape piece on the front of the wood body to seal it in place.

43) Cut a piece of the orange scrapbook paper for the jack-o-lantern for the front of the wood body, using the example in Diagram #13 above as a guide, making sure it’s sized to fit your witch.
44) Cut a piece of the black scrapbook paper for the pendulum tie for the front of the wood body, using the example in Diagram #13 above as a guide, making sure it’s sized to fit your witch.
45) Cut a piece of the black scrapbook paper for the key decoration for the front of the wood body, using the example in Diagram #13 above as a guide.
46) Apply ModPodge to the back side of the pumpkin with a brush.

47) Position the pumpkin piece on the witch’s left front as shown in Diagram #14 above and press down until it is firmly in place.
48) Roll it with the small wallpaper roller until it is securely in place and adheres to the front of the wood body.
49) Apply ModPodge to the back side of the pendulum tie with a brush.
50) Position the pendulum tie piece in the center of the witch’s body just under her neck, as shown in Diagram #14 above and press down until it is firmly in place.
51) Roll it with the small wallpaper roller until it is securely in place and adheres to the front of the wood body.
52) Apply ModPodge to the back side of the key with a brush.
53) Position the key piece on the right bottom front side of the witch, as shown in Diagram #14 above and press down until it is firmly in place.
54) Roll it with the small wallpaper roller until it is securely in place and adheres to the front of the wood body.
55) Apply a thin layer of the ModPodge to the entire front of the wood body, leaving the face area bare. Let dry completely.
56) Using the paper clay sculpting tools, cut a 2” by 2” by 1” deep rectangle of the paper clay out to fit the face area of the witch.
57) Roll the paper clay rectangle with your hands into a flat oval shape that will fit the head area of the witch.
58) Lie your paper clay oval flat on a piece of wax paper until you add the nose.
59) Using the paper clay sculpting tools cut a small piece of the paper clay and roll it into a 2” long by 1/3” wide long tube.
60) When you’re satisfied with the length of the tube cut it in half with the sculpting tools.
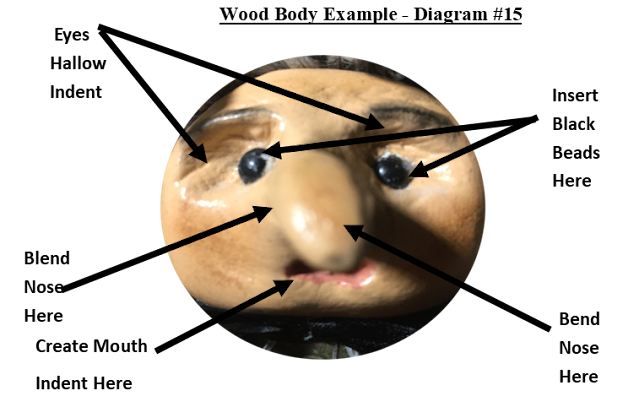
61) Gently roll one end of the tube into a point and then bend it down slightly so it will appear as a crooked nose, as shown in Diagram #15.
62) Gently press the other end into the center of your oval head and using the paper clay sculpting tools blend the paper clay end of the nose into the center of the face until you have a smooth intersection and no evidence of two separate pieces of paper clay, as shown in Diagram #15.
63) If need be gently bend the tip of the nose down again.
64) Insert one of the sculpting tools into the paper clay just below the nose to form a mouth, as shown in Diagram #15.
65) Use your fingers and the paper clay sculpting tools to create two small hollow indent sections for the eyes just to the left and right sides of the nose, as shown in Diagram #15.
66) Apply a small amount of hot glue to the back of one of the black beads for the eye and gently insert into the indented hollow section on the left side of the nose about 1/4” away from the nose, as shown on Diagram #15.
67) Do the same for the other black bead and insert it into the indented hollow section the right side of the nose about 1/4” away from the nose, as shown in Diagram #15.
68) Leave the paper clay head on the wax paper until it is dry.
69) When the head is completely dry use the paper clay sculpting tools to adjust or remove any excess clay bits there might be on the front of the head. There may or may not be some there.
70) When the face is completely dry look for any cracks on the paper clay. If there are any fill the cracks in with a tiny piece of paper clay making sure it fills the crack but doesn't interfere with the smooth side of the head. Let dry completely.
71) Lightly sand the head face with the sand paper until the edges, back, and face are smooth. Make sure the back of the head still lies flat.
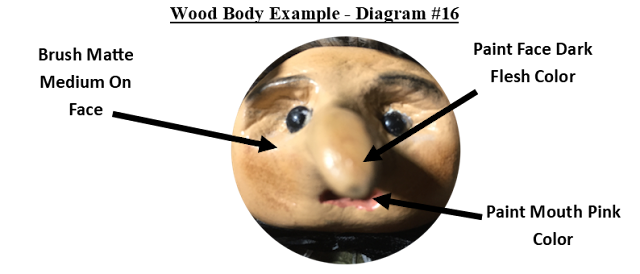
72) Paint the front and sides of the head with the dark flesh acrylic paint leaving the back bare, as shown in Diagram #16.
73) Paint the inside of the mouth with the pink acrylic paint, as shown in Diagram #16.
74) Brush some of the Liquitex matte medium on the front and side of the head and nose to secure the dark flesh paint, as shown in Diagram #16 and let dry completely.
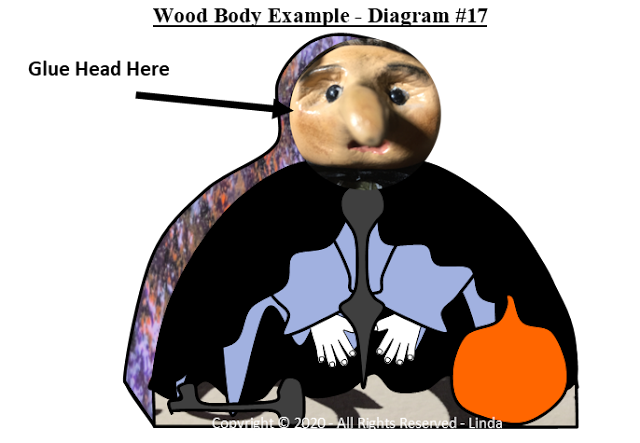
75) Apply the wood glue to the back of the head and position the head the wood body as shown in Diagram #17 above. Press down firmly to make sure the face lies flat and adheres to the wood. Remove any excess glue along the sides with a wet paper towel.
76) Let dry until the head is securely set.
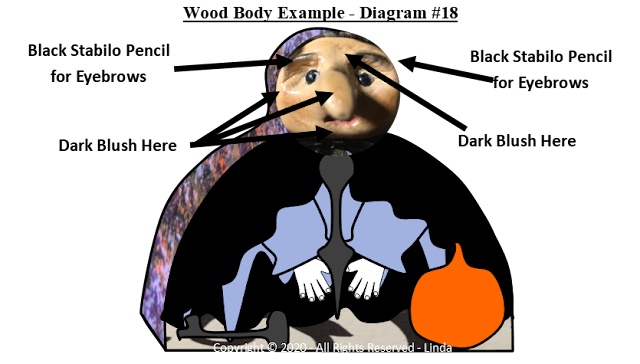
77) Apply a small amount of the dark colored blush to the cheeks, nose, chin and forehead, as shown in Diagram #18.
78) Use the black stabile pencil to draw the eyebrows, as shown in Diagram #18.
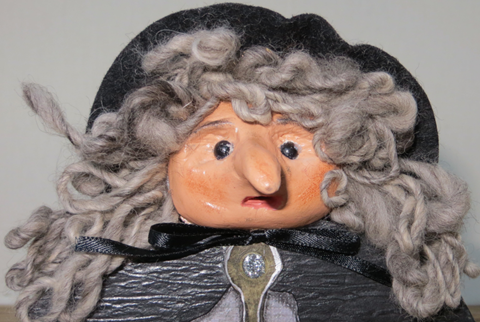
79) Cut a piece of the 1/8”ribbon trim 12" long. Form into a bow and using the hot glue, adhere the center of the bow just under the chin and just above the pendulum tie, as shown in the picture above.
80) To make the hair you are going to use loops of the 1/4” thick loopy alpaca yarn, glued all over the head, as shown in the picture above.
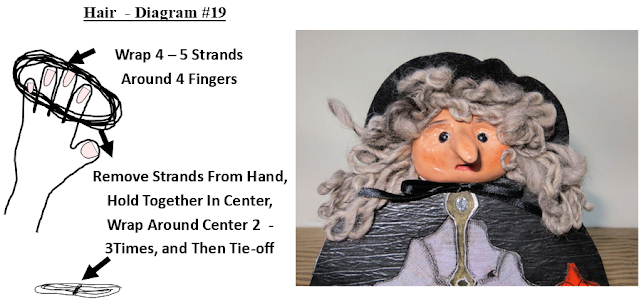
81) The easiest way to do this is to loop the yarn around 4 fingers 4 – 5 times (See Diagram #19).
82) Take the loops off the hand and, holding the center-point, wrap 2-3 times tightly, knot to secure and then tie it off (See Diagram #19).
83) Hot glue the center-point of the loops all over the head, as shown in the picture below.
84) The loops should be about 1 1/2” long from the center point and facing upwards with the center-point hot glued to the head.
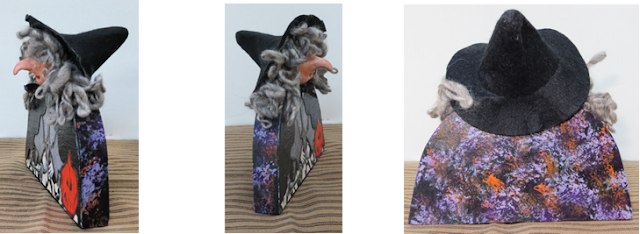
85) Apply glue to the inside of the black felt witch’s hat and affix it to the top of the witch’s head, as shown in the pictures above.
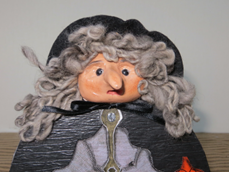
86) The witch, her hat and her hair should look as shown in the picture above.
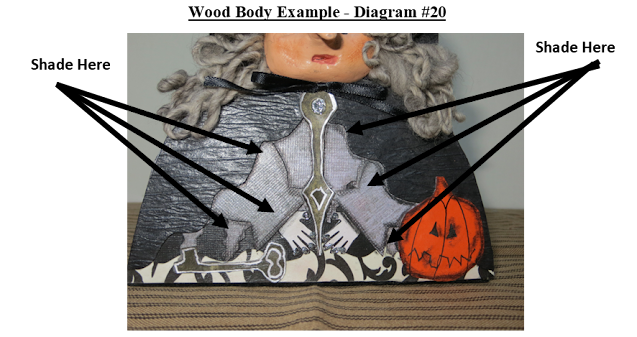
87) Use the black stabilo pencil to shade the edges of all the arm sleeves, jacket edges, and edge of the cape as shown in Diagram #20 above.
88) Blend all the stabilo lines with the Tortillions.
89) Make sure the blending is pleasing to the eye. If need be add more shading with the black stabilo pencil and blend again.
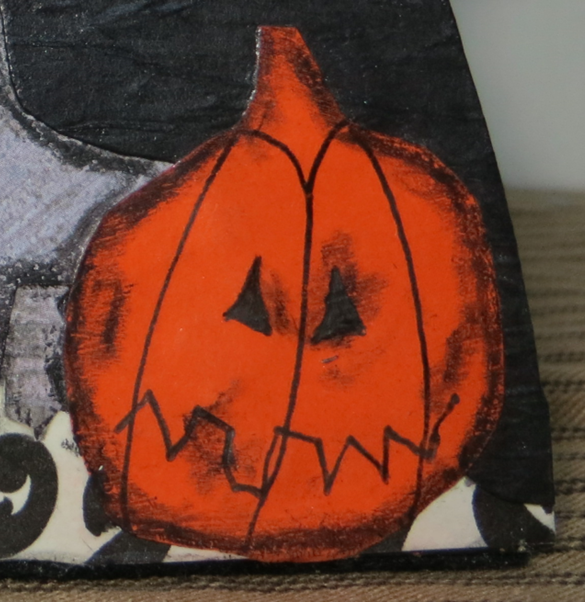
90) Use the black micron marker to draw the eyes, mouth lines, and pumpkin lines of the jack-o-lantern, as shown in the picture above.
91) Use the black stabilo pencil to shade the edges of the pumpkin, shade areas near the eyes, shade areas of the cheeks, and shade areas around the mouth, as shown in the picture above, and then blend the stabilo lines with the Tortillions.
92) Make sure the blending of the jack-o-lantern is pleasing to the eye. If need be add more shading with the black stabilo pencil and blend again.
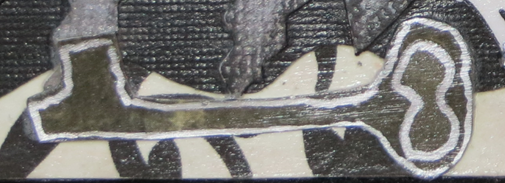
93) Use the black stabilo pencil to shade the edges of the key, as shown in the picture above, and then blend the stabilo lines with the Tortillions.
94) Make sure the blending of the key is pleasing to the eye. If need be add more shading with the black stabilo pencil and blend again.
95) Use the silver micron marker to draw an outline around the edges of the key, as shown in the picture above.
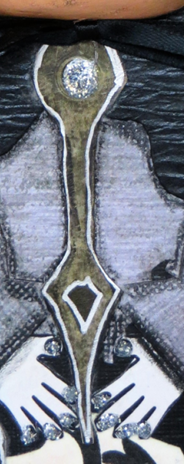
96) Use the black stabilo pencil to shade the edges of the pendulum tie, as shown in the picture above an then blend the stabilo lines with the Tortillions.
97) Make sure the blending of the pendulum tie is pleasing to the eye. If need be add more shading with the black stabilo pencil and blend again.
98) Use the silver micron marker to draw an outline around the edges of the pendulum tie, as shown in the picture above.
99) Add a droplet of the silver glitter paint to the top of the pendulum tie, as shown in the picture above and let it dry.
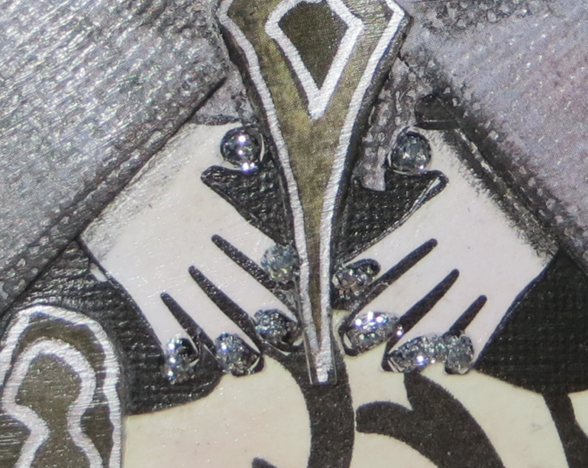
100) Add droplets to the fingernails of the fingers, as shown in the picture above and let them dry.
Congratulations! Your mixed media witch art doll is done.
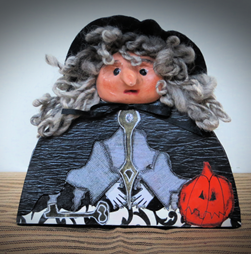
I also created a free e-book for you showing how I made my Harem mixed media collage self sitter witch.
Copyright © 2004 - 2023 - All Rights Reserved - Designed and Written By Linda Walsh
To view and download my free e-book please CLICK HERE. You'll be brought to Google Drive where you can view my free e-book. Then just download my free .pdf e-book by clicking on the down arrow in the top center.
For more information on all my free e-patterns, e-printables and e-books please CLICK HERE.
Please respect My Terms of Use: All patterns, e-patterns, printables, e-printables, e-books, graphics, tutorials, how-to's, articles and other e-products © 2004-2023 Linda Walsh Originals-Designs by Linda Walsh. All rights reserved. Commercial selling or reselling by any means prohibited without the written consent of Linda Walsh.
Patterns, e-patterns, printables, e-printables, e-books, graphics, tutorials, how-to's, articles and other e-products are for personal use only. You may not modify, photocopy, download, upload, post, transmit, display, perform, publish, license, reprint, create derivative works from, mass duplicate, re-sell, digitize, and reproduce in any other form (print, digital or electric) or commercially apply, embed, share, Email, or redistribution in any other means. Use of any of the above is prohibited without the written permission of Linda Walsh.
Patterns, e-patterns, printables, e-printables, e-books, graphics, tutorials, how-to's, articles and other e-products are for personal use only. You may not modify, photocopy, download, upload, post, transmit, display, perform, publish, license, reprint, create derivative works from, mass duplicate, re-sell, digitize, and reproduce in any other form (print, digital or electric) or commercially apply, embed, share, Email, or redistribution in any other means. Use of any of the above is prohibited without the written permission of Linda Walsh.
However, you may link to my website(s)/blog(s) and the individual page(s)/blog post(s) (including 1 picture) but do not copy, reprint or duplicate my website(s)/blog(s) or individual page(s)/post(s ) without my permission.
Items made from Linda Walsh Originals E-Patterns are intended for personal use for fun or small scale personal and business profit as long as you credit us with the design. Large scale commercial use (i.e. mass production) of items made from Linda Walsh Originals E-Patterns are by permission only.
Please see my Terms and Conditions for additional information.
Copyright © 2004 - 2023 - All Rights Reserved - Written By Linda Walsh of Linda Walsh Originals and Linda's Blog. Linda is a doll maker and doll pattern designer.