Friday, September 10, 2021

How I Made My Mixed Media "Putz" Chipboard Beach House Kit From AgedWithThyme Etsy Shop


Since you're well aware that I like buying pictures of houses and creating houses you shouldn't be surprised that I would venture into creating miniature 3d house models.  

So, what do I mean by that?  Well, if you've been a crafter for awhile and have ventured into any craft store before the holidays you must have seen displays for everything you might need to create a miniature Christmas house village.  

Some of the house supplies were created out of paper, some cardboard, some chipboard, some plastic, some wood and some ceramic.  You could create the houses using a kit or buy them already finished and add other decorations like trees, figurines, miniature Christmas decorations, etc.  The end result for all of this was creating a pretty little village scene to be displayed at the Christmas holiday season.

Several years ago I decided to make some chipboard gingerbread houses of my own for table decorations and wrote about them in a Linda's Blog post entitled: New Mixed Media Christmas Decorations - Adorable Gingerbread Houses.  

I also make some gingerbread ornaments that I could hang on my skinny Christmas tree and wrote about them in a Linda's Blog post entitled: My New Miniature Mixed Media Gingerbread House Christmas Ornaments.

I loved making them and after doing so I decided to see if there were other chipboard house kits I could buy not just for the holiday season but for all year.  So, I went searching online and found a lot of  information on house villages.

It seems that house villages have been around since the late Victorian era, which certainly piqued my interest, and were very popular from the 1920's through the 1950's or so.

I found out that they were called "putz" houses and they had originated from the German word "putzen" which means to clean or polish.

According to Wikipedia - Christmas Villages

A Christmas village (or putz) is a decorative, miniature-scale village often set up during the Christmas season. These villages are rooted in the elaborate Christmas traditions of the Moravian church, a Protestant denomination. Mass-produced cardboard Christmas villages became popular in the United States during the early and mid-20th century, while porcelain versions became popular in the later part of the century.

The tradition of decorative Christmas villages built around the Christmas tree is rooted in the late 18th century holiday traditions of the Moravian church, a Protestant denomination with early settlements in Salem, North Carolina and Bethlehem, Pennsylvania. Karal Ann Marling writes that "This usually took the form of an elaborate landscape with animals, which may or may not have alluded to the creatures in the stable at Bethlehem or the passengers on Noah’s Ark...the typical putz went beyond the limits of any biblical scene into pure, exuberant genre." These grew to encompass much more than a nativity scene, with animations such as working flour mills, jumping dogs, running water with waterfalls and electric trains, and could fill an entire room. Families would organize "putz parties" and compete for the best show.

After World War II, several Japanese companies started mass-producing cardboard or paper houses, churches, and other buildings. These small buildings usually had holes in the back or the bottom through which Christmas lights were placed to provide illumination. The buildings had tiny colored cellophane windows and were decorated with mica-dusted roofs to give the appearance of snow. Since these buildings were made of inexpensive material and were widely available throughout the United States, they became a very popular Christmas decoration.

In the 1970s, ceramic or porcelain Christmas villages were introduced and started to gain popularity. Department 56 was one of the first companies to make these buildings and remains amongst the most well-known. Other companies, such as Lemax, have also produced similar villages, and there are numerous other brands sold. In Europe, Luville and Dickensville are established brands.

Christmas village buildings are not usually made to consistent relative scale. A church building might well be ten times the height of an ordinary house in reality but this would make very cumbersome models and look odd within a Christmas village display. It is only necessary for the church building to be noticeably taller than the house, to give it an imposing stature.

Like many other Christmas traditions, the notion of a village to celebrate a holiday has spread to other holidays, with a few companies making Halloween and Easter villages.

It's no surprise that something that was originally started for religious purposes in the late 19th century  would gain popularity and, therefore, start to be mass produced for commercial purposes by companies several years or decades later.  

As you're well aware I love history so reading all about these little houses was very interesting to me.

However, I've side tracked a little, as I always do....lol

After making my gingerbread houses I set out to see if there were any other cardboard or chipboard kits that were available for making other miniature houses for the various seasons or holidays.  Well, to my delight, it seems there were.

I found a wonderful shop on Etsy called AgedWithThyme that sold chipboard sets for several different styles of "putz" houses, like the one pictured above.  I was delighted.  

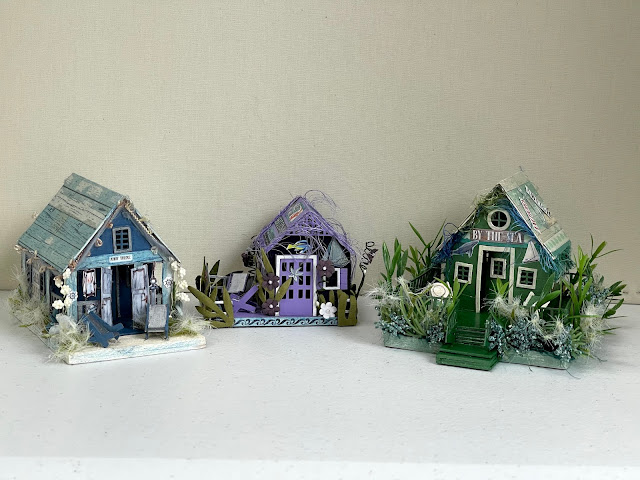
So, I bought three chipboard house kits.  One kit was for making six houses including a church.  One kit was for making 3 beach houses which I was intrigued by as I didn't have a lot of summer decorations and one kit was for making 4 houses including a saltbox colonial like the house I live in.  I was thrilled.

That was back in 2018 and, as usual, I didn't get around to making any of these until this past summer.

In looking at the three kits this summer I decided to start with the three beach houses as I had just finished making some mixed media house pictures for the spring and summer and was still in a summer mode.  

I wasn't sure how long my summer mode would last as September was upon us and you know how much I love the Fall and Christmas holiday decorating season.


The beach house kit, shown in the picture above, contained the picture, instructions, and the chipboard pieces for the houses and beach chairs.  Each of the three houses had a picture of the individual house pieces included in the kit and one page of very simple instructions for putting each of the beach houses together.  The kit also included one page of the designers tips for making the "putz" houses.

The instructions for each of the houses called for putting the houses together first and then painting them.  As, I had decided ahead of time that I wanted to make mixed media 3d beach houses that wasn't going to work for me as some of the pieces were going to be embellished versus painted.  I would need to decide ahead of time what embellishments I wanted to use so I could plan the sequence I would need for putting everything together.

I did notice that this particular chipboard kit did not have tabs for helping to align the corners when gluing the houses together so I knew ahead of time this could be a problem - and it was.  The houses in the other two chipboard kits I bought did have tabs.  For some reason the beach houses didn't.

Plus, the chipboard used in these kits for the houses and chipboard embellishments was much thinner than what I was used to from previous chipboard kits I had used from other sellers so I knew this could, potentially, be a problem for assembling the houses - which it definitely was when I put each of the beach houses together.  

I also thought the thinness of the chipboard pieces could be a problem for the small chipboard embellishments, like door frames and window frames, that I would need to paint first and then glue.

Despite my concerns I plowed ahead and decided to start with the green beach house which I had marked as #1 in the picture above.  

I decided to put each of the houses together in the same manner so the sequence outlined below applies to each house.

I wanted my beach houses to have solid foundations versus chipboard as I thought this would make my houses sturdier over time given the thinness of the chipboard.  For this beach house I had decided to use a rectangular wood base made out of 1/4" pine wood.  

For the gray house #3, in the picture above, I decided to use a square wood base made out of 1/4" pine wood. If you look at the picture above of the house I marked as #3 you'll notice that the house is glued to the deck which is supported above the ground with the deck railings.  

Given my concerns over the thinness of the chipboard I didn't think the support from the thin railings would last over time.  So, I decided to fill the area between the deck and my wood square base with multiple layers of chipboard squares.

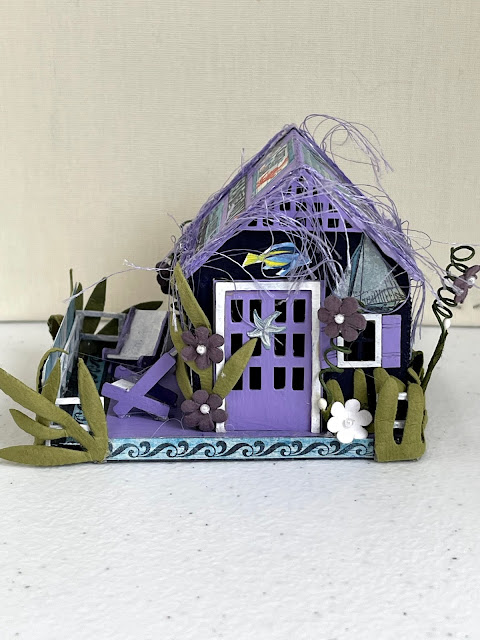
For the small blue house #2, in the picture above, I decided to use a solid ATC (artist trading card) chipboard piece I had.  It was slightly bigger than the chipboard rectangle in the kit but this was not going to be a problem for me given how I wanted to finish the house.

In making each of the houses the first thing I did was to paint the wood and chipboard bases and then glued them together.  

Then before gluing the houses and peripherals like the doors, roofs, door frames and window frames together I painted the pieces I was going to paint (inside and outside) and let them dry.   

I noticed when I painted some of the little peripherals that the thinness of the chipboard and size of some of the pieces when  they were wet tended to warp a little.  I would need to adjust for that when gluing them to the house.

On house #1 and #3, in the picture above, I was going to collage a scrapbook paper summer themed piece I wanted to add to the roofs.  I didn;t need to do this for house #2 as I was going to paint it.  I applied mod podge to the back of the scrapbook paper I was using for the individual roofs for house #1 and house #3 and allowed that to dry.  

I had decided to glue the roofs on last to allow for more flexibility with assembling the houses so when they were dry I temporarily set the roofs aside.  When I was staisfied that everything was dry I glued the house sides together and then glued the houses to their chipboard bases.

Each of the houses proved to have some sort of an issue with the thinness of the chipboard and keeping everything aligned.  I had to temporarily add a small piece of tape inside some of the house corners to keep them aligned while the glue dried.  Once everything was set I removed the small piece of tape on the inside of the house.

Then I cut the scrapbook paper pieces I was going to add to the unpainted chipboard embellishment pieces and applied mod podge to the backs of the pieces I was going to collage or embellish with other scrapbook paper pieces to glue them together and then glued these pieces to their respective location on the house.  

After being satisfied that my houses and chipboard embellishments were set I glued the roofs to the houses.

When the houses were dry I brushed matte medium on the outside of thechipboard houses, chipboard embellishments, and scrapbook paper embellishments to set everything.

After everything was dry I colored and blended around all the edges of my scrapbook images and chipboard embellishments with stabilo pencils and tortillions.

Once the houses were set I laid out the mixed media embellishments I was going to add for each house. 

My initial mixed media embellishments for the houses included painted beach themed chipboard pieces, beach themed stickers, beach themed sayings, beach themed scrapbook paper images, paper flowers, paper reeds, silk floral flowers and mixed media fibers.  

Here's how beach house #1 looked when I finished it.


For this beach house I had decided to go with a blue and gray trim theme.  I wanted to paint the house itself blue and paint the window trims, inside door, door trims, and porch support beams and railings gray.  I painted the beach chair backs and seats gray and the chipboard sides blue.

I also wanted to embellish parts of the house and porch support beams with strips of scrapbook papers to compliment the color of the house and roof.  

Plus, I had found two beach themed doors of scrapbook paper that I thought would look good on the outside of the porch entrance.

My initial mixed media embellishments for this house included painted beach themed chipboard pieces, beach themed stickers, beach themed sayings, and beach themed scrapbook paper images.  

Plus I wanted to add paper flowers, paper reeds, silk floral flowers, and mixed media fibers.

So, I applied mod podge individually to the backs of each of the applicable paper pieces and then individually placed them where they were going.  After everything was secure I brushed matte medium on the outside of the entire house to seal everything.

Then I used stabillo pencils to highlight around all of the paper embellishments and blended them with tortillons.  

Once everything was blended the way I wanted it I added the paper flowers, paper reeds, silk floral flowers, and embellishment mixed media fibers I wanted to use with hot glue. 


This is how the front of the beach house looked when finished.


This is how the left side of the beach house looked when finished.


This is how the back of the beach house looked when finished.


This is how the right side of the beach house looked when finished.


Here's how beach house #3 looked when I finished it.


For this beach house I had decided to go with a green and white trim theme.  I wanted to paint the house itself green and paint the window trims, door trims, and porch support beams and railings white.   I painted the beach chair backs and seats green and the chipboard sides white.

The initial plan for this house called for the house to be up held up by the skinny chipboard bottom and fencing around the deck that was included in the kit.  I thought that these pieces were all too flimsy and over time would fail to hold the piece up so I opted to finish this with a square piece of 1/4" pine wood and combination multi-layered pieces of chipboard to fill in the area under the deck.

My initial mixed media embellishments for this house included painted beach themed chipboard pieces, beach themed stickers, beach themed sayings, and beach themed scrapbook paper images.  

Plus I wanted to add paper flowers, paper reeds, silk floral flowers, and mixed media fibers.

So, I applied mod podge individually to the backs of each of the applicable paper pieces and then individually placed them where they were going.  After everything was secure I brushed matte medium on the outside of the entire house to seal everything.

Then I uses stabillo pencils to highlight around all of the paper embellishments and blended them with tortillons.  

Once everything was blended the way I wanted it I added the paper flowers, paper reeds, silk floral flowers, and embellishment mixed media fibers I wanted to use with hot glue. 


This is how the front of the beach house looked when finished.


This is how the left side of the beach house looked when finished.


This is how the back of the beach house looked when finished.


This is how the right side of the beach house looked when finished.


Here's how beach house #2 looked when I finished it.


For this beach house I had decided to go with a dark purple, lilac and white trim theme.  I wanted to paint the house itself dark purple and paint the window trims, door trims, roof, triangle lattice on the front and back of the house and deck lilac and paint the fence sections white.   I painted the beach chair backs and seats white and the chipboard sides lilac.

As this house was the smallest of the houses gluing the corner of the house with the skinny chipboard was definitely a problem and I ended up, once again, applying a piece of tape on the inside of the house corner allowing the edge enough time to dry.  This is definitely where corner tabs would have been helpful.  

My initial mixed media embellishments for this house included painted beach themed chipboard pieces, beach themed stickers, beach themed sayings, and beach themed scrapbook paper images.  

Plus I wanted to add paper flowers, paper reeds, silk floral flowers, and mixed media fibers.

So, I applied mod podge individually to the backs of each of the applicable paper pieces and then individually placed them where they were going.  After everything was secure I brushed matte medium on the outside of the entire house to seal everything.

Then I uses stabillo pencils to highlight around all of the paper embellishments and blended them with tortillons.  

Once everything was blended the way I wanted it I added the paper flowers, paper reeds, silk floral flowers, and embellishment mixed media fibers I wanted to use with hot glue. 


This is how the front of the beach house looked when finished.


This is how the left side of the beach house looked when finished.


This is how the back of the beach house looked when finished.


This is how the right side of the beach house looked when finished.


Here's how my three mixed media beach houses turned out.


This is how the beach houses looked vis-a-vis the kit I bought.

All in all I was very pleased with the way my mixed media beach themed houses turned out.  

I do think that the thin chipboard used for all the pieces in this kit could be improved upon by thickening the chipboard a little and apply tabs to the corners of all the houses - especially the smallest house.  

Other than that the kit worked well for my mixed media beach house intent.

I hope you like how they turned out.

Copyright © 2004 - 2023 - All Rights Reserved - Designed and Written By Linda Walsh

Thursday, September 09, 2021

More Mixed Media House Pictures For The Holiday Season


You had to know when you saw my previous Linda's Blog post about my new mixed media house pictures for the spring and summer that there would be more.  


If you thought that you would be right.  

After all when have I ever been able to stop at just two new creations...... lol

After  creating my spring and summer mixed media house pictures I decidd to create three for the Christmas and winter holiday season.  Here, too, I would be utilizing chipboard houses but the embellishments would be a little different.

Shown in the picture above is one of the mixed media winter house pictures I created.  For this picture I used an 8" by 8" artboard that was sponge painted in winter colors.  The embellishments I added included a chipboard house, a chipboard deer piece, chipboard window and door pieces, chipboard icicle pieces, and chipboard candy canes.  

Plus, I added 3-dimensional snow, scrapbook paper images, victorian children images, mixed media fibers, metallic snowflakes, plastic tubed ribbons, and chipboard winter sayings. I also drew curtains in the windows using metallic pens.


Pictured above is a close-up of the upper right hand corner.

Pictured above is a close-up of the lower right hand corner.

Pictured above is a close-up of the lower left hand corner.


Pictured above is a close-up of the upper left hand corner.

Shown in the picture above is another one of the mixed media winter house pictures I created.  For this picture I also used an 8" by 8" artboard that was sponge painted in winter blue colors.  The embellishments I added included a chipboard house, chipboard window and door pieces, and chipboard icicle pieces.  

Plus, I added 3-dimensional snow, scrapbook winter paper images, scrapbook winter scene images, victorian children images, several mixed media fibers, scrapbook paper winter sayings and a snowman with a fiber scarf. I also embellished the winter scene using metallic pens and stabilo pencils.


Pictured above is a close-up of the upper right hand corner.


Pictured above is a close-up of the lower right hand corner.


Pictured above is a close-up of the lower left hand corner.


Pictured above is a close-up of the upper left hand corner.


And, there is a Christmas mixed media house picture.  Surprise! Surprise! ..lol

For the Christmas picture I also used an 8" by 8" artboard that was sponge painted in Christmas and winter colors.  The embellishments I added included a small chipboard house, a chipboard sleigh, and two chipboard reindeer.  Scrapbook images were used for the window panes and curtains.

Embellishmenst included  3-dimensional snow, scrapbook Christmas paper images, scrapbook Christmas sayings, victorian children images, several mixed media fibers, scrapbook paper tree images, metallic bows, a ceramic Christmas tree and mistletoe. I also embellished the Christmas scene using metallic pens and stabilo pencils.


Pictured above is a close-up of the upper right hand corner.


Pictured above is a close-up of the lower right hand corner.


Pictured above is a close-up of the lower left hand corner.


Pictured above is a close-up of the upper left hand corner.

I was pleased with how my mixed media winter and Christmas house pictures turned out and hope you liked them, too.

Copyright © 2004 - 2023 - All Rights Reserved - Designed and Written By Linda Walsh

Tuesday, September 07, 2021

My Summer and Spring Mixed Media House Pictures


I know that I've mentioned over the years that my husband and I live in a house of dolls and houses.

You know about my passion for dolls but might not know that I love houses and house pictures as well.  

Over the years I have definitely created all sorts of dolls.  For the houses and house pictures I started by buying pictures I liked for our house starting 33 years ago.  After putting up all the pictures my husband and I realized most of the pictures we had selected were of houses or clusters of houses.  Too funny!


So, it seems, I'm also attracted to house art.... lol

Well,  over the years I've bought a few house sculptures - mainly ones that look like the house we live in but, from time to time, some a little different.  And, of course, when it came to craft kits I bought or crafts I wanted to make they featured houses, too.


For example, I bought a creative embroidery kit featuring a quilt shoppe - Embroidered Quilt Shoppe Kit by Chickadee Hollow Designs, which I reviewed here.  The picture above is the quilt shoppe I made and framed.


I also bought four punchneedle kits featuring homes which I finished with handmade pine wood shadowboxes and reviewed  as shown in the pictures above.

And, of course, there were pictures of houses that I had cross-stitched from cross-stitch kits I had bought and reviewed.


There were 20 cross-stitch kits that I purchased featuring houses and which I finished with store bought frames or where I made pine wood shadowboxes of my own.  I reviewed all of the kits so if you're interested in my reviews please click on the link below each picture.


 Of course, I didn't just make houses from craft kits I had bought.  Some were created based on craft classes I may have taken like the Tinytopia & The Magic of Little Things class I had taken and which was taught byMary Jane Chadbourne.  

In her class I created mixed media houses, some of which were rows of paper or wood houses, some were tiny house pictures made of paper or wood, one was a cluster of winter wood houses, one a cluster of fall wooden houses and several were fairy cottage houses made of wood and paper, all of which are shown in the picture above.

Since I've been in love with mixed media craft creations for several years now I, of course, made some house designs of my own.


There was my My New Handmade Mixed Media Wood Christmas Houses which were made out of pine wood blocks my brother had cut for me and which are shown in the picture above.  


Then there were my New Mixed Media Christmas Decorations - Adorable Gingerbread Houses which were made from chipboard paper house kits I had bought from Alphastamps.net which are shown in the picture above.  All were embellished with chipboard paper doors and other scrapbook paper images, some of which were my own designs.


There was the My New Miniature Mixed Media Gingerbread House Christmas Ornaments which were made from chipboard paper  house kits I had bought from Alphastamps.net which are shown in the picture above.  All were embellished with chipboard paper doors and other scrapbook paper images, some of which were my own designs.


So, what does all this have to do with my summer and spring mixed media house pictures shown at the beginning of this post and in the pictures above?  

Well, out of all the house crafts I had made over the years I didn't really have too many for the spring and summer season as I tend to favor fall and Christmas craft decorations.  Hmmm.... wonder why that is?

So, since I was in a mixed media picture creating mode I decided I should create a summer seaside house collage picture and a spring flower garden house collage picture.


My summer seaside house collage picture was created using an 8" by 8" art board which I sponge painted, paper house andchipboard paper accessory pieces I had bought from Alphastamps.net.  The collage picture contained various embellishments like paper flowers, paper reeds and various summer and beach scrapbook paper images. 

Included were other chipboard pieces like seahorses, anchors, starfish, shells, roof decorative embellishments, and more.


Pictured above is a close-up of the upper right hand corner.


Pictured above is a close-up of the lower right hand corner.


Pictured above is a close-up of the lower left hand corner. 


Pictured above is a close-up of the upper left hand corner.

I had decided ahead of time that I didn't want to hang this picture on the wall.  Instead I finished the back and placed it in a wooden stand.  It currently is sitting on my family room fireplace mantel and I love it. 


For the spring flower garden cottage picture I wanted something a little smaller so I chose to put this chipboard house that I had bought on a 5" by 7" art board.  

After sponge painting the art board I added chipboard embellishments like a water fountain, a birdhouse, birds, butterflies, and leaves.  I also added paper flower embellishments, silk florals, and various scrapbook paper images.  


Pictured above is a close-up of the upper right hand corner. 


Pictured above is a close-up of the lower right hand corner. 


Pictured above is a close-up of the lower left hand corner. 


Pictured above is a close-up of the upper left hand corner. 

I was happy with the way my spring cottage picture turned out and, like the seaside cottage picture, decided not to hang it on the wall but finish the back and add it to a small metal picture stand.  Then I placed it on the opposite side of my family room fireplace mantle.

I was really happy with the way my two pictures turned out and hope you like them too.

Copyright © 2004 - 2023 - All Rights Reserved - Designed and Written By Linda Walsh