Showing posts with label cross-stitch. Show all posts

Saturday, August 24, 2019

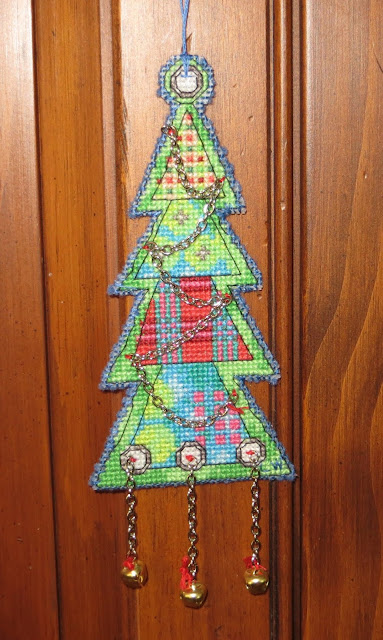
My Dimensions "Jingle Bell Ornaments" Cross-Stitch Kit


Now I know this won't come as any surprise to any of you but I was immediately drawn to the "joy" ornament in the "Jingle Bell Ornaments" kit by Dimensions.  As you know, I just can't resist any ornament with my Mom's name one it.  But, when I looked at the "Jingle Bell Ornaments" kit by Dimensions further I thought how pretty they were and how wonderful they would look on my pencil Christmas tree.

They looked pretty simple and easy to me.  Based on previous experience I knew they would take a while to do due to the black highlighting and due to the embellishments so I was prepared for that.


The black floss highlighting for each ornament transforms them from a pretty ornament to a beautiful ornament.  The highlighting really makes them stand-out and is well worth the extra time it takes to finish each ornament.  It's quite amazing to see them in person.  What adds to the length of time is the black highlighting is done one stitch at a time.

The "Jingle Bell Ornaments" ornament kit contained the presorted thread, #14 plastic canvas, linked chain, jingle bells, needle and instructions.  The pattern uses full counted cross-stitch and outline stitching for emphasis and depth.

I have worked with the #14 plastic canvas before without a problem. Generally, it is flexible enough to just hold it in your hands but also rigid enough to allow you to cross-stitch it without any problem. However, I found with this kit and the size of the ornaments, in particular, that the 14-count plastic canvas was just too big to hold in my hands and cross-stitch at the same time.  I had to cut the canvas.


The chart was 13 3/4" by 10 1/4" and had five ornaments of different sizes. The intent was to cross-stitch the plastic canvas from the left to the right.   However, I don't like doing that as you have to cut your threads when you cut the ornaments out at the end and then you have to glue the loose ends to the back of the canvas.  So, I decided to cut the plastic canvas into five pieces beforehand as it would make it easier to cross-stitch each of the ornaments and there would be no messy and time consuming gluing of the loose thread ends.

Unlike the previous ornaments I had done which were the same size each of these ornaments was a different size.  So, I had to count along the plastic canvas and mark where the ornament sides were before I could cut the plastic canvas.

The pattern came with starting, stitching and finishing instructions as well as a sample of the stitches required and a color chart with color coded symbols.  The symbols on the keys and chart were basically easy to read and follow.

As was the case with previous Dimensions kits the thread sorter was poorly designed. The embroidery threads were glued to two foam backed strips of cardboard that had a picture of the color of the thread and it's number. In order to get to the individual threads you had to separate threads from the foam back. Very quickly the threads separated from their section and then you no longer knew what the thread number was to tie to your symbols & legends.

Instead of designing my own thread sorter this time I decided to punch a whole at the top of each color on the thread sorter and cut one strand of 6 threads for that color as needed, tying the extra cut threads to the hole I had punched above that color.  That way I wouldn't have a problem identifying my threads with the chart.   Just below the hole I added the respective color coded cross-stitch symbol. This kit could be much improved if a different thread sorter with respective #'s and color coded symbols was provided.

Short of changing the thread sorter all together to make things even easier for the user the color symbol should at the very least have been shown on the thread sorter strip of cardboard as well. That way you would only need to use the thread sorter strip of cardboard to follow your chart.


The instructions called for leaving certain sections of the plastic canvas bare in the areas where the hanger would be places or where you were to insert the chain links.  I don't like leaving any area of the plastic canvas bare as I think it makes the ornament look unfinished so I decided to cross-stitch those sections with 2 strands of the white floss. 

Instead of following the directions for finishing these ornaments with the hangers, jingle bells, and chain links, which I found very confusing, I opted instead to tack the jingle bells and chain links to the front of the ornaments with the floss and to finish the backs with felt.


Once I had finished cross-stitching my ornaments I cut the plastic canvas close to the sides of the ornaments according to the finishing instructions.  I don't like leaving the ornaments with the back threads showing so I always opt to finish the back of my ornaments with felt.  This time I decided to use blue felt.

I rubbed Glue Stic on the back of my ornaments and then glued a rectangle piece of blue felt to the back.  Once the felt was glued on I cut the blue felt in the same shape as the ornament and then stitched the plastic canvas to the blue felt along the sides of each ornament with two strands of blue embroidery floss. Instead of following the instructions for creating cording  I created a hanger for the top of each ornament that didn't have a chain hanger with two strands of the blue embroidery floss.


I was happy with the way my "Jingle Bell Ornaments" came out and know they're going to look wonderful on my pencil tree.


Friday, June 14, 2019

My "Snowman and Friends" Dimensions Gold Petites Collection Cross-Stitch Picture


It seems a little crazy at the start of the summer to be posting about a winter cross-stitch picture I just finished.  You might wonder why I didn't post this in the winter.   Well, there's a really good reason for that.  I started this back on the Fall of 2018 and finally just finished it in June.  Everyone who cross-stitches knows that WIP sometimes take months or years to complete....lol.


I was looking for more cross-stitch winter seasonal pictures to display during the winter season and was drawn to the picture in the Dimensions Gold Collection Petites "Snowman & Friends" picture when I saw it.  So, I decided to buy the kit and add it to my other winter cross-stitch decorations on my fireplace mantle.

Like the other Dimensions Gold Collection Petites kits I had bought the kit included the pattern, pre-sorted cotton thread, 18 count white cotton Aida, needle and instructions.

The "Snowman & Friends" pattern uses full counted cross-stitch, french knots and outline stitching for emphasis and depth and this detailing really makes the picture stand out. It also varies the number of threads used with the various stitches to add to the depth emphasis. The design of this cross-stitch gives the finished picture a 3 dimensional aspect with the cross stitch, french knots and outlining being used for artistic effect.


Unlike other cross-stitch pictures I have done this one left large areas of the picture unfinished and just showing the white Aida cloth, like the picture shown above.  It also did not square the picture to the border.


However, I don't like leaving large sections of the cross-stitch picture unfinished so I opted to finish mine, as shown in the picture above.

Unlike other cross-stitch pictures I've completed the jagged edges to the unfinished areas and border required me to improvise and fill in the cross-stitch picture so I had a 5" by 7" rectangle border to my picture.  So,  I utilized the extra floss from the kit and added the colors and images that I envisioned the picture would have if it had been completely finished.


Not only did I decide to totally finish the picture around the edges but also decided to embellish it in a few other areas of the white snow to create more of a 3-dimensional effect.  I used 3-strands of the white floss and created several areas of french knots to create the effect of snow piles.

I also added more blue back stitching in the snow areas to highlight the depth of the snow piles and did the same in sections of the evergreen tree.

For the areas around the border that I filled in and for the large sections of white snow I used 2 strands of the respective floss color I was using in a half cross-stitch pattern.


I decided to use an 9" round embroidery frame to stitch this embroidery.  The white Aida wasn't big enough to fit into the frame so I sewed 4 muslin strips to the four sides of the Aida to keep the Aida tight and stretched so I could easily cross-stitch this design.

The pattern came with starting and working order instructions as well as samples of the various stitches required and instructions for creating them, color coded keys (with code #'s, lengths, color names, and cross-stitch symbols) and a chart with color coded symbols. The colors and symbols on the keys and chart were easy to read and follow.

While I was very pleased with the end results of this design there are some things in the kit and in the instructions that can be improved upon.

Unlike the problem I had with the size and readability of some of the other cross-stitch charts in the kits I had bought this color chart was large enough and easy to follow.

As was the case with previous Dimensions kits the thread sorter was poorly designed. The embroidery threads were glued to foam backed strips of cardboard that had a picture of the color of the thread and it's number. In order to get to the threads you had to separate the foam back from the cardboard strip. Very quickly the threads separated from their section and then you no longer knew what the thread number was to tie to your symbols & legends.

As I have done with other cross-stitch kits I've completed I had to design my own thread color sorter and symbol key. I took a piece of thin cardboard and cut a long rectangular piece out to use as a thread sorter. I then punched holes in my cardboard strip in which to tie each of the different colors. Just below the hole I wrote the DMC floss # and just above the hole I added the respective color coded cross-stitch symbol. I then inserted the floss threads that went with that # and symbol through the hole and tied them in a loose knot. This kit could be much improved if different thread sorter with respective #'s and color coded symbols was provided.

Short of changing the thread sorter all together to make things even easier for the user the color symbol should at the very least have been shown on the thread sorter strip of cardboard as well. That way you would only need to use the thread sorter strip of cardboard to follow your chart.

The pattern included instructions for finishing the piece. I didn't need these as I knew what type of picture frame I was going to use, the  mat I was going to use and the way in which I wanted to finish the picture.

I tend to favor adhesive mounting boards for the cross-stitch pictures I'm inserting into a finished picture frame. I had decided to use an 8" by 10" wood frame I had bought that had a white and gold double depth mat with a 5" by 7" opening.   Since the frame I was using didn't have enough depth to the inside of the frame I knew I wouldn't be able to use a 1/4" foam adhesive mounting board for this picture. 


I also wouldn't be able to mount this on an 8" by 10" adhesive board either as I didn't have enough depth to insert my finished mounted cross-stitch picture and then insert the back of the picture frame.  There just wasn't enough depth to then secure the back of the frame with the metal clips.

So, I opted instead to adhere my cross-stitch to a 5" by 7" Pres-On self-stick thin adhesive mounting board and secure my picture around the 5" by 7" mounting board.  This would allow for just enough depth along the side in which to secure the back of the frame with the metal clips.

When I had finished securing my cross-stitch around the 5" by 7" board I centered the picture within the white and gold mat and then secured it to the back of the white mat with masking tape.

When the picture was finished I was very happy with the way it turned out. It would be perfect for the winter season for my fireplace mantle.  I hope you like it too.

Monday, December 10, 2018

"Stained Glass" Ornaments Kit by Design Works Crafts


When I first looked at the "Stained Glass" ornaments kit by Design Works Crafts I thought how pretty and how wonderful they would look on my pencil Christmas tree. They looked pretty simple and easy to me.  Turns out looks can be deceptive.   It took me much longer than I first thought to finish the six ornaments in this kit.


What I didn't know before I bought the kit was that there was a lot of black floss highlighting for each ornament that transformed them from a pretty ornament to a beautiful ornament.  The highlighting really makes them stand-out and is well worth the extra time it takes to finish each ornament.  It's quite amazing to see them in person.  What added to the length of time was the black highlighting is done one stitch at a time.

The "Stained Glass" ornament kit contained the color cotton floss, #14 plastic canvas, needle and instructions.  The pattern uses full counted cross-stitch and outline stitching for emphasis and depth.


This is the first time I have worked with the #14 plastic canvas and I have to tell you it was wonderful.  It was flexible enough to just hold it in your hands but also rigid enough to allow you to cross-stitch it without any problem.


The chart was 11 1/2" by 17" and had four of the ornaments vertically aligned in a row along the top of the chart with two of the ornaments horizontally laid in a row along the bottom.  The intent was to cross-stitch the plastic canvas in the same manner.  However, I decided to cut the plastic canvas into six pieces beforehand as it would make it easier to cross-stitch each of the ornaments.


The pattern came with starting, stitching and finishing instructions as well as a sample of the two stitches required and a black and white chart with black and white coded symbols.  The symbols on the keys and chart were basically easy to read and follow but, for some reason, I kept confusing two of the triangle symbols every time I looked at the black and white chart.  If the black and white chart were just a little bigger or were actually color coded I think this could have been avoided.


I did have a few problems with the embroidery floss contained within the kit.  Unfortunately there wasn't enough black, light red, and green embroidery floss contained within the kit so I had to use some from my stash.

Also, the floss color key chart had the number of floss strands included within the kit for each color floss but 8 of colors were different than the actual numbers of floss strands contained within the kit.  For all 8 of these colors there was more floss strands than the key indicated.


I had no problem cross-stitching the "Stained Glass" ornaments and then cutting the plastic canvas close to the sides of the ornaments according to the finishing instructions.  I didn't like leaving the ornaments with the back threads showing so I decided to finish the back of my ornaments with white felt.

I rubbed Glue Stic on the back of my ornaments and then glued a rectangle piece of white felt to the back.  Once the felt was glued on I cut the white felt in the same shape as the ornament and then stitched the plastic canvas to the white felt along the sides of each ornament with two strands of white embroidery floss. I created a hanger for the top of each ornament with two strands of the white embroidery floss.


After I was done with all the ornaments I hung them on my pencil tree.  They all look beautiful there.


I was thrilled with the way my "Stained Glass" ornaments turned out and hope you like them too.


Friday, December 07, 2018

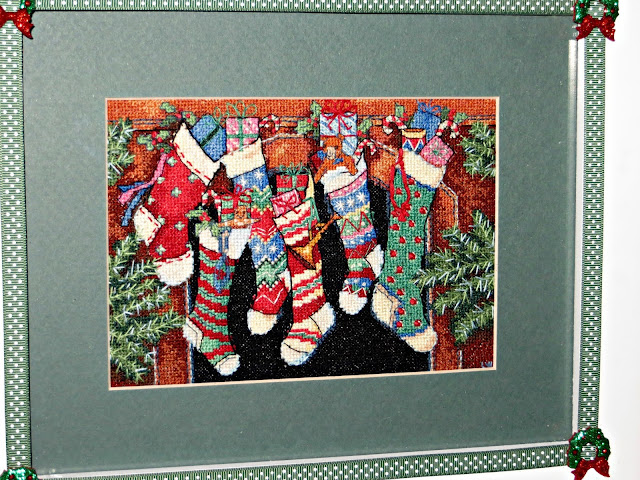
My "The Stockings Were Hung..." Cross-Stitch Picture


I don't think I've ever found a cross-stitch kit that I haven't loved - especially those regarding the Christmas holiday season.  I was drawn to the colorful fireplace stocking display picture in the Dimensions Gold Collection "The Stockings Were Hung...." the minute I saw it.  So, I decided to buy the kit and add it to my other Christmas cross-stitch decorations on my fireplace mantle.

Like the other Dimensions Gold Collection Petites kits I had bought the kit included the pattern, pre-sorted cotton thread, 18 count white cotton Aida, needle and instructions.

The "The Stockings Were Hung..." pattern uses full counted cross-stitch, french knots and outline stitching for emphasis and depth and this detailing really makes the picture stand out. It also varies the number of threads used with the various stitches to add to the depth emphasis. The design of this cross-stitch gives the finished picture a 3 dimensional aspect with the cross stitch, french knots and outlining being used for artistic effect.


The pattern came with starting and working order instructions as well as samples of the various stitches required and instructions for creating them, color coded keys (with code #'s, lengths, color names, and cross-stitch symbols) and a chart with color coded symbols. The colors and symbols on the keys and chart were easy to read and follow.


While I was very pleased with the end results of this design there are some things in the kit and in the instructions that can be improved upon.

Unlike the problem I had with the size and readability of some of the other cross-stitch charts in the kits I had bought this color chart was large enough and easy to follow.

As was the case with previous Dimensions kits the thread sorter was poorly designed. The embroidery threads were glued to two foam backed 6" by 1 1/4" strips of cardboard that had a picture of the color of the thread and it's number. In order to get to the threads you had to separate the foam back from the cardboard strip. Very quickly the threads separated from their section and then you no longer knew what the thread number was to tie to your symbols & legends.

As I have done with other cross-stitch kits I've completed I had to design my own thread color sorter and symbol key. I took a piece of thin cardboard and cut a long rectangular piece out to use as a thread sorter. I then punched holes in my cardboard strip in which to tie each of the different colors. Just below the hole I wrote the DMC floss # and just above the hole I added the respective color coded cross-stitch symbol. I then inserted the floss threads that went with that # and symbol through the hole and tied them in a loose knot. This kit could be much improved if different thread sorter with respective #'s and color coded symbols was provided.

Short of changing the thread sorter all together to make things even easier for the user the color symbol should at the very least have been shown on the thread sorter strip of cardboard as well. That way you would only need to use the thread sorter strip of cardboard to follow your chart.

I decided to use an 9" round embroidery frame to stitch this embroidery.  The white Aida wasn't big enough to fit into the frame so I sewed 4 muslin strips to the four sides of the Aida to keep the Aida tight and stretched so I could easily cross-stitch this design.

The kit did not include enough of the dark green #16880 embroidery floss.  I ran out before the pine needles were finished and had to use some of the embroidery floss I had from my stash.  I almost ran out of the rust #12338 embroidery floss, too, but was able to finish the area of the picture utilizing this color without having to dig into my stash.

The key split the strands of several of the colors into 1 strand for the highlighting.  I opted for using two strands of the highlighting colors for the pine needles, outside of the stockings, and fireplace sides as I thought they would make the picture stand out even more in the frame I was using.


The pattern included instructions for finishing the piece. I didn't need these as I knew what type of picture frame I was going to use, the  mat I was going to use and the way in which I wanted to finish the picture.

I tend to favor 1/4" foam backed adhesive mounting boards for the cross-stitch pictures I'm inserting into a finished picture frame. I had decided to use a 8" by 10" frame I had bought that had a white double depth mat with a 5" by 7" opening. I had already decided to remove the double depth mat and adhere the cross-stitch to a 1/4" foam backed 5" by 7" adhesive mounting board.  If I tried to use the double depth mat I wouldn't have been able to close the back of the frame as it wouldn't allow the cross-stitch picture on the 1/4" foam backed adhesive mounting board to be inserted into the slot on the back of the frame. So, instead, I opted to utilize a single 8" by 10" mat with a 5" by 7" opening which would provide enough room to insert the picture backing into the slots and allow for securing it to the frame.

I had chosen a white frame with green matting to finish it which I think really brought out the beautiful colors of the fireplace stockings scene.

I centered my cross-stitch picture on the 5" by 7" adhesive foam board and trimmed the excess white Aida cloth by 1/4" to 1/2" around.  The trimming allowed for me to tape the sides of the Aida cloth with masking tape to the back of the mat board I was using while providing enough room for the double folded corners to fit within the depth of the frame.

You can also finish the back of the cross-stitch by taping the center of each side with masking tape to the cardboard and then sewing four mitered corners into the Aida cloth so the picture is taunt to the cardboard.

Last year I had bought some decorative adhesive ribbons and hadn't had a chance to use them as of yet.  When looking at the white frame and the colorful stockings picture I thought one of the tapes I had bought would be perfect to decorate the four sides of this frame and really add to the holiday cheeriness of this picture.  So I cut four strips of the tape and adhered them to the frame.

I had also bought some mixed media miniature Christmas wreath ornaments last year and decided to utilize them at the four corners of the tape.  They came with adhesive backing so they were easy to adhere to the corners.

This picture took longer than usual to stitch as there were a lot of color changes within the stockings themselves and a lot of highlighting stitches, but was well worth the extra time it took to create it.

When the picture was finished I was very happy with the way it turned out. It would be perfect for the Christmas holiday season.  I hope you like it too.


Monday, November 19, 2018

Almost Time To Put The Fall Decorations Away - Make Way For Xmas!


I always think I never have enough decorations - especially when it comes to the Fall, Halloween and Thanksgiving decorating season.  Well, I have to admit, after crafting for fifty years you start to accumulate a LOT of decorations.

Hubby's been telling me for years that I have enough.  I, like any crafter I know, just shirks that off.

Well, I have to admit, he's right.  I do have enough.  So much so that I have to rotate them from year to year.   This year I decided to focus on my cross-stitch pictures.

If you've been following my blog for awhile you know that the Fall, by far, is my favorite season for crafting.  The reasons have to do with scarecrows, pumpkins, witches, ghosts, goblins, Frankenstein's, pilgrims, etc. that can all be created for the September through November home decorating season.

What would the Fall season be for crafters without pumpkins and scarecrows?  They're an integral part of everything Fall.  Just as integral  as blowing leaves, hay bales, and crows. Given how versatile they are they're a favorite design for crafters.

I love designing pumpkin and scarecrow dolls, crafts, custom fabric, ornaments, Fall mixed media collages, and so much more. And, I love to cross-stitch.  So, of course, I've bought a lot of cross-stitch kits over the years to create little pictures.

I thought you'd like to see how I rotated my decorations this year.  Here's the rundown:


The "W" pumpkin above is a new decoration added by hubby a couple of years ago.  The two pumpkins on the right are ceramic pumpkins my Mother and I found while shopping one year.  


Two of my favorite "BIG GUYS" that hubby and I made back in 2002 adorn the family room fireplace.  The sitting scarecrow on the left side of the fireplace was made based upon a "Harvest Me Up!" pattern by Pretty Primitives.


The pattern did not call for a basket of leaves in his lap.  I decided to add that one year.


Another one of my favorite big, wooden scarecrow is a tall scarecrow we made back in 2002.  It was made by hubby and I based upon a "Wally and His Pumpkins" pattern by Heidi  Markish Designs. I added the straw, gourd, and hay bale accessories at the bottom and raffia bows.


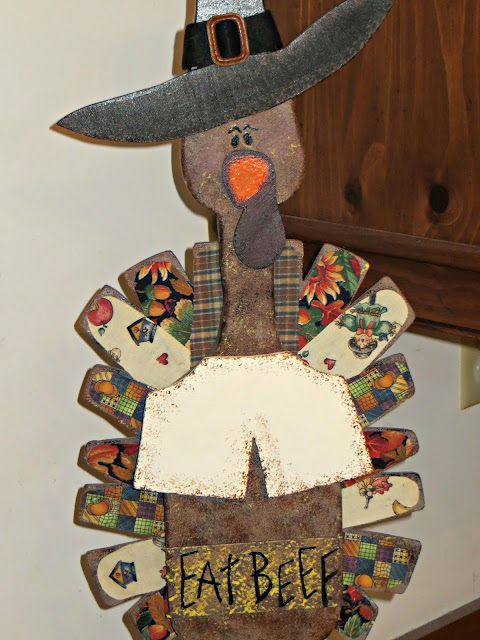
Another one of my  favorite wood creations is a large turkey we made back in 2002 based on a "Give Me Turkey Talk" pattern by Tattered Treasures.  Since I love to sponge paint I couldn't resist sponge painting him.


He has a little wooden sign saying, "Eat Beef." 


The family room mantle is decorated with 6 of the cross-stitch pictures I made as well as some of my mixed media holiday and seasonal decorations.

For the cross-stitch kits we have the following from L to R:

1) Haunted Mansion beaded cross-stitch Mill Hill pattern and kit.
2) Gather Together beaded cross-stitch Mill Hill pattern and kit.
3) Country Welcome beaded cross-stitch Mill Hill pattern and kit. 
4) Covered Bridge beaded cross-stitch Mill Hill pattern and kit.
5) Moonlit Treaters beaded cross-stitch Mill Hill pattern and kit.
6) Autumn Wreath beaded cross-stitch Mill Hill pattern and kit.

I am always amazed at how these little cross-stitch pictures come out.  I love putting them in shadow boxes so I can display them standing up on the mantle.


In the middle of the mantle I added some of my mixed  media designs and creations.  I fell  in love with mixed media creations several years ago and love making paper-clay and wood mixed media decorations.


Harold, pictured above on the left, is a 4" x 5 1/2" x 3/4" scarecrow and is a little apprehensive as to what he's supposed to do in the field.  He knows he's there to scare the crows, but he's unsure as to how to do it.  After all he doesn't want to be mean.

Harold is a mixed media scarecrow wood doll with paper-clay painted face with brushed brown cheeks.  His side and back are sponge painted and his outfit is a multi-layer embellished paper collage with paper center band and black raised dots.  Paper patches add charm to his collage outfit and his wild raffia hair is barely controlled under his straw hat.    An orange bow is tied under his neck.

Next to Harold is a mixed media cube I designed and made several years ago.  There is a story behind these creations, which as as follows:

My mother always loved to decorate for the various holidays and various seasons and loved decorating her home with handmade decorations either she had made or were made for her by her children.   So, when my mother down sized and moved into a senior citizen apartment many years ago she didn't have a lot of room to store or display her seasonal and holiday decorations.

In thinking about this over the years I thought about handmade decorations that could be left out for several holidays and several seasons.  Something that wouldn't take a lot of room.  Something you could bring out in September and leave out until March.

Well, light dawned on me one day and multi holiday and multi season mixed media 3-level collage art blocks seemed to fit the bill.  The multi level wood blocks would be perfect for a multi seasonal multi holiday mixed media collage decoration that could be left out for many months.

Since the Fall, Christmas, and Winter seasons are my favorite times of the year I thought my blocks should have a Fall side,  a Christmas side, a Winter side, and a Halloween side.  And, best of all, they could be left out for 7 months.  All you'd have to do was turn the block for the season or holiday you wanted.

I ended up creating a lot of mixed media collage art block towers with a Fall side,  a Christmas side, a Winter side, and a Halloween side.


Next to the mixed media cube is a mixed media canvas I created while taking a Tinytopia & The Magic of Little Things online class being taught by Mary Jane Chadbourne class at Artful Gathering several summers ago.

The project was to create a small, simple design mixed media canvas from the miniature houses.

Well, given that I never do anything in moderation my canvases were small (6" x 6" and 8" x 8") but not a simple design.  Mine ended up being dense collage clusters of sorts. I started out trying to make them simple, but they just wouldn't cooperate.    So, dense they became.


Next to my mixed media canvas is another one of my mixed media cubes.  Next to that is Hazel who is a mixed media witch I made several years ago.

Hazel is part of a trio of witches that are as ugly as they are confused.   Halloween is coming up and they have lost their witches brew recipe.  They've looked everywhere and cannot find it.  Without it Halloween will just not be the same.

Hazel is a 6" x 6" x 3/4" mixed media Victorian witch wood doll with painted paper-clay face with black bead eyes, red painted mouth, rosy blushed cheeks, black painted finger nails, sponge painted wood body, paper collage and embellished outfit. Her sides and back are sponge painted and her outfit is a multi-layer embellished paper collage with a black paper cape tied with ribbon bows under her neck. Her light gray curly alpaca yarn hair is barely controlled under her witches hat.  Paper jack-o-lanterns with painted faces and swords and key steam-punk paper images add charm to her collage outfit.


On top of the desk I like to decorate that is next to the family fireplace are four of the cross-stitch kits I have completed over the years.  They are as follows from L to R:

1) Be Thankful beaded cross-stitch Mill Hill pattern and kit.
2) The Gazebo Mill Hill beaded cross-stitch Mill Hill pattern and kit.
3) Country Quilts beaded cross-stitch Mill Hill pattern and kit.
4) Autumn Basket beaded cross-stitch Mill Hill pattern and kit.


I also love to decorate my dining room fireplace area and mantle.  It is a large area to cover so I end up putting a lot of my decorations there.

The two pumpkins shown above (Trick or Treat and Boo) were new decorations added a couple of years ago by hubby!  They always go well with any scene I choose.


In the far left corner is a large cloth scarecrow which I made in 2001 based on a "Hang Me Around Larry" scarecrow pattern by Time Worn Treasures.


We added the wood stand that he is supported by.


In  the far right corner is a Halloween decoration that we created based on a "I Just Love The Fall" pattern by Rustic Treasures.


In the center of the fireplace is a 3 1/2' large fall silk floral decoration I made about 20 years ago.  I love it because it's very colorful and totally fills up the area created by the dining room Rumsford fireplace.


Sometimes I like decorating with buntings so two years ago when I was experimenting with hand embroidered leaves I thought a bunting with hanging leaves would make a great Fall decoration for my dining room.


It is an 8' long ribbon bunting with twelve hand embroidered leaves. 


The leaves are all double sided and padded with batting and are all hand embroidered and blanket stitched along the edges using various DMC embroidery floss colors for emphasis.


The leaves range from large 6" leaves to medium 4" leaves to small 3" leaves. All of the leaves are hung from a ribbon hanger with loops on the end so I could easily hang it on the large mantle pegs.


In the far left end of the mantle is the "Haunted Library" cross-stitch picture that I made decades ago from a Mill Hill kit I had bought.


Just to the left of the "Haunted Library" cross-stitch picture is Tabitha who adores being a witch.  She loves casting spells, turning princes into frogs, and flying around with black ravens scaring everyone. She even likes bats, rats, spiders, and living in caves.

There really isn't anything Tabitha doesn't like about being a witch. And, the wonderful black, green, and purple outfit she gets to wear. Well, how can she not like those? Need to turn a prince into a frog or cast a spell on someone - just ask for Tabitha. She LOVES being a witch and all that entails.

She is a totally needle felted witch art doll that I made many years ago using alpaca roving from my sisters alpacas.  Her dress is made out of black felt.


On the right hand side of the "Haunted Library" is my Stan The Pumpkin Man  scarecrow who is a little apprehensive about anyone taking his pumpkins.  He knows that everyone will be coming in Fall for their pumpkins and hopes he'll be less apprehensive about them taking them by then. We'll see......

He is a totally needle felted scarecrow doll that I made many years ago using alpaca roving from my sisters alpacas.


Next to Stan The Pumpkin Man is another one of my mixed media cubes.  Next to that is Hildegarde Ann who is another mixed media witch I made several years ago.

Hildegarde Ann can hardly wait for Halloween.  Not because she loves scaring people. but because she's a good witch and loves handing candy out to all the trick-or-treaters.  In fact, she and her twin sister are known in their neighborhood for having the best candy.

Hildegarde Ann is a 6 1/2" x 6 1/2" x 3/4" mixed media shelf sitter wood doll with painted paper-clay face with black bead eyes, sponge painted wood body and paper collage embellished outfit. Her sides and back are sponge painted in her favorite Halloween colors and her outfit is embellished paper collage adorned with a jack-o-lanterns, clocks, bats,  scary insects, raised dots and ribbon bows. her gray thick alpaca yarn hair is from my sister's alpaca Masquerade's fiber and is barely controlled under her witches hat. Masquerade's yarn is also wrapped around the band of her witches hat and adorns the brim of the underside of her witches hat.


I don't know why it is that I can never do anything in moderation.  I try to, but always fall prey to loving what I'm doing and wanting to try this or try that.  That is definitely a formula for over doing and, one of these days, I am truly going to run out of space for everything I make.  Hubby and my sister would tell you that I'm way past that point right now.  They're probably right, but when my creative juices have a hold on me - I make way more than I should.

Such was the case with the miniature houses I made for the Tinytopia class I took at Artful Gathering years ago.  The class was taught by Mary Jane Chadbourne, who is an amazing mixed media artist.  I loved her class and loved the way she taught.  Her classes were always a lot of fun and filled with all sorts of different projects and methods to try.

The picture above is a Halloween menagerie of a row of houses that I made based upon things I learned in her class.


Pictured above are two of the houses I made based on her class.  The first house I put on a paper mache box mounted on wooden pegs.  The second trio of houses were mounted on turned upside down terra cotta candle tray.


Penny The Pumpkin Pie Maker is another one of the needle felted art dolls I made several years ago using my sisters alpaca roving.

She is a female scarecrow who just loves baking - especially when she's making her famous pumpkin pies. She has a knack for making the best pumpkin pies in the area and is well known far and wide for them. In fact she has so many requests for her pumpkin pies during the Fall season that she can't keep up with all the orders.

She tries to but sometimes she needs help from her cousins, Stan The Scarecrow Man, and Samuel Scarecrow. Stan is more than willing to help - even though he's a little apprehensive about his baking skills. Samuel, on the other hand not only thinks being a scarecrow is beneath him - cooking is also. He's just too regal to bake - or so he thinks.


Next to Penny is another one of my mixed media cubes.


In the far right corner of the mantle is Hagatha who another one of the needle felted art dolls I made years ago.  She, too, is needle felted and made from my sisters alpaca roving.

She isn't afraid of anything witchy except flying. She just doesn't like it. Too many unpredictable situations can arise - like wind, rain, snow, sleet, tornadoes, hurricanes and more.
She much prefers to stay at home in the cave and make witchy potions. That she's excellent at and that she will willingly do. Ask her to fly and you'll get her "Who me!" reaction. Need a witches brew? Just ask Hagatha. Need a few spells cast? Just ask Hagatha. Need a witch to fly around? Don't ask Hagatha. She's no where to be found.

I hope you have enjoyed seeing my Fall decorations.  By the end of this week they'll be put away and another one of my favorite decorating seasons, Christmas, begins.  I can hardly wait.