Tuesday, June 25, 2013

The "Birdies" and "Dollies" Had Their Way


I should have known better than to ever let the "dollies" mingle with the trio of "birdies" I was making for my Artful Gathering "Briley The Birdie" class with Colleen Moody. The "dollies" convinced the "birdies" they should be different than "Briley."

So, despite my best efforts to get them to conform my trio of "birdies" decided to be rebellious and be the class radicals. They decided they didn't want to be cream colored. They  wanted to be sponge painted. They insisted on it and then they had all the "dollies" urge me to sponge paint them.

There were just too many "dollies" clamoring for this that I had to acquiesce. Now I know you all know I hate to give in to the "dollies" demands but with the trio of "birdies" and all the "dollies" clamoring I was sorely outnumbered.


I thought if I gave in to the trio of "birdies" on this they'd calm down and let me create them the way I wanted to. Au contraire!  Each one had already developed a personality of their own and therefore a style they thought was best for them. Who was I to argue? I was just their creator. So, once again, I acquiesced.


One thought she was a Queen and wanted to be treated like one. I named her Queen Annabell but I refused to bow and curtsy to her.


Another decided she wanted to be Bohemian. I named her Natasha.


And, the third decided she wanted to be Funky. I named her Phebe.


Right now when I look at them all together they look like little "biddies" conspiring to me.  Of course, I see bogey men everyone when it comes to my "dollies" and their demands.  And, since the "birdies" have developed such a close relationship with the rest of the "dollies" who knows what they'll be demanding next.


I'll just have to wait and see.  For sure, I'm not going to wait on them.  I might serve them afternoon tea, but that's it.


Perhaps I'll be surprised and they'll be delightful.  Perhaps they'll be nice, well-mannered, and a delight to be around.  Perhaps their charm will rub off on the rest of the "dollies."  Perhaps.......

Copyright © 2004 - 2023 - All Rights Reserved - Written By Linda Walsh

Monday, June 17, 2013

They Don't Look Like Much Yet.........


If you've been wondering what I've been up to the last few days I'll give you a clue. I've had my hands covered with paper clay and I couldn't be happier. You see I'm having a blast.

Now I know that I'm dating myself with that baby boomer word but it's the truth. I am just loving my Artful Gathering "Briley The Birdie" class with Colleen Moody. The class is a blast. The group of ladies taking the class are a blast and Colleen is an amazing teacher. Her video's are so easy to follow and are so much fun.

And, well, how could you not have fun when making these guys - or should I say, these birdies:


They don't look like much yet.....

A New Baby Girl Alpaca Cousin Named Dahlia


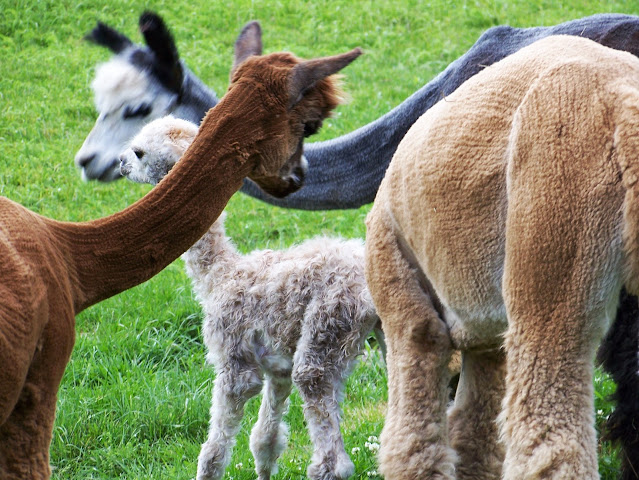
The "dollies" have been jumping up and down with joy the last few days.  The reason?  Well, they have a new baby girl alpaca cousin named "Dahlia."  And, she couldn't be more adorable.

Roxy and her new baby girl - Dahlia.

 Mom and daughter enjoying the sun.

 A tender kiss from  Mom.

How adorable is she?  Beautiful Dahlia.

Dahlia was born at Rock Garden Alpacas the afternoon of June 12th. By the evening she was out running in the fields.

Of course, all the "dollies" want to go visit their new alpaca cousin. With 1,796 of them that isn't going to happen any time soon.  So, of course, they're already bugging me about Dahlia's Alpacas Rock products.  I'm ignoring the "dollies" for now which is never a good idea, but she and her Mom, Roxy, are on the "to do" list.  So, stay tuned.


Thursday, June 13, 2013

It's A Baby Girl Named Dahlia For Roxy


Born yesterday at Rock Garden Alpacas. A beautiful baby girl named Dahlia for Roxy.

Mom and her baby girl are doing just fine and Dahlia was out yesterday evening running in the fields. Simply amazing.


According to my sister she came into this world at 3:20 yesterday afternoon.   Her dam is Bluestone Peruvian Roxy a Dark Silver Grey and her Sire is PHA Accoyo Stratosphere a fawn son out of Legacy.

Wednesday, June 12, 2013

My Embroidered "Crazy Autumn" Stitchery - "Crazy Autumn" Stitchery By Carol L. Steffensen Of Chickadee Hollow Designs


Several years ago I bought a couple of creative embroidery and stitchery kits that I thought would be fun to do and have been trying to find some time to complete them ever since. Two weeks ago I finally had some time to work on one of them and decided to make the Fall themed stitchery from Chickadee Hollow Designs that I had bought.

The kit  included the embroidery floss and the pattern included the design on pre-printed pre-colored fabric, as well as a basic embroidery stitches sheet and sheet of basic instructions for completing their stitchery.

I had decided ahead of time that I wanted to frame my stitchery as a picture instead of finishing it the way the pattern had suggested which was to add strips to the sides and finish it as a small quilt. I opted instead to finish mine as a stitchery picture and blanket stitch around the edges.

The stitchery design was pre-printed on pre-colored fabric and folded down the middle so as to fit inside the standard pattern envelope. The design was fine except I had a very difficult time ironing the crease out. I couldn't spray the design with water to help iron the crease out as the design was pre-printed and would have run. I did the best I could and hoped that when it was finished and stretched the design that the crease wouldn't be as visible.

The instructions called for adding fabric borders around the sides and on top of the batting so as to finish as a quilt. However, the pattern didn't include a picture of the finished piece just the picture as shown below:


The pattern included a sheet of general embroidery stitches, steps for finishing as a quilt, and instructions to use one or two strands of the embroidery floss on the design.  However, the pattern didn't tell you which stitches to be used and where and whether you were to use one or two strands in any particular area. It was basically left up to the user to choose which embroidery stitch to use and whether to use one or two strands.

The instructions called for positioning the design over a larger piece of Warm-N-Natural batting and fastening this with small safety pins then embroidering the stitchery. The pre-printed pre-colored fabric design was so close to the edge that I knew it was impossible to fit within any embroidery hoop without creating more creases.

My experience has always been that embroideries always come out better when stretched in an embroidery hoop so I chose to baste the pre-printed sheet to a standard felt square so that I could put in into a wooden embroidery frame as shown in the picture below:


As I wanted to finish this as a stitchery picture with blanket stitching around the edges I decided to embroider around the edges of the design using a 3-strand 3-color embroidery floss combination. I had opted to use this same 3-strand 3-color embroidery combination to frame the inside "Autumn" rectangle and was pleased with the result and thought a similar border around the design would be complimentary.

When my embroidery piece was done I removed it from the embroidery frame and cut it along the brown dotted lines about 1/4" from the edge of the stitchery outline.

I decided I would add one layer of quilt batting and a back piece of felt to my stitchery and to blanket stitch around the edges. Using the stitchery as a guide I cut out a piece of batting and a piece of felt for the backing and then layered them. Since I was pleased with the 3-strand 3-color embroidery combination of the center rectangle and design border I decided to use it to blanket stitch around the edges and like how it turned out as shown in the picture below:


As mentioned previously I was going to put my finished stitchery in a picture frame and had decided to use decorative paper as a background for my stitchery. The choice was between an evergreen colored background, bright yellow background or a rust colored background. I chose the rust colored background as shown in the picture below:


I had chosen a small black metal frame for my finished piece as I wanted the emphasis to be on the stitchery and not on the frame. It took me 26 1/2 hours to complete this picture including the framing and was thrilled with the way it turned out. I hope you like it as much as I do.