Showing posts with label Occasions. Show all posts

Sunday, December 30, 2018

Here's An Idea - Terracotta Painted and Stenciled Pot Decorations


As you probably know I LOVE to create and decorate with just about anything I find for the various seasons and holidays.  So it should come as no surprise that I'd be looking for different ways to decorate over the years and back in 1999 fell in love with the idea of using painted and stenciled terra-cotta pots.

Whether it's decorating with dolls, floral arrangements, or wood crafts I just love decorating - especially when it comes to decorating my sun-room for the different seasons and holidays.

The reason this is so much fun for me is because I've now limited the seasonal decorations in my home to a couple places in the house.  I used to try and decorate every room for every season and holiday, but that was getting to be a  OF WORK.  And, I just didn't have the time for it.  So, I've been limiting the decorations to a few areas - which I'm very happy with.


Well, several years ago I was looking for something different to decorate my sun-room and thought that maybe I should paint some of the terracotta pots I had bought on one of my many shopping trips. And, I had bought a few - well, make that A LOT!

I don't know why I'm always drawn to the terracotta aisle of the craft store, but I am.  I just love all the different sizes of the terracotta and love experimenting with different ways to use them.  And use them I have.


Whether its terracotta bride and groom wedding shower favors, or baby boy and baby girl terracotta baby shower favors, or a terracotta bunny head for Easter - I just LOVE creating with the terracotta pots.  And, I love creating free e-patterns so you can create some of your own.

Right now I have several free e-patterns and free combo e-patterns (shown above and below) that I've designed featuring terracotta type dolls (if you could call something with a terracotta body a doll!)


There's my "It's Me, Ginny" bunny, my "I Do! Terra Jane" bride favor, my "I Do! Terra Joe" groom favor,  my "It's a Girl! Terra Head" baby shower favor, my "It's A Boy, Terra Head" baby shower favor, my Walsh caroling family, and my trio of Santa's.

They are all fun and easy to make.  The bride and groom e-patterns are part of our "Wedding Shower Favor" group of free e-patterns and the boy and girl are part of our "Baby Shower Favor" group of free e-patterns.


In any event,  during one of the Fall seasons I was looking at the standard pot size terracotta pots I had and thought they might make cute decorations for the Fall. I was thinking that I could paint them and stencil them with seasonal decorations.

So, I decided back then that a shopping trip to the craft store (like I need any excuse to go to the craft store! LOL LOL) was in order to buy the paint and some stencils.

Well, it turned out to be a wonderful shopping trip as I found many Provo Craft First Impressions rub-on stencils that I liked and could use for the various seasons and holidays.

Of course, like everything I do, I never do anything in moderation.  As a result I had many, many pots to decorate with which meant I had lots of paint and stencils to buy.

To my delight the stencil aisle was filled with all sorts of rub-on stencils that I could use for my pots - and use them all I did.


There were scarecrows and snowmen and flowers and Santa's and .....  Well, just about everything for every season and holiday. There were borders and sayings that I could combine with my pictures. The possibilities were endless.

My mind was thinking of so many possibilities at once that I couldn't keep everything straight. I wasn't sure what I was putting with what. It didn't matter anyway - that was part of the fun.

So, of course, I bought a bunch of the rub-on stencils. I figured if I had any extra's I could always use the stencils on something else. That's what I told hubby when he saw how many I actually had! LOL LOL

In any event, first I decided which pot I was going to use and then decided which stencils I would be using.  The stencils would be driving the paint color so I needed to decided on them first.  And, of course for that shopping trip, I was drawn to the Fall stencils and Fall colors.

I had originally thought of using some of my painted pots for some of my household plants, but gave up that idea as I would have to change the pots out for each season and I just didn't want or didn't have time for that.  So, I decided to use the pots to hold potpourri or ornies appropriate for the season or holiday in question.


The pictures shown above are some of the painted terracotta pots I did for the Fall.  In the pictures they're empty, but I fill them with potpourri for the Fall season.  My rooms smell great and they're wonderfully decorated for the Fall. I loved creating them so much I decided to create a free e-book so you could make some of your own.

I ended up making a bunch of painted terracotta pots for all four seasons and even had some for the various holidays.  When I was done I had a bunch of decorations that I could use and a bunch that I could give as gifts.


Since I also have a passion for silk floral decorations I decided to paint some of the large terra-cotta pots for use with some of my silk floral seasonal decorations (like those shown in the pictures above). I painted them different colors and added stencils for decorations.  And, of course, I created free e-books so you could create some of your own.


My mother and I were always looking out for craft projects we could do together to use as decorations for the various holidays and seasons.  In the April 1999 issue of Crafts we saw a picture and instructions for a  craft project called "Clay Pot Bunny Family" designed by Mary Ayres that had the cutest group of terra-cotta painted bunnies using all different sizes of terra cotta pots.

We loved it and decided to create bunny families of our own to decorate during the upcoming spring season and Easter holiday. We ended up making 3 families (like those shown in the picture above) for ourselves and my sister.  The two shown on the bottom of the collage above were made using the tiniest little terra-cotta pots.  I love their hats.  They're bigger than they are.
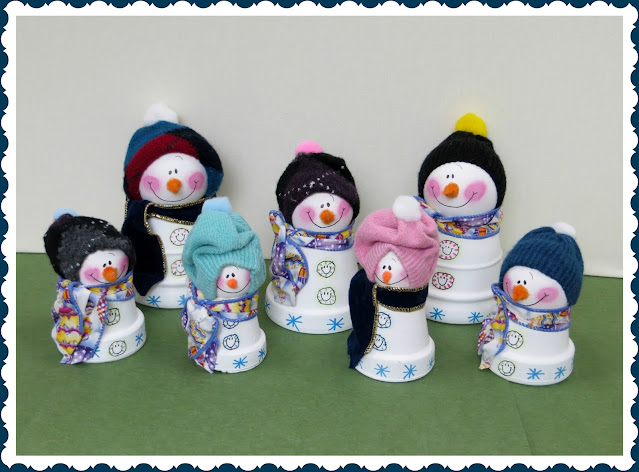

My mother and I loved making the bunnies families so much we decided to create some terra-cotta painted snow people families (like those shown in the picture above) for the following winter season. We decided to paint them white, draw designs on the front with colored markers, add old socks for hats with pompom decorations, and add wired ribbons around their necks for scarves.  Their noses were made from orange pipe cleaners shaped into cones and glued to their faces.


In 1999 I saw a cute Halloween craft project in the September 1999 issue of Crafts N Things that I thought would make a really cute decoration for Halloween.  It was called "Candy Corn Pots and Lollipop Ghosts" and was designed by by Dorothy Egan that used 5" and 6" terra cotta pots.  It was so cute I decided to make them (shown in the picture above) for myself , my mother, my step-daughter and my daughter-in-law.  They loved them so painting and decorating those terra-cotta pots was a big success.  Aren't they adorable?


In the Spring of 2000 I was looking for something for my step-daughter to make for the upcoming Easter holiday and decided terra-cotta pots with painted wood decorations glued to the front and filled with all sorts of Easter craft decorations like painted eggs, bows, and silk floral would be cute. So, we made  two small ones and two large ones (like those shown in the picture above) to decorate our homes during the Easter season.


My favorite terra-cotta pots to use are the little mini pots and I've used many of them in the different craft projects I've done.  I saw an article in the Crafts September 1999 issue for making the cutest pincushions using 2 1/2" clay pots.  It was called Pin Pal Pincushions and was created by Mary Ayres, So, of course I decided to make a few as gifts, like those shown in the picture above.  Tiny little pincushions.  Adorable aren't they?


Back in 1999 while were expecting the birth of our 4th grandchild I saw a picture of a baby craft project in one of the crafts magazines I subscribed to for making baby heads sticking out of tiny terra-cotta pots.  The baby heads were made of cloth and the terra-cotta pots were painted ecru and had a blue heart for a boy and a pink heart for a girl on the front. I decided to make some.

I thought they were adorable but decided to make mine with wood egg shaped painted heads, pink terra-cotta pots for girls and blue painted terra-cotta posts for boys.  I decided to draw a  dashed triangle on the fronts of the posts and write "It's A Girl" for the girls and  "It's A Boy" for the boys. In the area below the dashed triangle I added the date, time, and weight for when my grandson was born and gave it to my step-daughter as a memento.  She loved her trio.

All in all I was pleased with all the decorations I've created over the years.  Painted and stenciled terracotta pots for decorating for all seasons and holidays - now that's a good idea.

Please respect My Terms of Use:  All patterns, e-patterns, printables, e-printables, e-books, graphics, tutorials, how-to's, articles and other e-products © 2004-2023 Linda Walsh Originals-Designs by Linda Walsh. All rights reserved. Commercial selling or reselling by any means prohibited without the written consent of Linda Walsh.

Patterns, e-patterns, printables, e-printables, e-books, graphics, tutorials, how-to's, articles and other e-products are for personal use only. You may not modify, photocopy, download, upload, post, transmit, display, perform, publish, license, reprint, create derivative works from, mass duplicate, re-sell, digitize, and reproduce in any other form (print, digital or electric) or commercially apply, embed, share, Email, or redistribution in any other means. Use of any of the above is prohibited without the written permission of Linda Walsh.

However, you may link to my website(s)/blog(s) and the individual page(s)/blog post(s) (including 1 picture) but do not copy, reprint or duplicate my website(s)/blog(s) or individual page(s)/post(s ) without my permission.

Items made from Linda Walsh Originals E-Patterns are intended for personal use for fun or small scale personal and business profit as long as you credit us with the design. Large scale commercial use (i.e. mass production) of items made from Linda Walsh Originals E-Patterns are by permission only.

Please see my Terms and Conditions for additional information.

Copyright © 2004 - 2023 - All Rights Reserved - Written By Linda Walsh of Linda Walsh Originals and Linda's Blog. Linda is a doll maker and doll pattern designer.

Tuesday, August 29, 2017

My New Free Baby Decoration E-Pattern - Raggedy Bassinet


I love creating decorations that can be used for decorating a baby shower or given as a gift to decorate a nursery.

I also happen to like dolls - especially raggedies.  So, I thought it might be fun to make a raggedy baby head sticking out of a bassinet.


My "Raggedy Bassinette" free e-pattern makes either a boy (blue) or girl (pink) 7" by 9" boy or girl decoration.

I hope you enjoy my free e-pattern.


To view and download my free e-pattern please CLICK HERE.  You'll be brought to Google Drive where you can view my free e-pattern. Then just download my free .pdf e-pattern  by clicking on the down arrow.

Once my e-product is downloaded to your computer you can save it and print it. I hope you enjoy my free e-products.

For more information on all my free e-patterns, e-printables and e-books please CLICK HERE.

Please respect My Terms of Use:  All patterns, e-patterns, printables, e-printables, e-books, graphics, tutorials, how-to's, articles and other e-products © 2004-2023 Linda Walsh Originals-Designs by Linda Walsh. All rights reserved. Commercial selling or reselling by any means prohibited without the written consent of Linda Walsh.

Patterns, e-patterns, printables, e-printables, e-books, graphics, tutorials, how-to's, articles and other e-products are for personal use only. You may not modify, photocopy, download, upload, post, transmit, display, perform, publish, license, reprint, create derivative works from, mass duplicate, re-sell, digitize, and reproduce in any other form (print, digital or electric) or commercially apply, embed, share, Email, or redistribution in any other means. Use of any of the above is prohibited without the written permission of Linda Walsh.

However, you may link to my website(s)/blog(s) and the individual page(s)/blog post(s) (including 1 picture) but do not copy, reprint or duplicate my website(s)/blog(s) or individual page(s)/post(s ) without my permission.

Items made from Linda Walsh Originals E-Patterns are intended for personal use for fun or small scale personal and business profit as long as you credit us with the design. Large scale commercial use (i.e. mass production) of items made from Linda Walsh Originals E-Patterns are by permission only.

Please see my Terms and Conditions for additional information.

Copyright © 2004 - 2023 - All Rights Reserved - Written By Linda Walsh of Linda Walsh Originals and Linda's Blog. Linda is a doll maker and doll pattern designer.

Thursday, August 24, 2017

My New "Christen Me Beautiful Babies!" Boy and Girl Christening Dolls Free E-Pattern


"Christen Me Beautiful Babies!" are just waiting for their 1st Christening.

Maybe it's the beautiful white outfits, or the white lace, or the very special occasion. They're not sure.

They just know they're very excited.


"Christen Me Beautiful Babies" have muslin bodies and the girl doll has an embroidered face.  The boy christening doll is faceless.

They both have a mass of yarn hair that is barely controlled under their Christening bonnets.  The boy has straight dark brown hair while the girl has curly medium brown.  Both have red striped boots that are cross laced and their bloomers are lace trimmed and gathered at the waist and legs.

Their beautiful Christening gown is a multi-layered combination of eyelet fabric and satin fabric under lace fabric. The dress bodice is lace covered and lace trimmed. The sleeves are gathered at the shoulders.


The dress skirt is multi-sectional with the front having a center section of satin under layer and eyelet lace top layer and two side sections of satin under layer and lace top layer. The back section of the dress skirt is multi-layered with a satin under layer and lace top layer. The dress skirt is beautifully gathered at the waist and adorned with lace trim and the bottom hem of the dress has two layers of lace trim, as well. The dress is gathered at the neck and adorned with lace trim.

"Christen Me Beautiful Babies" christening bonnet is multi-layered with a satin under layer and lace top layer, as well. It is lined and with satin bonnet ties that wrap around their neck and are tacked to the front of their dress with a bow.  The boys us blue and the girls is pink.

"Christen Me Raggedy Babies!" are really looking forward to their 1st Christening and would make a beautiful and unique gift for any baby's Christening event. Will you take them to their 1st one?


This pattern makes a faceless boy christening doll and a girl christening doll with an embroidered face.  The only difference is the boy is faceless, his hair is cut straight on the ends and shorter on the sides than the girl’s, and he has a blue bow.

To view and download my free e-pattern please CLICK HERE. You'll be brought to Google Drive where you can view my free e-pattern. Then just download my free .pdf e-pattern.

For more information on all my free e-patterns, e-printables and e-books please CLICK HERE.

Please respect My Terms of Use:  All patterns, e-patterns, printables, e-printables, e-books, graphics, tutorials, how-to's, articles and other e-products © 2004-2023 Linda Walsh Originals-Designs by Linda Walsh. All rights reserved. Commercial selling or reselling by any means prohibited without the written consent of Linda Walsh.

Patterns, e-patterns, printables, e-printables, e-books, graphics, tutorials, how-to's, articles and other e-products are for personal use only. You may not modify, photocopy, download, upload, post, transmit, display, perform, publish, license, reprint, create derivative works from, mass duplicate, re-sell, digitize, and reproduce in any other form (print, digital or electric) or commercially apply, embed, share, Email, or redistribution in any other means. Use of any of the above is prohibited without the written permission of Linda Walsh.

However, you may link to my website(s)/blog(s) and the individual page(s)/blog post(s) (including 1 picture) but do not copy, reprint or duplicate my website(s)/blog(s) or individual page(s)/post(s ) without my permission.

Items made from Linda Walsh Originals E-Patterns are intended for personal use for fun or small scale personal and business profit as long as you credit us with the design. Large scale commercial use (i.e. mass production) of items made from Linda Walsh Originals E-Patterns are by permission only.

Please see my Terms and Conditions for additional information.

Copyright © 2004 - 2023 - All Rights Reserved - Written By Linda Walsh of Linda Walsh Originals and Linda's Blog. Linda is a doll maker and doll pattern designer.


Monday, October 31, 2016

I've Been Playing Again! This Time With Labeley.com


If you're a reader of my Linda's Blog and have been following me and all my blogs (yes, I do have a few! LOL LOL) you are well aware that I love to play and experiment. Especially when it comes to interactive websites.

Well, a couple of weeks ago I received an email from Ana Brady at Labeley.com (http://www.labeley.com) asking me if I'd like to try their "free online custom label creator developed by the team behind the well-known free online tool for designing and customizing labels, Labeley."

Hmmm... Free online tool for designing..... What's not to love about that?

So, given my love of playing I thought I'd try it out. Plus, she volunteered to write a "How to Create Holiday Decorations For Free With Labeley" article for me. Another plus....

While I had planned to do other things today I decided to read her how-to article and try out Labeley.

Here's what her article said:

How to Create Holiday Decorations For Free With Labeley

You must’ve noticed over the past few weeks how the nature around us has been changing its colors. Leaves on trees turned pale yellow, coral, and even bright red. The whole nature is gradually taking on warm golden, amber and scarlet hues. These changes of colors indicate that the green summer is long gone and fall rolls around. The temperature is dropping, but the holiday excitement is rising. Halloween is just around the corner, while Thanksgiving and Christmas are on their way. It’s that time of the year when you seem to be spending most of your your spare time on decorating your home for the next holiday.

Thankfully, fall with its colors and hues is probably the most inspirational season for holiday decorations. And what better way to spread the holiday spirit than to bring the warm and vivid hues of fall into your home? Let the fall inspire you with ideas to decorate your home this holiday season! You can mix elements such as fall foliage, pumpkins, pinecones, acorns and candles to decorate your fireplace or entrance or any other part of the house. Or, for more Halloween-centric appeal you can add some scary spiders or bats on the curtains, furniture etc.

One tool that can definitely come in pretty handy in these holiday decorating endeavors is Labeley. It’s a free online label maker that allows you to create all kinds of holiday stickers for decorating your gifts, creating festive centerpieces, making fun-looking place cards, preparing fun games for the youngest, decorating the holiday meals and more.


How to use Labeley for creating holiday decorations?

Visit Labeley Holidays and start designing your labels. Labeley offers several label elements you can play with. Start by choosing a shape for your label. Once you’ve done that, you will be able customize the look of the background, add a border if you need one, add some fun and colorful text, and ultimately spruce up your design with graphics. You can choose among many different illustrations for Halloween (bats, cats, spiders, ghosts, owls and more), than Thanksgiving (turkeys, pies, gravy, acorns, leaves and more), Christmas (Santa Claus, Christmas tree, gingerbread man, Rudolph the reindeer and more). Labeley also offers an extra feature to upload any image from your computer and use it in the design as a background or center element. For example, you can upload photos of your family and make fun holiday ornaments.


You can play and create as many designs as you like, save and download them on your computer, print them out and use them for any holiday craft. Should you decide to keep your designs for next year’s holidays, you can sign up for a free Labeley account where you’ll have all your labels waiting for you to modify or reuse them again as they are.

Labeley sticker maker is really simple and easy-to-use, so chances are that you’ll have numerous holiday designs prepared in just a few minutes. Give Labeley a spin and jazz up your home with fun holiday crafts!

Seemed easy enough to use so I decided to give it a try.


I started by familiarizing myself with thew different features which was very easy to do and only took a couple of minutes. It definitely was very easy to use.

Since today is Halloween I decided to create a Halloween label using a combination of my own graphics and some of their graphics. I choose a shape, added a background, added a border, and then started adding and re-sizing the graphics until I had a Halloween label I liked. The alpaca, green and rust trees, house and brown tree with spider webs in the label shown above were my graphics. The rest were theirs. After I was pleased with the layout I added the "Happy Halloween" text and then saved the image to my computer.


I like to add stickers to the back of the holiday cards that I send out each year so I decided to create labels for that purpose using one of my own graphics.


For each I started with a shape, added a background color, added a border, uploaded and re-sized my own graphics and then added my "Happy Holidays" text. It literally took seconds to do this. It was that easy.

I also love using gift labels on all my Christmas presents and am always looking for cute designs. So, I thought I'd design a "To: and From:" gift label of my own, which is shown in the picture. Once again I started with a shape, added a background pattern, uploaded and re-sized my own graphics and then added my "To: and From:" text. I love how it turned out. Of course, my imagination got the better of me as all sorts "To: and From:" label designs started filling my head.

At this point I knew it was time to stop. I was having way too much fun with this. I decided I'd wait until tomorrow to decide how many of my stickers and gift labels I was going to order.


Tuesday, March 01, 2016

Baby Lollipops Decoration Centerpiece Free E-Pattern


"Baby Lollipops Decoration" is a fabulous way to add cheer and sunshine to any baby shower.  It's a wonderful centerpiece decoration for the honoree's table and for all the guest tables.  Plus, it would make a bright and cheery focal point for any food displays.  Just image it surrounded by pink and blue cupcakes.  How adorable would that be?

"Baby Lollipops Decoration" is a pattern to create the cutest" baby shower lollipop basket centerpiece and was created using various fat quarters from my It’s Raining Baby Shower fabric collections.

My "Baby Lollipops Decoration" is a delightful basket centerpiece to make for any baby shower.

It contains a large lollipop centered in a wicker basket which is surrounded with smaller lollipop favor ornaments.  A personalized baby shower tag with the particulars of this event can be added to the smaller lollipop favor ornaments for your guests to take home as a keepsake.


Clusters of pink and blue tulle as well as pink and blue ribbons add delightful color to the lollipop basket centerpiece.

If you would like to add the personalized baby shower tags I have two free "Baby Shower Free E-Printable Favor Tag#1" and "Baby Shower Free E-Printable Favor Tag#2" that can be downloaded and used with my "Baby Shower Personalized Favor Stickers."

I also have a free e-book entitled "How To Make Our Personalized Baby Shower Favor Tags Free E-Book" free tutorial e-book"  that can be downloaded and which shows you how to create my tags.

"Baby Lollipops Decoration" makes an adorable baby shower centerpiece decoration and a wonderful decoration for the mother-to-be.


To view and download my free e-pattern please CLICK HERE.  You'll be brought to Google Drive where you can view my free e-pattern. Then just download my free .pdf e-pattern  by clicking on the down arrow.

Once my e-product is downloaded to your computer you can save it and print it. I hope you enjoy my free e-products.

For more information on all my free e-patterns, e-printables and e-books please CLICK HERE.

Please respect My Terms of Use:  All patterns, e-patterns, printables, e-printables, e-books, graphics, tutorials, how-to's, articles and other e-products © 2004-2023 Linda Walsh Originals-Designs by Linda Walsh. All rights reserved. Commercial selling or reselling by any means prohibited without the written consent of Linda Walsh.

Patterns, e-patterns, printables, e-printables, e-books, graphics, tutorials, how-to's, articles and other e-products are for personal use only. You may not modify, photocopy, download, upload, post, transmit, display, perform, publish, license, reprint, create derivative works from, mass duplicate, re-sell, digitize, and reproduce in any other form (print, digital or electric) or commercially apply, embed, share, Email, or redistribution in any other means. Use of any of the above is prohibited without the written permission of Linda Walsh.

However, you may link to my website(s)/blog(s) and the individual page(s)/blog post(s) (including 1 picture) but do not copy, reprint or duplicate my website(s)/blog(s) or individual page(s)/post(s ) without my permission.

Items made from Linda Walsh Originals E-Patterns are intended for personal use for fun or small scale personal and business profit as long as you credit us with the design. Large scale commercial use (i.e. mass production) of items made from Linda Walsh Originals E-Patterns are by permission only.

Please see my Terms and Conditions for additional information.

Copyright © 2004 - 2023 - All Rights Reserved - Written By Linda Walsh of Linda Walsh Originals and Linda's Blog. Linda is a doll maker and doll pattern designer.

Monday, May 11, 2015

Gotta LOVE Babies and My Baby Shower & Baby Gifts Tutorials, Patterns, Video's and How-To's Pinterest Board


When it comes to melting my heart an adorable smile from a little baby will get me every time.  I can't resist babies - especially smiling babies.


One of my all time favorite doll designs is my "Baby Nicky" doll. He's a baby shower centerpiece doll that I designed based upon my grandson "Nicky" who had the most wonderful, curly head of hair as a baby that you could ever imagine. I just LOVED it and would love to swap hair with him.


If you've been following my Linda's Blog you know that "Baby Nicky" has been involved in a lot of what goes on in "The Dollie Storage Room." That's not hard to understand as he's a fun loving doll and is very popular among the other "dollies."

When I was designing new patterns a couple of years ago I wanted to design some more baby shower centerpieces and favors or ornaments to compliment "Baby Nicky." So, I ended up designing a bunch of centerpieces and favors.

I wanted something for the centerpieces that would capture the guests attention at a baby shower and decided that a baby boy and baby girl doll around 16" tall each would be perfect. Something that could stand alone on a center table or individual tables and be easy to make.


I also wanted the centerpiece to look soft, cuddly, warm and inviting so I decided to create my dolls out of some old flannel pillowcases that my sister had given me. You see, in our family we never throw anything away that could be used in sewing or crafts. So, as you might expect I get a LOT of stuff. In any event, the old flannel pillowcases were perfect for the two baby centerpiece dolls I had in mind.


After the centerpieces were designed I decided that I wanted to design some FUN baby shower favors. Again, the key was they would be easy to make and could end up being ornaments for the guests to bring home. Plus, I wanted a variety of different kinds of favors that could be made.

While thinking about what to make for favors I again thought about my grandson, Nicky,  who was born 31 weeks premature.   He had spent 9 weeks in a special care nursery and I remembered that the nurses would wrap him in a swaddling blanket which allowed them to easily carry him around. They always looked like they were carrying him around like a football.


The nurses taught all the family members how to bathe, feed, and dress Nicky so I learned how to wrap my grandson in a swaddling blanket. So, I thought maybe a baby shower favor with a baby head sticking out of a swaddling blanket would be cute.

Then I decided I wanted to create baby head favors that could stand alone and decided to use wooden spools and terracotta pots as the base.


I have to admit that I just LOVED making the baby heads on pink and blue spools.  I had wanted something that would make everyone smile and when you're looking down on them you can't help but laugh. I was laughing my head off while creating them and when my husband saw the finished heads lined up on the table he started laughing as well.

I thought they would definitely make for a very enjoyable baby shower and could picture a room filled with tables and a baby head favor holding the place setting for each guest. I figured the guests could take them home to function not only as a pincushion but as a nostalgic reminder of a wonderful baby shower.

So, my baby shower line of patterns and e-patterns was born. Ever since then I have wanted to create a line of baby shower decoration products. Coordinated decorations that would fun and easy to make. Cozy and intimate - just like an old fashioned baby shower.

I can remember baby showers that I went to years ago that were held at a neighbors house or a girlfriends house. We would decorate the living room and invite between ten and 20 guests, We'd make all the decorations and all the finger food and would sit around while our "mother-to-be" opened the presents. We'd play a few games and some of the experienced mothers would tell stories of their various pregnancies. There was always a LOT of  teasing going on and you could hear us laughing for hours on end. It was always a delightful time.

I wanted to re-create that atmosphere. To design baby shower decorations that would all compliment each other.  That were fun and easy to make. I also wanted to combine my dolls with graphics of my dolls, as well as create baby shower graphics I could use for printables and fabric. And, for baby products.

So, I designed centerpiece doll patterns, easy to make e-printables using graphics of my baby shower dolls and favors, cut and sew doll and favor ornaments using the baby shower graphics, coordinating fabrics using the baby shower graphics for baby shower decorations as well as for making baby shower presents. Just about everything you could think of for a delightful baby shower except the food.


With all I've done by now you'd have to agree I LOVE babies.   I also LOVE finding all sorts of ideas for creating baby shower decorations as well as gifts for babies and mothers-to-be. As a result, I set up two Pinterest boards for all the wonderful baby ideas I've found.  One is for baby showers and one is for baby gifts.


I just LOVE babies and old fashioned baby showers. If you do, too I hope you find the tutorials, video's, patterns and how-to's helpful.

If you love my Baby Shower Tutorials Video's, Patterns, Printables & How-To's board please follow my board by clicking on the link above.


I also love ideas for baby gifts.  If you do, too I hope you find the tutorials, video's, patterns and how-to's helpful.

If you love my Baby & Baby Gifts Tutorials, Patterns, Video's and How-To's board please follow my board by clicking on the link above.


Saturday, March 05, 2011

It's Graduation Day All Around and We Are Thrilled For "James" and "Anna"


This is the story behind my "James" and "Anna" graduation doll patterns and involves my Dad, my niece, and my twin granddaughters.

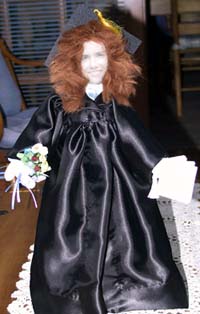
When both my twin granddaughters and my niece were graduating from high school and college, respectively, I wanted to give them something special. For me, that usually involves something crafty that I'd made or, and this may come as a surprise to all of you, a doll. So, I decided on a doll. But, I didn't want just any graduation doll. I thought how about taking their graduation picture and transposing that onto a doll's head using iron on transfer paper. It was a nice idea, but a bad application from the start.

So, I set about to design a stand alone graduation doll that would have each of their respective graduation gown colors. I knew I wanted the doll to be stand alone and wanted the body bottoms to be made out of denim. I decided that I would use popcorn kernels to weight the bodies down. So, I began by scanning in their respective graduation pictures and then setting about to crop the images and adjust the image size until their faces would fit on my graduation doll patterns head. I should have known right from the start that this was going to be a disaster. I just couldn't seem to get the right size face with the right size head. In any event, I finally had something I could work with and transferred the face to my cloth head piece.

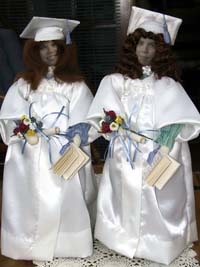
Then I put the three dolls together using my rough draft pattern pieces. The doll's bodies and graduation gowns came out wonderful. Their faces were an entirely different story almost bordering on scary. See for yourself. What do you think? Scary, frightening, yuck?

The first person to receive her doll was my niece. Well, the graduation doll was the talk of the graduation barbecue until my niece arrived and I gave it to her. Everyone thought the doll was creative and unique. My niece loved it but thought it was "CREEPY!"

She wasn't sure whether she should thank me and keep it or thank me and hide it at the back of her closet. I have to admit it was pretty "creepy" and pretty scary looking. I suppose having ones face on a doll is "creepy" and just the looks of the doll was pretty scary. Not that her face is scary or anything. It's just the flat dimensions on what's supposed to be a three dimensional face just didn't work. Flat faces look great on pillows. On dolls, that's another story.

My twin granddaughters were the next group to receive their graduation dolls. Once, again, everyone thought they were unique, exceptional, and downright scary. My grandsons wouldn't even look at them. They were too scared. My granddaughters just laughed and got a kick out of showing all their friends their "frightening" graduation dolls.

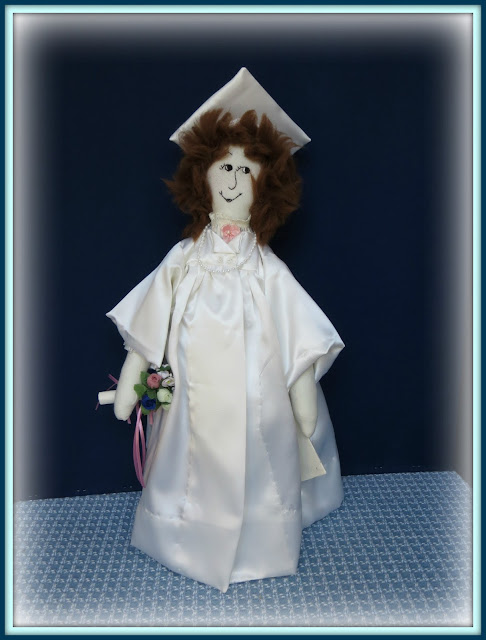
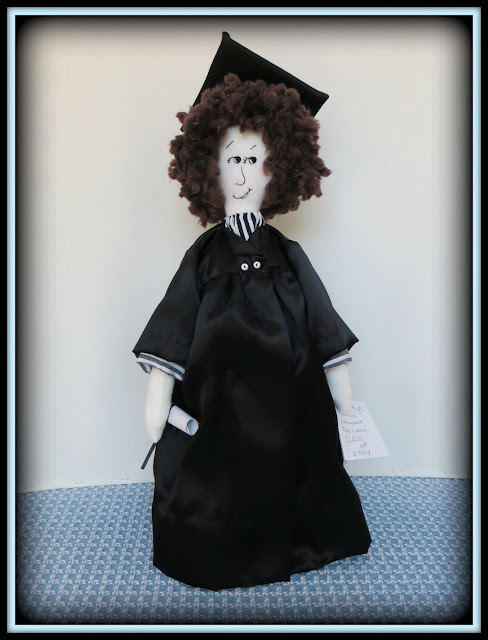
So, I decided I had to make something positive out of this disaster and decided to design the graduation doll with an embroidered face. After all I already had the rough draft pattern. All I needed was a face. Instead of doing just one doll pattern I decided to do two: a male graduation doll pattern and a female graduation doll pattern. I could easily alter the clothes underneath the gown to suit either a male or female.


Anna is so happy to be finally graduating. It seems like it's been a long time coming and she's looking forward to her summer vacation. Of course, it won't be a vacation for her as she has to prepare for moving into college all the way across the country from where she lives. She wanted the best school in her field and it was far away. While Anna and her parents weren't really happy that she'd be this far from home they want her to have the best education possible - so they agreed. So, Anna has a lot to do before she goes on to college.

Anna has been waiting a long time for her Graduation Day and is a free-standing cloth doll with a square bottom denim base. She has a long tunic shirt with fringed 3/4 gathered sleeves and square-bottomed denim pants. Her face is embroidered and she has round black button eyes. She is wearing a white satin graduation gown with 3/4 sleeves and is holding a bouquet of silk ribbon flowers with streamers and diploma in her right hand and her commencement exercise booklet in her left hand. She has long flowing red hair framing her face and has a white graduation cap on her head. A string of pearls and ribbon bow decorate her outfit.


James has been preparing for his Graduation Day for quite some time. He decided that he wanted to take the summer off after his graduation and travel around the country. He wants to have some fun before he has to settle down into a real job in the real world. He's not sure his parents will approve the summer off. He certainly is going to give them all the reasons why this is a good thing, maybe, even throw in an "impish" smile of two. That will sway them to his way of thinking. He can be a charmer when he wants to.

James has been impishly awaiting his Graduation Day and is a free-standing cloth doll with a square bottom denim base. He sports a long cotton shirt with rolled sleeves and square-bottomed denim pants. His face is embroidered and he has round black button eyes. He is wearing a black satin graduation gown with 3/4 sleeves and is holding his diploma in his right hand and his commencement exercise booklet in his left hand. He has wild curly brown hair framing his face and has a black graduation cap on his head.

Well, this story had several phases. It was a nice idea whose application was downright frightening and was rescued by creative embroidering. Hopefully, you'll agree.

If you'd like to try your hand at transferring the face of a graduate you know please do so. Maybe you'll have better luck then I did.

If not, the embroidered faces in my "Anna" and "James" graduation doll patterns are just adorable and make great centerpiece decorations for any graduation party. At least, they won't cause nightmares.

Copyright © 2004 - 2023 - All Rights Reserved - Designed and Written By Linda Walsh