Showing posts with label flowers. Show all posts

Wednesday, May 24, 2023

Another Remake For My Large Silk Floral Dining Room Fire Place Decoration


Back in March of 2014 I decided to create a tutorial of how I made my large silk floral basket for my dining room, as shown in the picture below.  My post is here.


Well, since then I really haven't been happy with it.  I didn't like the size, the large pink daises, the light blue daises and the white daises.  So, I decided to recreate it with some new beautiful white dahlia silk floral I had bought.  It basically was made exactly the same as my original but, with different flowers.

The result of my recreation is shown in the picture at the top of this post and below.  


I was really pleased with the new floral arrangement and the way it turned out and hope you like it too. 

Copyright © 2004 - 2023 - All Rights Reserved - Designed and Written By Linda Walsh

Monday, January 20, 2020

Babies Splashing In the Rain Penny Rug Baby Picture Decoration Free E-Pattern


Sometimes you just totally enjoy what you're designing. Such was the case with my new "It's Raining Baby Showers" penny rug wool felt baby pictures.

I had been wanting to create wool felt penny rug type pictures for my "It's Raining Baby Showers" baby shower decorations line and thought that pictures with baby heads peeking out of baby carriages surrounded by flowers and showering umbrellas would be cute.

I thought they'd make cheery and adorable pictures to decorate a baby girls or baby boys nursery or to decorate a baby girls or baby boys baby shower? It's raining babies, rattles, umbrella's, and rain drops.


Babies Splashing In The Rain is a pattern to create an 8/12" by 11" penny rug blue wool felt picture mounted on a yellow 11" by 14" foam backboard and framed within a 16" by 18" white washed white table top frame. A baby boy head peeking out from a blue baby carriage under a showering pink umbrella and baby girl head peeking out from a pink baby carriage under a showering blue umbrella are surrounded by large pink, purple, and yellow flowers. Rain drops are scattered throughout the picture.

The wool felt picture is made from two blue pieces of wool felt (8 1/2" by 11") which are blanket stitched around all the edges. The umbrellas are embellished with lace bows and embroidered with accent lines. The baby heads have embroidered and blushed cheek faces and yarn for hair. The baby carriages are embroidered with accent lines. The flowers have French knotted centered and embroidered accent lines on the petals and leaves.

The pattern can be made as just a penny rug wool felt blanket stitched picture or enclosed within a wall picture frame or tabletop picture frame.

The pattern includes text instructions, step-by-step color diagrams for finishing the penny rug picture from start to finish, full page colored diagram sheet, and full page single sided pattern piece sheets.


To view and download my free e-pattern please CLICK HERE.  You'll be brought to Google Drive where you can view my free e-pattern. It's a big file filled with lots of graphic illustrations so please be patient while it loads on Google Drive.  Then just download my free .pdf e-pattern.

Once my e-product is downloaded to your computer you can save it and print it. I hope you enjoy my free e-products.

For more information on all my free e-patterns, e-printables and e-books please CLICK HERE.
Please respect My Terms of Use:  All patterns, e-patterns, printables, e-printables, e-books, graphics, tutorials, how-to's, articles and other e-products © 2004-2023 Linda Walsh Originals-Designs by Linda Walsh. All rights reserved. Commercial selling or reselling by any means prohibited without the written consent of Linda Walsh.

Patterns, e-patterns, printables, e-printables, e-books, graphics, tutorials, how-to's, articles and other e-products are for personal use only. You may not modify, photocopy, download, upload, post, transmit, display, perform, publish, license, reprint, create derivative works from, mass duplicate, re-sell, digitize, and reproduce in any other form (print, digital or electric) or commercially apply, embed, share, Email, or redistribution in any other means. Use of any of the above is prohibited without the written permission of Linda Walsh.

However, you may link to my website(s)/blog(s) and the individual page(s)/blog post(s) (including 1 picture) but do not copy, reprint or duplicate my website(s)/blog(s) or individual page(s)/post(s ) without my permission.

Items made from Linda Walsh Originals E-Patterns are intended for personal use for fun or small scale personal and business profit as long as you credit us with the design. Large scale commercial use (i.e. mass production) of items made from Linda Walsh Originals E-Patterns are by permission only.

Please see my Terms and Conditions for additional information.

Copyright © 2004 - 2023 - All Rights Reserved - Written By Linda Walsh of Linda Walsh Originals and Linda's Blog. Linda is a doll maker and doll pattern designer.

Saturday, January 11, 2020

Alpacas Love Their Daisies Wool Felt Picture Free E-Pattern


As mentioned previously, I fell in love with mini quilts years ago. Mainly because they were tiny little mini quilts you could easily make and you could hang them just about anywhere for a cute little decoration.  The mini quilts could be made out of any type of fabric, wool felt, and even needle felted out of roving.

Given I was in an "Alpacas Rock" creating mode I decided to design 6 wool felt mini quilts and 1 mug rug showing alpacas for the various decorating seasons and create e-patterns for them as well.  Last week I decided to make all 7 of these e-patterns free for you so you could create cute little alpaca mini quilts and mug rugs of your own.


"Alpacas Love Their Daisies" is a free e-pattern to create a 4" by 7" alpaca stitchery in a 5 1/2" by 7 1/2" purchased picture frame.

Your alpaca stitchery picture utilizes two 4” by 7” pieces of felt. One to sew all the wool felt pieces of the picture to and the other as back lining. The two felt alpaca pieces are embroidered as a stitchery and then embroidered to the felt background. The clouds are embroidered to the felt background. The fence rails and fence posts are embroidered to the alpacas and the felt background. Two lazy daisy flowers and leaves of grass are also embroidered to the felt background. Rub-on stencils are added to the picture background to complete the picture.

The pattern includes text instructions, step-by-step color diagrams for finishing the alpaca stitchery picture from start to finish, full page picture layout sheet, alpacas embroidery design instructions sheet and full page single sided pattern piece sheets. The pattern also includes step-by-step illustrations and instructions for blanket stitching and step-by-step illustrations and instructions for creating the lazy daisy flowers.


To view and download my free e-pattern please CLICK HERE.  You'll be brought to Google Drive where you can view my free e-pattern. Then just download my free .pdf e-pattern  by clicking on the down arrow in the top center.

Once my e-product is downloaded to your computer you can save it and print it. I hope you enjoy my free e-products.

For more information on all my free e-patterns, e-printables and e-books please CLICK HERE.

Please respect My Terms of Use:  All patterns, e-patterns, printables, e-printables, e-books, graphics, tutorials, how-to's, articles and other e-products © 2004-2023 Linda Walsh Originals-Designs by Linda Walsh. All rights reserved. Commercial selling or reselling by any means prohibited without the written consent of Linda Walsh.

Patterns, e-patterns, printables, e-printables, e-books, graphics, tutorials, how-to's, articles and other e-products are for personal use only. You may not modify, photocopy, download, upload, post, transmit, display, perform, publish, license, reprint, create derivative works from, mass duplicate, re-sell, digitize, and reproduce in any other form (print, digital or electric) or commercially apply, embed, share, Email, or redistribution in any other means. Use of any of the above is prohibited without the written permission of Linda Walsh.

However, you may link to my website(s)/blog(s) and the individual page(s)/blog post(s) (including 1 picture) but do not copy, reprint or duplicate my website(s)/blog(s) or individual page(s)/post(s ) without my permission.

Items made from Linda Walsh Originals E-Patterns are intended for personal use for fun or small scale personal and business profit as long as you credit us with the design. Large scale commercial use (i.e. mass production) of items made from Linda Walsh Originals E-Patterns are by permission only.

Please see my Terms and Conditions for additional information.

Copyright © 2004 - 2023 - All Rights Reserved - Written By Linda Walsh of Linda Walsh Originals and Linda's Blog. Linda is a doll maker and doll pattern designer.

Thursday, January 02, 2020

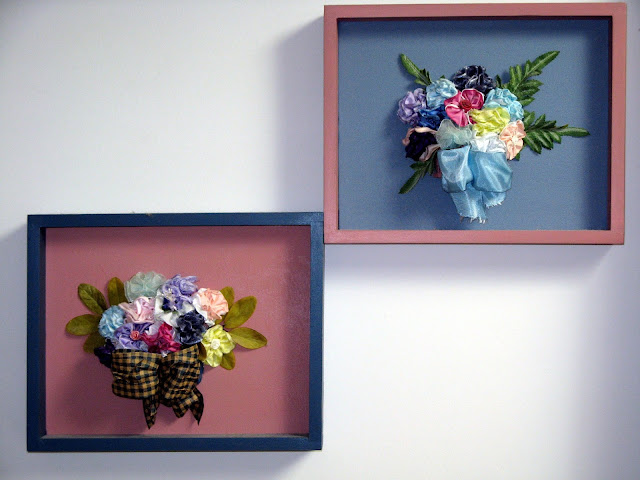
How I Made My Wired Ribbon Flower Shadowboxes


Back in 1999 I wanted to make something a little different than a doll. I had been intrigued with ribbon floral crafts since I had seen some of the absolutely stunning creations of some of my creative embroidery friends. I wanted to try making flowers out of ribbons, too. Not to be added to cloth, but used in some sort of floral arrangement.

While shopping at a local craft store with my mother I had come across a booth selling dried floral shadowbox pictures that contained a half basket and dried floral. The concept and colors were perfect for my half bath so I bought two.

Well, in thinking about creating something utilizing the ribbon floral crafts I thought maybe a half basket filled with wired ribbon floral crafts glued to a painted art board canvas panel and surrounded by a painted wooden shadowbox would fit the bill.

Of course, this also meant that hubby needed to make shadowbox frames for me to attach to the 8" x 10" painted art board canvas.

So, we talked about what I wanted to make and he suggested that we make shadowbox frames that would be routed to hold the art board canvas panel within the shadowbox and nail the wood frames to the sides of the art board canvas panels. I agreed so we started.

As with everything I do we had quite a few wired ribbon floral shadowboxes to make.  I figured I could give some away as gifts for the holidays.


We used 1/2" x 2" pine boards to create the shadowbox frames and cut two pieces of wood 9" long and two pieces of wood 11" long to fit around the 8" by 10" art board.  We wanted to create mitered corners with each of the four corners at a 45° angle.

We also wanted to prevent the art board from falling through the wood shadowbox frame and thought a routed edge on the inside edge would provide enough support to hold the art board within the frame.  For this to happen we used a router to create routed edges on the pine boards of about 1/4" for the art board canvas panels to rest against on the inner side.

When we were done cutting the wood and assembling the frames we sanded them.


I decided what colors I wanted to use for the frames and what colors I wanted to use for the art board canvas panels.  Once I knew what colors I wanted to use for each picture I then selected the wired ribbon that I wanted to use for each flower.

I also selected wider wired ribbons and wired paper to be used for a bow on top of the wicker baskets in each picture.  To all this I wanted to add some silk floral leaves that would serve as a back drop for the floral baskets.

As I wanted the frames to be different colors than the canvas panels I painted the frames and canvas panels separately with acrylic paints and then when they were dry brushed each with a matte varnish finish to seal them. 

Then we nailed the frames to the sides of the art board canvas panels.

When we were done with this we added picture hangers to the top center back of the wood frames and two rubber corner protectors to the bottom corners on the back of the frames.


I cut the miniature wicker baskets I had chosen for each picture in half and spray painted them on the outside. I added a small amount of Spanish Moss to the inside of each and then glued a small block of floral foam to the inside of the baskets.  Then I glued my half baskets to their respective art board canvas panels in the center and about 1/4 of the way up the art board.  After I was happy with the gluing and positioning of the baskets I added the silk leaves I wanted to use for each picture and glued them into place.


I then proceeded to create the wire  ribbon flowers. I had several printouts from various magazines to help me with this and ended up making 2 different styles of wired ribbon flowers in multiple colors and wired ribbon widths.  I wanted the different wired ribbon widths to give my arrangements depth.  Some of the flowers be gathered wired ribbon flowers and some would be wired petal ribbon flowers.  Instructions for making both are shown below.

For some of the flowers I added a tiny miniature ribbon floral to the center  in order to finish the center seed section. When the flowers were done I inserted their wires into the floral foam of the basket.  I had to cut several of the wires to shorten them based on their positioning within the green floral foam block.


When I was happy with the arrangement of all the ribbon flowers I tied the larger wired ribbons and wired paper into bows and then glued them to the front of their respective baskets.


Both hubby and I were pleased with the way our ribbon floral shadowboxes had come out. They were a little different, but would make great gifts that holiday season.


Instructions for making the gathered wired ribbon flowers and petal wired ribbon flowers are shown below:

Creating Wire Ribbon Floral Stems Guide -  Gathered & Petal Flowers  


Supplies Needed

1” to 1 1/2” Wide Wired Ribbon Rolls In Various Colors
3/8” Silk Ribbon Floral Roses (Colors To Match Wired Ribbon Rolls)
Upholstery Thread
Sewing Needle
24 - 26 Gauge Wire
Wire Cutters

Gathered Wired Ribbon Flower


1)  Cut the 1” to 1 1/2” wired ribbon 10” long.

2)  Fold the wired ribbon in half.


3)  Using the diagram above as a guide knot the upholstery thread and sew a stitch at  Point A. Sew a gathering stitch in a counter clockwise direction with the upholstery thread down the left hand side, across the bottom edge, and up the right hand side to Point B.  Gather tightly and secure with back-stitches.  Overlap the left hand side to the right hand side at Point A and B and secure with a few stitches.


4)  Cut a piece of the 24 - 26 gauge wire 8” long.  Fold the wire in half and insert each end into the center of the wired ribbon floral.  Pull tightly and twist the wires tightly to secure.  Wrap the two wires around each other to create a stem.

5)  Fluff the wire ribbon until the flower is pleasing to the eye.


Petal Wired Ribbon Flower

1)  Cut the 1” to 1 1/2” wired ribbon 10” long.

2)  Fold the wired ribbon almost in half.


3)  Using the above diagram as a guide knot the upholstery thread and sew a stitch at  Point A. Sew a gathering stitch in a counter clockwise direction with the upholstery thread down the left hand side, across the bottom edge, and up the right hand side to Point B.  Continue in this manner until you reach Point E.  Gather tightly into four double petals and secure with back-stitches.

4)  Join the ends at Point A and Point E creating a small center circle.


5)  Insert the 3/8” silk ribbon floral rose into the center of the flower.


Copyright © 2019 - 2020 - All Rights Reserved - Written By Linda Walsh

Please respect My Terms of Use:  All patterns, e-patterns, printables, e-printables, e-books, graphics, tutorials, how-to's, articles and other e-products © 2004-2023 Linda Walsh Originals-Designs by Linda Walsh. All rights reserved. Commercial selling or reselling by any means prohibited without the written consent of Linda Walsh.

Patterns, e-patterns, printables, e-printables, e-books, graphics, tutorials, how-to's, articles and other e-products are for personal use only. You may not modify, photocopy, download, upload, post, transmit, display, perform, publish, license, reprint, create derivative works from, mass duplicate, re-sell, digitize, and reproduce in any other form (print, digital or electric) or commercially apply, embed, share, Email, or redistribution in any other means. Use of any of the above is prohibited without the written permission of Linda Walsh.

However, you may link to my website(s)/blog(s) and the individual page(s)/blog post(s) (including 1 picture) but do not copy, reprint or duplicate my website(s)/blog(s) or individual page(s)/post(s ) without my permission.

Items made from Linda Walsh Originals E-Patterns are intended for personal use for fun or small scale personal and business profit as long as you credit us with the design. Large scale commercial use (i.e. mass production) of items made from Linda Walsh Originals E-Patterns are by permission only.

Please see my Terms and Conditions for additional information.

Copyright © 2004 - 2023 - All Rights Reserved - Written By Linda Walsh of Linda Walsh Originals and Linda's Blog. Linda is a doll maker and doll pattern designer.

Wednesday, November 20, 2019

Paper Flowers For Winter Seasonal Mixed Media Paper Flowers and Collage Embellished Vases


One of the bottles I embellished was an unusual bottle to say the least.  It was an odd shaped clear glass bottle that reminded me of Aladdin's lamp.  I don't know why but it's shape intrigued me.

For this vase first I added old book page collage papers to it first.  Then I painted it with black acrylic paint and added a sponge paint combination of metallic royal blue paint, metallic silver paint, metallic dark blue paint, and white acrylic paint.

Since it was so different I also decided to add an embellished texture in several areas with paper-clay smeared shapes that I could stamp and then paint.

In looking at my unusual vase I decided to add five two-layer passion daisies to it as they, too, were a little unusual in nature so they would fit the unusual vase.

I decided to compliment the colors of the vase and created five royal blue and dark blue metallic painted blossoms with a tinge of light acrylic blue.   After painting my paper blossoms I inserted them into the paper clay centers I had fashioned to hold them and set them aside to dry.  After the paper-clay centers were dry I painted them with a bronze silver paint.  Once the metallic paints were dry I added a clear glossy glazing medium.

Because the vase was bigger than my miniature bottles and because the flowers were larger and heavier I decided to add smaller cubes of the green floral foam to the inside of the vase until it filled it up to within 1" of the top of the vase.  This helped to stabilize the larger floral stems.

When everything was dry I added the paper stems to my unusual bottle vase and bent them into positions that I thought would compliment my unusual vase.  I love how the vase turned out and hope you do too.  Unusual but beautiful in it's uniqueness.

Tuesday, November 19, 2019

Paper Flowers For My Mixed Media Collage or Embellished Vases


There's nothing quite like having a delightful time "playing" with crafts and being lost in your creations.  Such is the way I've been for several months now and I couldn't be happier.  Lost in my crafting bliss.

I have been experimenting with collage and painting of glass vases or bottles I have accumulated over the years or from my crafts supplies stash and creating paper flowers for them.

One of the vases I embellished was a round glass vase that stood 6" tall.  The vase above was originally solid blue in color and I wanted it to be a combination of blue, teal, black and white sponge-painted colors.  I added a paper collage to the vase first and then added the sponge painting to it.

In looking at the paper flowers that I should make for this vase I decided to go with a combination of daisy like flowers and poppies. I created three double-layer white daisies and five blue poppies.

I decided to compliment the colors different colors of metallic paints on the vase and painted the poppy blossoms with a combination of royal blue, dark blue, and silver metallic paints and painted their paper-clay centers with a silver metallic paint.  For the double daisy blossoms I painted them a combination of white and silver metallic paint with purple glitter paint and painted the paper-clay centers with a Christmas green metallic paint.  Once the metallic paints were dry I added a clear glossy glazing medium.

Because the vase was bigger than my miniature bottles and because the flowers were larger and heavier I decided to add smaller cubes of the green floral foam to the inside of the vase until it filled it up to within 1" of the top of the vase.  This helped to stabilize the larger floral stems.

Once the flowers were dry I added them to the vase and bent them into the positions I wanted.


One of the vases I embellished was a glass vase that stood 13" tall.  The vase above was originally solid blue in color and I wanted it to be a combination of blue, teal, black and white sponge-painted colors.  Generally I like to collage the vase first and then add the sponge painting but, this time, I decided due to the shape of the vase I would just sponge paint it.

I loved the way it turned out so much with just with the sponge painting that I decided not to embellish it any more.  I was going to add Victorian collage images but felt the beautiful colors should stand on their own.

In looking at the paper flowers that I should make for this vase I decided to go with large daisy type flowers as this vase was so tall it needed tall flowers.  So, I created eight daisy like paper flowers.

I decided to compliment the colors of the teal and royal blue metallic paints on the vase and created three royal blue metallic painted flowers and five teal blue metallic painted flowers. I painted the royal blue blossoms with a combination of royal blue, white, and silver metallic paints and painted the paper-clay centers with a silver metallic paint.  For the teal blue blossoms I painted them a combination of dark teal, light teal, and silver metallic paint and painted the paper-clay centers with a green metallic paint.  Once the metallic paints were dry I added a clear glossy glazing medium.

When everything was dry I added the paper stems to my vase and bent them into positions that were pleasing to my eye.

Because this vase was bigger than my miniature bottles and because the flowers were larger and heavier I decided to add smaller cubes of the green floral foam to the inside of the vase until it filled it up to within 1" of the top of the vase.  This helped to stabilize the larger floral stems.

I created these two vases for the winter season decorations and can hardly wait to put them out.  They're just so pretty and so beautifully blue.  Maybe they'll cheer me up during the snowy winter season when I, too, might be blue....  One can hope......

Monday, November 18, 2019

New Paper Flowers For My Mixed Media Paper Flowers and Collage Embellished Bottles


As you know, I have been having a delightful time experimenting with glass vases and bottles for the past few months.  During the last few weeks I decided to make paper flowers for my embellished vases and started with the two small 4" - 6" mixed media vases I had made with a Victorian theme.

When deciding what paper flowers I should make for this vase I decided that small daisy multi-layer like flowers in complementary colors to match the embellished vase would be pretty and would add to their overall prettiness.

I decided that five small flowers (one center flower with four surrounding flowers) would be suitable for the size of this vase. For their blossoms I thought a combination of royal blue acrylic paint, dark blue metallic paint, light blue metallic paint, and silver glitter paint would be pretty.  I also thought the center stem for this group should be just a little different than the four stems surrounding it.  After the paint had dried I inserted them into the paper clay centers I had fashioned to hold them and set them aside for the paper-clay to dry.

After the paper-clay was dry I painted the paper-clay centers with a metallic silver paint.  Once the metallic paints were dry I added a clear glossy glazing medium.

Once the flowers were dry I added them to the vase and bent them into the positions I wanted.  In looking at the bottle I have to say it's still very Victorian and still very "pretty."


The small lace embellishment from my creative embroidery stash made the second vase in this group  a little different so I decided to make the flowers for this vase just a little different as well.

Once again I decided that five small flowers (one center flower with four surrounding flowers) would be suitable for the size of this vase. However, since this vase was already a little different I thought this arrangement should be a little different as well and decided to make the center stem a different color than the stems surrounding it.

For the four stems surrounding the center one I thought the blossoms here should be a combination of teal blue acrylic paint, dark teal metallic paint, light teal metallic paint, and silver glitter paint. I painted the center stem with a combination of royal blue acrylic paint, dark blue metallic paint, light blue metallic paint, and silver glitter paint.  After my paper blossoms were dry I inserted them into the paper clay centers I had fashioned to hold them and set them aside for the paper-clay to dry.

After the paper-clay was dry I painted the paper clay centers of the four teal blue flowers with a metallic silver paint.  I painted the paper clay center of the royal blue flower with a gold metallic paint.  Once the metallic paints were dry I added a clear glossy glazing medium.

Once all the flowers were dry I added them to the vase and bent them into the positions I wanted. I was happy with the way this bottle came out as well.  It, too, is certainly "pretty."

I hope you like how my mixed medial paper flowers and collage embellished bottle turned out.

Sunday, November 17, 2019

Flowers For My Mother's Bud Vase


During the past two months I've been working on creating paper flowers for the mixed media vases I had embellished this past summer.


One of the clear glass vases I decided to alter this past summer was a clear glass single bud vase that had sentimental value to it for me.  You see, over 40 years ago my mother gave it to me as a present.

The purpose of this vase was to hold one flower stem - usually a rose.  I have held on to this vase for many decades and decided this summer it would make a lovely mixed media blue bud vase.


I had originally decided I wanted to create an embellished paper rose for my vase. I wanted the paper rose to compliment the blue/purple color theme and glitter paint. However, in looking at the vase and where I wanted to put it I thought it would be easier to embellish a silk floral rose stem with the blue/purple glitter paint and add it to my vase.

Plus, I wasn't quite sure how to create a paper rose so I decided to put this off until I had more time. The holiday season is coming up so fast and I have so much to do I really didn't have time to experiment with this right now. I figured I can always learn how to do this later.


So, I bought two floral rose stems.  One was a silk floral stem with three white roses and one was a silk floral stem with three white and pink tinged roses.

I decided that the silk floral stem with three white and pink tinged roses would be a good fit with one of the roses cut off.  I had originally thought one rose would be good but after testing this stem I decided two roses would be good.

I wanted the color of the roses to compliment my vase so I decided to embellish the buds with the blue/purple glitter paint.

The pictures above don't really do the vase and embellished roses justice.  It is just so pretty.  I know my mother would be pleased.  I know I am.  At least until I learn how to make my paper rose.... lol

Thursday, November 14, 2019

My Red and White Poinsettia Flowers For My Victorian Mixed Media Christmas Bottles


After finishing my large red poinsettia arrangement I turned my attention to some of the Christmas mixed media bottles I had made that could function as vases with embellished paper flowers.


Initially,  I had decided that my Victorian mixed media Christmas vases would stay as bottles as I loved them just the way they were but decided that some red, white and green poinsettia stems in them would be very pretty.  So I decided to create paper flowers for all four of the vases.


I decided that four, five or six small poinsettia stems painted in a bright Christmas red, white and green would be pretty so I made the paper blossoms and painted the red ones with a combination of acrylic red, metallic red paint, and clear glitter paint. I painted the white blossoms with a combination of white acrylic paint, white metallic paint, and clear glitter paint.


I painted the green blossoms with a festive green metallic paint and then sponge painted a combination of white pearl metallic paint and glorious gold metallic paint on them.

As the gold puffy paint worked well for my large red poinsettia arrangement I decided to use that here as well.   So, I inserted my paper blossoms into the paper clay centers I had fashioned to hold them and set them aside to dry.

When the paper clay was dry I painted the red flower paper clay centers with a metallic Christmas green and then added the gold puffy paint. I painted the white and green flower paper clay centers with the festive green metallic paint and then added the gold puffy paint. Once again, the puffy paint worked really well so I was pleased with all of them.


Once everything was dry I added my two small white poinsettia stems, two small red poinsettia stems, and two miniature white poinsettia stems to the white "Joy" mixed media vase and bent them into the shape that I wanted.


For the red "Peace On Earth" vase I decided to use three small red poinsettia stems and three miniature poinsettia stems. 

Once everything was dry I added my small red poinsettia stems and miniature red poinsettia stems to the red "Peace On Earth" mixed media vase and bent them into the shape that I wanted.


Once everything was dry I added my two small green poinsettia stems and two small red poinsettia stems to the green "Merry Christmas" mixed media vase and bent them into the shape that I wanted.


Once everything was dry I added my red poinsettia stems and white poinsettia stems to the gold "Merry Christmas" mixed media vase and bent them into the shape that I wanted.

I can hardly wait for the Christmas season to begin so I can put all four of my Victorian mixed media Christmas bottles out.   It's a little too early to put my Christmas decorations out now but I promise I will take pictures when I do and post them for you all to see.

The Christmas season will soon be upon us..... yippee!

Copyright © 2004 - 2023 - All Rights Reserved - Designed By Linda Walsh

Monday, November 11, 2019

Finally Finished The Paper Flowers For My Mixed Media Fall Embellished Vases


Pretty soon we'll be decorating for the Christmas holiday season so it's only fitting that I should finally create paper flowers for the two fall seasonal mixed media embellished vases I made several months ago.


I had previously made two paper flower stems but needed to make more for the two vases.


For one of the vases I wanted to create paper flowers that were similar to black-eyed Susan's.  I really wanted to create sunflowers, as I just love them, but thought they would be too big for my little vases.  So, I created three black-eyed Susan type stems.

After creating them I realized they were just a little too big for the vase.  Given I hate to waste anything I've made I decided to just let them be a little too big for the vase anyway.  They still look nice on my mantle.  Maybe over time I'll decide to change them, but for now they're fine.


For the second vase I needed to add two small stems that would compliment the two floral daisy sponge painted paper stems I had already made. I wanted these two to be much smaller and be prickly type desert or cactus type flowers so I created two that looked like pods.


The pods don't quite look like any type of flower that you could name, but are pretty none the less.  Plus, they match the sponge painting on my original daisy stems.

They, too, look great on my family room mantle so I'm happy with the way they both look.