Showing posts with label Halloween. Show all posts

Sunday, July 24, 2022

Scary and Fun Crafts To Make For The Scary Halloween Season


One of my most favorite holidays is Halloween.  There are just so many different creatures you can make for scary, frightening and delicious you can make for your home decorating purposes. 

If you love to decorate for Halloween like I do and love Halloween creatures I think you'll like the gathering of Halloween crafts shown in the picture above.  Most are free e-patterns.  Some are free e-books or how-to articles on making that particular scarecrow.  

If you're eager to get started on your Halloween decorating just click on the pictures or links below for the decoration(s) you're interested in creating.  

Have fun with your "spooky" decorating!

For more information on all my free e-patterns, e-printables and e-books please CLICK HERE.

Please respect My Terms of Use:  All patterns, e-patterns, printables, e-printables, e-books, graphics, tutorials, how-to's, articles and other e-products © 2004-2023 Linda Walsh Originals-Designs by Linda Walsh. All rights reserved. Commercial selling or reselling by any means prohibited without the written consent of Linda Walsh.

Patterns, e-patterns, printables, e-printables, e-books, graphics, tutorials, how-to's, articles and other e-products are for personal use only. You may not modify, photocopy, download, upload, post, transmit, display, perform, publish, license, reprint, create derivative works from, mass duplicate, re-sell, digitize, and reproduce in any other form (print, digital or electric) or commercially apply, embed, share, Email, or redistribution in any other means. Use of any of the above is prohibited without the written permission of Linda Walsh.

However, you may link to my website(s)/blog(s) and the individual page(s)/blog post(s) (including 1 picture) but do not copy, reprint or duplicate my website(s)/blog(s) or individual page(s)/post(s ) without my permission.

Items made from Linda Walsh Originals E-Patterns and E-Books are intended for personal use for fun or small scale personal and business profit as long as you credit us with the design. Large scale commercial use (i.e. mass production) of items made from Linda Walsh Originals E-Patterns are by permission only.

Please see my Terms and Conditions for additional information.

Copyright © 2004 - 2023 - All Rights Reserved - Written By Linda Walsh of Linda Walsh Originals and Linda's Blog. Linda is a doll maker and doll pattern designer.


Boo! Hoo! Billy Primitive Ghost Ornament Free E-Pattern For "Nice" Halloween Decorating


We all know that ghosts are supposed to be scary! That's their job - to scare everyone at Halloween, especially the little children. 

Well, what if there's a ghost that doesn't want to scare anyone - especially little children. 

A ghost that just wants to be friends with everyone and a ghost that doesn't just want to be visible at one time of the year. 

A ghost that wants to celebrate Christmas, and New Year's Day, and St. Patrick's Day, and Easter, and the 4Th of July, and any of the other holidays. 

A ghost that wants to have a family someday of 12 little ghosts running around. 

A ghost that is nice and kind and thoughtful and considerate. 

Well, that would be "Boo! Hoo! Billy." 

"Boo! Hoo! Billy" is tired of being viewed as mean and nasty and malicious. 

He's never been nor does he ever want to be anything like that. 

He just wants to be a normal person with a normal life. 

Is that too much to ask? 

"Boo! Hoo! Billy" doesn't think so. 


"Boo! Hoo! Billy" is a 7" primitive ghost ornament with a coffee stained white muslin cloth body and embroidered face. He is wearing a shredded shirt that he thinks fits him very well and isn't frightful at all. In fact, he will right proudly tell you that he made it himself. 

Not only is he a very friendly ghost, but a very handy one, too. 

He'll need to be after all if he wants to have 12 little ghosts someday. 

Wouldn't you agree?


To view and download my free e-pattern please CLICK HERE. You'll be brought to Google Drive where you can view my free e-pattern. Then just download my free .pdf e-pattern. 

For more information on all my free e-patterns, e-printables and e-books please CLICK HERE.

Please respect My Terms of Use:  All patterns, e-patterns, printables, e-printables, e-books, graphics, tutorials, how-to's, articles and other e-products © 2004-2023 Linda Walsh Originals-Designs by Linda Walsh. All rights reserved. Commercial selling or reselling by any means prohibited without the written consent of Linda Walsh.

Patterns, e-patterns, printables, e-printables, e-books, graphics, tutorials, how-to's, articles and other e-products are for personal use only. You may not modify, photocopy, download, upload, post, transmit, display, perform, publish, license, reprint, create derivative works from, mass duplicate, re-sell, digitize, and reproduce in any other form (print, digital or electric) or commercially apply, embed, share, Email, or redistribution in any other means. Use of any of the above is prohibited without the written permission of Linda Walsh.

However, you may link to my website(s)/blog(s) and the individual page(s)/blog post(s) (including 1 picture) but do not copy, reprint or duplicate my website(s)/blog(s) or individual page(s)/post(s ) without my permission.

Items made from Linda Walsh Originals E-Patterns and E-Books are intended for personal use for fun or small scale personal and business profit as long as you credit us with the design. Large scale commercial use (i.e. mass production) of items made from Linda Walsh Originals E-Patterns are by permission only.

Please see my Terms and Conditions for additional information.

Copyright © 2004 - 2023 - All Rights Reserved - Written By Linda Walsh of Linda Walsh Originals and Linda's Blog. Linda is a doll maker and doll pattern designer.

Saturday, July 23, 2022

Care For Some Brew, Virginia Primitive Halloween Witch Free E-Pattern - She's Frightening!


If you're looking for a frightening witch decoration to make for this Halloween season they don't get more frightening than my "care For Some Brew, Virginia" primitive witch ornament.

I'll get you my pretty! 

Yes, I will!" 

YIKES! 

Not only is she a nasty sounding witch, but a really scary one to boot! Maybe that's why she's an extreme primitive. The scarier - the better. 

Well, they don't get much nastier or scarier than "Can For Some Brew, Virginia!" 

I don't know about you, but I don't think I'd accept anything from "Care For Some Brew, Virginia!" Would you? 

If you did I'm not too sure what would happen to you. 

Would you get sick? Maybe! 

Would you melt? Maybe if you're lucky 

Would you be so delusional you'd start to think "Care For Some Brew, Virgina! wasn't scary? 

Maybe, but you'd have to be out of your mind for that?


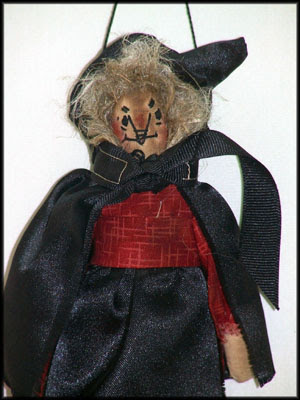
"Care For Some Brew, Virginia!" is a 9" extreme primitive witch ornament and has a coffee stained cloth body with an embroidered watercolor penciled face. 

She is wearing fringed bloomers, a fringed dress, fringed and banded apron, has raffia wrapped ties around her legs and feet. She also has a fringed cap and, of course, a witch's hat. 

Her ugly ragged gray yarn hair just compliments her extreme primitive appearance. Wouldn't you agree? 

Care for some brew?  Or should I say, "Dare for some brew?"


To view and download my free e-pattern please CLICK HERE. You'll be brought to Google Drive where you can view my free e-pattern. Then just download my free .pdf e-pattern. 

For more information on all my free e-patterns, e-printables and e-books please CLICK HERE.

Please respect My Terms of Use:  All patterns, e-patterns, printables, e-printables, e-books, graphics, tutorials, how-to's, articles and other e-products © 2004-2023 Linda Walsh Originals-Designs by Linda Walsh. All rights reserved. Commercial selling or reselling by any means prohibited without the written consent of Linda Walsh.

Patterns, e-patterns, printables, e-printables, e-books, graphics, tutorials, how-to's, articles and other e-products are for personal use only. You may not modify, photocopy, download, upload, post, transmit, display, perform, publish, license, reprint, create derivative works from, mass duplicate, re-sell, digitize, and reproduce in any other form (print, digital or electric) or commercially apply, embed, share, Email, or redistribution in any other means. Use of any of the above is prohibited without the written permission of Linda Walsh.

However, you may link to my website(s)/blog(s) and the individual page(s)/blog post(s) (including 1 picture) but do not copy, reprint or duplicate my website(s)/blog(s) or individual page(s)/post(s ) without my permission.

Items made from Linda Walsh Originals E-Patterns and E-Books are intended for personal use for fun or small scale personal and business profit as long as you credit us with the design. Large scale commercial use (i.e. mass production) of items made from Linda Walsh Originals E-Patterns are by permission only.

Please see my Terms and Conditions for additional information.

Copyright © 2004 - 2023 - All Rights Reserved - Written By Linda Walsh of Linda Walsh Originals and Linda's Blog. Linda is a doll maker and doll pattern designer.


Sunday, July 17, 2022

A Bit Of a Challenge - Free Primitive Annie Witch E-Pattern


With Halloween coming up in the Fall I thought you might like a little sewing challenge with creating a primitive witch decoration.    

She's a lot of fun to make but,  can be quite frightening when she wants to be.  She is a witch for sure.

Sometimes she gets lonely and tries to be nice. After all, everyone needs a little company from time to time. Even Primitive Witchy Annie. 

The truth is she'd actually like to have some real friends. That way she could always call them when she's lonely and when she can feel a real "Watch Out My Pretty I'm Going To Get You!" mood coming on.


Primitive Witchy Annie has a coffee stained cloth body and embroidered face with black bead eyes.  She's wearing a coffee stained, tattered, and fringed dress, a tattered apron with bow, and gathered bloomers.

She has lace-tied boots, patches on her clothes and wild black hair along the sides and top of her head. Her raggedy leg stripes are sewn on with black floss.

She has a lined cape with patches and wired witches hat. 

Because she has a lined cape she feels she is a little above the rest of the witches. They only have wool or black felt capes. Nothing as nice as Primitive Annie Witch has. Wouldn't you agree?


So, do you want to be her friend? She promises she'll try to prevent her ""Watch Out My Pretty I'm Going To Get You!" mood from coming on.

If you want to be her friend just don't wear any "ruby red slippers" when you come to visit. They bring back too many bad memories for her and might just trigger that "Watch Out My Pretty I'm Going To Get You!" mood coming on.


Please note: My free e-pattern shows you how to make a 15" primitive witch doll.  The chair that is pictured is not included in the directions.

To view and download my free e-pattern please CLICK HERE. You'll be brought to Google Drive where you can view my free e-pattern. Then just download my free .pdf e-pattern. 

For more information on all my free e-patterns, e-printables and e-books please CLICK HERE.

Please respect My Terms of Use:  All patterns, e-patterns, printables, e-printables, e-books, graphics, tutorials, how-to's, articles and other e-products © 2004-2023 Linda Walsh Originals-Designs by Linda Walsh. All rights reserved. Commercial selling or reselling by any means prohibited without the written consent of Linda Walsh.

Patterns, e-patterns, printables, e-printables, e-books, graphics, tutorials, how-to's, articles and other e-products are for personal use only. You may not modify, photocopy, download, upload, post, transmit, display, perform, publish, license, reprint, create derivative works from, mass duplicate, re-sell, digitize, and reproduce in any other form (print, digital or electric) or commercially apply, embed, share, Email, or redistribution in any other means. Use of any of the above is prohibited without the written permission of Linda Walsh.

However, you may link to my website(s)/blog(s) and the individual page(s)/blog post(s) (including 1 picture) but do not copy, reprint or duplicate my website(s)/blog(s) or individual page(s)/post(s ) without my permission.

Items made from Linda Walsh Originals E-Patterns and E-Books are intended for personal use for fun or small scale personal and business profit as long as you credit us with the design. Large scale commercial use (i.e. mass production) of items made from Linda Walsh Originals E-Patterns are by permission only.

Please see my Terms and Conditions for additional information.

Copyright © 2004 - 2023 - All Rights Reserved - Written By Linda Walsh of Linda Walsh Originals and Linda's Blog. Linda is a doll maker and doll pattern designer.


Saturday, July 16, 2022

Free Primitive Andy Frankenstein E-Pattern For Halloween Decorating Fun


With Halloween coming up in the Fall I thought you might like to create an adorable Primitive Andy Frankenstein doll.  Don't worry. He won't scare anyone.

So, don't be frightened. He won't harm you. He's no scary Frankenstein! 

In fact, he's basically harmless. He might be a "Frankenstein" in essence or appearance, but he considers himself just another "primitive."


Primitive Andy Frankenstein has a coffee stained cloth body and embroidered face with black bead eyes. He's wearing a coffee stained and fringed shirt with 3/4 length sleeves and large tattered and fringed pants with patches. 

He's also sporting a wool felt vest with patches. He has a small tattered ribbon tied around his neck, and wild black cut hair along the sides and top of his head. Old buttons are used for his head bolts and raffia is tied on his legs and feet for his raggedy stripes.


"Primitive Andy Frankenstein" just loves the fact that he's coffee stained throughout. Why? Because it provides him with a wonderful tan on his face and a wonderful aroma everywhere he goes. 

In fact, other primitives often ask where he got his "coffee glow" and his "coffee aroma." 

Primitive Andy Frankenstein just boasts "My Linda" gave it to me. She's wonderful. 

Primitive Andy Frankenstein might look like a regular Frankenstein, but he knows better. He knows he's a "not scary" and that makes him special.


Please note: My free e-pattern shows you how to make a 15" primitive Frankenstein doll.  The chair that is pictured is not included in the directions.

To view and download my free e-pattern please CLICK HERE. You'll be brought to Google Drive where you can view my free e-pattern. Then just download my free .pdf e-pattern. 

For more information on all my free e-patterns, e-printables and e-books please CLICK HERE.

Please respect My Terms of Use:  All patterns, e-patterns, printables, e-printables, e-books, graphics, tutorials, how-to's, articles and other e-products © 2004-2023 Linda Walsh Originals-Designs by Linda Walsh. All rights reserved. Commercial selling or reselling by any means prohibited without the written consent of Linda Walsh.

Patterns, e-patterns, printables, e-printables, e-books, graphics, tutorials, how-to's, articles and other e-products are for personal use only. You may not modify, photocopy, download, upload, post, transmit, display, perform, publish, license, reprint, create derivative works from, mass duplicate, re-sell, digitize, and reproduce in any other form (print, digital or electric) or commercially apply, embed, share, Email, or redistribution in any other means. Use of any of the above is prohibited without the written permission of Linda Walsh.

However, you may link to my website(s)/blog(s) and the individual page(s)/blog post(s) (including 1 picture) but do not copy, reprint or duplicate my website(s)/blog(s) or individual page(s)/post(s ) without my permission.

Items made from Linda Walsh Originals E-Patterns and E-Books are intended for personal use for fun or small scale personal and business profit as long as you credit us with the design. Large scale commercial use (i.e. mass production) of items made from Linda Walsh Originals E-Patterns are by permission only.

Please see my Terms and Conditions for additional information.

Copyright © 2004 - 2023 - All Rights Reserved - Written By Linda Walsh of Linda Walsh Originals and Linda's Blog. Linda is a doll maker and doll pattern designer.
Monday, November 01, 2021

How I Made My Quick and Easy Little Spooky Collaged Bottle Decoration


I just love crafts that are quick and easy to make.  Especially little decorations that can be placed just about anywhere.

Several years ago one of the online classes I was taking was for making collaged glass bottles.  I loved that class and have been making different collaged bottles ever since then.

For years I have been wondering how well tissue paper would work for the main layer of the collage instead of using paper.  So, I decided to find out.

In adding craft supplies to my Linda Walsh Originals Zazzle shop last year I decided to add some of my Halloween designs to their tissue papers - including one of my jack-o-lantern designs.  Since purchasing the tissue paper I've wondered ever since how it would work on glass.


So, this year while I was creating several mixed media paper doll creations I decided to find out.  Here's how my experiment turned out and how I made it.


Supplies Needed:

1 small glass bottle with cork.
Jack-O-Lantern Tissue Paper 
Halloween Scrapbook Paper Images 
Halloween Graphic Image Stickers 
1 Tattered Cloth Strip - 12" long by 1" wide
Multiple Mixed Media Fibers - 20" long each
Mod Podge
Stabilo Pencil - Black
Tortillon's or Blending Stump
Brushes
Scissors


1) Take the cork out of the top of the bottle and set it aside. 

2) Take a sheet of tissue paper to use as the main background and cut it so you have enough to cover the whole bottle beneath the top of the rim under the lip and including the bottom. 

3) Brush mod podge on the entire surface of the glass bottle underneath the top of the rim under the lip and along the bottom of the bottle.

4) Press the tissue paper to the glass bottle making sure it adheres all over the sides of the bottle and along the bottom of the bottle.  Make sure it is not too bulky where the folds are.  If it is cut the bulk out until the tissue paper folds lie flat.

5) When satisfied with the tissue paper placement brush Mod Podge on the tissue paper you just glued to the bottle to seal it.

6) Let the bottle dry before adding any of the embellishments.

7) Decide which scrapbook paper and sticker image embellishments you want to use for collaging sections of the bottle on top of the tissue paper.

8) Cut out the scrapbook paper images you want and then add Mod Podge to the back of the scrapbook paper images and then place them on the bottle.

9) Cut around the outer white edges of the stickers so there is no white edging and then place them on the bottle where you want them.  If they will not stick properly to the curvature of the bottle add Mod Podge to the back of the sticker and then apply it to the bottle.

10) When you are satisfied with the placement of your stickers and scrapbook paper images brush Mod Podge on them to seal everything to the bottle.

11) Let the bottle dry completely.

12) Apply stabilo pencil shading along all the edges of your images to shade them.

13) Blend the stabilo pencil shading with a tortillon or blending stump so the edges look finished and are blended.

14) Wrap several of the mixed media fibers individually around the top rim of the bottle under the lip so it is covered and tie each tightly in a knot.  Trim the ends.

15) Tie the tattered fabric around the top of the rim under the lip and then in a bow on top of the mixed media fibers you placed there.

16) Knot the ends of the tattered fabric strip.

17) Place the cork stopper back in the bottle.


Ta da! You're done.

Easy peasy - right!

Copyright © 2004 - 2023 - All Rights Reserved - Written By Linda Walsh of Linda Walsh Originals and Linda's Blog. Linda is a doll maker and doll pattern designer.

My New Mixed Media Paper Doll Witch and Frankenstein


I had so much fun with creating my mixed media paper doll for the ""BUBBLE, BUBBLE, TOIL AND TROUBLE.... LET’S GET BUSY ON THE DOUBLE" swap I decided to make another mixed media paper doll for myself.

Now, if you know me, you have to know that "moderation" in creating is not in my vocabulary. When I'm  creating I usually create several different items or more than I really should.  This time I restrained myself and created just one additional Halloween mixed media paper doll.

I wonder if this is the new me - nah....... lol 

It's just a singular aboration..... lol


However, the paper doll I created entered up being both a witch and a Frankenstein so you could say I created two more mixed media paper dolls....lol

I wanted this design to be a sceptical witch and friendly Frankenstein standing in front of a witch's brewing pot.  Even though the Frankenstein was friendly I decided to have him hold two bloody heads ready to go in the pot.

Given the width of this creation I decided it would be easier to not make this duo with articulated arms and legs. All of the layers would be fixed.  

Given how much I love mixed media, I decided this duo would have several embellishments, paper flowers, several different types of fibers, ribbons, chipboard stickers, paper graphic images and various scrapbook papers.


I already had an idea for my witch and Frankenstein "paper dollie's" faces. 

As you know my biggest weakness when it comes to my dolls are painting and drawing the faces.  I can't seem to keep my hands from shaking when I have to paint tiny little details, like the face of a paper doll would be.  So, I decided to use two graphic image faces I had designed years ago for one of my witch e-patterns and one of my Frankenstein e-patterns.

I already had the graphic design faces in my computer so I would be able to easily re-size them to fit my "paper dollie" heads. 


I also decided to use one of my own ghost digital images, as well as several of the  heads that I created for one of my ghost e-patterns years ago. I figured they would be a cute addition to the witch's brewing pot that for this design.  After all - what's a witch's brewing pot without a few heads....lol 

With all those ideas in mind I set about to design the two bodies and the front and back of their costumes.  

I wasn't as concerned with the back of this duo as I wanted them to hang on the wall in my farmer's porch bathroom for the Halloween holiday season.  Since no one was going to see the back I decided to just finish their backs with the same scrapbook papers I would be using on the front of their outfits.

I'm still thinking about a name for this scary duo but I'm working on it.  For now they are hanging on the wall in the bathroom.

I hope you like the way they turned out.


Copyright © 2004 - 2023 - All Rights Reserved - Designed and Written By Linda Walsh

My Mixed Media Witch For The Bell, Book and Cauldron Halloween Paper Doll Swap


I had so much fun with creating my first mixed media paper doll for the "Life Is A Cabaret" swap organized by Hally Levesque for the Progressive Paper Doll Party Facebook group that I decided to participate in the "Bell, Book and Cauldron Halloween Paper Doll Swap." 

The theme for this paper doll swap was "BUBBLE, BUBBLE, TOIL AND TROUBLE.... LET’S GET BUSY ON THE DOUBLE." For this swap we needed to make one paper doll and add a boo-licious recipe to it.

According to Hally: "It may be a traditional or creepy conjured up recipe, as long as it is part of the paper doll creation. (Example) ... a witch, stirring her brew plus a written recipe... just as long as the recipe is part of the doll or its presentation."

No matter what kind of doll I make they always have an opinion on what they should be and my "paper dollie" decided while being a witch she was going to be a nice witch. 

Here's what she told me: "She loves the Halloween season and having fun, but doesn’t like to scare anyone. She’d much rather have a conversation with them or teach them how to fly around on a broomstick." 

"She doesn’t like to create nasty brews but doesn’t mind creating jello brains. You might think that “jello brains” would be scary but she can assure you they are not. They’re “jello” after all."

"However, she does have a reputation to maintain and does need to be somewhat scary for that to remain intact so her solution is to create a visually scary dish but something that wouldn’t hurt a fly." 

I had no choice but to accede to her wishes.


So, I thought about what I wanted to do and decided to go with an articulated witch paper doll with moveable arms and legs. 


For the recipe I decided to have her hold a recipe book in her right hand.


She had to be mainly paper but could include some embellishments so, given how much I love mixed media, I decided she would have several embellishments, paper flowers, a creative embroidery trim, lace, several different types of fibers, paper graphic images and various scrapbook papers.


I decided to use two of my own ghost digital images, as well as several of the "brain" jello images and a scary eyeball image from one of the Halloween scrapbook paper sheets I had bought. 


I already had an idea for my "paper dollie's" face.  My biggest weakness when it comes to my dolls are painting and drawing the faces.  I can't seem to keep my hands from shaking when I have to paint tiny little details, like the face of a paper doll would be.  So, I decided to use a graphic face I had designed years ago for one of my witch e-patterns and my Spoonflower fabric designs.

I already had the graphic design face in my computer so I would be able to easily re-size it to fit my "paper dollie's" head. 

With all those ideas in mind I set about to design the body, moveable legs, moveable arms, and the front and back of her costume.  

I decided the easiest thing for me to do for the back was add a long cape so the back would be finished but nothing would interfere with her moveable legs and arms.

After finishing my paper dolI stood back to take a look at her and decided for my second "paper dollie" she had turned out okay.  

I had decided to name her "Brainna" and she was pleased with that. Phew..... lol

After taking pictures of her I packaged her up for her recipient.

I hope you like "Brainna."  I like her and, luckily, she likes herself, too.....lol


Copyright © 2004 - 2023 - All Rights Reserved - Designed and Written By Linda Walsh

Friday, October 29, 2021

My Halloween Mixed Media Spooky House


As you know from my previous blog post in September of 2021 I wrote a Linda's Blog post about how I had made the "Putz" chipboard beach house kits I had bought from AgedWithThyme Etsy Shop. Along with posting about the kits I also posted a little about what "Putz" houses were.  You know how I love history.... lol

Well, I so enjoyed making the beach houses so much I decided to make more of the "Putz" house kits I had bought.  There were 10 kits left so I decided to make one a haunted house for Halloween and two houses for the Fall season.  

The remaining 7 would be for the Christmas and Winter holiday season.  Some of the kits were larger homes 3" x 2" by 4" and some were tiny 2" x 2" by 2" houses, which would be perfect as ornaments for the Christmas holiday season.

I selected the haunted house and fall houses I wanted to use and set the other 7 house kits aside.


I decided to start with the two fall houses as it had a larger saltbox colonial kit which looked very similar to our home with a few exceptions.

After finishing my two Fall houses I set my sites on my spooky mixed media collage Halloween house. 

I had also decided to use a pine rectangle board as the base for this house as well as it would make my house a little sturdier and instead of painting the top of the wood base I would use paper scrapboard  to collage the top side and chose an orange colored paper with black spider images alll over it. The remaining sides and bottom would be painted dark brown.

For this house I used a separate chipboard front door alcove and two chipboard dormers.  I opted to paint all the sides and window frames of the house with dark purple acrylic paint but paper collage the roof of the front door alcove and roof of the two dormer windows. I would be painting the main house roof with a dark metallic acrylic paint.

As this was meant to be a spooky Halloween house I decided to paint the front door alcove, sides of the two dormers, and chimney with the dark purple metallic acrylic paint as well.   I chose a black and white check scrapbook paper for the front door alcove roof and two dormer roofs.

After gluing the roofs for the chipboard front door alcove and two chipboard dormers I then glued the bottom of the house to my wood base and proceeded to add the mixed media embellishments.  

Instead of using a chipboard fence for the edges around my pine rectangle base board I decided to use  strips of a Halloween scrapboard paper cat border I had found as the border for my base.  After sizing it for fit I glued it to my wood base.

The embellishments I had in mind included some of my paper scrapboard paper, paper images and sticker images from my Linda Walsh Originals Zazzle shop.

They also included mixed media fringe in two different colors, paper and wire floral, silk floral flowers, and a ton of Halloween scrapbook paper graphic images and sayings that I thought would be perfect for my spooky house.  

Once I was happy with the graphic images I had glued on I used a black stabilo pencil to blend in the edges of some of the graphics I had used.

It took a little while to create my spooky house but I was really pleased with it when I was done.

Here's how it turned out:


The photo above shows the left hand side of the house.


The photo above shows the back side of the house.


The photo above shows the right side of the house.

I was really pleased with my mixed media Halloween spooky house and hope you like it too.

 Copyright © 2004 - 2023 - All Rights Reserved - Designed and Written By Linda Walsh