Showing posts with label Craft Kits Linda Bought. Show all posts

Saturday, August 24, 2019

My Dimensions "Jingle Bell Ornaments" Cross-Stitch Kit


Now I know this won't come as any surprise to any of you but I was immediately drawn to the "joy" ornament in the "Jingle Bell Ornaments" kit by Dimensions.  As you know, I just can't resist any ornament with my Mom's name one it.  But, when I looked at the "Jingle Bell Ornaments" kit by Dimensions further I thought how pretty they were and how wonderful they would look on my pencil Christmas tree.

They looked pretty simple and easy to me.  Based on previous experience I knew they would take a while to do due to the black highlighting and due to the embellishments so I was prepared for that.
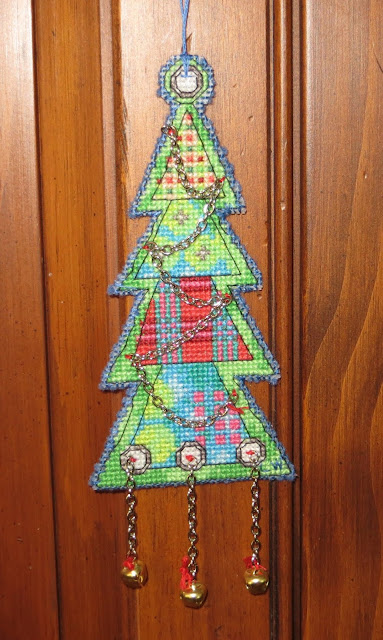

The black floss highlighting for each ornament transforms them from a pretty ornament to a beautiful ornament.  The highlighting really makes them stand-out and is well worth the extra time it takes to finish each ornament.  It's quite amazing to see them in person.  What adds to the length of time is the black highlighting is done one stitch at a time.

The "Jingle Bell Ornaments" ornament kit contained the presorted thread, #14 plastic canvas, linked chain, jingle bells, needle and instructions.  The pattern uses full counted cross-stitch and outline stitching for emphasis and depth.

I have worked with the #14 plastic canvas before without a problem. Generally, it is flexible enough to just hold it in your hands but also rigid enough to allow you to cross-stitch it without any problem. However, I found with this kit and the size of the ornaments, in particular, that the 14-count plastic canvas was just too big to hold in my hands and cross-stitch at the same time.  I had to cut the canvas.


The chart was 13 3/4" by 10 1/4" and had five ornaments of different sizes. The intent was to cross-stitch the plastic canvas from the left to the right.   However, I don't like doing that as you have to cut your threads when you cut the ornaments out at the end and then you have to glue the loose ends to the back of the canvas.  So, I decided to cut the plastic canvas into five pieces beforehand as it would make it easier to cross-stitch each of the ornaments and there would be no messy and time consuming gluing of the loose thread ends.

Unlike the previous ornaments I had done which were the same size each of these ornaments was a different size.  So, I had to count along the plastic canvas and mark where the ornament sides were before I could cut the plastic canvas.

The pattern came with starting, stitching and finishing instructions as well as a sample of the stitches required and a color chart with color coded symbols.  The symbols on the keys and chart were basically easy to read and follow.

As was the case with previous Dimensions kits the thread sorter was poorly designed. The embroidery threads were glued to two foam backed strips of cardboard that had a picture of the color of the thread and it's number. In order to get to the individual threads you had to separate threads from the foam back. Very quickly the threads separated from their section and then you no longer knew what the thread number was to tie to your symbols & legends.

Instead of designing my own thread sorter this time I decided to punch a whole at the top of each color on the thread sorter and cut one strand of 6 threads for that color as needed, tying the extra cut threads to the hole I had punched above that color.  That way I wouldn't have a problem identifying my threads with the chart.   Just below the hole I added the respective color coded cross-stitch symbol. This kit could be much improved if a different thread sorter with respective #'s and color coded symbols was provided.

Short of changing the thread sorter all together to make things even easier for the user the color symbol should at the very least have been shown on the thread sorter strip of cardboard as well. That way you would only need to use the thread sorter strip of cardboard to follow your chart.


The instructions called for leaving certain sections of the plastic canvas bare in the areas where the hanger would be places or where you were to insert the chain links.  I don't like leaving any area of the plastic canvas bare as I think it makes the ornament look unfinished so I decided to cross-stitch those sections with 2 strands of the white floss. 

Instead of following the directions for finishing these ornaments with the hangers, jingle bells, and chain links, which I found very confusing, I opted instead to tack the jingle bells and chain links to the front of the ornaments with the floss and to finish the backs with felt.


Once I had finished cross-stitching my ornaments I cut the plastic canvas close to the sides of the ornaments according to the finishing instructions.  I don't like leaving the ornaments with the back threads showing so I always opt to finish the back of my ornaments with felt.  This time I decided to use blue felt.

I rubbed Glue Stic on the back of my ornaments and then glued a rectangle piece of blue felt to the back.  Once the felt was glued on I cut the blue felt in the same shape as the ornament and then stitched the plastic canvas to the blue felt along the sides of each ornament with two strands of blue embroidery floss. Instead of following the instructions for creating cording  I created a hanger for the top of each ornament that didn't have a chain hanger with two strands of the blue embroidery floss.


I was happy with the way my "Jingle Bell Ornaments" came out and know they're going to look wonderful on my pencil tree.


Monday, December 10, 2018

"Stained Glass" Ornaments Kit by Design Works Crafts


When I first looked at the "Stained Glass" ornaments kit by Design Works Crafts I thought how pretty and how wonderful they would look on my pencil Christmas tree. They looked pretty simple and easy to me.  Turns out looks can be deceptive.   It took me much longer than I first thought to finish the six ornaments in this kit.


What I didn't know before I bought the kit was that there was a lot of black floss highlighting for each ornament that transformed them from a pretty ornament to a beautiful ornament.  The highlighting really makes them stand-out and is well worth the extra time it takes to finish each ornament.  It's quite amazing to see them in person.  What added to the length of time was the black highlighting is done one stitch at a time.

The "Stained Glass" ornament kit contained the color cotton floss, #14 plastic canvas, needle and instructions.  The pattern uses full counted cross-stitch and outline stitching for emphasis and depth.


This is the first time I have worked with the #14 plastic canvas and I have to tell you it was wonderful.  It was flexible enough to just hold it in your hands but also rigid enough to allow you to cross-stitch it without any problem.


The chart was 11 1/2" by 17" and had four of the ornaments vertically aligned in a row along the top of the chart with two of the ornaments horizontally laid in a row along the bottom.  The intent was to cross-stitch the plastic canvas in the same manner.  However, I decided to cut the plastic canvas into six pieces beforehand as it would make it easier to cross-stitch each of the ornaments.


The pattern came with starting, stitching and finishing instructions as well as a sample of the two stitches required and a black and white chart with black and white coded symbols.  The symbols on the keys and chart were basically easy to read and follow but, for some reason, I kept confusing two of the triangle symbols every time I looked at the black and white chart.  If the black and white chart were just a little bigger or were actually color coded I think this could have been avoided.


I did have a few problems with the embroidery floss contained within the kit.  Unfortunately there wasn't enough black, light red, and green embroidery floss contained within the kit so I had to use some from my stash.

Also, the floss color key chart had the number of floss strands included within the kit for each color floss but 8 of colors were different than the actual numbers of floss strands contained within the kit.  For all 8 of these colors there was more floss strands than the key indicated.


I had no problem cross-stitching the "Stained Glass" ornaments and then cutting the plastic canvas close to the sides of the ornaments according to the finishing instructions.  I didn't like leaving the ornaments with the back threads showing so I decided to finish the back of my ornaments with white felt.

I rubbed Glue Stic on the back of my ornaments and then glued a rectangle piece of white felt to the back.  Once the felt was glued on I cut the white felt in the same shape as the ornament and then stitched the plastic canvas to the white felt along the sides of each ornament with two strands of white embroidery floss. I created a hanger for the top of each ornament with two strands of the white embroidery floss.


After I was done with all the ornaments I hung them on my pencil tree.  They all look beautiful there.


I was thrilled with the way my "Stained Glass" ornaments turned out and hope you like them too.


Saturday, August 11, 2018

Let It Snow - Mill Hill Sticks Cross-Stitch Ornament


As you know from my previous post it's the middle of the summer and sweltering here.  More heat and humidity than I would like.  Yet, I'm making Christmas ornaments.  Maybe the coldness of my craft project will have an effect on Mother Nature.  I doubt it, but one can be hopeful.

This time the ornaments that I'm working on  are a pair of 3" by 3" Christmas stocking ornaments by Mill Hill - Sticks line.

The "Let It Snow" ornament kit contained the presorted thread, 14 count perforated paper, needles (stitching and beading), beads and instructions. The pattern uses full counted cross-stitch and outline stitching for emphasis and depth.


The pattern came with starting, stitching and 2 different back finishing instructions as well as samples of the various stitches required, beading instructions and color code chart (with code #'s, color names, and cross-stitch symbols) and a black and white chart with black and white coded symbols.  The colors and symbols on the keys and chart were easy to read and follow except the symbols under the stars that were to be highlighted with floss were hard to read.

The only other problem I had with the kit was there was only one strand of the medium blue DMC floss and I ran out of it before I started the 2nd stocking.

I had no problem cross-stitching the stocking ornaments and then cutting the perforated paper close to the sides of the stocking figures. This kit did come with 2 different options for finishing the back the ornaments back to back.  The other was creating two ornaments and finishing the back with felt or card stock.  I opted to create two ornaments and finish mine with green felt which I glued to the back with an Avery disappearing color glue stick.  I wanted to finish the edges by whip stitching around the edges of the perforated paper with 4 strands of he green floss so I trimmed the edges and left enough of the felt and perforated paper to stitch around the edges.


Instead of adding a floss hanger according to the instructions I opted to sew two strands of floss to the top of the ornament, securing the edge of the ornament with an additional stitch and then tying the ends at the top in a large knot.  They're going to look great on my pencil Christmas tree

I was very happy with the way my "Let It Snow" stocking ornaments turned out and hope you like it too.

Friday, August 10, 2018

Joy - Mill Hill Sticks Cross-Stitch Ornament


It's the middle of the summer and sweltering here.  More heat and humidity than I would like.  So, you're probably wondering why I'm showing you two Christmas cross-stitch ornaments I just finished.  Well, when I'm making ornaments for the Christmas holiday season I like to start early. They are a pair of 3" by 3" stocking ornaments by Mill Hill - Sticks line.

I just love to cross-stitch small ornaments with the word "joy" in them because my mother's name was Joy and when I look at them I think of her.

The "Joy" ornament kit contained the presorted thread, 14 count perforated paper, needles (stitching and beading), beads and instructions.  The pattern uses full counted cross-stitch and outline stitching for emphasis and depth.


The pattern came with starting, stitching and 2 different back finishing instructions as well as samples of the various stitches required, beading instructions and color code chart (with code #'s, color names, and cross-stitch symbols) and a black and white chart with black and white coded symbols.  The colors and symbols on the keys and chart were easy to read and follow.

I had no problem cross-stitching the stocking ornaments and then cutting the perforated paper close to the sides of the stocking figures. This kit did come with 2 different options for finishing the back of the ornaments. The first was finishing them back to back.  The other was creating two ornaments and finishing the back with felt or card stock.  I opted to create two ornaments and finish mine with green felt which I glued to the back with an Avery disappearing color glue stick.  I wanted to finish the edges by whip stitching around the edges of the perforated paper with 4 strands of the green floss so I trimmed the edges and left enough of the felt and perforated paper to stitch around the edges.


Instead of adding a floss hanger according to the instructions I opted to sew two strands of floss to the top of the ornament, securing the edge of the ornament with an additional stitch and then tying the ends at the top in a large knot.  They're going to look great on my pencil Christmas tree.

I was very happy with the way my "Joy" stocking ornaments turned out and hope you like it too.

Wednesday, June 27, 2018

My Best Friend Santa Cross-Stitch Ornament


It definitely isn't any where near the holiday season so I'm sure you're wondering why I'm showing you a Christmas cross-stitch ornament I just finished.  Well, I started this after last Christmas and just finished it the other day.  It's a 3 1/2" by 5" ornament so it only takes a few hours to make but I only had a chance to work on it for a few minutes here or there.  As a result, it took months to finish.

I just love to cross-stitch small ornaments especially when they contain images of dogs.  I also love cross-stitching small ornaments because they don't take a lot of time to complete.So, when I saw the "My Best Friend Santa" cross-stitch ornament from Mill Hill I knew I was going to make it.

The "My Best Friend Santa" ornament kit contained the presorted thread, 14 count perforated paper, needles (stitching and beading), beads and instructions.  The  pattern uses full counted cross-stitch and outline stitching for emphasis and depth.

The pattern came with starting, stitching and back finishing instructions as well as samples of the various stitches required, beading instructions and color code chart (with code #'s, color names, and cross-stitch symbols) and a black and white chart with black and white coded symbols.  For the most part the colors and symbols on the keys and chart were easy to read and follow.  However, the symbols behind the highlighted lines were hard to read at times.  


A JS20-5106 Correction sheet for two of the key symbols that were wrong was included in the kit.  The medium salmon symbol was wrong and the white symbol was wrong in the code chart.

I had no problem cross-stitching the Santa ornament and then cutting the perforated paper close to the sides of the Santa figure. This kit did come with instructions for finishing the back and I opted to finish mine with red felt which I glued to the back with an Avery disappearing color glue stick.  
I trimmed the edges so the felt was aligned with the perforated paper.  

Instead of adding a floss hanger according to the instructions I opted to sew two strands of floss to the top of the ornament, securing the edge of the ornament with an additional stitch and then tying the ends at the top in a large knot. 


Unfortunately I can't tell you how many hours it took me to complete this ornament as I've been working on it little by little over the last few months and didn't keep track of it. 


I was very happy with the way my Mill Hill Counted Cross Stitch, Santa and best friend ornament turned out and hope you like it too.


Sunday, September 10, 2017

My Be Thankful - Mill Hill Cross-stitch Picture


Since Fall is one of my favorite seasons for decorating I am naturally drawn to Fall cross-stitch kits. Such is the case with the Be Thankful cross-stitch kit by Mill Hill - MH14-7202.

The Be Thankful Beaded Counted Cross Stitch Kit Mill Hill Buttons & Beads Autumn Series MH14-7202 pattern uses full and half counted cross-stitch and straight stitch highlighting as well as beads of various sizes for emphasis and depth. The Mill Hill patterns usually call for certain areas of the perforated paper to be left untouched like the background the border. In this case they were leaving sections of the brown perforated paper background and border untouched.

In embroidering the cross-stitch I decided to once again utilize the rectangular wood frame jig that my darling husband built for me that I could tape the edges of my perforated paper to. The wood frame jig is a rectangular embroidery hoop of sorts, but without bending the perforated  paper. He had made it out of 1/2" x 1" pine wood strips with an adjustable center strip that I used for this 5.25 x 5.25 square design.

I had learned from previous mistakes that I needed to draw diagonal lines to locate the exact center of the perforated paper as in previous perforated paper cross-stitch picture I have done the picture was slightly off center by a few holes which caused a problem with inserting the needles in the holes along one of the edges of my frame. So, I lightly drew a diagonal line across each corner with a pencil to get the center point of the perforated paper.

A lot of the cross-stitch 5.25" by 5.25" pictures I have made were finished in small 6 1/2" by 6 1/2" shadowbox frames with 5" by 5" openings that I had gotten at Michaels when they went on sale one year.  I used up all the shadowbox frames I had gotten that year and have been looking for them ever since and haven't found them again.

So, I decided to buy some 8" by 8" hand painted wood frames that Mill Hill created for their cross-stitch pictures.  This frame is bare bones.  There's no glass or plastic cover and there's nothing on the back to hold the picture into the frame.  They do, however, provide a thin 6" by 6" cardboard back and wood dowel for inserting in the holes in the back to allow for the frame to stand on it's own.  Of course, if you're going to hang this on the wall you'd just add a picture hanger to the back.

The directions did not include any instruction for finishing the back.  I decided to finish mine with 1/4" thick self sticking art needle-craft mounting foam.  I used an 8" by 10" by Pres-On sheet that I cut 6" by 6"with an X-acto knife to fit my picture.  Since the depth of the back of the frame for inserting the picture is 1/4" deep the 1/4" foam was a perfect fit for inserting it as well as the cardboard backing that came with the frame.

After adhering my cross-stitch picture to the 6" by 6" adhesive foam board that I bought I inserted it into the back of the frame and then inserted the 6" by 6" cardboard that came with the frame over it.  I taped the back of the cardboard with masking tape to hold it.

The antique white wood frame is 8" by 8" so to totally finish the back I cut a piece of thick decorative paper 8" by 8" to entirely cover the back.  I rubbed purple color disappearing glue stick all over the back and then pasted my 8" by 8" decorative paper sheet on the back.  I signed by name and dated it and was done with finishing the back.  I used a pencil to stab the decorative paper I had glued to the back so I could insert the dowel into it so the picture would stand on it's own.

The pattern called for a antique white colored wooden frame and for the border and certain sections of the background of the perforated paper to be left untouched like the picture shown below:


However, I don't like seeing the perforated sections for the background or border as I think it makes the cross-stitch picture look unfinished and opted instead to finish the background and with rust colored #167 DMC embroidery floss sewn as a half cross-stitch using three strands of the #167 floss.


The pattern didn't call for any outlining.  Give the collage nature of the cross-stitch picture I thought certain sections of the collage would benefit from some outlining so I decided to add more definition as follows:

1)  I back-stitch outlined the letters of "Be Thankful" with 1 strand of black floss.
2)  I back-stitch outlined the letters of "Autumn" with 1 strand of black floss.
3)  I back-stitch outlined around the edge of the center turkey picture with 1 strand of the dark brown floss.
4)  I back-stitch outlined around the edge of the straw hay bale picture with 1 strand of the dark brown floss.
5)  I back-stitch outlined around the edge of the 3 apples picture with 1 strand of the dark brown floss.
6)  I back-stitch outlined around the edge of the 3 different pumpkins with 1 strand of the dark orange floss.


While the end results of this design were wonderful some things in the kit and in the instructions could be improved upon so I'd like to offer the following constructive suggestions:

The cross-stitch chart was in black and white as was the floss color code and symbol key. Both were easy to read and very clear. While I had no problem with the chart and keys I did have a problem with the way the DMC floss was presented. All of the floss was tied together in one big knot so you had to separate the floss pieces yourself, sort them, and try to interpret which color belonged to which floss # and symbol key on the color chart.

If you only have a few colors to deal with this isn't a problem. However, if you have several different colors to choose from that are close in color then interpreting the chart can be tricky. You may assign the wrong color to the wrong symbol if the colors are too closely aligned like ecru and light beige. The key code chart should have contained the number of strands that were included in the kit so I would know how many strands I had for the different floss colors.

As I have done with other cross-stitch kits I've completed I had to design my own thread color sorter and symbol key. I took a piece of thin cardboard and cut a 1" x 9" long rectangular piece out to use as a thread sorter. I then punched holes in my cardboard strip in which to tie each of the different colors. Just above the hole I wrote the DMC floss # and just below the hole I added the respective cross-stitch symbol. I then inserted the floss threads that went with that # and symbol through the hole and tied them in a loose knot. This kit could be much improved if a thread sorter with respective #'s and symbols was provided.

The beads were contained within three small Ziploc bags which was fine. The chart had footnote symbols to help distinguish which beads were within which bag.

The kit included an acorn that was to be sewn to the bottom right corner of the picture.  The button was okay except it was glued to a small piece of cardboard which did not easily come off and the glue used had hardened and extended over the sides of the button.  I cut it with scissors and managed to make it presentable enough to use in my picture. I have found over time that the buttons used in the Mill Hill cross-stitch kits are usually of poor quality and the worst parts of the kits. Sometimes I use them sometimes I don't.

My results with the totally finished background, border and frame is shown below:


Despite the relatively small issues I had encountered with the kit I was happy with the way my Country Welcome turned out.

It took me 38 hours to complete this picture including the framing. As always, my comments are meant to be constructive to enable future purchasers to benefit from my experience and to enhance their ability to create a wonderful little cross-stitch design.


Thursday, August 31, 2017

My Country Quilts - Mill Hill Cross-stitch Picture


Since Fall is one of my favorite seasons for decorating I am naturally drawn to Fall cross-stitch kits. Such is the case with the Country Quilts cross-stitch kit by Mill Hill - MH14-1621.

The Country Quilts Beaded Counted Cross Stitch Kit Mill Hill Buttons & Beads Autumn Series MH14-1621 pattern uses full and half counted cross-stitch and straight stitch highlighting as well as beads of various sizes for emphasis and depth. The Mill Hill patterns usually call for certain areas of the perforated paper to be left untouched like the background the border. In this case they were leaving sections of the brown perforated paper border untouched.

In embroidering the cross-stitch I decided to once again utilize the rectangular wood frame jig that my darling husband built for me that I could tape the edges of my perforated paper to. The wood frame jig is a rectangular embroidery hoop of sorts, but without bending the perforated  paper. He had made it out of 1/2" x 1" pine wood strips with an adjustable center strip that I used for this 5.25 x 5.25 square design.

I had learned from previous mistakes that I needed to draw diagonal lines to locate the exact center of the perforated paper as in previous perforated paper cross-stitch picture I have done the picture was slightly off center by a few holes which caused a problem with inserting the needles in the holes along one of the edges of my frame. So, I lightly drew a diagonal line across each corner with a pencil to get the center point of the perforated paper.

A lot of the cross-stitch 5.25" by 5.25" pictures I have made were finished in small 6 1/2" by 6 1/2" shadowbox frames with 5" by 5" openings that I had gotten at Michaels when they went on sale one year.  I used up all the shadowbox frames I had gotten that year and have been looking for them ever since and haven't found them again.

So, I decided to buy some 8" by 8" hand painted wood frames that Mill Hill created for their cross-stitch pictures.  This frame is bare bones.  There's no glass or plastic cover and there's nothing on the back to hold the picture into the frame.  They do, however, provide a thin 6" by 6" cardboard back and wood dowel for inserting in the holes in the back to allow for the frame to stand on it's own.  Of course, if you're going to hang this on the wall you'd just add a picture hanger to the back.

The directions did not include any instruction for finishing the back.  I decided to finish mine with 1/4" thick self sticking art needle-craft mounting foam.  I used an 8" by 10" by Pres-On sheet that I cut 6" by 6"with an X-acto knife to fit my picture.  Since the depth of the back of the frame for inserting the picture is 1/4" deep the 1/4" foam was a perfect fit for inserting it as well as the cardboard backing that came with the frame.

After adhering my cross-stitch picture to the 6" by 6" adhesive foam board that I bought I inserted it into the back of the frame and then inserted the 6" by 6" cardboard that came with the frame over it.  I taped the back of the cardboard with masking tape to hold it.

The green wood frame I chose to use is 8" by 8" so to totally finish the back I cut a piece of thick decorative paper 8" by 8" to entirely cover the back.  I rubbed purple color disappearing glue stick all over the back and then pasted my 8" by 8" decorative paper sheet on the back.  I signed by name and dated it and was done with finishing the back.  I used a pencil to stab the decorative paper I had glued to the back so I could insert the dowel into it so the picture would stand on it's own.

The pattern called for a rust colored wooden frame and for the border of the perforated paper to be left untouched like the picture shown below:


However, I don't like seeing the perforated sections for the border as I think it makes the cross-stitch picture look unfinished and opted instead to finish the border with a medium taupe DMC embroidery floss sewn as a half cross-stitch using three strands of the taupe floss.


The pattern called for outlining some of the clothes line with white and gold floss, the windows with white floss and sides of the porch roof with white floss.  I didn't think this was enough outlining emphasis so I decided to add more definition as follows:

1)  I back-stitched along the clothes line with 2 strands of white floss.
2)  I back-stitch outlined the sides of the tree with 2 strands of black floss.
3)  I back-stitch outlined along the porch roof, sides of the house, and top roof and chimney with 2 strands of the dark gray floss.
4)  I straight stitched all along the windows and window panes with 1 strand of the white floss.
5)  I back-stitch outlined the clothes line post with 2 strands of the dark gray floss.


While the end results of this design were wonderful some things in the kit and in the instructions could be improved upon so I'd like to offer the following constructive suggestions:

The cross-stitch chart was in black and white as was the floss color code and symbol key. Both were easy to read and very clear. While I had no problem with the chart and keys I did have a problem with the way the DMC floss was presented. All of the floss was tied together in one big knot so you had to separate the floss pieces yourself, sort them, and try to interpret which color belonged to which floss # and symbol key on the color chart.

If you only have a few colors to deal with this isn't a problem. However, if you have several different colors to choose from that are close in color then interpreting the chart can be tricky. You may assign the wrong color to the wrong symbol if the colors are too closely aligned like ecru and light beige. The key code chart should have contained the number of strands that were included in the kit so I would know how many strands I had for the different floss colors.

As I have done with other cross-stitch kits I've completed I had to design my own thread color sorter and symbol key. I took a piece of thin cardboard and cut a 1" x 9" long rectangular piece out to use as a thread sorter. I then punched holes in my cardboard strip in which to tie each of the different colors. Just above the hole I wrote the DMC floss # and just below the hole I added the respective cross-stitch symbol. I then inserted the floss threads that went with that # and symbol through the hole and tied them in a loose knot. This kit could be much improved if a thread sorter with respective #'s and symbols was provided.

The beads were contained within three small ziploc bags which was fine. The chart had footnote symbols to help distinguish which beads were within which bag.

The kit included a rooster button that was to be sewn to the bottom right corner of the picture.  The button was okay except it was glued to a small piece of cardboard which did not easily come off and the glue used had hardened and extended over the sides of the button.  I cut it with scissors and managed to make it presentable enough to use in my picture. I have found over time that the buttons used in the Mill Hill cross-stitch kits are usually of poor quality and the worst parts of the kits. Sometimes I use them sometimes I don't.

My results with the totally finished border and frame is shown below:


Despite the relatively small issues I had encountered with the kit I was happy with the way my Country Welcome turned out.

It took me 32 hours to complete this picture including the framing. As always, my comments are meant to be constructive to enable future purchasers to benefit from my experience and to enhance their ability to create a wonderful little cross-stitch design.


Monday, January 10, 2011

I Didn't Realize I'd Created and Reviewed That Many Craft Kits


Boy! Sometimes you really do surprise yourself.

I know that this morning I did and the surprise had nothing to do with dolls.

It actually had to do with the number of craft kits I have put together and reviewed for my "The Book Review Corner" blog.  During the last couple of years I have managed to put together 30 different craft kits.  They may have been cross-stitch or punchneedle or penny rug kits.  I guess whatever was suiting my fancy at the time.

In fact, over on my "The Book Review Corner" blog the number of craft kits reviewed has far exceeded the number of books I've reviewed.  Maybe I should change the name to "The Craft Kits Review Corner!" LOL LOL

Nah....  I like "the Book Review Corner" name just fine.

However, I guess I'd better start reviewing more books.

Now that's a good New Year's resolution for that blog.

Let's see if I can achieve it during 2011.

Cross your fingers.

Monday, January 03, 2011

Just One More, Mom! One More!


 If you've been following my Linda's Blog for awhile and my The Book Review Corner Blog then you know that among a million other things I LOVE crafting with wool felt and wool felt kits.

In fact, I've written several posts about my wool felt adventures, which are as follows: "I Just Love This "Pumpkin Patch" Penny Rug", "More Handmade Presents for Christmas 2009 - Wool Felt Santa Ornaments", and "More Of My Projects From This Year - My Needle Felting Projects."

Whether it's making wool felt penny rugs, or needle felted penny rug pictures, or ornaments I just LOVE wool felt.

And, it doesn't have to be limited to penny rugs  or ornaments. Over the years I have made hundreds of cloth dolls using wool felt, brushed felt, shaggy felt, etc. I have found that it is especially useful for making animals, but the uses are practically limitless.

I was introduced to penny rugs during a shopping trip with my Mom to Sturbridge many, many years ago. There were several wonderful primitives shops out there that we liked to visit that carried primitive doll kits, wool felt kits, punchneedle kits, and penny rug kits.

One store in particular specialized in wool fabric. And, boy, did they have wool fabric. Some of the most beautiful wool fabric you'd ever want to see. And, boy, was it EXPENSIVE.

This store, in particular, would put together wool fabric bundles, maybe 10-15 wool pieces per bundle. I just loved looking at the color combination's and would imagine what I could make out of them. Then, my Mother would snap me back to reality by turning the price tag over. YIKES! Beautiful wool is expensive. Alas, all I could do was dream and save my pennies.

During the last couple of years there was a store out there that we liked to visit that put together penny rug kits. It, too, is no longer there. However, during our last visit I bought several penny rug wool kits and have been trying to find the time to make them during the last few years.

As usual I had many, many kits that I wanted to buy.  So many, in fact, I asked my Mother if she would carry a few to the counter.  Well, when she saw how many I had she said, "LINDA, one or two would do!  Look at how many you have!" I, of course, just laughed at the numbers I was carrying and decided to put a few (just a few) back.

That year I had decided that I wanted to try needle felting and wool felting as it seemed like everyone was having so much fun with it this year. I don't mean wet needle felting where you are actually creating a needle felted object from the wet felt. I'm just not that adventuresome!

I started with three wool felt kits where one was a penny rug type decoration that needed to have some sheep and tree decorations needle felted. The other two kits were more like wool felt embroidery kits to create primitive wool decorations which could be hung on a wall or placed on a table top.

Well, last Spring I finally had an opportunity and a small window of time that I could use to create some more of the penny rug kits I had bought. I had already created 3 of the kits back in 2009 and had posted about them in a Linda's Blog post entitled "More Of My Projects From This Year - My Needle Felting Projects." During this window of opportunity I was able to finish two more of the penny rug kits I had bought.  One of those was a pumpkin patch penny rug picture that I wrote about in a Linda's Blog post entitled "I Just Love This "Pumpkin Patch" Penny Rug."

The other was a penny rug kit to create a holiday candle penny rug. The kit was put together based upon a Lakeview Primitives "Holiday Light" pattern #423. The finished size of the penny rug was 16 1/2" x 13 1/2".

The pattern was very easy to follow and I had no problems with it. It contained the pattern pieces, supplies list, and directions for creating the Holiday Candle penny rug decoration. As penny rug decorations are usually put together using a blanket stitch the pattern also included an illustration for how you stitch a blanket stitch. The pattern also calls for pre-felted wool - which, in my case, was already provided in the kit. However, if you don't have a kit and buy wool the pattern contains directions for felting your wool. And, it also contains instructions for creating French knots which were used in the pattern.

Like all the other wool kits it was nicely put together by the store and contained plenty of the wool and DMC floss needed for the pattern. In fact, once again, there was plenty of wool scraps and DMC floss left over that I could and would utilize for another design if I wanted to.

With all the other penny rug wool kits I created I had placed a piece of cardboard in between the front and back sections of the penny rug to give them some rigidity and stability.  However, the "Holiday Light" pattern had three layers of wool felt and, as a result, I didn't need to add cardboard to the middle to give it some stability.  It seemed to be rigid enough as it was.  I had decided to hang this off a hook so I created a small hanger on the back of the "Holiday Light" out of DMC embroidery floss that I could use to hang it.

The result is shown in the picture at the beginning of this post.

I still have a couple of penny rug wool kits left from that shopping trip with my Mother.  Maybe in 2011 I'll have another small window of opportunity that I can use to finish the rest of the kits.

And, if I do that, well - I'll just have to go on another shopping trip.  However, as the shop is no longer in Sturbridge this time I'll let my fingers do the walking all over my keyboard and all over the internet. You never know what I'll find but, I'm sure I'll find something I like.

And, I'm sure if I go overboard in the amount I'm buying a little bird will be whispering in my ear, "LINDA, don't you think you have enough of those!"

And, I'll answer, "Just one more Mom. One more!"

Tuesday, December 01, 2009

Last Year's Punchneedle Kits and Shadowboxes


Like everything I do I never do anything in moderation. Instead of just creating a couple of punchneedle and cross-stitch kits to give as Christmas presents I created 30 or more. As a result I had more than I needed to give as presents. Was this intentional? Maybe!

Then again, maybe not! Maybe I'm so highly organized that I knew I would need some in the future. Anticipating the future? Maybe! Then again, maybe not!

In any event I ended up with more shadowboxes than I needed. The punch needle pine tree shown above was created based upon a "Pine Tree" pattern kit by Rachael T. Pellam of Rachael's of Greenfield that I added a dark green, burgundy and white sponge painted wood shadowbox frame to. This pattern included detailed instructions and tips for punchneedle as well as an iron-on transfer sheet that you had to iron on to the foundation cloth which was included in the kit.  It also included a piece of paper with the DMC floss numbers printed on it and each of the floss strands grouped by color tied to a punched out square next to it's respective DMC floss number.  It did not include a diagram with the detailed numbers on it but included a listing on the back of the pattern indicating which DMC floss numbers were to be used and where.


I also found a wonderful punch needle pattern by Linda Coleman of Jeremiah Junction called "Folksy Sheep" that I liked.  As with my other punchneedle projects I decided to add a sponged painted wood shadowbox frame.  I wanted the frame to appear like the sky so I sponge painted it royal blue, light blue, and white.

The pattern and instructions were easy to follow and the diagram was well laid out and easy to read. The pattern included the pre-printed weavers cloth.

What I also really liked about the Jeremiah Junction pattern was that it not only included a diagram with the colored DMC floss numbers but included a picture colored with the DMC floss colors and a table that included a small square of the DMC floss color and it's respective DMC, ANC, or JPC floss number.    The kit included reverse pre-printed fabric, DMC floss, and pattern with instructions.  The design was printed on the reverse side of the fabric and you work on the reverse side when punching to create the image on the front side.


I also found several patterns from Dimensions that I liked.  The 1st pattern and kit was  Dimensions Live, Laugh, Love Kit #73224 which was easy to follow and had diagrams and numbered key codes for the DMC floss.  The kit included reverse pre-printed fabric, DMC floss, and pattern with instructions as well as punch needle tips.  The design was printed on the reverse side of the fabric and you work on the reverse side when punching to create the image on the front side.

The pattern and kit was for creating a  framed picture with the fabric serving as the picture mat.    I decided to make mine as a purple, pink, cream, and white sponge painted shadow box that could be placed just about anywhere.

The white fabric was to serve as the white backdrop, but I changed this and added white floss as separators and changed all the colors from what the pattern called for to something I wanted instead.  I surrounded my mounted press board punchneedle image with blue and pink lace trim and then enclosed it within my shadowbox.


The 2nd pattern and kit was  Dimensions Vase Of Flowers Kit #73400 which was easy to follow and had diagrams and numbered key codes for the DMC floss.  The kit included reverse pre-printed fabric, DMC floss, and pattern with instructions as well as punch needle tips.  The design was printed on the reverse side of the fabric and you work on the reverse side when punching to create the image on the front side.

The pattern and kit was for creating a  framed picture with the fabric serving as the picture mat.   The white fabric was to serve as the white backdrop and the punchneedle image had leaves and flowers extending out from the main body of the punchneedle.   I decided to box my picture and box around the flowers and leaves so it would fit in my baby blue, cream, and white sponge painted shadow box.


The 3rd pattern and kit was  Dimensions There's No Place Like Home Kit #73401 which was easy to follow and had diagrams and numbered key codes for the DMC floss.  The kit included reverse pre-printed fabric, DMC floss, and pattern with instructions as well as punch needle tips.  The design was printed on the reverse side of the fabric and you work on the reverse side when punching to create the image on the front side.

The pattern and kit was for creating a  framed picture with the fabric serving as the picture mat and the words "There's No Place Like Home" embroidered on the bottom of the picture.    The white fabric was to serve as the white backdrop and the punchneedle image had tree tops extending out from the top of the main body of the punchneedle.   I decided to box my picture and box around the tree tops so it would fit in my lilac, green, yellow, and blue sponge painted shadow box.     I also changed some of the colors of the trees and ran out of the blue they included for the sky and had to substitute some of my own floss.


I also found a wonderful punchneedle pattern by Linda Coleman of Jeremiah Junction called "Crow and Sunflower" that I liked.  As with my other punchneedle projects I decided to add a sponged painted wood shadowbox frame.

The pattern and instructions were easy to follow and the diagram was well laid out and easy to read. The pattern included the pre-printed weavers cloth. 

What I also really liked about the Jeremiah Junction pattern was that it not only included a diagram with the colored DMC floss numbers but included a picture colored with the DMC floss colors and a table that included a small square of the DMC floss color and it's respective DMC, ANC, or JPC floss number.    The kit included reverse pre-printed fabric, DMC floss, and pattern with instructions.  The design was printed on the reverse side of the fabric and you work on the reverse side when punching to create the image on the front side.


I also found a wonderful punchneedle pattern by Linda Coleman of Jeremiah Junction called "Stoneware Crock" that I liked. The pattern called for a scrolled top to the punchneedle piece, but I squared my top so that it would fit in the royal blue, beige, dark blue and white sponged painted wood shadowbox frame.

The pattern and instructions were easy to follow and the diagram was well laid out and easy to read. The pattern included the pre-printed weavers cloth. 

What I also really liked about the Jeremiah Junction pattern was that it not only included a diagram with the colored DMC floss numbers but included a picture colored with the DMC floss colors and a table that included a small square of the DMC floss color and it's respective DMC, ANC, or JPC floss number.    The kit included reverse pre-printed fabric, DMC floss, and pattern with instructions.  The design was printed on the reverse side of the fabric and you work on the reverse side when punching to create the image on the front side.

This is one of the shadowboxes that I am keeping as it's primitive nature and blue colors fit right in with my home decor.  In fact, it resides right next to several of my blue crock pottery pieces on my dining room mantle.