Showing posts with label gifts. Show all posts

Saturday, August 24, 2019

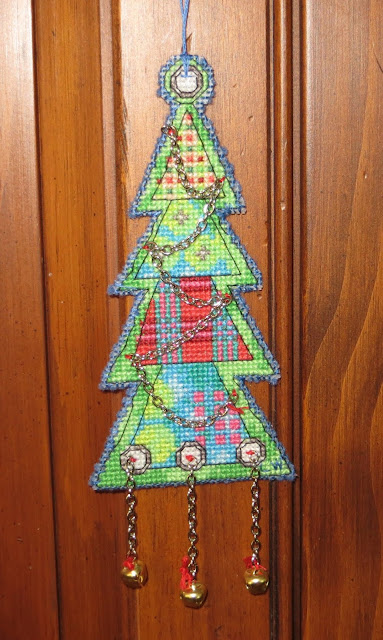
My Dimensions "Jingle Bell Ornaments" Cross-Stitch Kit


Now I know this won't come as any surprise to any of you but I was immediately drawn to the "joy" ornament in the "Jingle Bell Ornaments" kit by Dimensions.  As you know, I just can't resist any ornament with my Mom's name one it.  But, when I looked at the "Jingle Bell Ornaments" kit by Dimensions further I thought how pretty they were and how wonderful they would look on my pencil Christmas tree.

They looked pretty simple and easy to me.  Based on previous experience I knew they would take a while to do due to the black highlighting and due to the embellishments so I was prepared for that.


The black floss highlighting for each ornament transforms them from a pretty ornament to a beautiful ornament.  The highlighting really makes them stand-out and is well worth the extra time it takes to finish each ornament.  It's quite amazing to see them in person.  What adds to the length of time is the black highlighting is done one stitch at a time.

The "Jingle Bell Ornaments" ornament kit contained the presorted thread, #14 plastic canvas, linked chain, jingle bells, needle and instructions.  The pattern uses full counted cross-stitch and outline stitching for emphasis and depth.

I have worked with the #14 plastic canvas before without a problem. Generally, it is flexible enough to just hold it in your hands but also rigid enough to allow you to cross-stitch it without any problem. However, I found with this kit and the size of the ornaments, in particular, that the 14-count plastic canvas was just too big to hold in my hands and cross-stitch at the same time.  I had to cut the canvas.


The chart was 13 3/4" by 10 1/4" and had five ornaments of different sizes. The intent was to cross-stitch the plastic canvas from the left to the right.   However, I don't like doing that as you have to cut your threads when you cut the ornaments out at the end and then you have to glue the loose ends to the back of the canvas.  So, I decided to cut the plastic canvas into five pieces beforehand as it would make it easier to cross-stitch each of the ornaments and there would be no messy and time consuming gluing of the loose thread ends.

Unlike the previous ornaments I had done which were the same size each of these ornaments was a different size.  So, I had to count along the plastic canvas and mark where the ornament sides were before I could cut the plastic canvas.

The pattern came with starting, stitching and finishing instructions as well as a sample of the stitches required and a color chart with color coded symbols.  The symbols on the keys and chart were basically easy to read and follow.

As was the case with previous Dimensions kits the thread sorter was poorly designed. The embroidery threads were glued to two foam backed strips of cardboard that had a picture of the color of the thread and it's number. In order to get to the individual threads you had to separate threads from the foam back. Very quickly the threads separated from their section and then you no longer knew what the thread number was to tie to your symbols & legends.

Instead of designing my own thread sorter this time I decided to punch a whole at the top of each color on the thread sorter and cut one strand of 6 threads for that color as needed, tying the extra cut threads to the hole I had punched above that color.  That way I wouldn't have a problem identifying my threads with the chart.   Just below the hole I added the respective color coded cross-stitch symbol. This kit could be much improved if a different thread sorter with respective #'s and color coded symbols was provided.

Short of changing the thread sorter all together to make things even easier for the user the color symbol should at the very least have been shown on the thread sorter strip of cardboard as well. That way you would only need to use the thread sorter strip of cardboard to follow your chart.


The instructions called for leaving certain sections of the plastic canvas bare in the areas where the hanger would be places or where you were to insert the chain links.  I don't like leaving any area of the plastic canvas bare as I think it makes the ornament look unfinished so I decided to cross-stitch those sections with 2 strands of the white floss. 

Instead of following the directions for finishing these ornaments with the hangers, jingle bells, and chain links, which I found very confusing, I opted instead to tack the jingle bells and chain links to the front of the ornaments with the floss and to finish the backs with felt.


Once I had finished cross-stitching my ornaments I cut the plastic canvas close to the sides of the ornaments according to the finishing instructions.  I don't like leaving the ornaments with the back threads showing so I always opt to finish the back of my ornaments with felt.  This time I decided to use blue felt.

I rubbed Glue Stic on the back of my ornaments and then glued a rectangle piece of blue felt to the back.  Once the felt was glued on I cut the blue felt in the same shape as the ornament and then stitched the plastic canvas to the blue felt along the sides of each ornament with two strands of blue embroidery floss. Instead of following the instructions for creating cording  I created a hanger for the top of each ornament that didn't have a chain hanger with two strands of the blue embroidery floss.


I was happy with the way my "Jingle Bell Ornaments" came out and know they're going to look wonderful on my pencil tree.


Friday, April 05, 2019

When It Comes To Books Grandma Knows Best


When the 7th and final book in the wildly popular Harry Potter series entitled "Harry Potter and the Deathly Hallows" was released in July 21, 2007 I thought it would be a good idea to introduce one of my grandsons to the series.  In thinking about books and my new "We Love Books" collection of products I thought I'd relate a story about the series and my grandson that you might enjoy.


Back in 2007 I was looking for a birthday present for my grandson. I wanted the present that his Grandfather and I gave him to be one that was "THE HOTTEST ITEM" among adolescent and teenage boys at the time.

I had read that one of the hottest and coolest items among adolescents and teenage boys was "The Harry Potter" Series of books, which then had only 3 books in the series. So, I decided we'd give him the 3 hardcover books that were in the series.

Even though this was the "hottest" ticket item it was a gamble for his Grandfather and I. You see, my grandson wasn't a reader. But, I figured peer pressure would create enthusiasm for him and maybe he'd discover a love for reading.


Well, he opened his present, smiled and said thank-you, but wasn't really thrilled. We'd bombed out. At least we thought so until the following year when "Harry Potter" really took off. Then the teenage boys and adolescents couldn't get enough of Harry Potter. Harry Potter mania had set in and all of a sudden we (that is his Grandfather and I) were just the "coolest" grandparents as our Grandson already had the first three books in the series and was "the man" among all his friends.

Even our son-in-law was enthusiastic about the books and decided to start reading them to our youngest grandson for his bedtime stories. It took awhile but they got through the first 3 books and decided to buy the 4th book in the series.

Well, not to be outdone by their younger brothers our older teenage granddaughters decide to read the series, too. So they, too read all three of the books in the set we had given their brother and then read Book 4.

After that they moved on to Book 5, then Book 6, then Book 7.  They all read all of those, too.

Our grandson ended up loving the books. I'd love to say that he became a reader because of it. He did and he didn't.


He has become a reader - just a reader of a different kind of book. You see - he loves the Japanese cartoon books that you read from back to front like "Inu Yasha", "Fruit Basket", "Juvenille Orion", and the "Trigun Maximum" series.


For me, the Grandmother who gives books every Christmas that's terrific. At least he's reading. Doesn't matter whether it's comics or not. He's reading. So, I just buy him the latest comic books in those series.

In fact, all of my grandchildren know that when it comes to Christmas presents that some of those will be books.  And,  believe it or not, they look forward to them.  After all, when it comes to physical presents nothing lasts longer with children than books.  That's a win-win in my book. No pun intended....lol

Books and reading gets them every time. LOL At first my grandson's enthusiasm was lukewarm.  When the mania ended his enthusiasm was he couldn't get it fast enough.  Grandma definitely knows best when it comes to books.

So, the moral of the story is that - "Just because a present isn't initially received with the greatest of enthusiasm doesn't mean it won't be appreciated over time."  When it comes to books Grandma knows best!


Monday, December 10, 2018

"Stained Glass" Ornaments Kit by Design Works Crafts


When I first looked at the "Stained Glass" ornaments kit by Design Works Crafts I thought how pretty and how wonderful they would look on my pencil Christmas tree. They looked pretty simple and easy to me.  Turns out looks can be deceptive.   It took me much longer than I first thought to finish the six ornaments in this kit.


What I didn't know before I bought the kit was that there was a lot of black floss highlighting for each ornament that transformed them from a pretty ornament to a beautiful ornament.  The highlighting really makes them stand-out and is well worth the extra time it takes to finish each ornament.  It's quite amazing to see them in person.  What added to the length of time was the black highlighting is done one stitch at a time.

The "Stained Glass" ornament kit contained the color cotton floss, #14 plastic canvas, needle and instructions.  The pattern uses full counted cross-stitch and outline stitching for emphasis and depth.


This is the first time I have worked with the #14 plastic canvas and I have to tell you it was wonderful.  It was flexible enough to just hold it in your hands but also rigid enough to allow you to cross-stitch it without any problem.


The chart was 11 1/2" by 17" and had four of the ornaments vertically aligned in a row along the top of the chart with two of the ornaments horizontally laid in a row along the bottom.  The intent was to cross-stitch the plastic canvas in the same manner.  However, I decided to cut the plastic canvas into six pieces beforehand as it would make it easier to cross-stitch each of the ornaments.


The pattern came with starting, stitching and finishing instructions as well as a sample of the two stitches required and a black and white chart with black and white coded symbols.  The symbols on the keys and chart were basically easy to read and follow but, for some reason, I kept confusing two of the triangle symbols every time I looked at the black and white chart.  If the black and white chart were just a little bigger or were actually color coded I think this could have been avoided.


I did have a few problems with the embroidery floss contained within the kit.  Unfortunately there wasn't enough black, light red, and green embroidery floss contained within the kit so I had to use some from my stash.

Also, the floss color key chart had the number of floss strands included within the kit for each color floss but 8 of colors were different than the actual numbers of floss strands contained within the kit.  For all 8 of these colors there was more floss strands than the key indicated.


I had no problem cross-stitching the "Stained Glass" ornaments and then cutting the plastic canvas close to the sides of the ornaments according to the finishing instructions.  I didn't like leaving the ornaments with the back threads showing so I decided to finish the back of my ornaments with white felt.

I rubbed Glue Stic on the back of my ornaments and then glued a rectangle piece of white felt to the back.  Once the felt was glued on I cut the white felt in the same shape as the ornament and then stitched the plastic canvas to the white felt along the sides of each ornament with two strands of white embroidery floss. I created a hanger for the top of each ornament with two strands of the white embroidery floss.


After I was done with all the ornaments I hung them on my pencil tree.  They all look beautiful there.


I was thrilled with the way my "Stained Glass" ornaments turned out and hope you like them too.


Saturday, August 11, 2018

Let It Snow - Mill Hill Sticks Cross-Stitch Ornament


As you know from my previous post it's the middle of the summer and sweltering here.  More heat and humidity than I would like.  Yet, I'm making Christmas ornaments.  Maybe the coldness of my craft project will have an effect on Mother Nature.  I doubt it, but one can be hopeful.

This time the ornaments that I'm working on  are a pair of 3" by 3" Christmas stocking ornaments by Mill Hill - Sticks line.

The "Let It Snow" ornament kit contained the presorted thread, 14 count perforated paper, needles (stitching and beading), beads and instructions. The pattern uses full counted cross-stitch and outline stitching for emphasis and depth.


The pattern came with starting, stitching and 2 different back finishing instructions as well as samples of the various stitches required, beading instructions and color code chart (with code #'s, color names, and cross-stitch symbols) and a black and white chart with black and white coded symbols.  The colors and symbols on the keys and chart were easy to read and follow except the symbols under the stars that were to be highlighted with floss were hard to read.

The only other problem I had with the kit was there was only one strand of the medium blue DMC floss and I ran out of it before I started the 2nd stocking.

I had no problem cross-stitching the stocking ornaments and then cutting the perforated paper close to the sides of the stocking figures. This kit did come with 2 different options for finishing the back the ornaments back to back.  The other was creating two ornaments and finishing the back with felt or card stock.  I opted to create two ornaments and finish mine with green felt which I glued to the back with an Avery disappearing color glue stick.  I wanted to finish the edges by whip stitching around the edges of the perforated paper with 4 strands of he green floss so I trimmed the edges and left enough of the felt and perforated paper to stitch around the edges.


Instead of adding a floss hanger according to the instructions I opted to sew two strands of floss to the top of the ornament, securing the edge of the ornament with an additional stitch and then tying the ends at the top in a large knot.  They're going to look great on my pencil Christmas tree

I was very happy with the way my "Let It Snow" stocking ornaments turned out and hope you like it too.

Friday, August 10, 2018

Joy - Mill Hill Sticks Cross-Stitch Ornament


It's the middle of the summer and sweltering here.  More heat and humidity than I would like.  So, you're probably wondering why I'm showing you two Christmas cross-stitch ornaments I just finished.  Well, when I'm making ornaments for the Christmas holiday season I like to start early. They are a pair of 3" by 3" stocking ornaments by Mill Hill - Sticks line.

I just love to cross-stitch small ornaments with the word "joy" in them because my mother's name was Joy and when I look at them I think of her.

The "Joy" ornament kit contained the presorted thread, 14 count perforated paper, needles (stitching and beading), beads and instructions.  The pattern uses full counted cross-stitch and outline stitching for emphasis and depth.


The pattern came with starting, stitching and 2 different back finishing instructions as well as samples of the various stitches required, beading instructions and color code chart (with code #'s, color names, and cross-stitch symbols) and a black and white chart with black and white coded symbols.  The colors and symbols on the keys and chart were easy to read and follow.

I had no problem cross-stitching the stocking ornaments and then cutting the perforated paper close to the sides of the stocking figures. This kit did come with 2 different options for finishing the back of the ornaments. The first was finishing them back to back.  The other was creating two ornaments and finishing the back with felt or card stock.  I opted to create two ornaments and finish mine with green felt which I glued to the back with an Avery disappearing color glue stick.  I wanted to finish the edges by whip stitching around the edges of the perforated paper with 4 strands of the green floss so I trimmed the edges and left enough of the felt and perforated paper to stitch around the edges.


Instead of adding a floss hanger according to the instructions I opted to sew two strands of floss to the top of the ornament, securing the edge of the ornament with an additional stitch and then tying the ends at the top in a large knot.  They're going to look great on my pencil Christmas tree.

I was very happy with the way my "Joy" stocking ornaments turned out and hope you like it too.

Wednesday, June 27, 2018

My Best Friend Santa Cross-Stitch Ornament


It definitely isn't any where near the holiday season so I'm sure you're wondering why I'm showing you a Christmas cross-stitch ornament I just finished.  Well, I started this after last Christmas and just finished it the other day.  It's a 3 1/2" by 5" ornament so it only takes a few hours to make but I only had a chance to work on it for a few minutes here or there.  As a result, it took months to finish.

I just love to cross-stitch small ornaments especially when they contain images of dogs.  I also love cross-stitching small ornaments because they don't take a lot of time to complete.So, when I saw the "My Best Friend Santa" cross-stitch ornament from Mill Hill I knew I was going to make it.

The "My Best Friend Santa" ornament kit contained the presorted thread, 14 count perforated paper, needles (stitching and beading), beads and instructions.  The  pattern uses full counted cross-stitch and outline stitching for emphasis and depth.

The pattern came with starting, stitching and back finishing instructions as well as samples of the various stitches required, beading instructions and color code chart (with code #'s, color names, and cross-stitch symbols) and a black and white chart with black and white coded symbols.  For the most part the colors and symbols on the keys and chart were easy to read and follow.  However, the symbols behind the highlighted lines were hard to read at times.  


A JS20-5106 Correction sheet for two of the key symbols that were wrong was included in the kit.  The medium salmon symbol was wrong and the white symbol was wrong in the code chart.

I had no problem cross-stitching the Santa ornament and then cutting the perforated paper close to the sides of the Santa figure. This kit did come with instructions for finishing the back and I opted to finish mine with red felt which I glued to the back with an Avery disappearing color glue stick.  
I trimmed the edges so the felt was aligned with the perforated paper.  

Instead of adding a floss hanger according to the instructions I opted to sew two strands of floss to the top of the ornament, securing the edge of the ornament with an additional stitch and then tying the ends at the top in a large knot. 


Unfortunately I can't tell you how many hours it took me to complete this ornament as I've been working on it little by little over the last few months and didn't keep track of it. 


I was very happy with the way my Mill Hill Counted Cross Stitch, Santa and best friend ornament turned out and hope you like it too.


Friday, June 22, 2018

A Crazy Quilt Bridal Purse For My Granddaughter


Six years ago I took an Artful Gathering class by Pat Winter on making a crazy quilt purse.  It was my first Artful Gathering class and I LOVED it.  That's when I fell in love with crazy quilting.  It was just so much fun and produced such beautiful results.


As with every craft I try, crazy quilting gave me all sorts of ideas for creating other beautiful items that I could make and give as gifts.   I had a great idea involving special occasions and bought a bunch of fine fabrics when they were on sale.  If you want to check out what fabrics I bought my post is here.  Suffice to say - there were a lot of them.


I never had the time to make any of the gifts I had in mind to do when I bought the fabrics but when one of my granddaughters got engaged to be married I decided to put some of the white and cream fine fabrics to use.

She wanted a "bohemian, garden party, woodland" type wedding so I thought a "bohemian" type crazy quilt purse to hold small things she might want with her at the wedding, like her cell phone, keys, tissues, and more, would be appropriate.

I decided to use a graphic of a Victorian bride that I had printed on fabric as the center image and arranged the fabrics in a crazy quilt pattern around that image - using Pat Winter's purse pattern that I had from the Artful Gathering class.


I added all sorts of creative embroidery laces and trims as well as silk floral, silk ribbon flowers, fringes, beaded trims, embroidered motifs, etc.


I had decided before hand that I wanted to add a white cord around the edges and use that same cord as a shoulder strap and to line the purse with a fine white fabric.  Instead of using snaps to hold the top closed I decided to use a white frog closure sewn to the top inside center of the purse.


I was pleased with the way the purse turned out.  Definitely bohemian, garden party and woodland.


Wednesday, June 20, 2018

Wrapping Paper, Gift Bags, Tissue Paper and Ribbons


I just love coordinating designs, especially when it comes to gift giving.  So, when I had the occasion to utilize some of my custom gift wrap designs from my Linda Walsh Originals page at Spoonflower.com I jumped at the chance.  The custom gift wrap is part if a bridal collection I set-up at Spoonflower.com and is for sale here.


I love wrapping my presents with ribbons so I decided to add a coordinating ribbon design for the boxed gift and created one at Zazzle.


I also created a custom gift card utilizing the same design and tucked it under the bow I had fastened to the top of the gift.


My gift included both a large box and something I had made which I wanted to put into a gift bag as it was too delicate to wrap.  So, I created a custom gift bag and custom tissue utilizing the same design at Zazzle as well.


I had a little of the custom ribbon left over after wrapping the box present and added it to the top of the gift bag.  I also had a little of the custom gift wrap left over and created a gift tag which I folded in half for the top of my gift bag as well.

I created the custom gift bag, tissue, ribbon, and gift card at Zazzle as private designs.  I'm contemplating opening them up for sale in their public marketplace but haven't quite decided to do that as of yet.  Do you think I should?


Sunday, January 21, 2018

Large Tote Bags For Christmas Presents and Free How To Make A Large Lined Tote Bag E-Book


I am a big fan of tote bags.  The more the merrier.  I use than for all sorts of reasons as I'm sure you all do too.  For the most part they work out great, but once in awhile, they're just not big enough.  As a result, I'm always on the look out for larger ones.

I'm sure all of you have your fabric stash piles like I do.  For years now I've been looking at two lightweight cotton twill fabrics in a pile on top of my sewing basket.  They're there to remind me to do something with them. So, of course, they've sat there for years now.

Well, this year I decided to make a few really big lined tote bags with long straps for Christmas presents.


I had previously bought 5 yards of my Beautiful Victorian Flowers Fabric #1  custom fabric design out of lightweight cotton twill and decided that I'd use it to make three lined tote bags.


My sister had given me several yards of this blue and white check fabric that she had gotten from a friend and had given to me. She was cleaning out her stash of fabrics and knew I wouldn't refuse it.  It would be used at some point in time.  In looking at my Beautiful Victorian Flowers Fabric #1  custom fabric design I decided the blue and white check would be a perfect compliment for a lining not only for these three bags but for the Victorian Pastel Water Lilies Flower Fabric 15  cut and sew tote bag as well.

I decided a  22" wide by 21" long by 6" deep lined tote bag with a square corner would be a perfect size for these three as well.  I figured I would start with the three yards of my Beautiful Victorian Flowers Fabric #1  custom fabric design out of cotton twill first.

Here's how I made my tote bag:

Supplies Needed Per Bag:

1 Yard of 58" wide Lightweight Cotton Twill Fabric - Beautiful Victorian Flowers Fabric  (for bag)
1 1/4 Yards of 42" Wide Cotton Fabric (for lining)
Sewing Thread and Upholstery Thread
1/2" Lace Trim - 1 1/2 Yards
1 Yard of Fusi-boo Batting

Instructions:

RS - Right Sides       RST - Right Sides Together       RSO - Right Sides Out
WS - Wrong Sides    WST - Wrong Sides Together    WSO - Wrong Sides Out


1) Cut two sections of lightweight cotton twill fabric 22" wide by 21" long, two sections of the cotton fabric lining 22" wide by 21" long, and  two sections of the fusi-boo batting 22" wide by 21" long.


2) Cut two sections of the lightweight cotton twill 5" wide by 31" long and two sections of the fusi-boo batting 3" wide by 29" long for the handles.


3) Iron the two lightweight cotton twill sections and two cotton fabric sections for the tote bag.

4) Sandwich one of the fusi-boo pieces in between the WS of one of the lightweight cotton twill fabric pieces and WS of one of the cotton fabric pieces so you have a 3-layer tote bag section.  Do the same with the other lightweight cotton twill piece, fusi-boo piece, and other cotton fabric piece. You should have two 3-layer tote bag sections.

5) Iron the RS of the lightweight cotton twill fabric and then turn the 3-layer tote bag section over and iron the RS of the cotton fabric so the fusi-boo fabric is fused to the WS of both the lightweight cotton twill and cotton fabrics. Do the same for the other 3-layer tote bag sections.
 

6)  The edges of the two 3-layer tote bag section will be labeled as shown in the illustration above.


7)  Baste the top edge of each of the two 3-layer tote bag section pieces.


8) The edges of the handles will be labeled as shown in the illustration above.

9)  Turn one of the handle pieces over and place one of the 29" by 3" Fusi-Boo pieces on the WS of the handle piece so it is evenly centered.  Do the same for the other handle piece.


10) Turn the side edges of the handle fabric over 1" WST so they cover the edges of the fusi-boo as shown in the illustration above and iron the 1" sides.  Do the same for the other handle piece.


11) Fold the bottom side edge over 1 1/2" so it meets the top side edge and iron both sides so the fusi-boo is fused in between the side edges of the handle. The handle piece should now measure 1 1/2" by 31".  Do the same for the other handle piece.


12)  Top-stitch the 31" folded over side edge 1/4" from the edge and then top-stitch the other side edge 1/4" from the fold. Do the same for the other handle piece and then iron both and set them aside.


13) Place the two tote bag sections RS so the lightweight cotton twill fabrics are RST and so the  basted top edge, side edges, and bottom edges are even.


14) With RST stitch the two tote bag sections along the sides edges and bottom edge using a 3/4" seam allowance.  Trim the seams leaving a 3/8" seam allowance.


15) Finish stitch along the side edges and bottom edge using a zig-zag stitch or overlock stitch.


16) You want to square the bottom left and right corners of the tote bag sections to form a square bottom 6" wide with 3" on the left side and 3" on the right side.  Measure 3" up from the bottom left corner edge and mark the four Point A’s on the side edge of the two tote bag sections as shown in the illustration above. You should have two Point A’s on the left hand side edge of the sewn tote bag sections and two Point A’s on the right hand side edge of the sewn tote bag sections. Measure 3" across the bottom edge from the left corner bottom edge and the mark the four Point B’s on the bottom edge of the two tote bag sections as shown in the illustration above. You should have two Point B’s on the left hand side bottom edge of the sewn tote bag sections and two Point B’s on the right hand side bottom edge of the sewn tote bag sections. Mark the four Point C’s on the side edge of the two tote bag sections as shown in the illustration above. You should have two Point C’s on the left hand side edge of the sewn tote bag sections and two Point C’s on the right hand side edge of the sewn tote bag sections. Mark the four Point D’s on the side edge of the two tote bag sections as shown in the illustration above. You should have two Point D’s on the left hand side edge of the sewn tote bag sections and two Point D’s on the right hand side edge of the sewn tote bag sections.

17) With RST bring the Points B on the left hand side bottom edge of the sewn tote bag sections to meet the Points A, on the left hand side edge, as indicated in the illustration above and pin to hold.  Do the same for the right hand side Points A and B.

18) Sew straight across on the left hand side edge from Point C on the front hand side edge to Point C on the back left hand side edge. Your sewn line should measure 6".  Do the same for the two Point C’s on the right hand side edge of the sewn tote bag. This should create a triangle on the sides and a rectangle on the bottom of the sewn tote bag. Fold the triangle down along the bottom edge and hand stitch at the top of the triangle to hold it to the bottom edge seam with upholstery thread.


19) Turn the bag RSO and iron the seams.


20)  Measure 4" from the top front top edge and top front right edge.  Do the same for the top back top edge. 


21) With RST place the bottom edge of one of the straps at the 4" mark on the top front left top edge and the top edge of that same handle RST on the top front right top edge with the handle facing downwards towards the bottom of the tote bag and pin both to hold. Do the same for the remaining handle and top back top edge.

22) Turn the tote bag inside out so the handles are facing downwards on the inside of the bag and the cotton lining fabric showing on the outside.  With RST fold the top edge of the tote bag and handle under twice and pin to hold.

23) Stitch the top edge of the folded under top edge of the tote bag 1/4" from the bottom edge of the folded down section.


24)  Pull the handles up and with RST pin the handles to the top edge of the tote bag. Stitch 1/4" from the top edge of the folded down area and handle.


25)  Turn the tote bag RSO.  Cut a piece of the 1/2" lace trim to fit around the top edge of the tote bag overlapping the edges by 2".  Fold one edge of the lace trim WST and then pin the lace trim to the top edge of the tote bag along the sewn line on the bottom of the folded down section. Continue pining around the top of the tote covering your sewn line until meeting the lace trim again.  Fold the edge of the lace trim under 1" and pin to hold.  Stitch the lace trim to the tote bag stitching along the center line of the lace trim.


26) Your tote bag should look as shown in the picture above.


27) The inside of the tote bag should look as shown in the picture above.

Since I was making them anyway I decided to create an e-book tutorial showing you how I made my large tote bags.
To view and download my free e-pattern please CLICK HERE.  You'll be brought to Google Drive where you can view my free e-pattern. Then just download my free .pdf e-pattern  by clicking on the down arrow in the top center.

Once my e-product is downloaded to your computer you can save it and print it. I hope you enjoy my free e-products.

For more information on all my free e-patterns, e-printables and e-books please CLICK HERE.

Please respect My Terms of Use:  All patterns, e-patterns, printables, e-printables, e-books, graphics, tutorials, how-to's, articles and other e-products © 2004-2023 Linda Walsh Originals-Designs by Linda Walsh. All rights reserved. Commercial selling or reselling by any means prohibited without the written consent of Linda Walsh.

Patterns, e-patterns, printables, e-printables, e-books, graphics, tutorials, how-to's, articles and other e-products are for personal use only. You may not modify, photocopy, download, upload, post, transmit, display, perform, publish, license, reprint, create derivative works from, mass duplicate, re-sell, digitize, and reproduce in any other form (print, digital or electric) or commercially apply, embed, share, Email, or redistribution in any other means. Use of any of the above is prohibited without the written permission of Linda Walsh.

However, you may link to my website(s)/blog(s) and the individual page(s)/blog post(s) (including 1 picture) but do not copy, reprint or duplicate my website(s)/blog(s) or individual page(s)/post(s ) without my permission.

Items made from Linda Walsh Originals E-Patterns are intended for personal use for fun or small scale personal and business profit as long as you credit us with the design. Large scale commercial use (i.e. mass production) of items made from Linda Walsh Originals E-Patterns are by permission only.

Please see my Terms and Conditions for additional information.

Copyright © 2004 - 2023 - All Rights Reserved - Written By Linda Walsh of Linda Walsh Originals and Linda's Blog. Linda is a doll maker and doll pattern designer.