Showing posts with label picture. Show all posts

Monday, May 31, 2021

Fun With Paper Dolls - New Christmas Mixed Media Art Picture Creations


As mentioned in my previous post, over a year ago JoAnn Robinson, who is an amazing artist, posted about some of the mixed media digital paper doll images that she had created.   I saw them and just fell in love with them.  They were just adorable and I knew I had to create something with them.  

Jo is an online friend of mine from some of my Artful Gathering online classes who sells her digital art in her waifsNwhatnots Etsy store.  As I usually do I got carried away and ended up buying a lot of her digital images.  I just couldn't resist them.

Well, as craft projects usually go with me I wasn't able to play with them until a couple of weeks ago and play I did.  Jo's paper art doll images are just so much fun to create with and I couldn't resist creating mixed media art paper art doll pictures on art boards.  

I wanted to create different seasonal and holiday picture decorations of various art board sizes and envisioned some would hang on my wall and some would be stand alone art pictures in picture stands. 

I also wanted my mixed media pictures to create a 3d effect so I added a combination of collage images, sponge painting,  mixed media fibers, ribbons, buttons, 3d paper flowers, paper foliage, dried floral, and fringe. 

Given that Christmas is my all time favorite decorating season I knew I would love all of Jo's Christmas paper art doll images.  So, when I saw Jo's paper art doll star angels and elf I knew I would be making some of them right away.  They were the first pictures I created.  

I ended up making 3 pictures for the Christmas holiday decorating season and they are as follows:


For this picture I added glitter paint, puffy paint, fiber embellishments and paper flower embellishments.


Created from Jo's Christmas Star Bright Articulated Paper Doll Instant Digital Download.


For this picture I added glitter paint, fiber embellishments, silk ribbon floral embellishments, paper flora wired embellishments and paper flower embellishments.


For this picture I added fiber embellishments, elastic glittery embellishments, puffy glitter paint  and silk floral ribbon embellishments.


Please stay tuned for my subsequent posts as they show in more detail the mixed media paper art doll pictures I created for a present for one of my grandsons.

For this picture I added fiber embellishments, silk ribbon floral embellishments, paper flora embellishments and paper flower embellishments.

If you get a chance to visit Jo's waifsNwhatnots Etsy shop to see her adorable paper doll images I hope you end up playing like I did.  Way, way too much fun for a senior citizen to be having.... lol

Copyright © 2004 - 2023 - All Rights Reserved - Written By Linda Walsh

Sunday, May 30, 2021

Fun With Paper Dolls - New Fall and Halloween Mixed Media Art Picture Creations


As mentioned in my previous post, over a year ago JoAnn Robinson, who is an amazing artist, posted about some of the mixed media digital paper doll images that she had created.   I saw them and just fell in love with them.  They were just adorable and I knew I had to create something with them.  

Jo is an online friend of mine from some of my Artful Gathering online classes who sells her digital art in her waifsNwhatnots Etsy store.  As I usually do I got carried away and ended up buying a lot of her digital images.  I just couldn't resist them - especially the witches.

Well, as craft projects usually go with me I wasn't able to play with them until a couple of weeks ago and play I did.  Jo's paper art doll images are just so much fun to create with and I couldn't resist creating mixed media art paper art doll pictures on art boards.  

I wanted to create different seasonal and holiday picture decorations of various art board sizes and envisioned some would hang on my wall and some would be stand alone art pictures in picture stands. 

I also wanted my mixed media pictures to create a 3d effect so I added a combination of collage images, sponge painting,  mixed media fibers, ribbons, buttons, 3d paper flowers, paper foliage, dried floral, and fringe.

I ended up making 4 pictures for the fall and Halloween decorating season because the witches were too adorable to resist.  The pictures I created are as follows:


For this picture I added fiber embellishments, button embellishments, and paper flower embellishments.


Created from Jo's Halloween Witch Paper Doll Poe Crow And Friend Lenore Articulated Instant Digital Download.


For this picture I added fiber embellishments, paper flora embellishments, and paper flower embellishments.


For this picture I used two different sizes of Jo's witch images.  I also added fiber embellishments, button embellishments, paper flora embellishments, dried floral embellishments and paper flower embellishments.


For this picture I added fiber embellishments, silk ribbon floral embellishments, and paper flower embellishments.


Please stay tuned for my subsequent posts as they show in more detail the mixed media paper art doll pictures I created for the Christmas holiday season, spring season and as a present for one of my grandsons.

I still have a lot left to create when I get a chance.  I'm not sure when that will be but I do, eventually, end up with some free time when I can play with Jo's paper art doll images again.  

If you get a chance to visit Jo's waifsNwhatnots Etsy shop to see her adorable paper doll images I hope you end up playing like I did.  Way, way too much fun for a senior citizen to be having.... lol

Copyright © 2004 - 2023 - All Rights Reserved - Written By Linda Walsh


Saturday, May 29, 2021

A Mixed Media Art Picture For My Grandson


As mentioned in my previous post, over a year ago JoAnn Robinson, who is an amazing artist, posted about some of the mixed media digital paper doll images that she had created.   I saw them and just fell in love with them.  They were just adorable and I knew I had to create something with them.  

Jo is an online friend of mine from some of my Artful Gathering online classes who sells her digital art in her waifsNwhatnots Etsy store.  As I usually do I got carried away and ended up buying a lot of her digital images.  I just couldn't resist them.

Well, as craft projects usually go with me I wasn't able to play with them until a couple of weeks ago and play I did.  Jo's paper art doll images are just so much fun to create with and I couldn't resist creating mixed media art paper art doll pictures on art boards.  

When I saw one of Jo's art doll digital images of a Victorian man in the moon I knew I had to make a picture from him as a graduation present present for my grandson.  He would be perfect as a handmade gift that I could give him and the words were definitely fitting for a college graduation.  

I decided to sponge paint him using 6 different masculine metallic colors and added lace for a 3d effect for his ascot as well as adding paper flowers, ribbon embellishments and button embellishments.


I wanted his image to stand out from the art board so I pasted his image to thick watercolor art pages and then pasted those to the art board I had sponge painted.


I still have a lot left to create when I get a chance.  I'm not sure when that will be but I do, eventually, end up with some free time when I can play with Jo's paper art doll images again.   

If you get a chance to visit Jo's waifsNwhatnots Etsy shop to see her adorable paper doll images I hope you end up playing like I did.  Way, way too much fun for a senior citizen to be having.... lol

Copyright © 2004 - 2023 - All Rights Reserved - Written By Linda Walsh

Friday, May 28, 2021

Playing With Mixed Media Paper Dolls and Art Pictures For The Spring


As mentioned in my previous post, over a year ago JoAnn Robinson, who is an amazing artist, posted about some of the mixed media digital paper doll images that she had created.   I saw them and just fell in love with them.  They were just adorable and I knew I had to create something with them.  

Jo is an online friend of mine from some of my Artful Gathering online classes who sells her digital art in her waifsNwhatnots Etsy store.  As I usually do I got carried away and ended up buying a lot of her digital images.  I just couldn't resist them.

Well, as craft projects usually go with me I wasn't able to play with them until a couple of weeks ago and play I did.  Jo's paper art doll images are just so much fun to create with and I couldn't resist creating mixed media art paper art doll pictures on art boards.  

I wanted to create different seasonal and holiday picture decorations of various art board sizes and envisioned some would hang on my wall and some would be stand alone art pictures in picture stands.

I also wanted my mixed media pictures to create a 3d effect so I added a combination of collage images, sponge painting,  mixed media fibers, ribbons, buttons, 3d paper flowers, paper foliage, dried floral, and fringe.  

I absolutely adored Jo's bunnies and decided to use two of them in one large art board picture for the wall in my farmer's porch.  I ended up making 2 pictures for the spring and summer decorating season and they are as follows:


For this picture I added fiber embellishments, silk ribbon floral embellishments, paper flora embellishments and paper flower embellishments.


I absolutely love sponge painting and I tend to favor certain metallic paint colors for my sponge painting.  To my surprise, unconsciously, I ended up using metallic paints for Jo's Easter Lamb image picture that matched the jester art dolls I had created during the Artful Gathering 2019 Session 1 "Leonardo Loves Zia" Class by Christina Zinnia Galliher that I took two years ago. 

I love how they look together and decided to remove the cross-stitch picture I usually had with them and replace it with my new mixed media lamb paper art doll picture.


They looked perfect with the two jesters and paper flowers I created based on that class, which are shown in the picture above.

For this picture I added fiber embellishments and ribbon embellishments.
 

Please stay tuned for my subsequent posts as they show in more detail the mixed media paper art doll pictures I created for the Christmas holiday season and as a present for one of my grandsons.

I still have a lot left to create when I get a chance.  I'm not sure when that will be but I do, eventually, end up with some free time when I can play with Jo's paper art doll images again.   

If you get a chance to visit Jo's waifsNwhatnots Etsy shop to see her adorable paper doll images I hope you end up playing like I did.  Way, way too much fun for a senior citizen to be having.... lol


Thursday, May 27, 2021

Fun With Mixed Media Paper Art Doll Pictures


Over a year ago JoAnn Robinson, who is an amazing artist, posted about some of the mixed media digital paper doll images that she had created.   I saw them and just fell in love with them.  They were just adorable and I knew I had to create something with them.  

Jo is an online friend of mine from some of my Artful Gathering online classes who sells her digital art in her waifsNwhatnots Etsy store.  As I usually do I got carried away and ended up buying a lot of her digital images.  I just couldn't resist them.

Well, as craft projects usually go with me I wasn't able to play with them until a couple of weeks ago and play I did.  Jo's paper art doll images are just so much fun to create with and I couldn't resist creating mixed media art paper art doll pictures on art boards.  

I wanted to create different seasonal and holiday picture decorations of various art board sizes and envisioned some would hang on my wall and some would be stand alone art pictures in picture stands.  

I ended up making 4 pictures for the fall and Halloween decorating season, 3 for the Christmas holiday decorating season, two for the spring and summer decorating season and one as a graduation present for my grandson.

I still have a lot left to create when I get a chance.  I'm not sure when that will be but I do, eventually, end up with some free time when I can play with Jo's paper art doll images again.  

If you get a chance to visit Jo's waifsNwhatnots Etsy shop to see her adorable paper doll images I hope you end up playing like I did.  Way, way too much fun for a senior citizen to be having.... lol


Sunday, September 20, 2020

How I Made My Stenciled Shadowbox Pictures


I just love seasonal and holiday shadowboxes and have made many over the years. Some were decorations, some were given as gifts and some have been for sale.


The shadowboxes I made were mostly made out of 1/2"x 1" pine for the frames and 1/2" pine boards for the centers.  The centers were two different sizes: 4” by 4” and 5” by 7” wood pieces.  


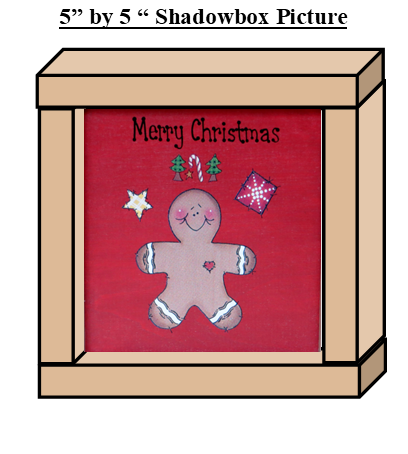
The frames were cut from the wood and were painted one color and the center boards were painted another. The finished shadowboxes ended up being 5” by 5” and 6” by 8” when framed.  

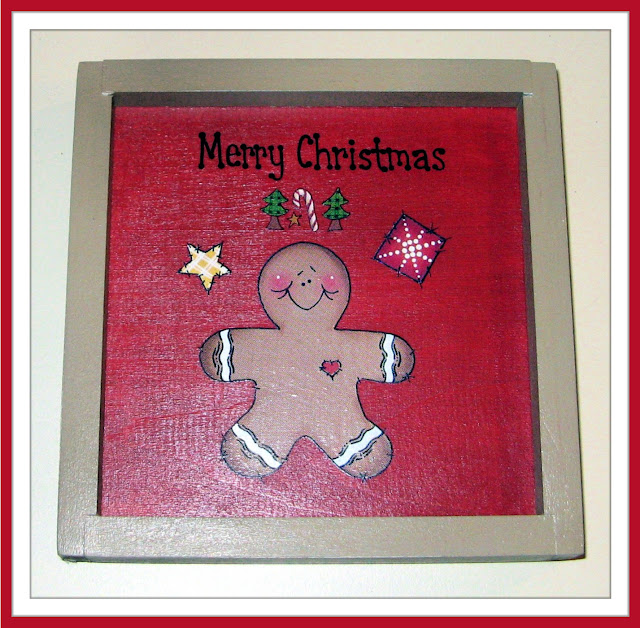
The pictures were created by adding rub-on stencils to the center boards to complete the pictures.


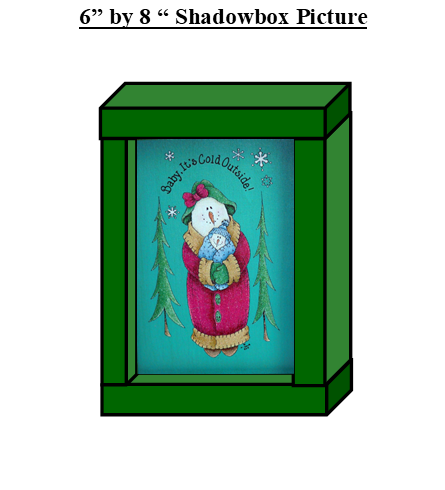
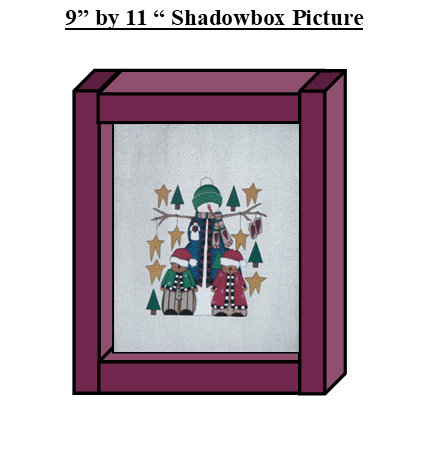
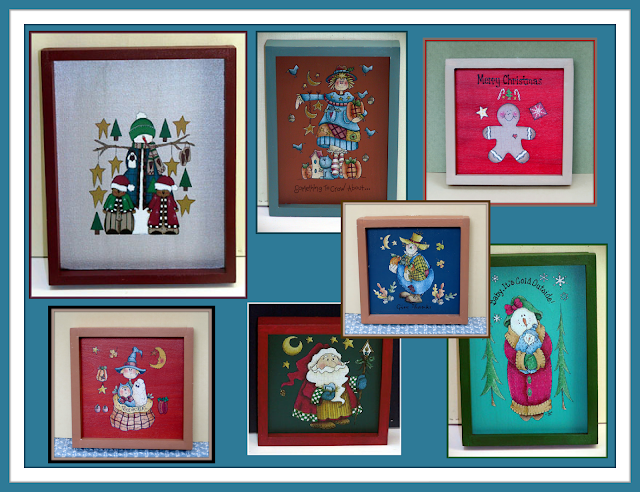
There was only one exception to the wood pictures I made and that was for the snowman picture shown in the top left corner of the collage above and in the picture to the right. That shadowbox was created using pine wood for the frames and a 8"x 10" stretched canvas board for the enter. 

The finished picture measured 9” by 11” when framed.

Like the other shadowbox pictures I painted the canvas panel a different color than the wood frames and then applied the rub-on stencils that I had purchased at various arts & crafts stores to create the picture. 

Brush on varnish was added to seal everything. 

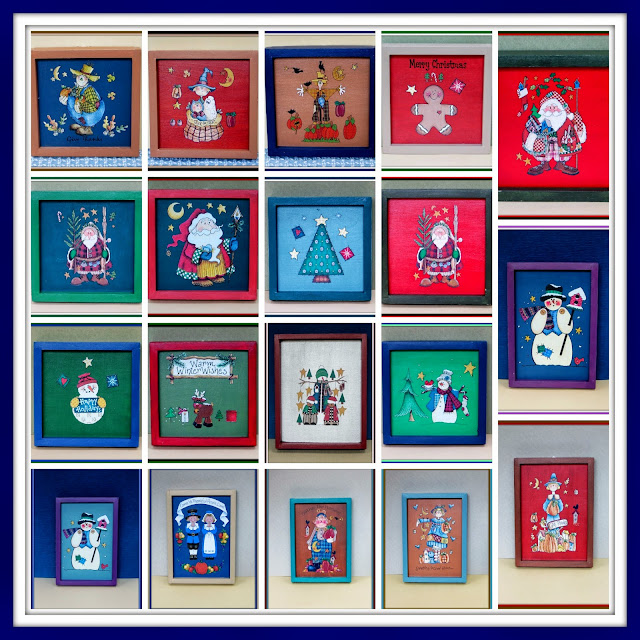
In 1999 I ended up making twenty-four 5” by 5” shadowbox pictures, eight 6” by 8” shadowbox pictures, and two 9” by 11” shadowbox pictures.  

I made shadowbox pictures for Christmas holiday decorations, fall seasonal decorations, winter seasonal decorations, and Halloween decorations.  I ended up giving over half of them away as Christmas presents that year.

That is generally how I made them.  

Here’s exactly how I made them:

Supplies Needed

1/2” by 1” Pine Wood  - For Wood Frames (2 Feet Long for Each 5” by 5” Picture)
1/2” by 1” Pine Wood  - For Wood Frames (3 Feet” Long for Each 6” by 8” Picture)
1/2” by 1” Pine Wood  - For Wood Frames (4 Feet” Long for Each 9” by 11” Picture)
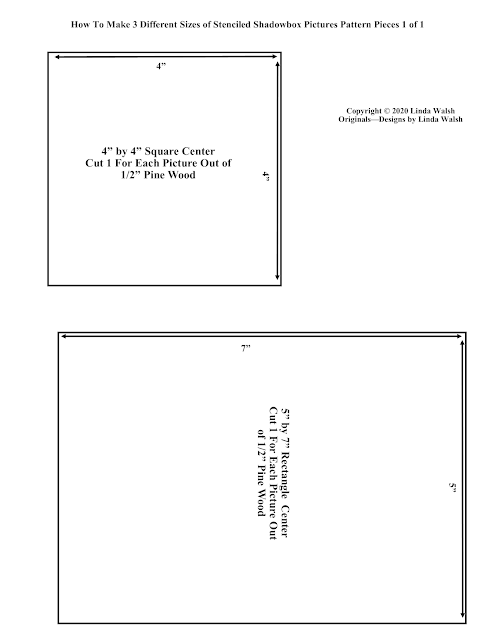
1/2” Pine Wood  - For Wood Centers (1/2” by 7” by 7” for Each 5” by 5” Picture)
1/2” Pine Wood  - For Wood Centers (1/2” by 8” by 10” for Each 6” by 8” Picture)

Determine how many shadowbox pictures you will be making for each size picture and then adjust the amount of wood you will need to buy for the frames and for the centers. 
 
8” by 10” Stretched Canvas Boards - One For Each 9” by 11” Shadowbox Picture
Rub-On Stencils or Transfers With Popsicle Sticks 
Acrylic Paints
Pencil
Varnish
Paint Brushes
Thin Nails - 3/4” Long
Thin Nails - 1” Long
Mitre Saw or Table Saw
Sandpaper
Hammer
Saw Tooth Hanger - 1 For Each Picture
Paper Towel

Instructions For 5" by 5" Shadowbox Picture: 

The shadowboxes may be different sizes but they are basically made the same way so follow the directions below for the 5” by 5” shadowbox just changing the wood needed for the 6” by 8” picture and 9” by 11” stretched canvas board wood frame.


1)  Use the pattern piece as a guide for the 5” by 5” picture and lightly draw a 4” by 4” square on the 1/2” pine wood with the pencil.  Do the same for the 6” by 8” picture and it’s respective pattern piece.


Pictures of the pattern piece sheet is shown above.  For full size pattern piece sheets please CLICK HERE to download the full size pattern piece sheets for all twelve of the leaves from my free How To Make 3 Sizes of Stenciled Shadowbox Pictures - Linda's How-Do-I Series? e-book.

2)  Cut the wood piece for the 4” by 4” square center out of the 1/2” pine wood using the mitre saw or table saw.  

3)  Use the sandpaper to lightly sand the front and back of the wood piece, then wipe clean with a damp paper towel and let it dry.

4)  Cut the four wood pieces for the frame out using the mitre saw or table saw.

5)  Cut two 5” long pieces out of the 1 2/” by 1” pine wood, then wipe clean with a damp paper towel and let each piece dry.

6)  Cut two 4” long pieces out of the 4” by 1” pine wood, then wipe clean with a damp paper towel and let each piece dry.

7)  Use the sandpaper to lightly sand the wood pieces, then wipe clean with a damp paper towel and let it dry.


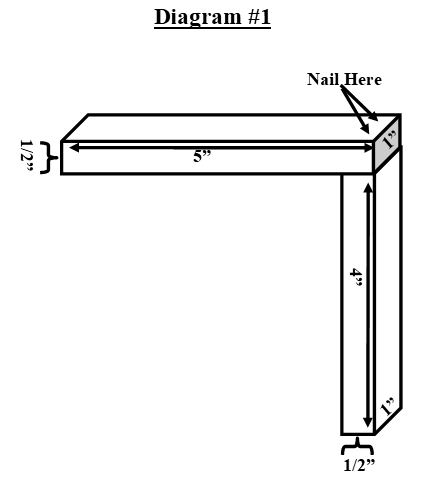
8)  Position the end of one of the 5” long pine wood pieces to the end of one of the 4” long pine wood pieces, as shown in Diagram #1.

9)  Nail two of the 1” long thin nails to the end of the 5” long piece spacing them evenly at the end about 1/4” from the edge, as shown in Diagram #1.


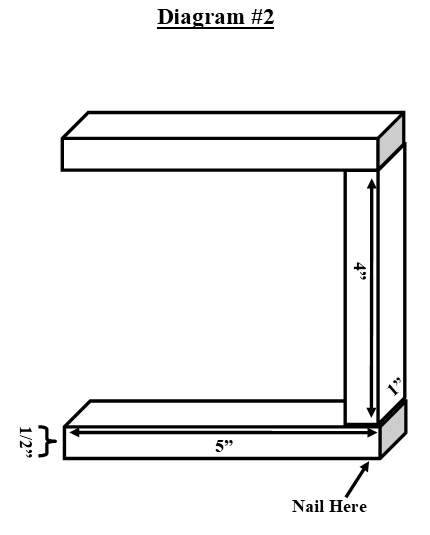
10)  Position the end of the other 5” long pine wood pieces to the other end of the 4” long pine wood piece, as shown in Diagram #2.

11)  Nail two of the 1” long thin nails to the end of the 5” long piece spacing them evenly at the end about 1/4” from the edge, as shown in Diagram #2. 


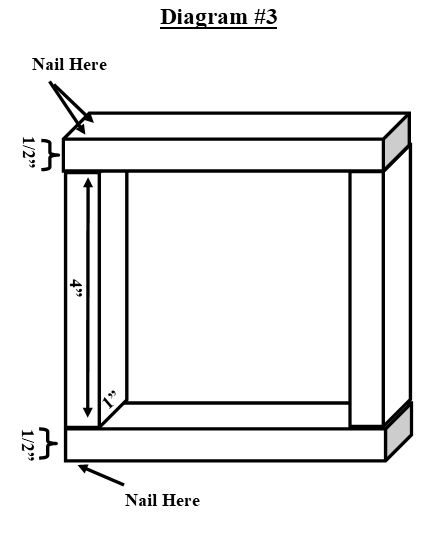
12)  Position the end of the remaining 4” long pine wood piece in between the two 5” long pieces so the ends all match, as shown in Diagram #3.

13)  Nail two of the 1” long thin nails to both of the ends of each of the 5” long pieces spacing them evenly at the end about 1/4” from the edge, as shown in Diagram #3. 


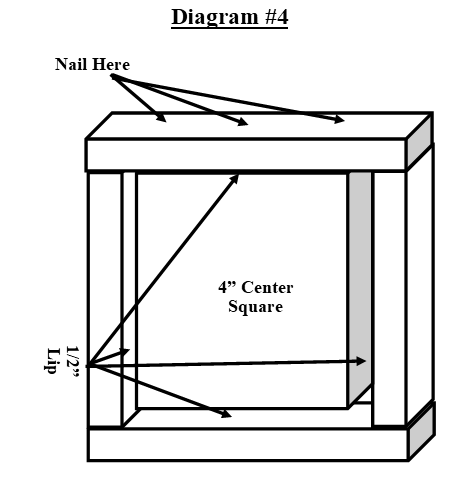
14)  Place the 4” square wood center piece inside the 5” by 5” wood frame so all four sides are flush with the back of the wood frame leaving a 1/2” shadowbox lip on the front of the frame, as shown in diagram #4.

15)  Now you want to insert the center square and nail it to the wood frame.  Nail three of the 3/4” long thin nails to each of the four sides spacing them evenly between the length of the 4” center square along each of the sides of the frame about 1/4” from the center square edge and frame bottom edge, as shown in Diagram #4. 


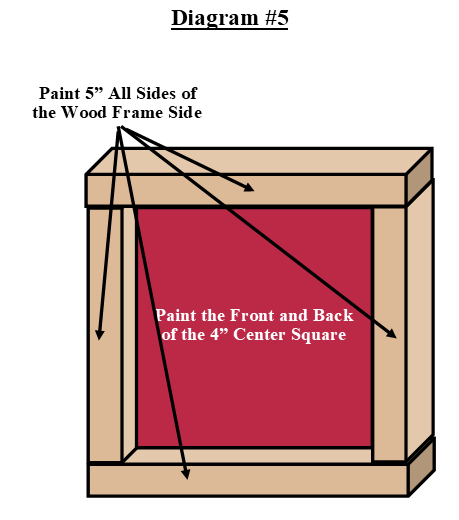
16) Paint the front and back of the 4” by 4” center with the acrylic color you’ve chosen for this picture and let the paint dry, as shown in Diagram #5.

17)  Paint all the sides of the 5” by 5” frame with the acrylic color or colors you have chosen for this picture and let the paints dry, as shown in Diagram #5. 


18)  Place the rub-on stencils that you want for the picture on the front of the 4” by 4” center piece and then rub them on with the popsicle stick following the directions for the stencil you bought, as shown in Diagram #6.

19)  When your stencil is securely positioned on the center piece apply the varnish to the entire picture with the paintbrush and let it dry, as shown in Diagram #6.

20)  When your picture is dry apply the sawtooth picture hanger to the center back of the top of the frame and hang your stenciled shadowbox picture on a wall.  


For the 6” by 8” shadowbox picture follow the directions for the 5” by 5” shadowbox picture Step #1 through Step #20 except change the dimensions of the center rectangle and the length of the sides of the frame.


For the 9” by 11” shadowbox picture follow Step #4 through Step #13 for creating the frame.  For Step #14 through Step #20 paint the 8” by 10” stretched canvas board first before inserting it into the wood frame in Step#14.

Congratulations! Your three different size shadowbox pictures are done.  Enjoy!

I also created a free e-book for you showing how I made my three sizes of stenciled shadowbox pictures.


To view and download my free e-book please CLICK HERE. You'll be brought to Google Drive where you can view my free e-book. Then just download my free .pdf e-book by clicking on the down arrow in the top center.

For more information on all my free e-patterns, e-printables and e-books please CLICK HERE.

Please respect My Terms of Use:  All patterns, e-patterns, printables, e-printables, e-books, graphics, tutorials, how-to's, articles and other e-products © 2004-2023 Linda Walsh Originals-Designs by Linda Walsh. All rights reserved. Commercial selling or reselling by any means prohibited without the written consent of Linda Walsh.

Patterns, e-patterns, printables, e-printables, e-books, graphics, tutorials, how-to's, articles and other e-products are for personal use only. You may not modify, photocopy, download, upload, post, transmit, display, perform, publish, license, reprint, create derivative works from, mass duplicate, re-sell, digitize, and reproduce in any other form (print, digital or electric) or commercially apply, embed, share, Email, or redistribution in any other means. Use of any of the above is prohibited without the written permission of Linda Walsh.

However, you may link to my website(s)/blog(s) and the individual page(s)/blog post(s) (including 1 picture) but do not copy, reprint or duplicate my website(s)/blog(s) or individual page(s)/post(s ) without my permission.

Items made from Linda Walsh Originals E-Patterns are intended for personal use for fun or small scale personal and business profit as long as you credit us with the design. Large scale commercial use (i.e. mass production) of items made from Linda Walsh Originals E-Patterns are by permission only.

Please see my Terms and Conditions for additional information.

Copyright © 2004 - 2023 - All Rights Reserved - Written By Linda Walsh of Linda Walsh Originals and Linda's Blog. Linda is a doll maker and doll pattern designer.