It's almost time to start my Fall decorating and I can hardly wait. I love the fall for the crisp air and all the vivid colors of the trees and leaves. I love the vivid orange, brown, burgundy, and yellow colors of the season. So many possibilities for decorating, inside and outside.
So, I thought you might like a how-to on creating another really quick and easy fall door or wall wreath.
This one has some of the vivid fall colors I love.
Here's how I made this wreath:

Like my previous wreath the reason why this wreath is so quick and easy to make is because you’re using a grapevine wreath and a silk floral garland. It basically involves wrapping the garland around the grapevine wreath, making a few adjustments, creating a hanger and then hanging your wreath. Easy! Simple! You’re done.
So, here’s how to make this quick and easy fall wreath:
Supplies Needed:
19” by 19” Around Grapevine Wreath
2” Wired Fall Sparkly Plaid Ribbon - Roll
Silk Floral Fall Garland - 6 Feet to 10 Feet
Hot Glue and Glue Gun - Low Temperature
Wire Cutters
22 Gauge or Thicker Wire (For Hanger) - 2 Feet
Pipe Cleaner
Instructions:

1) You are going to insert one of the ends of the silk floral garland on the top center back of the wreath, where shown in Diagram #1 and glue it to hold it in place.
2) Start wrapping the garland around the wreath in a clockwise direction spacing the garland evenly around the wreath until you end up where you started, where shown in Diagram #1.
3) Once you are happy with your spacing insert the other end of the silk floral garland on the top center of the back where you began and glue it in place to hold it.
4) You want the back of the wreath to lie flat against the wall or door so cut any silk floral heads and leaves that would interfere with that at the junction of where they meet the wired garland and set them aside.
You may be utilizing them for filler on the front and sides of the wreath.

5) You want the front of the wreath to be pleasing to the eye so evenly space your silk floral heads and leaves and glue them in place to hold them, if need be as shown in Diagram #2.
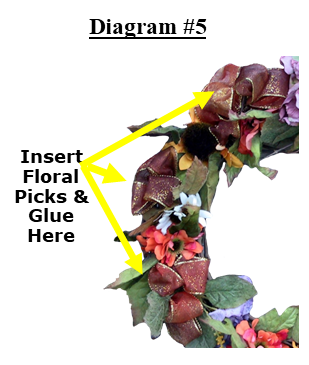
6) Use the extra silk floral heads and leaves from the back to fill in any glaring holes in the front and sides of the wreath.
Insert them into the grapevine wreath and glue them to hold.
Form a multiple loop bow out of the 2” wired ribbon until your bow will fill up the bottom center of the wreath and tightly secure it with the pipe cleaner twisting the ends several times.
8) For help creating your wired ribbon bow please use my How To Make A Two Ribbon Combination Bow Free E-Book As A Guide.

9) Insert the pipe cleaner ends into the bottom front of the grapevine wreath and while holding the bow in place turn the wreath over and secure the ends of the pipe cleaner to the back of the grapevine wreath until the bow is secured tightly to the back of the wreath and tucked into the front of the wreath as shown in Diagram #3.
Hide the ends of the pipe cleaner inside the grapevine wreath so they aren't shown.

10) You want to form a sturdy hanger out of the 22 gauge wire for hanging your wreath.
Cut a piece of the 22 gauge wire 12” long and fasten it into a small loop in the center of the wire so that the loop is about 1” long on each side, as shown in Diagram #4.
Twist the ends around each other a few times to secure the loop where shown in Diagram #4.
11) Turn the wreath over and locate the top center of the wreath and then move down about 2”.
Insert the ends of the wire into the grapevine wreath 2” down from the top center of the back of the wreath until the bottom of the loop touches the back of the grapevine wreath and the loop is hanging tightly out the back.
Twist the ends of the wire around the grapevine pieces in the back of the wreath in several places to securely hang the wreath.
Cut the excess ends of the wire with the wire cutters and tuck them inside the grapevine wreath.
Congratulations! Your really quick and easy fall wreath is done.
Hang it on your wall or front door.

I also created a free e-book for you showing how I made my simple Fall wreath shown in the picture at the top of this post and above.

To view and download my free e-book please CLICK HERE. You'll be brought to Google Drive where you can view my free e-book. Then just download my free .pdf e-book by clicking on the down arrow in the top center.
For more information on all my free e-patterns, e-printables and e-books please CLICK HERE.
Please respect My Terms of Use: All patterns, e-patterns, printables, e-printables, e-books, graphics, tutorials, how-to's, articles and other e-products © 2004-2023 Linda Walsh Originals-Designs by Linda Walsh. All rights reserved. Commercial selling or reselling by any means prohibited without the written consent of Linda Walsh.
Patterns, e-patterns, printables, e-printables, e-books, graphics, tutorials, how-to's, articles and other e-products are for personal use only. You may not modify, photocopy, download, upload, post, transmit, display, perform, publish, license, reprint, create derivative works from, mass duplicate, re-sell, digitize, and reproduce in any other form (print, digital or electric) or commercially apply, embed, share, Email, or redistribution in any other means. Use of any of the above is prohibited without the written permission of Linda Walsh.
Patterns, e-patterns, printables, e-printables, e-books, graphics, tutorials, how-to's, articles and other e-products are for personal use only. You may not modify, photocopy, download, upload, post, transmit, display, perform, publish, license, reprint, create derivative works from, mass duplicate, re-sell, digitize, and reproduce in any other form (print, digital or electric) or commercially apply, embed, share, Email, or redistribution in any other means. Use of any of the above is prohibited without the written permission of Linda Walsh.
However, you may link to my website(s)/blog(s) and the individual page(s)/blog post(s) (including 1 picture) but do not copy, reprint or duplicate my website(s)/blog(s) or individual page(s)/post(s ) without my permission.
Items made from Linda Walsh Originals E-Patterns are intended for personal use for fun or small scale personal and business profit as long as you credit us with the design. Large scale commercial use (i.e. mass production) of items made from Linda Walsh Originals E-Patterns are by permission only.
Please see my Terms and Conditions for additional information.
Copyright © 2004 - 2023 - All Rights Reserved - Written By Linda Walsh of Linda Walsh Originals and Linda's Blog. Linda is a doll maker and doll pattern designer.