Tuesday, December 31, 2013

My Dimensions Counted Cross-Stitch Tree Ornament


I just love to cross-stitch and always have a cross-stitch project half finished. Some of my projects are finished quickly while others seem to linger for months on end. My cross-stitch tree ornament is in the lingering category. I don't remember when I started my tree ornament. My guess is sometime last spring.

So, with the Christmas holidays looming I thought it was time to finish it.

The Dimensions Counted Cross Stitch, Tree Ornament kit contained the presorted thread, 14 count plastic canvas, needle, and instructions.  The  pattern uses full counted cross-stitch and outline stitching for emphasis and depth.

The pattern came with starting, stitching, finishing and even cleaning instructions as well as samples of the various stitches required, and color coded keys (with code #'s, color names, and cross-stitch symbols) and a chart with color coded symbols. The colors and symbols on the keys and chart were easy to read and follow.

While I was very pleased with the end results of this design there are some things in the kit and in the instructions that can be improved upon.

As was the case with previous Dimensions kits the thread sorter was poorly designed. The embroidery threads were glued to two foam backed 2 3/4" by 1" strips of cardboard that had a picture of the color of the thread and it's number. In order to get to the threads you had to separate the foam back from the cardboard strip. Very quickly the threads separated from their section and then you no longer knew what the thread number was to tie to your symbols & legends. I had to punch a hole in the thread sorter cardboard strip just below the color of the thread & it's number and then insert the threads through the hole and tie them in a loose knot so my threads, colors, and numbers would stay together.

I also added the symbols to the strip to make reading the chart easier. To make things even easier for the user the color symbol should have been shown on the thread sorter strip of cardboard as well. That way you would only need to use the thread sorter strip of cardboard to follow your chart.

I had no problem cross-stitching the tree ornament and then cutting the plastic canvas close to the sides of the tree. I was pleased with the way the tree ornament came out but was disappointed that the finishing instructions only contained instructions for making the cord and nothing for finishing the back of the ornament. It's was such a cute ornament to leave the back unfinished with the cross-stitch threads showing didn't seem to me to be the right way to finish this ornament.

So, I decided to finish the back of my ornament with red felt. First I cut a piece of .25m DMC embroidery floss for the hanger and taped this to the back top of the ornament using double sided tape. Then I cut a square of red felt to fit the back of the ornament and taped it to the back of the ornament using double sided tape. Once I was satisfied that everything was holding I cut the red felt along the tree ornament edges.

It took me 15 hours to complete this ornament. Despite the problems I encountered with the thread sorter and the finishing of the back I was very happy with the way my Dimensions Counted Cross Stitch, Tree Ornament turned out.

Monday, December 23, 2013

Happy Holidays


Have Yourself A Merry Little Christmas
(Alecia Elliott)

Have yourself a merry little Christmas,
Let your heart be light
From now on,
our troubles will be out of sight

Have yourself a merry little Christmas,
Make the Yule-tide gay,
From now on,
our troubles will be miles away.

Here we are as in olden days,
Happy golden days of yore.
Faithful friends who are dear to us
Gather near to us once more.

Through the years
We all will be together,
If the Fates allow
Hang a shining star upon the highest bough.
And have yourself A merry little Christmas now.

Saturday, December 14, 2013

Experimenting With Hand Embroidered Leaf Ornaments, Bunting, and Mini Quilt


This past Fall I've been dabbling in leaves. Leaves for buntings, mini quilts, and ornaments. Leaves of all shapes and sizes.  After I created my Gotta Love Leaves 3D Quilt With Wire and Wood Hanger and Embroidered Leaves which I posted about HERE I thought the leaves would make an adorable bunting, adorable ornaments, and an adorable appliqued mini quilt.


If you're looking for a colorful mini wall quilt for the Fall season my "Gotta Love Leaves Mini Quilt With Wire and Wood Hanger and Embroidered Leaves" would be a perfect decoration.  My mini quilt is 12" by 19" with a large, wide that allows it to hang from a wire and wood mini quilt hanger.

The leaves are all padded with batting and are all hand embroidered with various DMC embroidery flosses for emphasis.  The leaves range from large leaves to medium leaves to small leaves and are arranged in a complementary and multi-layered pattern.  All of the leaves are hand embroidered to a mini quilt with a padded quilt back lining with hand embroidered running stitches along the edges.  Two wire ribbon bows are attached to the wide quilt tab for accent decorations.


If you're looking for some colorful ornaments for the Fall Gotta Love Leaves Handmade Embroidered Ornaments Set of 7 Leaves 3" to 6" would be perfect.

The leaves are all double sided and padded with batting and are all hand embroidered and blanket stitched along the edges using various DMC embroidery floss colors for emphasis. The leaves range from large 6" leaves to medium 4" leaves to small 3" leaves. All of the leaves are hang from a DMC floss hanger.

Hopefully, the e-pattern will available next year so stay tuned.


Sometimes I like decorating with buntings so this past Fall when I was experimenting with hand embroidered leaves I thought a bunting with hanging leaves would make a great Fall decoration for my dining room.

Gotta Love Leaves Bunting With 12 Hand Embroidered Ornaments is an 8' long ribbon bunting with twelve hand embroidered leaves. The leaves are all double sided and padded with batting and are all hand embroidered and blanket stitched along the edges using various DMC embroidery floss colors for emphasis. The leaves range from large 6" leaves to medium 4" leaves to small 3" leaves. All of the leaves are hang from a DMC floss hanger.


Copyright © 2004 - 2023 - All Rights Reserved - Designed and Written By Linda Walsh

Monday, December 09, 2013

Gotta Love Leaves 3D Quilt With Wire and Wood Hanger and Embroidered Leaves


By now I know you all know that I absolutely LOVE the Fall season. In fact it has to be my most favorite season of all. The reason is that it lasts the longest time of any season and has the most holidays associated with it. For someone who loves and creates decorations Fall is a perfect season.

As a doll maker I've made scarecrows, pumpkin dolls, ghosts, witches, Frankenstein, Dracula's, ghouls, mummies, pilgrims, and turkeys. I've made cloth dolls, needle felted dolls, wood dolls & crafts, ornaments, large cloth and wood dolls, felt quilts, pillows, tote bags, and so much more. I've even designed fabrics for the Fall season and holidays.

Well, this Fall I wanted to try something a little different. So, I decided to create a 3-D type of leaf quilt that could hang off the wall for a Fall decoration. Not a large quilt - just a small one.  So, I designed a wall quilt 19" by 21" that has tabs that allow it to hang from a wire and wood mini quilt hanger.

The leaves are all double sided and padded with batting and are all hand embroidered and blanket stitched along the edges using various DMC embroidery floss colors for emphasis.  The leaves range from large leaves to medium leaves to small leaves and are arranged in a complimentary and multi-layered pattern.  All of the leaves are hanging from a mini quilt with a solid brown fabric front and cream colored padded quilt back lining.  Three wire ribbon bows are attached to the quilt tabs and top of the wood and wire hanger for accent decorations.


I was pleased with the way my "Gotta Love Leaves 3D Quilt With Wire and Wood Hanger and Embroidered Leaves"  turned out and hope you like it too.


My Fall Teal Quilted Runner, Place-mats and Mug Rugs


I've had a couple of yards of this really adorable Fall themed fabric for several years now and haven't had a chance to use it.  I can't remember where I got it.  Either my sister gave it to me or my Mother and I bought it on one of our shopping trips.  It's filled with adorable images of scarecrows, pumpkins, leaves, etc. and beautiful teal blue, brown, orange and yellow colors. Perfect for the Fall.  Perfect for my dining room table which is much wider than the kitchen/family room table shown above.

As I haven't really had a dining room runner and place-mats that I've liked for the Fall I thought this fabric might make a great addition to the Fall dining room table and decorations I have there.


I decided to use a 40" long section of the beautiful teal fall fabric for the center rectangle and surround it with brown rectangles and gathered teal border. I used a cream colored print quilted fabric for the back liner.  I also machine top-stitched along the edge of the brown rectangle borders and along several areas of the teal fall fabric design for support.

I was pleased with the way my teal runner turned out and knew it was going to be perfect for the dining room table.  And, if I chose not to use it there I could always use it on the kitchen/family room table shown above or my family room coffee table which is also shown above.

Hopefully, the e-pattern will available next year so stay tuned.


I decided to use a 15" long section of the beautiful teal fall fabric for the center rectangle and surround it with brown rectangles and gathered teal border. I used a cream colored print quilted fabric for the back liner.  I also machine top-stitched along the edge of the brown rectangle borders and along several areas of the teal fall fabric design for support.

I was pleased with the way my teal place-mats turned out and knew they were going to be perfect for the dining room table along with the matching  runner.  And, if I chose not to use it there I could always use it on the kitchen/family room table shown above.

Hopefully, the e-pattern will available next year so stay tuned.


When I was making my teal Fall fabric runners and place-mats I also I thought mug rugs made out of the same fabric would be cute.  So, I designed a set of two 8 3/4" by 6 1/4" mug rugs.

Each mug rug has one teal fabric rectangle surrounded by solid brown rectangles and back lined with beige quilted fabric.  Each mug rug is also machine top-stitched along the edges of the center rectangle.

My handmade mug rugs set  makes an adorable gift and decoration for the Fall.

Please Note: Mug shown in picture not included in handmade mug rug set.

Baptist and Jael - Just Who Do They Think They Are?


At first I thought all the muttering and sputtering that I was hearing from "The Dollie Storage Room" was due to my using the little red wagon for my Fall decorations seasonal scene.

However, that was days ago and I thought the boy "dollies" had already gotten over that. So, if it wasn't that what was all the clamor about?

I didn't have to wait long to find out.

The "dollies" were annoyed that not only had I given chairs from the group of chairs my sister had gotten for me to Baptist and Jael but they now were prominently displayed on top of the book shelves in the upstairs hall.

"Just Look At Them," one of the "dollies" said. "Just Who Do They Think They Are?"

Oh, boy! The "dollies" weren't happy about this.

Of course, the "dollies" aren't happy unless they're all included. Well, with 1,796 dolls of my own creation there was no way I was going to give each of them their own chair.

So, I explained to the "dollies" who had gathered in the upstairs hall that the chairs didn't belong to Baptist and Jael. I was going to use the two wonderful chairs Baptist and Jael were sitting in to display some of the other dolls from time to time.

The "dollies" that had gathered in the upstairs hall seemed pleased with this idea.

That is, until they returned to "The Dollie Storage Room" and told the others. I should have know what was going to happen. It had happened before with the boy dolls." The "dollies" wanted to know how I was going to decide who should be featured and when.

They were all yelling and stammering and jumping about so as to get noticed. When this happens the only thing to do is to shut the door and walk away. The "dollies" would have to figure this out on their own.

So, I shut the door and started to walk downstairs. As I passed Baptist and Jael in the upstairs hall I couldn't help but think how adorable they looked in the chairs. Perhaps I'd teach the "dollies" a lesson and give the chairs to Baptist and Jael after all. If all the clamoring in "The Dollie Storage Room" didn't stop soon that was exactly what I would do.

When I got to the bottom of the stairs I looked up and could see Baptist and Jael smiling from ear to ear. They were thrilled with their chairs and the possibility of their chairs becoming their permanent seats.


Sunday, December 08, 2013

Gotta Love Little Red Wagons and Doll Chairs


I just love surprises - don't you?

For the "dollies" and me it's even more delightful when it's something they can use. They're so demanding and spoiled it's hard to keep them happy.

So, when my sister told me she had a friend who was moving and who had a gift shop full of inventory that she needed to sell that included doll chairs and wanted to know if I was interested I said, "absolutely!"

I was getting these sight unseen and had no idea how many chairs and what types they were. It would definitely be a surprise. And, surprised I was. Actually, "delighted" is a better word.

Tucked inside the box was the most adorable little red wagon. My sister thought I could use it for the "dollies" so she grabbed it for me. Of course, I loved it and immediately put it to good use in my Fall decorations seasonal scene. I thought it would look cute carrying a pumpkin.

Of course, when the boy "dollies" found out I was using it for one of my seasonal displays there was a lot of stomping, banging and clanging coming from "The Dollie Storage Room." I knew it was the boy "dollies" showing their displeasure with my using the little red wagon that way. So I just ignored them. I'm sure they weren't happy about that, but sometimes I just have to have the upper hand.

Hubby, of course, said , "The boys aren't going to let this go. They're very unhappy!"

To which I replied, "Well, they can't always have their way."

To which he replied, "You're gonna regret this."

I was determined not to let the boy "dollies" get their way but knew hubby was probably right. The "dollies" always got their way.

Thursday, December 05, 2013

Dyeing Alpaca Fiber & Roving and Creating Carded Alpaca Fiber Batts


I have been in love with needle felting creations like art dolls since they started becoming more and more popular several years ago. And, when my sister became an alpaca farmer I was definitely smitten. I LOVE fiber - especially alpaca fiber.

My sister who is Debbie Bohringer of Inspired Creations By D, Rock Garden Alpacas and Rock Garden Alpacas Fiber has been teasing me with fiber surprises all year. Several times now when checking the mail  hubby has brought in a package in from my sister. The packages are usually filled to the brim. When you open them they literally explode with the fiber trying to get out.

The last package she sent contained a wonderful selection of alpaca fiber she had hand dyed. They looked so pretty in the package. Almost too pretty to use...

So, when planning my trip to Rock Garden Alpacas and Rock Garden Alpacas Fiber last month she told me I was going to learn how to dye roving and washed fiber and learn how to create carded batts. If you don't know what carded batts are they are lengths and widths of fiber produced on a drum carding machine like my sister's which is shown below:


You can card natural washed fibers alone or in a combination of natural colors, card dyed fibers alone or in a combination of dyed colors, or add various other fibers like Angelina silk to natural or dyed fibers. The possibilities seem endless.

We decided to set several days aside for dying and carding our fibers. I should say we set several days aside to play and have fun. And, have fun we did.

I do not profess to be an expert on dying alpaca fiber & roving and creating carded alpaca fiber batts. The following is nothing more than a general summary of what we did and not intended to be a detailed tutorial on dyeing and carding.

When carding and dyeing fiber the first step is to process the raw fiber which involves picking vegetable matter like hay out, cleaning, and washing the fiber. Luckily for me my sister had already done that with several huge piles of alpaca fiber so we didn't have to do that.

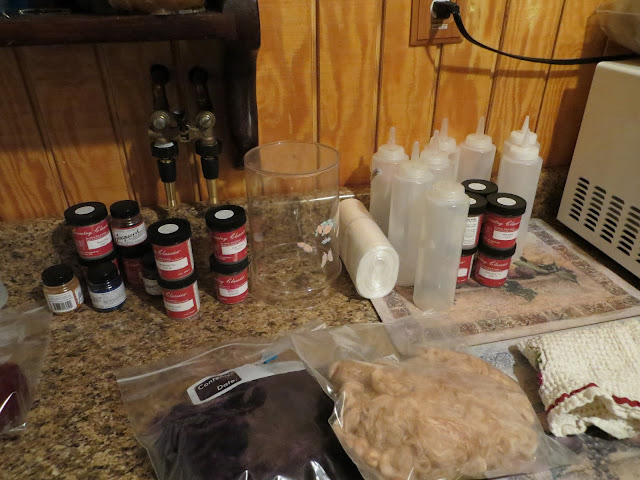
Next on the list was to decide what colors we wanted to create and which dyes we were going to use. I was eager to create a flesh color for use in making my needle felted art dolls. My sister and I had gone to a fiber show in October and for the life of me we couldn't find flesh colored fiber at any of the booths so she was determined that we were going to dye our own when I came to visit.


My sister likes to dye her fiber using the microwave method. Suffice to say there are many ways to dye your fiber. Which you choose is strictly up to you.  The microwave method my sister used was easy to do and was very manageable. Once we decided the colors we wanted to create, the dyes and fibers we were going to use to create our colors we were all set.

The first step was to decide on the type and amount of fiber we were going to dye and then weigh it so we had an exact amount to use for the amount of dye we were going to use.  Then we immersed it in a pan of hot water.  As we were going to be dyeing several colors we decided to immerse enough fiber in the hot water so that we could split it into groups of four.

The next step was to measure the dye powder and dump it into squeezable containers that we could add water to. Once the dye powder was mixed with the water we squirted a small amount from one of the squeezable containers into the bottom of a small microwaveable container with a breathable lid and then added our measured wet fiber on top. We squirted the remainder of the dye onto the fiber until it was evenly spread and used tongs to turn the fiber over until the dye was evenly dispersed.  We did this for all the different fibers we were going to dye.

Next up was to microwave the fiber several times for a few minutes each time. We allowed for cooling time in between each of the cooking intervals and checked on the progress after each interval. The idea was for the liquid to go clear. However, depending on the dyes used my sister told me this doesn't always occur. If the liquid doesn't go clear you can always experiment with it an use it with other fibers you want to dye. Needless to say this takes a lot of time.

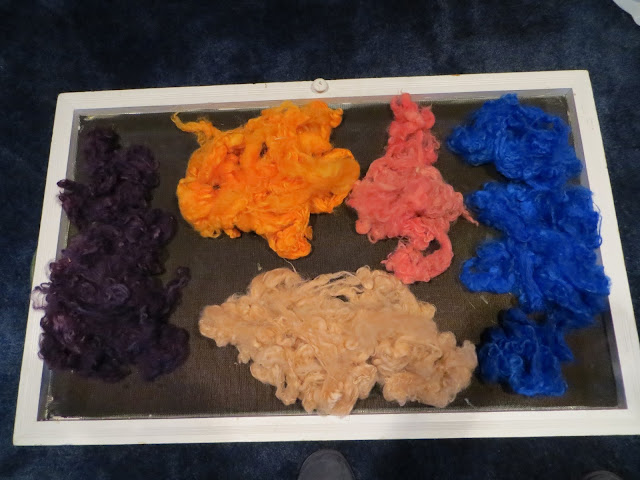
Once the fiber is dyed and strained you need to put it on a screen to dry. This also takes a lot of time and requires space to do this -  especially if you're doing it in your house.

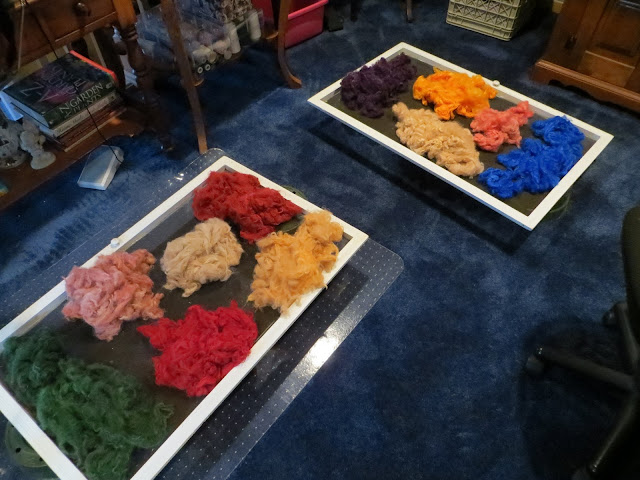
We ended up with 12 different dyed colors of the washed alpaca fiber some using a basic dye powder color and some using a combination of several dye powders. We were trying different types of dyes and fibers to get the flesh colored fiber we wanted.


We had also decided to dye some roving and used a drying rack to dry the long roving strips.


Every few hours we'd fluff and turn the fibers so they'd dry evenly and gently pulled the roving apart so it would dry evenly as well. It's really quite amazing how a small wet pile of fiber turns into an enormous pile of dry fiber.

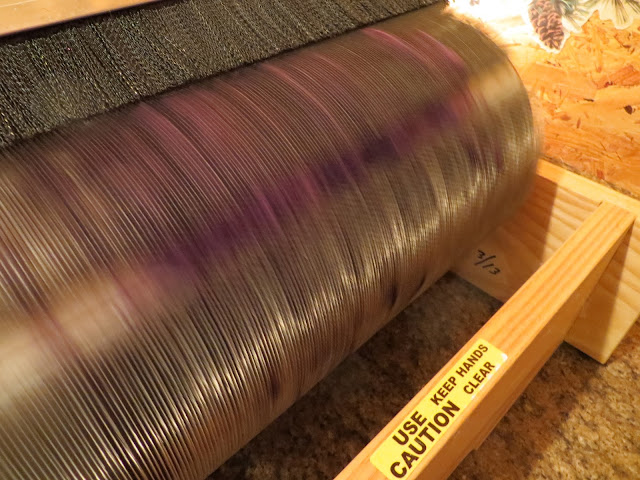
After our fibers had dried our next step was to process them using my sister's drum carder. We decided to process the purple fibers we had dyed first.


My sister likes to spread the fibers out on the input tray first and then slowly feed them into the carder.


Once the fibers have been processed through the carder you use a hook to gently cut the fiber and then slowly remove it from the drum.


My sister likes to process her fibers twice through the carder so we separated the first group into three long sections and slowly fed them through the carder again.


The end result was a wonderful thick batt of purple fiber.


As we were experimenting we decided to add some pink Angelina fibers to some of the purple fiber we had set aside from the first pass through the carder and slowly fed the combination through the carder for the second pass.


The end result was a beautiful purple fiber with speckles of pink glitter.

We continued creating our batts and combination batts until we had processed all the fiber we had dyed. It took a while to do all this but the end result was several wonderful batts of fiber to use.

And, best of all - out of our three attempts at different fibers and different dyes or combination of dyes we were able to achieve getting the flesh color for my art dolls. Needless to say I was a happy camper.


We had a wonderful time dyeing our fiber and creating our batts. Some of the colors worked out really well and some didn't work as well as we had hoped. However, that's the fun part of experimenting isn't it?

If you get a chance please check out my sister's Rock Garden Alpacas Etsy Shop where she sells her alpaca fiber and handmade alpaca fiber products.

Copyright © 2004 - 2023 - All Rights Reserved - Written By Linda Walsh of Linda's Blog. Linda is a doll maker and doll pattern designer.

My New Front Door Christmas Hanging Silk Floral Spray Tower


One of the things my sister and I LOVE to do is SHOP. And, when we get together well, shop we do. Shop til we drop that is.

Well, on my recent visit to Rock Garden Alpacas my sister made sure to include a day for shopping. Instead of going to the wonderful fabric store we had visited last year this time we were going to a local craft store. My sister had told me I was going to love it as it was like a combination A.C. Moore, Michaels, Joann's, and Homegoods put together.

She was right. I LOVED it. When we entered the store I knew right away I was in trouble. I didn't think we'd ever get out of the store - let alone out of the Christmas Department. Customers were looking at me as I was laughing and laughing and laughing. My sister had a huge smile on her face knowing "baby sister was right!"

For several years now we've put a large wooden old-fashioned Santa that hubby and I had made on the front door for Christmas. This year I wanted to change that as I thought the Santa, while wonderful, wasn't big enough and you couldn't really see him behind the storm door from the street.


I wanted something larger only I wasn't sure exactly what that should be. That is until I rounded the corner of the silk floral department and saw the most colorful 3 foot long red and green sparkling poinsettia silk floral stem. It was gorgeous.

I thought it was perfect for the front door and that three of these silk floral stems in a tower arrangement would be perfect for the front door. I had also seen some long glittery green grass silk floral stems I liked and thought that turned upside down they'd make a great finish for the bottom of my long silk floral spray tower. And, of course there would be a large wired floral bow.

I asked "baby" sister what she thought and she said it would be perfect for the front door. With that kind of encouragement how could I not buy the Christmas silk floral?

"Baby" sister started laughing and I knew right away what she was laughing about. I had my carriage in front of me in the aisle and I could not fit anything else into the carriage. Of course, when I looked at her carriage I, too, started laughing. Neither one of us could fit anything else into our carriages. We kept telling ourselves that we needed all these craft supplies and decorations. And, how could we beat these prices? That's what we told ourselves. What would we tell our hubbies?

As we were standing in line at the register the woman behind me asked me what I was going to do with the 3 glittery silk floral stems. I told her I wanted to create a Christmas floral spray tower for my front door and thought the glittery silk floral stems in a tower arrangement would be perfect.She thought it was a great idea and told me she was going to buy some for her house.


This past weekend when hubby and I were putting up the Christmas decorations I decided to make the large Christmas floral spray for the front door.

The first thing I did was flattened all three of the silk floral stems as I knew the space between the front door and the storm door was only about 3" or so and they needed to fit into it.

After flattening the floral stems I positioned the 2nd one under the first with the wire stems lined up and the floral petals nicely displayed. Once satisfied with the positioning I tightly tied my 2 wire stems together with a wire twisty. Then I lined the 3rd one up just under the 2nd and tied the three together with a wire twisty once I was satisfied that the floral petals were nicely arranged.

I had bought two long green glittery grass silk floral stems that I wanted to turn upside down to finish the bottom of the long silk floral tower spray. I measured the length of the glittery grass to see how much of the wire stems would be covered and how much of the wire stems I would need to cut off.

The two bottom floral stems were too long. I cut about 6" off the bottom of the lower two stems and then wrapped floral tape around the ends to cover the sharp wire cut end and help secure the floral stems together. Once I was happy with the layout I secured the floral stems with more wire twists and floral tape in several places along the wire stem line.

Then I turned the glittery grass stems upside down and lined them up side by side on the bottom of the spray making sure to cover the three silk floral wire stems with my glittery grass. When I was happy with the glittery grass arrangement I tied them to the back of the spray in several places with wire twists and floral tape.

I was pleased by the way my spray was turning out. It was very colorful and very big. About 1 1/2 feet wide and 4 feet long. For sure it would cover the front door and be seen from the street.

I had chosen a 2" wide plaid wire ribbon for the bow. Instead of making a multi-looped bow I decided to cut my wire ribbon in half and make two bows with two long loops each. While I prefer multi-looped bows I knew they'd be too puffy for the 3" between the front door and the storm door. I tied the two bows where the floral stems met the glittery grass.

The last step was to fasten a loop out of wire about 3" from the top of the spray so it could hang on the nail on the front door.


Both hubby and I were pleased with the way the silk floral had turned out. You definitely could see it through the storm door and, best of all, you could see it from the street.


Copyright © 2004 - 2023 - All Rights Reserved - Written By Linda Walsh of Linda Walsh Originals, Linda Walsh Originals E-Patterns, and Linda's Blog. 

Tuesday, December 03, 2013

My Visit To Rock Garden Alpacas


In November I went to visit my sister and Rock Garden Alpacas. This time there were 3 new babies and one new alpaca I hadn't met yet, Roxy.

I have to tell you that the babies were absolutely adorable. Of course they were a little skittish at first and stayed with their mothers for the most part until it was time for Breakfast Club and Dinner Club. That's when Auntie held the hay in her hands and fed whomever was interested in fresh hay. The mothers would stand and eat while the babies would try to grab the hay from underneath. When it comes to eating all's fair in love and war even with mother's and babies.

This visit Sunflower, Ivy, and Masquerade were a little friendlier. Zinnia, who had followed me around like a puppy dog on my last visit was a little tentative due to being pregnant. The babies were curious as to who this new visitor was with Berberis being the most friendly - he kept trying to bite my pants.


Each time my sister and I went down to tend the alpacas Masquerade and Cosmo were there to greet us. Cosmo is the official Rock Garden Alpacas greeter and is not happy until you go over to say hello and he gets to nuzzle and kiss you.  To be fair I should say every time I went down to play with the kids while my sister went down to attend to the water, hay, and of course, the poop.  I draw the line at cleaning up alpaca poop.

Like the last visit, every time we went down to tend to the kids it was freezing. So, taking pictures was a little challenging. I did, however, manage to take a few. Hope you enjoy them.

It was so cold even the alpacas had frost on them.

Ivy and her baby, Iris.

Sunflower and her baby, Berberis.

Cosmo and Dahlia saying hello.

Masquerade and Roxy saying hello.

Zinnia saying hello.

The visit was not all fun and games with the kids. My sister and I had work to do. We had to work on her websites, package fiber, dye roving, dye fiber and card it into batts, add inventory to her farm store, attend a few meetings, and SHOP.  Of course, there was shopping to be done. More on all of that later.