Sunday, September 20, 2020

How I Made My Stenciled Shadowbox Pictures


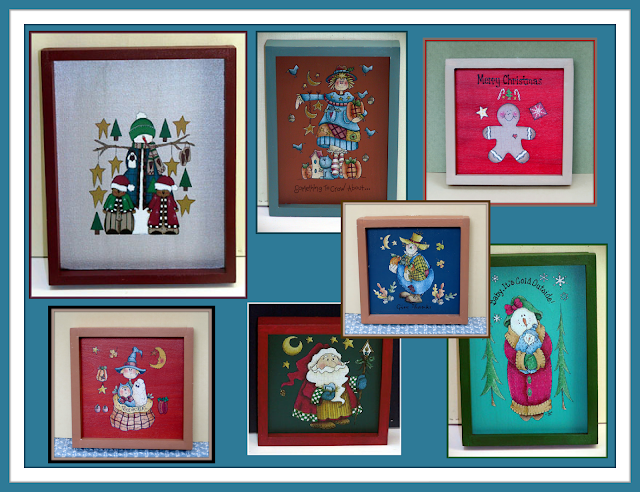
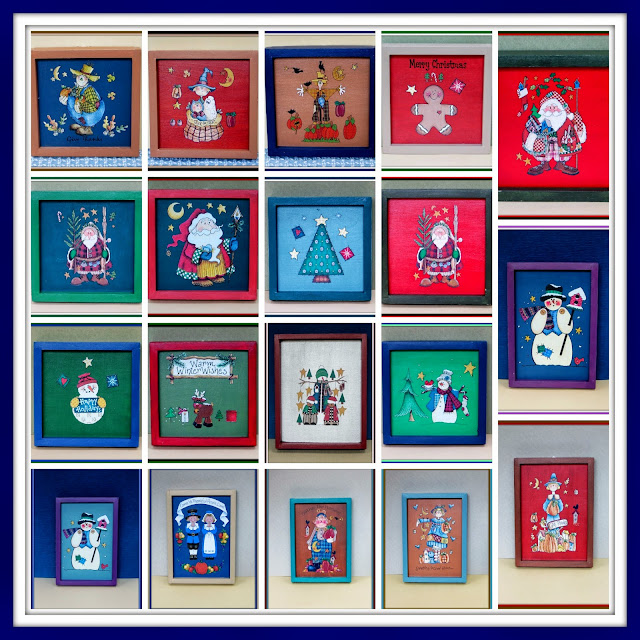
I just love seasonal and holiday shadowboxes and have made many over the years. Some were decorations, some were given as gifts and some have been for sale.
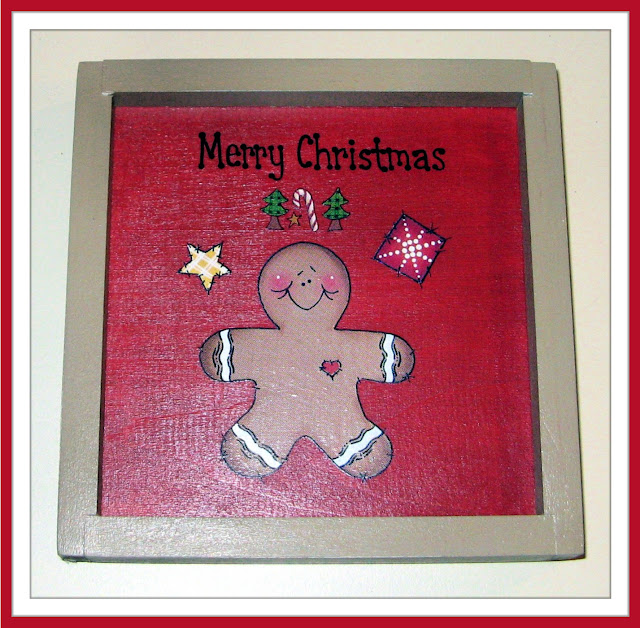

The shadowboxes I made were mostly made out of 1/2"x 1" pine for the frames and 1/2" pine boards for the centers.  The centers were two different sizes: 4” by 4” and 5” by 7” wood pieces.  


The frames were cut from the wood and were painted one color and the center boards were painted another. The finished shadowboxes ended up being 5” by 5” and 6” by 8” when framed.  

The pictures were created by adding rub-on stencils to the center boards to complete the pictures.


There was only one exception to the wood pictures I made and that was for the snowman picture shown in the top left corner of the collage above and in the picture to the right. That shadowbox was created using pine wood for the frames and a 8"x 10" stretched canvas board for the enter. 

The finished picture measured 9” by 11” when framed.

Like the other shadowbox pictures I painted the canvas panel a different color than the wood frames and then applied the rub-on stencils that I had purchased at various arts & crafts stores to create the picture. 

Brush on varnish was added to seal everything. 

In 1999 I ended up making twenty-four 5” by 5” shadowbox pictures, eight 6” by 8” shadowbox pictures, and two 9” by 11” shadowbox pictures.  

I made shadowbox pictures for Christmas holiday decorations, fall seasonal decorations, winter seasonal decorations, and Halloween decorations.  I ended up giving over half of them away as Christmas presents that year.

That is generally how I made them.  

Here’s exactly how I made them:

Supplies Needed

1/2” by 1” Pine Wood  - For Wood Frames (2 Feet Long for Each 5” by 5” Picture)
1/2” by 1” Pine Wood  - For Wood Frames (3 Feet” Long for Each 6” by 8” Picture)
1/2” by 1” Pine Wood  - For Wood Frames (4 Feet” Long for Each 9” by 11” Picture)
1/2” Pine Wood  - For Wood Centers (1/2” by 7” by 7” for Each 5” by 5” Picture)
1/2” Pine Wood  - For Wood Centers (1/2” by 8” by 10” for Each 6” by 8” Picture)

Determine how many shadowbox pictures you will be making for each size picture and then adjust the amount of wood you will need to buy for the frames and for the centers. 
 
8” by 10” Stretched Canvas Boards - One For Each 9” by 11” Shadowbox Picture
Rub-On Stencils or Transfers With Popsicle Sticks 
Acrylic Paints
Pencil
Varnish
Paint Brushes
Thin Nails - 3/4” Long
Thin Nails - 1” Long
Mitre Saw or Table Saw
Sandpaper
Hammer
Saw Tooth Hanger - 1 For Each Picture
Paper Towel

Instructions For 5" by 5" Shadowbox Picture: 

The shadowboxes may be different sizes but they are basically made the same way so follow the directions below for the 5” by 5” shadowbox just changing the wood needed for the 6” by 8” picture and 9” by 11” stretched canvas board wood frame.


1)  Use the pattern piece as a guide for the 5” by 5” picture and lightly draw a 4” by 4” square on the 1/2” pine wood with the pencil.  Do the same for the 6” by 8” picture and it’s respective pattern piece.
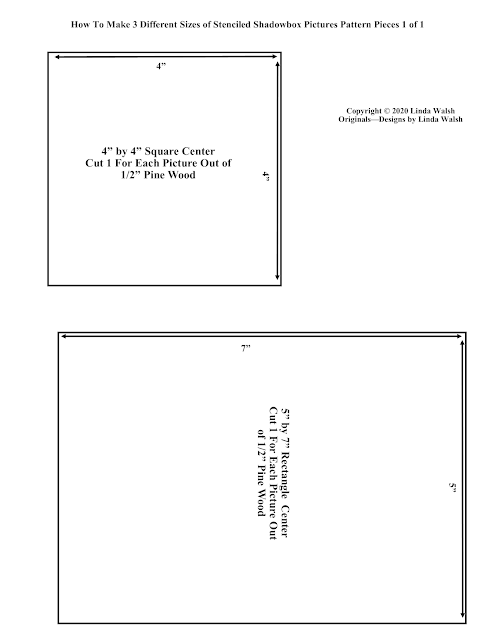

Pictures of the pattern piece sheet is shown above.  For full size pattern piece sheets please CLICK HERE to download the full size pattern piece sheets for all twelve of the leaves from my free How To Make 3 Sizes of Stenciled Shadowbox Pictures - Linda's How-Do-I Series? e-book.

2)  Cut the wood piece for the 4” by 4” square center out of the 1/2” pine wood using the mitre saw or table saw.  

3)  Use the sandpaper to lightly sand the front and back of the wood piece, then wipe clean with a damp paper towel and let it dry.

4)  Cut the four wood pieces for the frame out using the mitre saw or table saw.

5)  Cut two 5” long pieces out of the 1 2/” by 1” pine wood, then wipe clean with a damp paper towel and let each piece dry.

6)  Cut two 4” long pieces out of the 4” by 1” pine wood, then wipe clean with a damp paper towel and let each piece dry.

7)  Use the sandpaper to lightly sand the wood pieces, then wipe clean with a damp paper towel and let it dry.


8)  Position the end of one of the 5” long pine wood pieces to the end of one of the 4” long pine wood pieces, as shown in Diagram #1.

9)  Nail two of the 1” long thin nails to the end of the 5” long piece spacing them evenly at the end about 1/4” from the edge, as shown in Diagram #1.


10)  Position the end of the other 5” long pine wood pieces to the other end of the 4” long pine wood piece, as shown in Diagram #2.

11)  Nail two of the 1” long thin nails to the end of the 5” long piece spacing them evenly at the end about 1/4” from the edge, as shown in Diagram #2. 


12)  Position the end of the remaining 4” long pine wood piece in between the two 5” long pieces so the ends all match, as shown in Diagram #3.

13)  Nail two of the 1” long thin nails to both of the ends of each of the 5” long pieces spacing them evenly at the end about 1/4” from the edge, as shown in Diagram #3. 


14)  Place the 4” square wood center piece inside the 5” by 5” wood frame so all four sides are flush with the back of the wood frame leaving a 1/2” shadowbox lip on the front of the frame, as shown in diagram #4.

15)  Now you want to insert the center square and nail it to the wood frame.  Nail three of the 3/4” long thin nails to each of the four sides spacing them evenly between the length of the 4” center square along each of the sides of the frame about 1/4” from the center square edge and frame bottom edge, as shown in Diagram #4. 


16) Paint the front and back of the 4” by 4” center with the acrylic color you’ve chosen for this picture and let the paint dry, as shown in Diagram #5.

17)  Paint all the sides of the 5” by 5” frame with the acrylic color or colors you have chosen for this picture and let the paints dry, as shown in Diagram #5. 


18)  Place the rub-on stencils that you want for the picture on the front of the 4” by 4” center piece and then rub them on with the popsicle stick following the directions for the stencil you bought, as shown in Diagram #6.

19)  When your stencil is securely positioned on the center piece apply the varnish to the entire picture with the paintbrush and let it dry, as shown in Diagram #6.

20)  When your picture is dry apply the sawtooth picture hanger to the center back of the top of the frame and hang your stenciled shadowbox picture on a wall.  


For the 6” by 8” shadowbox picture follow the directions for the 5” by 5” shadowbox picture Step #1 through Step #20 except change the dimensions of the center rectangle and the length of the sides of the frame.


For the 9” by 11” shadowbox picture follow Step #4 through Step #13 for creating the frame.  For Step #14 through Step #20 paint the 8” by 10” stretched canvas board first before inserting it into the wood frame in Step#14.

Congratulations! Your three different size shadowbox pictures are done.  Enjoy!

I also created a free e-book for you showing how I made my three sizes of stenciled shadowbox pictures.


To view and download my free e-book please CLICK HERE. You'll be brought to Google Drive where you can view my free e-book. Then just download my free .pdf e-book by clicking on the down arrow in the top center.

For more information on all my free e-patterns, e-printables and e-books please CLICK HERE.

Please respect My Terms of Use:  All patterns, e-patterns, printables, e-printables, e-books, graphics, tutorials, how-to's, articles and other e-products © 2004-2023 Linda Walsh Originals-Designs by Linda Walsh. All rights reserved. Commercial selling or reselling by any means prohibited without the written consent of Linda Walsh.

Patterns, e-patterns, printables, e-printables, e-books, graphics, tutorials, how-to's, articles and other e-products are for personal use only. You may not modify, photocopy, download, upload, post, transmit, display, perform, publish, license, reprint, create derivative works from, mass duplicate, re-sell, digitize, and reproduce in any other form (print, digital or electric) or commercially apply, embed, share, Email, or redistribution in any other means. Use of any of the above is prohibited without the written permission of Linda Walsh.

However, you may link to my website(s)/blog(s) and the individual page(s)/blog post(s) (including 1 picture) but do not copy, reprint or duplicate my website(s)/blog(s) or individual page(s)/post(s ) without my permission.

Items made from Linda Walsh Originals E-Patterns are intended for personal use for fun or small scale personal and business profit as long as you credit us with the design. Large scale commercial use (i.e. mass production) of items made from Linda Walsh Originals E-Patterns are by permission only.

Please see my Terms and Conditions for additional information.

Copyright © 2004 - 2023 - All Rights Reserved - Written By Linda Walsh of Linda Walsh Originals and Linda's Blog. Linda is a doll maker and doll pattern designer.


Monday, September 14, 2020

22 Different Fall Crafts Decorations How-To's and Tutorials


Looking for some fall decorating ideas?  Check out my 23 different free how-to's and tutorials for making fall home decorations.  

I have wreaths, quilts, ornaments, pictures, silk floral and dried natural floral arrangements, terra-cotta pots, wool felt mug rugs, mini-quilts, needle felted sunflowers, embroidered leaf garlands, embroidered leaves, and cloth pumpkins.

 My "freebies" range from easy to a little more challenging.  With so much to choose from I'm sure you'll find something you'll love creating and making for your home this fall.  Enjoy!


How To Make My "Punkin Ornaments Are We" Fall Ornaments Decorations


Babies In the Pumpkin Patch Penny Rug Baby Picture Decoration Free E-Pattern


I love to create free e-patterns, free e-printables, and free e-books for my customers and blog readers and have created several of each.

All of my "Needle-Felting Crafts Freebies" are on my "My Free E-Patterns, E-Printables, E-Tutorials, and E-Books" Pinterest board. If you would like to see my board just CLICK HERE.

All of my free e-patterns, e-printables, e-books & tutorials are also view-able and downloadable on my Google Drive.

Please respect My Terms of Use:  All patterns, e-patterns, printables, e-printables, e-books, graphics, tutorials, how-to's, articles and other e-products © 2004-2023 Linda Walsh Originals-Designs by Linda Walsh. All rights reserved. Commercial selling or reselling by any means prohibited without the written consent of Linda Walsh.

Patterns, e-patterns, printables, e-printables, e-books, graphics, tutorials, how-to's, articles and other e-products are for personal use only. You may not modify, photocopy, download, upload, post, transmit, display, perform, publish, license, reprint, create derivative works from, mass duplicate, re-sell, digitize, and reproduce in any other form (print, digital or electric) or commercially apply, embed, share, Email, or redistribution in any other means. Use of any of the above is prohibited without the written permission of Linda Walsh.

However, you may link to my website(s)/blog(s) and the individual page(s)/blog post(s) (including 1 picture) but do not copy, reprint or duplicate my website(s)/blog(s) or individual page(s)/post(s ) without my permission.

Items made from Linda Walsh Originals E-Patterns are intended for personal use for fun or small scale personal and business profit as long as you credit us with the design. Large scale commercial use (i.e. mass production) of items made from Linda Walsh Originals E-Patterns are by permission only.

Please see my Terms and Conditions for additional information.

Copyright © 2004 - 2023 - All Rights Reserved - Written By Linda Walsh of Linda Walsh Originals and Linda's Blog. Linda is a doll maker and doll pattern designer.

Sunday, September 13, 2020

How To Make A Large Trio Of Cloth Pumpkins


I just love the Fall and all the vivid colors. And, I love pumpkins, scarecrows, Fall leaves, and apple orchards. So, of course, during one of my Fall decorating seasons I decided I needed a trio of large cloth pumpkins for one of my coffee tables.

They looked great on my coffee table so I thought you might like to know how to make some of your own.  

When made the three pumpkins were a small (3 1/2” H by 2 1/2” W), medium (4” H by 5 1/2” W) and large (6 1/2” H by 5” W).  If you want to make even larger pumpkins the pattern pieces can be easily modified.   Think of all the possibilities for various size cloth pumpkin decorations all over your house this upcoming Fall season.

Here’s how I made them:

LW551 How To Make A Trio of Large Pumpkin Decorations

Supplies Needed

6 Different Fabrics For Each Pumpkin - 1/2 Yard Each
12” by 12” Scraps Fall Green Fabric (For Pumpkin Leaves) 
10” by 10” Scraps Brown Fabric (For Pumpkin Stems)
DMC Embroidery Floss (Dark Brown)
Poly-fil (For Stuffing the Pumpkins)
Batting or Warm and Natural (For The Pumpkin Leaves)
Upholstery Thread
Sewing Thread
Sewing and Embroidery Needles
Scissors
Sewing Pins
Sewing Machine


IMPORTANT: PLEASE READ ALL INSTRUCTIONS BEFORE BEGINNING.

1.  All seam allowances are ¼” unless otherwise stated.
2.  RST = Right Sides Together    WST = Wrong Sides Together          WS = Wrong Side
3.  RSO = Right Sides Out           WSO = Wrong Sides Out                   RS = Right Side
4.  Clip all curves and corners.                                 
5.  Glue is hot glue unless otherwise noted.
6.  Iron fabric pieces and seams as required.  Seam edges should be ironed flat.
7.  Trace all pattern pieces onto tracing paper or tissue paper or use the enclosed pattern pieces directly.  
8.  Trim seams as required with the scissors.
9.  Cut all fabric pieces outside the black lines shown on the pattern.

Despite the three different sizes of pumpkins each of the pumpkins is made the same so follow the directions below for each pumpkin.

PUMPKINS:  The  pumpkins each have six different fabric sections sewn together for the main body of the pumpkin.  

1)  Cut 6 different fabric scraps for each of the three pumpkins, as shown on the respective pattern pieces.  


Pictures of the pattern piece sheets are shown above.  For full size pattern piece sheets please CLICK HERE to download the full size pattern piece sheets for all seven of the leaves from my free  How To Make A Large Trio Of Pumpkins - Linda's How-Do-I Series?e-book.


2)  With RST sew the side seam of one of the pumpkin sides to the side seam of another one of the pumpkin sides matching the top and bottom edges (See Diagram #1).  

3)  With RST sew the side seam of another one of the pumpkin sides to the side seam of the combined pumpkin piece you just stitched matching the top and bottom edges (See Diagram #1).  

Set your first section of three aside.  

4)  With RST sew the side seam of one of the remaining pumpkin sides to the side seam of another one of the remaining pumpkin sides matching the top and bottom edges (See Diagram #1).  

5)  With RST sew the side seam of the last pumpkin side to the side seam of the combined pumpkin piece you just stitched matching the top and bottom edges (See Diagram #1). 


6)  With RST sew the side seams of the two pumpkin piece sections together to form the six section body of the pumpkin matching the top and bottom edges (See Diagram #2). 

7)  Turn the top edge of all the pumpkins under 1/4” WST and baste. 

8)  Stuff the pumpkin with polyfil almost to the top edge (See Diagram #2).

9)  Do the same for the remaining two pumpkins and then set the three stuffed pumpkins aside.


10)  Cut four pieces of leaf fabric for the two leaves for each of the three pumpkins, as shown on the respective leaf pattern pieces.   Mark each of the two Points A on each leaf, as shown in the respective leaf pattern piece.

11) Cut 4 batting or warm and natural pieces for the two pumpkin leaves for each pumpkin and respective leaf size, as shown on the leaf pattern pieces.  Trim the edges of the batting by 1/16”.


12)  Pin each of the batting or warm and natural leaf pieces to the WS of each of the respective leaf pieces then baste along the side edges of each piece 1/16” away from the edges (See Diagram #3).

13)  Place two of the pumpkin leaves RST and then stitch 1/4” along the side seams leaving the side seam open between the two points A (See Diagram #3).  

14)  Trim the side edges of the leaves with the scissors (See Diagram #3).  Do the same for the other two leaf pieces for this pumpkin.


15)  Turn the leaves RSO, fold the side edge between the two points A under 1/4” WST and then hand sew the opening between the two Points A closed with the sewing thread (See Diagram #4).  

16)  Do the same for the two other leaves for the two other pumpkins. 

17)  Using six strands of the Dark Brown DMC embroidery floss cut a piece of the DMC embroidery floss long enough so you can embroider a double running stitch on all the vein lines on each leaf without needing to cut another piece of floss.


18)  You are working on a double sided leaf so using the Embroidery Stitch Guide for each leaf size embroider a double running stitch on the front and back of the leaf at the same time so you create the effect of vein lines, as shown in Diagram #5.  

19)  To do this you will first embroider up the vein line and then turn back down the same vein line until you reach your starting point (See Diagram #5).


20)  Knot one end of the DMC embroidery floss and insert the needle At Point A on the back side of the first leaf until you come out at Point A on the front side, as shown in Diagram #6.  

21)  To create a double running stitch on both sides you are going to start at Point A, as shown on Diagram #6, and embroider a running stitch up the center vein line and then embroider a running stitch back down the center vein line filling in the spaces in between your stitches until reaching the bottom of the center vein line at Point A again, as shown in Diagram #6.  

22) After exiting at Point A on the front side, insert the needle at Point B on the front side and come out at Point B on the back side then insert your needle at Point C on the back side and come and come out at Point C on the top side, as shown in Diagram #6. 

23)  Insert your needle at Point D on the front side and come out at Point D on the back side then insert your needle at Point E on the back side and come and come out at Point E on the top side, as shown in Diagram #6. 

24)  Insert your needle at Point F on the front side and come out at Point F on the back side then insert your needle at Point G on the back side and come and come out at Point G on the top side, as shown in Diagram #6. 

25)  Insert your needle at Point H on the front side and come out at Point H on the back side then insert your needle at Point I on the back side and come out at Point I on the top side, as shown in Diagram #6. 

26)  Insert your needle at Point J on the front side and come out at Point J on the back side then insert your needle at Point I on the back side and come out at Point I on the top side, as shown in Diagram #6. 

27)  Insert your needle at Point H on the front side and come out at Point H on the back side then insert your needle at Point G on the back side and come out at Point G on the top side, as shown in Diagram #6. 

28)  Insert your needle at Point F on the front side and come out at Point F on the back side then insert your needle at Point E on the back side and come out at Point E on the top side, as shown in Diagram #6. 

29)  Insert your needle at Point D on the front side and come out at Point D on the back side then insert your needle at Point C on the back side and come out at Point C on the top side, as shown in Diagram #6.

30)  Insert your needle at Point B on the front side and come out at Point B on the back side then insert your needle at Point A on the back side and come out at Point A on the top side, as shown in Diagram #6. 

  
31)  If you have enough floss left to continue embroidering the cross veins take a tiny stitch at Point A and re-insert your needle at Point A so your needle is between the fabric and warm and natural layers and come out at Point B, as shown in Diagram #7.  

32)  If you don’t have enough floss then take a tiny stitch at Point A on the back side and tie a tiny Knot at Point A on the back side.  Cut the end of the floss.

33)  Cut a new length of floss long enough to finish embroidering the cross veins, knot one end, and insert at Point A on the back side and come out at Point B on the front side, as shown in Diagram #7.

34)  Insert your needle at Point K on the front side and come out at Point K on the back side then insert your needle at Point L on the back side and come and come out at Point L on the top side, as shown in Diagram #7. 

35)  Insert your needle at Point M on the front side and come out at Point M on the back side then insert your needle at Point N on the back side and come out at Point N on the top side, as shown in Diagram #7. 

36)  Insert your needle at Point O on the front side and come out at Point O on the back side then insert your needle at Point N on the back side and come out at Point N on the top side, as shown in Diagram #7. 

37)  Insert your needle at Point M on the front side and come out at Point M on the back side then insert your needle at Point L on the back side and come out at Point L on the top side, as shown in Diagram #7. 

38)  Insert your needle at Point K on the front side and come out at Point K on the back side then insert your needle at Point B on the back side and come out at Point B on the top side, as shown in Diagram #7. 


39)  Insert your needle at Point P on the front side and come out at Point P on the back side then insert your needle at Point Q on the back side and come out at Point Q on the top side, as shown in Diagram #8.

40)  Insert your needle at Point R on the front side and come out at Point R on the back side then insert your needle at Point S on the back side and come out at Point S on the top side, as shown in Diagram #8. 
  
41)  Insert your needle at Point T on the front side and come out at Point T on the back side then insert your needle at Point S on the back side and come out at Point S on the top side, as shown in Diagram #8. 

42)  Insert your needle at Point R on the front side and come out at Point R on the back side then insert your needle at Point Q on the back side and come out at Point Q on the top side, as shown in Diagram #8. 

43)  Insert your needle at Point P on the front side and come out at Point P on the back side then take a tiny stitch at Point P on the back side and tie a tiny knot at Point P, as shown in Diagram #8.  Cut the end of the floss.

44) Embroider the vein lines for the remaining pumpkin leaves in the same manner.  

45)  Cut two pieces of stem fabric for each of the three pumpkins, as shown on the respective stem pattern pieces.  


46) With RST stitch the pumpkin stem pieces together along the side seams and top seam
leaving the bottom edge open for turning (See Diagram #9).  

47)  Clip the corners and then turn the pumpkin stem RSO (See Diagram #9).  

48)  Stuff tightly with poly-fil to within 1/2” of the bottom edge (See Diagram #9).

49)  Baste the pumpkin stem along the bottom edge (See Diagram #9). 

 50) Do the same for the other two pumpkin stems and then set the pumpkin leaves and stems aside.


51) With RST place the pumpkin stem in between the two pumpkin leaves leaving 1/2” of the bottom edge of the pumpkin stem exposed and the leaves 1/2” up the pumpkin stem (See Diagram #10).

52)  Stitch across the bottom edge of the pumpkin leaves thru all 6 layers (See Diagram #10).

53)  Do the same for the other two pumpkin stems and leaves.  


54)  Sew a gathering stitch along the gathering line as indicated in the pumpkin pattern with the upholstery thread and leave the ends open until the leaves and stems are inserted (See Diagram #11). 

55)  Insert the stem and leaves into the top of the pumpkin so the bottom of the leaves are even with the top edge of the pumpkin and the bottom edge of the stem is inside the top of the pumpkin by 1/2” (See Diagram #11).

56)  Add  more polyfil to the top of the pumpkin if needed (See Diagram #11).  


57)  Pull the gathering stitch tightly to secure the top edge around the pumpkin stem and leaves and then tie a couple knots (See Diagram #12).  

58)  Do the same for the other two pumpkins, stems and leaves.  

59)  Thread a long embroidery needle with a long piece of 6 strands of the dark brown embroidery floss and then tie a large knot on the end of the long strand of dark brown DMC embroidery floss.  


60)  Insert the needle and embroidery floss into the center bottom of the pumpkin with the long embroidery needle and exit at the center of the gathered top edge pulling tightly to indent the bottom of the pumpkin (See Diagram #13).  

61)  Secure the thread by sewing a stitch along the top of one of the side seams and exiting at the top of an adjoining side seam (See Diagram #13).  

62)  Position the dark brown DMC embroidery floss along the top edge of one of the side seams and then insert the needle and thread into the center bottom of the pumpkin, keeping the dark brown embroidery floss along the side seam, and exit at the center of the gathered top edge of another side seam pulling tightly to indent that side seam of the pumpkin (See Diagram #13).  

63)  Do the same for the remaining 5 side seams until all are covered with the dark brown DMC embroidery thread and indented (See Diagram #13).  

64)  When you are done with the last side seam insert the needle into the top of the pumpkin and come out at the center of the bottom of the pumpkin.  Pull tightly and then tie a knot and cut the floss.

65)  Do the same for the remaining two pumpkins.

Congratulations!  Your pumpkins are done.  We hope you enjoyed making them.


Pictures of the leaf embroidery guide sheets are shown below.  For full size leaf embroidery guide sheets please CLICK HERE to download the full size leaf embroidery guide sheets for all seven of the leaves from my free How To Make A Large Trio Of Pumpkins - Linda's How-Do-I Series? e-book.


I also created a free e-book for you showing how I made the trio of pumpkins shown in the picture at the top of this post and above.


To view and download my free e-book please CLICK HERE. You'll be brought to Google Drive where you can view my free e-book. Then just download my free .pdf e-book by clicking on the down arrow in the top center.

For more information on all my free e-patterns, e-printables and e-books please CLICK HERE.

Please respect My Terms of Use:  All patterns, e-patterns, printables, e-printables, e-books, graphics, tutorials, how-to's, articles and other e-products © 2004-2023 Linda Walsh Originals-Designs by Linda Walsh. All rights reserved. Commercial selling or reselling by any means prohibited without the written consent of Linda Walsh.

Patterns, e-patterns, printables, e-printables, e-books, graphics, tutorials, how-to's, articles and other e-products are for personal use only. You may not modify, photocopy, download, upload, post, transmit, display, perform, publish, license, reprint, create derivative works from, mass duplicate, re-sell, digitize, and reproduce in any other form (print, digital or electric) or commercially apply, embed, share, Email, or redistribution in any other means. Use of any of the above is prohibited without the written permission of Linda Walsh.

However, you may link to my website(s)/blog(s) and the individual page(s)/blog post(s) (including 1 picture) but do not copy, reprint or duplicate my website(s)/blog(s) or individual page(s)/post(s ) without my permission.

Items made from Linda Walsh Originals E-Patterns are intended for personal use for fun or small scale personal and business profit as long as you credit us with the design. Large scale commercial use (i.e. mass production) of items made from Linda Walsh Originals E-Patterns are by permission only.

Please see my Terms and Conditions for additional information.

Copyright © 2004 - 2023 - All Rights Reserved - Written By Linda Walsh of Linda Walsh Originals and Linda's Blog. Linda is a doll maker and doll pattern designer.