Sunday, December 13, 2020

How I Made My New Christmas Poinsettia Front Door Wreath


In December 2013 I wrote a blog post about a visit to my sister's Rock Garden Alpacas Farm.  

During this visit my sister made sure to include a day for shopping. Instead of going to the wonderful fabric store we had visited in 2012 when I visited this time we were going to a local craft store. My sister had told me I was going to love this store as it was like a combination A.C. Moore, Michaels, Joanns, and Homegoods put together. 

She was right. I loved it. When we entered the store I knew right away I was in trouble. I didn't think we'd ever get out of the store - let alone out of the Christmas Department. Customers were looking at me as I was laughing and laughing and laughing. My sister had a huge smile on her face knowing "baby sister was right!"


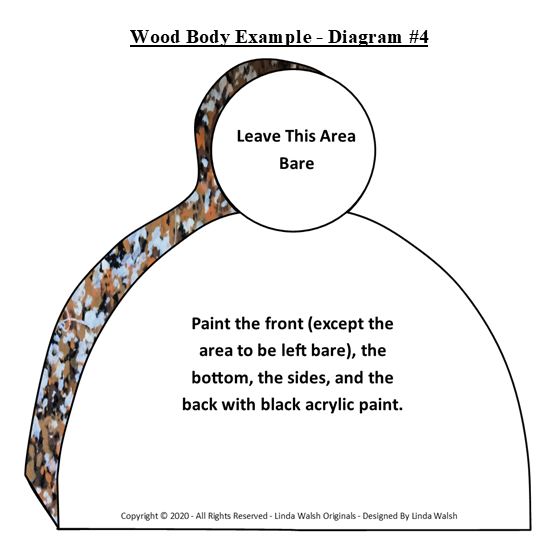
For several years I had put a large wooden old-fashioned Santa, shown in the picture above, that hubby and I had made on the front door for Christmas. Back in 2013 I wanted to change that as I thought the Santa, while wonderful, wasn't big enough and you couldn't really see him behind the storm door from the street.

I wanted something larger only I wasn't sure exactly what that should be. That was until I rounded the corner of the silk floral department and saw the most colorful 3 foot long red and green sparkling poinsettia silk floral stems. They were gorgeous.

I thought they would be perfect for my front door and that three of these silk floral stems in a tower type arrangement would be perfect for the front door. I had also seen some long glittery green grass silk floral stems that I liked and thought that turned upside down they'd make a great finish for the bottom of my long silk floral spray tower. And, of course there would be a large wired floral bow. 

I asked "baby" sister what she thought and she said it would be perfect for the front door. With that kind of encouragement how could I not buy the Christmas silk floral?  Like I ever really need incentive to buy silk floral....lol 

"Baby" sister started laughing and I knew right away what she was laughing about. My carriage was so full I could not fit anything else into the carriage. Of course, when I looked at her carriage I, too, started laughing. Neither one of us could fit anything else into our carriages. 

We kept telling ourselves that we needed all these craft supplies and decorations. And, how could we beat these prices? That's what we told ourselves anyway. What would we tell our hubbies?  Not that we were really worried about that...lol 

As we were standing in line at the register the woman behind me asked me what I was going to do with the 3 glittery silk floral stems. I told her I wanted to create a Christmas floral spray tower for my front door and thought the glittery silk floral stems in a tower arrangement would be perfect. She thought it was a great idea and told me she was going to buy some for her house.  Inspiring other crafters - I loved it!


So the first December weekend of 2013 when hubby and I were putting up the Christmas decorations I decided to make the large Christmas floral spray for the front door, which is shown in the picture above. If you would like to read about how I made my tower my Linda's Blog post is here

Well, over the years the tower has faded from the sun.  Given that the front of the house hardly ever gets direct sunlight on it I couldn't understand how this could have faded, but it did.  So, I needed to replace it and decided to do that this year.

I decided that instead of a tower I wanted to replace it with a large wreath.  I couldn't put a grapevine wreath there as there wasn't enough depth between the front door and the storm door and the only thing that would fit was a straw wreath.

Unlike 2013 when I could shop at a craft store, this year, due to Covid, I had to let my fingers do the walking and order everything I needed online.  So, of course, that's what I did.  Heavens knows that not being able to physically go to a craft store can't stop a crafter from creating...lol 

I had initially wanted a poinsettia wreath with the letters "J-O-Y" spread across the center of the wreath so I ordered three wooden craft letters.  Unfortunately, when I ordered the letters all three were available and when the J and Y were delivered I was notified that the "O" was out of stock and they had no idea when it would be back in.  Well, you can't have the word "J-O-Y" without the "O."  Needless to say, I was annoyed.  

However, as all crafters know when they encounter a problem with something they want to create they adapt.  So adapt I did...lol  

So, instead of a Christmas wreath with "J-O-Y" on it I decided to make a bright and festive Christmas  red and white poinsettia front door wreath.


It was very easy to make so I thought you might like to know how I made my Christmas poinsettia front door wreath, which is shown in the picture above.  Here's how I made it:

Supplies Needed For The Christmas Poinsettia Front Door Wreath:

2 1/2" Faux Linen Wired Ribbon (For Loops)  - At Least 6 Feet
18" Straw Wreath -  1
24” Single Stem Dark Red Poinsettia - 4
24” Single Stem Multi Red Colored Poinsettia - 4 (Which I Did Not Use)
4 - 6 Extra Poinsettia Leaves If Necessary and Available
24” White Poinsettia With Three Flowers With Snow - 3 Stems
17 Gauge Wire
Heavy Duty Wire Cutters
Glue Gun and Low-Temperature Hot Glue Sticks
Scissors
Slim Knife
Pipe Cleaners - 2

Instructions:


When making my silk floral creations the first thing I do is sort the silk floral.  So I put the 4 dark red poinsettia in a pile, put the 4 multi colored red poinsettia in a pile and put the three white silk poinsettia with snow in a pile.  


In looking at the size of the red poinsettia heads I decided I would only use four as using eight might have caused a problem for me with the depth of the door area I was working with.  So, I set the 4 multi colored red poinsettia aside.  Like any crafter, extra supplies are never a problem.  They always get used somewhere at some later point in time...lol


Usually I create all my silk floral in my basement workshop as it tends to be a messy process.  However, it was a little too cold the other day for me to do this so I was working in my living room.

In looking at the18" straw wreath which came wrapped in cellophane and thinking of my living room I decided not to remove the cellophane from the straw wreath.  If you've never worked with a straw wreath before you need to know that it can get messy at times.  I didn't want to be vacuuming little straw pieces out of my carpet so I left the cellophane on.


The first thing I did was cut a 12 foot long piece of the 2 1/2" wired ribbon and glued one end onto the back of the straw wreath with the hot glue.  Then I started tightly wrapping it around the straw wreath.  

The 12 feet wasn't enough to wrap the whole wreath so I cut another long piece, glued one of  the ends overlapping it where I had stopped and continued wrapping it around the wreath until it was fully covered. 

I cut the excess wired ribbon, folded the end over, and glued it to the back of the wreath so it was tight and the end was fully glued to the back of the wreath.

The wreath was going to be heavy so I wanted to make sure the hanger would be able to hold the weight of the wreath and poinsettia.  I decided to use 17 gauge wire to create a loop to hang it by.


I cut a 20" long piece of the 17 gauge wire and formed a 1 1/2" long loop in the center and wrapped the ends around the wire to secure the loop.  Then I held the wire loop on the back top center where I wanted it on the wreath and wrapped one end around the front to the back in a counter clock wise direction until it met the loop and wrapped that end several times around the wire and left that end dangling for now. 


I took the remaining loop and wrapped it around the back to the front to the back in a clockwise direction until it met the loop and wrapped that end several times around the wire.  Then I took the two dangling wires and wrapped them around each other until I was satisfied they were secure.  

Once they were secure I cut the two ends with the wire cutter and twisted them so they were safe and wouldn't cut me when I was hanging the wreath.


After securing the wire I took the four red poinsettia stems and cut the leaves at the base of the leaf with the scissors and set them aside.  


In looking at the red poinsettia stem I realized that it wasn't all one piece and was, instead, several pieces aligned on the stem for the 3d look of the flower.  So, I couldn't just cut the head off an glue it to the front of the straw wreath.  

So, I decided to insert the poinsettia head and stem into the front of the wreath to secure it.  I cut the poinsettia head about 2" down from where the head met the stem with the wire cutters.  I needed two inches of stem to insert into my straw wreath to secure the poinsettia on the front of the wreath.  

I took the slim knife and inserted it into wired ribbon wrapped around the wreath and the front of the straw wreath where I wanted the red poinsettia to go.  I turned the knife a little in a circle to create a small hole in which to insert the 2" stem.

Then I inserted the red silk floral stem and head into the hole I had cut until the bottom of the head met the top of the wreath.


When I was happy with the placement I glued the bottom of the head to the front of the wreath with hot glue.


I placed the other three red poinsettia heads where I wanted them to be and marked the wreath where I needed to cut the other three holes.  Once I was happy with the red poinsettia heads inserted into their holes I glued the bottom of the three heads to the front of the wreath with the hot glue.


I wanted to use the poinsettia leaves to cover some of the area on the front of the outside of the wreath under the poinsettia's head.  Each of the red poinsettia heads had two large leaves so I knew I had two leaves per head that I could use for this purpose. I glued the top of both the leaves side by side just under the red poinsettia on the front outside of the wreath.  


After gluing the 8 red poinsettia leaves to the front outside of the wreath I took the four white poinsettia stems with snow with three white poinsettia heads each and cut the leaves at the base of the leaf where it met the stem with the scissors and set them aside.  Each white poinsettia head had one or two snow covered leaves so I had at least 5 or 6 snow covered leaves per stem to utilize.

Then I cut the white poinsettia heads about 1 1/2" down from where the heads met the stem.  I needed 1 1/2" inches of stem to insert into my straw wreath to secure the white poinsettia on the front of the wreath in a 3-triangle cluster.  


I wanted to place the three white poinsettia stems in-between the red poinsettia's on the front of the wreath and to use the leaves to cover the outside and inside of the wreath just under the white poinsettia heads that I would be placing in a 3-triangle cluster.  

I placed two of the white poinsettia heads side by side on the front of the wreath and the third white poinsettia in the center of the two on the inside of the wreath where I wanted the cluster to be.  I marked the three white poinsettia's as to where I needed to mark my cuts for inserting the stems.

I took the slim knife and inserted it into wired ribbon wrapped around the wreath and the front of the straw wreath where I wanted the first white poinsettia to go. I turned the knife a little in a circle to create a small hole in which to insert the 1 1/2" stem.  I did the same for the two remaining white poinsettia heads for this cluster.

Once I was happy with the white poinsettia heads cluster inserted into their holes I glued the bottom of the three heads to the front of the wreath with the hot glue.


I wanted to use the white poinsettia leaves to cover some of the area on the front of the outside and inside of the wreath under the white poinsettia cluster.  I had five or six leaves per cluster that I could use for this purpose.  When I was happy with their placement I glued the top of the leaves under the cluster heads on the outside and inside of the wreath with hot glue.


I placed the other three white poinsettia heads where I wanted them to be on the next cluster and marked the wreath where I needed to cut the other three holes.  Once I was happy with the white poinsettia heads inserted into their holes I glued the bottom of the three heads to the front of the wreath for this cluster with the hot glue and moved on to the other two white poinsettia clusters.

Like the first white poinsettia cluster, I wanted to use the white poinsettia leaves to cover some of the area on the front of the outside and inside of the wreath under the white poinsettia clusters.  Once again, I had five or six leaves per cluster that I could use for this purpose.  When I was happy with their placement in the three clusters I glued the top of the leaves under the cluster heads on the outside and inside of the wreath with hot glue.


After I was finished with the white clusters I looked at my wreath to see if I had any holes or gaps along the outside or inside of the wreaths.  I was hoping that I wouldn't have any gaps but found I had a few gaps.

As a crafter I never throw anything away that I know might be helpful on some future creation so I knew I had a few extra poinsettia leaves in my crafting area in the basement.  I went down to the basement and found six I could use and cut them at the top of each leaf where it met the stem with the scissors.

Then I glued the top of each of the six extra leaves I had under the red poinsettia's where I had a few gaps.

I usually put a large bow on the top or bottom of my wreaths but didn't think a large bow would be good for the design of this wreath.

Instead I decided to create four loopy clusters in-between each of the red poinsettia's and white poinsettia's on the front of the bow.  First I cut the two pipe cleaners in half and set them aside.   

Then I cut four 18" long sections of the 2 1/2" wired ribbon.   I took the first 18" long section and fashioned it into four loops - two on the top and two on the bottom.  

I formed the first loop of 2" on each side and while holding the bottom of the end piece and the center of the other piece of the loop I twisted it.  Then I formed the second loop of 2" on each side and while holding the center of the two loops now I twisted it.  Then I formed the third loop of 2" on each side and while holding the center of the loop three loops twisted it. Finally, I formed the fourth loop of 2" on each side and while holding the center twisted it once more.  Then holding the center I tightly wrapped one of the pipe cleaners around the center, cut the end of the ribbon, and cut the ends of the pipe cleaner. 


Following these instructions I created three more loopy clusters.  I wanted all four loops to be facing in the same direction on the front of the wreath in a cluster so I folded the loops in half at the center where the pipe cleaner was. 

Using the hot glue I glued the center of the loops on the right side of each of the four red poinsettia's on the front of the wreath, as shown in the picture above.


I looked at my wreath to make sure I was happy with it.  I was happy with the way it turned out so I hung my Christmas poinsettia wreath from the front door. 

I love how it looks and hope you do too.

I also created a free e-book for you showing how I made my Poinsettia Front Door Wreath.


To view and download my free e-book please CLICK HERE. You'll be brought to Google Drive where you can view my free e-book. Then just download my free .pdf e-book by clicking on the down arrow in the top center.

For more information on all my free e-patterns, e-printables and e-books please CLICK HERE.

Please respect My Terms of Use:  All patterns, e-patterns, printables, e-printables, e-books, graphics, tutorials, how-to's, articles and other e-products © 2004-2023 Linda Walsh Originals-Designs by Linda Walsh. All rights reserved. Commercial selling or reselling by any means prohibited without the written consent of Linda Walsh.

Patterns, e-patterns, printables, e-printables, e-books, graphics, tutorials, how-to's, articles and other e-products are for personal use only. You may not modify, photocopy, download, upload, post, transmit, display, perform, publish, license, reprint, create derivative works from, mass duplicate, re-sell, digitize, and reproduce in any other form (print, digital or electric) or commercially apply, embed, share, Email, or redistribution in any other means. Use of any of the above is prohibited without the written permission of Linda Walsh.

However, you may link to my website(s)/blog(s) and the individual page(s)/blog post(s) (including 1 picture) but do not copy, reprint or duplicate my website(s)/blog(s) or individual page(s)/post(s ) without my permission.

Items made from Linda Walsh Originals E-Patterns are intended for personal use for fun or small scale personal and business profit as long as you credit us with the design. Large scale commercial use (i.e. mass production) of items made from Linda Walsh Originals E-Patterns are by permission only.

Please see my Terms and Conditions for additional information.

Copyright © 2004 - 2023 - All Rights Reserved - Written By Linda Walsh of Linda Walsh Originals and Linda's Blog. Linda is a doll maker and doll pattern designer.

Saturday, October 17, 2020

This Surprised Me - I Had To Change My Nurses Fabric Designs


Even after being online for 16 years you can still be surprised.  Well, at least I can.

Nurses Medical Professionals Design Challenge New

On August 25th I was notified by Spoonflower that twelve of my nurses designs had been removed from my Spoonflower account.  

Nurses Fabric 2 Border New

I thought, "What!  They were all my original designs from close to a decade ago based on the nurse handmade dolls I had designed and made years ago. What could possibly be in violation?"

Nurses Fabric 2 New

Well, it turns out I had made a mistake in the design that I was totally unaware of and never gave any thought to.  I would never have thought what they were citing would ever have been a problem. 

Nurses Fabric Border New

It seems that Spoonflower had been notified from lawyers representing the Red Cross, holders of the Red Cross mark and name, that they had identified one or more of my designs that they thought might infringe upon their registered trademarks or copyrights.  

Nurses Fabric New

According to Spoonflower, the objection was the red crosses I had placed on the front of the nurses hats and medical bags, as well as some I used on a couple designs in the background.

I was surprised as I'm a believer in copyrights and try not to violate anyone else's copyrights or trademarks that I'm aware of.  

Nurses Doll Fabric 4 Border New

I was never aware that using a cross, which I have always believed is a geometric symbol, would violate someone else's trademarks or copyrights.  I guess, if it's red in color, then it is in violation.

Nurses Doll Fabric 4 New

Spoonflower had no choice but to remove my designs and I totally understood this. 

However, given what a wonderful company Spoonflower is they did allow me to re-work the design and remove any imagery or mention of red crosses and then upload the revised designs back to my Spoonflower shop, which I did.

Nurses Fabric 3 Border New

I have always loved my original nurses designs and didn't really want to drastically change the design so I decided that since most people love nurses that I'd just change the red cross to a red heart and place that on the nurses hats, medical bag, and throughout the backgrounds where it made sense. 

Nurses Raggedy Anne Doll Fabric 3 New

Out of curiosity I decided to see if there were any other Spoonflower designs that had red crosses on them and didn't find any on Spoonflower but, did find hundreds of thousands of designs with red crosses on them in a google image search.  

Whether or not any of them are in violation of the Red Cross copyrights and trademarks is not for me to decide.  I know mine no longer are.

I hope you like all my revised designs.


© 2020 - 2023 Copyright Linda Walsh Originals - Designs By Linda Walsh. 

Friday, October 16, 2020

How I Made My Harold Mixed Media Shelf Sitter Scarecrow Stump Doll


For me I just LOVE the fall decorating season.  One of my reasons is because I just love scarecrows and have made many over the years.  So, when I got a chance to make some paper-clay and wood mixed media shelf sitter scarecrows several years ago I jumped right in and made two.


Harold, pictured on the left, and Hank, pictured on the right in the picture above are a pair of scarecrows that are a little apprehensive as to what they are supposed to do in the field.  They know they're there to scare the crows, but are unsure as to how to do it.  After all they don't want to be mean.

Harold and Hank are 4" x 5 1/2" x 3/4" mixed media Victorian scarecrow wood dolls with paper-clay painted faces with brushed brown cheeks.  Their sides and back are sponge painted and their outfits are a multi-layer embellished paper collage with paper center band and black raised dots.  Paper patches add charm to their collage outfits.  Their wild raffia hair is barely controlled under their straw hat.    An orange bow is tied under their necks.

Right now Harold is sitting on my family room fireplace mantle.  He's seems so pleased with himself there.

I loved making my two mixed media scarecrows so much I thought you might like to know how I made my Harold Mixed Media Collage Shelf Sitter Scarecrow Doll so you could make one of your own.  Here’s how:


Supplies Needed:

3/4" wood pine - 7" by 7" by 3/4"
Paper Clay
Acrylic Paint - Black, Orange, Dark Taupe, White, Dark Brown, Dark Flesh, Peach, Pink
Paper Clay Sculpting Tools
Sandpaper
Low Temperature Hot Glue Gun and Hot Glue Sticks
Various Scrapbook Papers - Brown (Textured), Fall Plaid, Fall Striped, and Orange Scrapbook Papers
1/8" Orange Decorative Ribbon Trim - 18" Long
Blush for Cheeks - Dark Rust Color and Black
Micron Markers - Black of Various Widths
Puffy Paint - Black
ModPodge
Liquitex Matte Medium
Paint Brushes
Paper Sheets - Flesh Colored and White
Lead Pencil
Stabilo Pencil - Brown (for shading)
Tortillons (for blending stabilo lines)
Band-saw and Table Saw to Cut The Wood
Paper Towel
Small Nail Files or Emery Boards
Scissors
Sea Sponges
Small Wallpaper Roller
Wood Glue
Wax Paper
Thin Raffia Strips
Straw Raffia Hat - 3” Round
Gold Glitter Paint

Harold 4" x 5 1/2" x 3/4" Handmade Mixed Media Victorian Collage Shelf Scarecrow Doll With Paper-clay Face

Harold is a 4" x 5 1/2" x 3/4" mixed media Victorian scarecrow wood doll with paper-clay painted faces with brushed brown cheeks.  His sides and back are sponge painted and his outfit are a multi-layer embellished paper collage with paper center band and black raised dots.  Paper patches add charm to his collage outfit.  His wild raffia hair is barely controlled under his straw hat.    An orange bow is tied under his neck.


1) Using the paper body template example and measurements from Diagram #1 above draw a body template on a white piece of paper with the lead pencil.  Adjust as necessary so your measurements match the ones in the Paper Body Template Example - Diagram #1 above.

2) Highlight the outside edges with the black micron markers and then cut the paper body template outside the black marker edge lines.

3) Cut a piece of 3/4 " pine 7" by 7" square with the table saw.

4) Center the paper body template on the 7" by 7" wood square and draw along the outside edge with the lead pencil. 


5)  Cut the wood body out along the outside edges with the band saw. Your wood body and wood body measurements should be similar to the wood body example shown in Diagram #2 above and be able to stand evenly.

6) Sand all edges of the wood body so they are smooth to the touch.  Make sure the sanding doesn't affect the ability of the wood body to stand evenly.

7) Once you're satisfied with the sanding wipe all the edges and sides down with a wet piece of paper towel.


8)  Paint the front (except the head area which you need to leave bare), sides, bottom and the back of the wood body with the black acrylic paint.  See Diagram #3 above.

9)  Using the sea sponges paint the sides and the back of the wood body with the peach, orange, dark taupe, dark brown, and white acrylic paint.  See Diagram #4 above.

10) Your sponge painted areas should look similar to the pictures above.

11)  Apply Liquitex matte medium to the front (except the head area which you should leave bare), sides, and back of the wood body to seal your sponge painted areas.  Let dry completely.


12) Cut a piece of the fall plaid scrapbook paper to fit the front area of the front side leaving the head area bare (as shown in Diagram #5 above) and making sure the edges slightly overhang the side and bottom edges by 1/32”.

13) Apply ModPodge to the front side of the wood body (leaving the head area bare) with a brush.

14)  Position the front piece on the front side of the wood body and press down until it is firmly in place.  

15)  Roll it with the small wallpaper roller until it is securely in place and adheres to the front side.

16)  Gently sand the side and bottom edges of the fall plaid scrapbook paper with the small nail files or emery boards until they are flush and smooth with the sides.

17) Apply a thin layer of the ModPodge to the fall plaid scrapbook piece on the front of the wood body to seal it in place.

18) Cut a piece of the fall striped scrapbook paper for the center strip using the shape shown in Diagram #6 above.  Cut the bottom edge with the scissors making sure the bottom edge slightly overhang the bottom edge of the wood body by 1/32".   Cut the top edge curved so it aligns with the head area that you are leaving bare, as shown in Diagram #6 above.

19) Apply ModPodge to the back side of the center strip.

20)  Position the center strip piece on the front side of the wood body and press down until it is firmly in place.  

21)  Roll it with the small wallpaper roller until it is securely in place and adheres to the front side. 

22)  Gently sand the bottom edge of the center strip piece with the small nail files or emery boards until it is flush and smooth with the bottom edge pf the wood piece.

23) Apply a thin layer of the ModPodge to the center strip piece on the front of the wood body to seal it in place.


24) Cut a piece of the brown textured scrapbook paper for the pants using the scissors in the shape shown in Diagram #7 above making sure the bottom edge of the pants overhangs the bottom edge of the wood body by 1/32”.

25) Apply ModPodge to the back side of the pants.

26)  Position the pants piece on the front side of the wood body and press down until it is firmly in place.  

27)  Roll it with the small wallpaper roller until it is securely in place and adheres to the front side. 

28)  Gently sand the bottom side of the pants piece with the small nail files or emery boards until they are flush and smooth with the bottom side of the wood body.

29) Apply a thin layer of the ModPodge to the pants piece on the front of the wood body to seal it in place.


30) Using the hands example from Diagram #8 above draw the hands for the scarecrow on the flesh colored paper sheet making sure your hands will be sized correctly for your scarecrow piece.


31) Using the shirt sleeves example from Diagram #9 above draw the shirt sleeves for the scarecrow out of the fall plaid scrapbook paper making sure your shirt sleeves will be sized correctly for your scarecrow piece.


32) Apply ModPodge to the top front side of each of the hands that will be positioned under the bottom of the sleeves with a brush, as shown in Diagram #10 above and then position them there.

33) Apply ModPodge to the back side of the combined sleeve and hand pieces.


34)  Position the sleeves and hands pieces on the front of the body as shown in Diagram #11 above and press down until they are firmly in place.  

35) Roll them with the small wallpaper roller until they are securely in place and adhere to the front of the shirt.

36) Apply a thin layer of the ModPodge to the sleeve and hand pieces on the front of the wood body to seal them in place.


37) Cut 2 small square and 2 small rectangle pieces of the orange scrapbook paper for the shirt patches, as shown in Diagram #12 above.  

38) Apply ModPodge to the back side of each patch piece with a brush.

39)  Position the patches on the front of the doll as shown in Diagram #12 above and press down until they are firmly in place.  

40)  Roll them with the small wallpaper roller until they are securely in place and adhere to the shirt.

41) Apply a thin layer of the ModPodge to the patch pieces on the front of the wood body to seal them in place.

42)  Cut a piece of the 1/8” orange ribbon trim 12" long.  Form into a bow and using the hot glue, adhere the center of the bow just under the chin and in the middle of the center srrip, as shown in the Diagram #13 above.

43)  Using the paper clay sculpting tools, cut a 2” by 2” by 1” deep rectangle of the paper clay out to fit the face area of the scarecrow.

44) Roll the paper clay rectangle with your hands into a flat round shape about 1/4 inch deep that will fit the head area of the scarecrow.

45) Lie your paper clay round flat piece on a piece of wax paper until you add the nose and cheeks. 

46) Using the paper clay sculpting tools cut a small piece of the paper clay and roll it into a 1/2” long by 1/4” wide  by 1/2” deep tube.

47) When you’re satisfied with the length of the tube cut it in half with the sculpting tools so it is only 1/2” long by 1/4” wide by 1/4” deep

 48)  Use the sculpting tools and cut a triangle out of the rectangle piece, as shown on Diagram #14.

49)  Gently press the triangle nose on the head and using the paper clay sculpting tools blend the paper clay nose edges into the center of the head until you have a smooth intersection and no evidence of two separate pieces of paper clay, as shown in Diagram #14.  


50)  Using the paper clay sculpting tools cut a small piece of the paper clay and roll it into a 1/4” round ball and then cut the ball in half to form two cheeks.

51)  Gently press the two cheek pieces on the head and using the paper clay sculpting tools blend the paper clay cheek edges on each side of the nose until you have a smooth intersection and no evidence of two separate pieces of paper clay, as shown in Diagram #14.  

52)  Use your fingers and the paper clay sculpting tools to create two small  indent sections for the eyes just above  the left and right sides of the nose, as shown in Diagram #14.

53)  Leave the paper clay head on the wax paper until it is dry.  

54)  When the head is completely dry use the paper clay sculpting tools to adjust or remove any excess clay bits there might be on the front of the head.  There may or may not be some there.

55)  When the head  is completely dry look for any cracks on the paper clay.  If there are any fill the cracks in with a tiny piece of paper clay making sure it fills the crack but doesn't interfere with the smooth side of the head.  Let dry completely.

56)  Lightly sand the head with the sand paper until the edges, back, and face are smooth.  Make sure the back of the head still lies flat.

57)  Paint the front and sides of the head with the dark flesh acrylic paint leaving the back bare, as shown in Diagram #15.

58) Brush some of the Liquitex matte medium on the front and side of the head and nose to secure the dark flesh paint, as shown in Diagram #15 and let dry completely.


59) Apply the wood glue to the back of the head and position the head the wood body as shown in Diagram #15 above.  Press down firmly to make sure the face lies flat and adheres to the wood.  Remove any excess glue along the sides with a wet paper towel.

60)  Let dry until the head is securely set. 


61)  Using the black micron marker drawn the dashed mouth on the scarecrow face, as shown in Diagram #16.  

62)  Using the black micron marker drawn the two triangle eyes on the scarecrow face, as shown in Diagram #16.  

63)  Using the black micron marker drawn the two black pupils for the eyes on the scarecrow face, as shown in Diagram #16.  

64)  Apply a small amount of the dark rust colored blush to the cheeks, as shown in Diagram #16.

65)  Apply black blush to the nose and all around the head, as shown in Diagram #16.


66)  To make the hair you are going to use loops of the thin raffia, strips glued all over the head, as shown in the picture above.


67)  The easiest way to do this is to loop the raffia around 4 fingers 4 – 5 times (See Diagram #17).  

68)  Take the loops off the hand and, holding the center-point, wrap 2-3 times tightly, knot to secure and then tie it off (See Diagram #17).   

69)  Hot glue the center-point of the loops all over the head, as shown in Diagram #17.


70) Apply glue to the inside of the 3” round raffia straw hat and affix it to the top and back of the scarecrow’s head, as shown in the pictures above.  


71The scarecrow, his hat and his raffia hair should look as shown in the picture above


72)  Use the brown stabilo pencil to shade the edges of all the arm sleeves, sleeve edges, and sides of the center strip,  as shown in Diagram #18 above.

73) Blend all the stabilo lines with the Tortillions.

74) Make sure the blending is pleasing to the eye.  If need be add more shading with the brown stabilo pencil and blend again.


75)  Use the black puffy paint to draw the black thread lines on the four shirt patches, as shown in Diagram #19, and let them dry.

76)  Use the black puffy paint to draw the black button dots on the center strip of the shirt, as shown in Diagram #19, and let them dry.

77)  Use the gold glitter paint to draw a splash of glitter on the bottom edge of the shirt, as shown in Diagram #19, and let it dry.

78)  Add pink acrylic paint to the fingernails of the fingers, as shown in Diagram #19 and let them dry. 

Congratulations! Your mixed media scarecrow doll is done.


I also created a free e-book for you showing how I made my Harold mixed media collage self sitter scarecrow doll.

To view and download my free e-book please CLICK HERE. You'll be brought to Google Drive where you can view my free e-book. Then just download my free .pdf e-book by clicking on the down arrow in the top center.

For more information on all my free e-patterns, e-printables and e-books please CLICK HERE.

Copyright © 2004 - 2023 - All Rights Reserved - Designed and Written By Linda Walsh

Please respect My Terms of Use:  All patterns, e-patterns, printables, e-printables, e-books, graphics, tutorials, how-to's, articles and other e-products © 2004-2023 Linda Walsh Originals-Designs by Linda Walsh. All rights reserved. Commercial selling or reselling by any means prohibited without the written consent of Linda Walsh.

Patterns, e-patterns, printables, e-printables, e-books, graphics, tutorials, how-to's, articles and other e-products are for personal use only. You may not modify, photocopy, download, upload, post, transmit, display, perform, publish, license, reprint, create derivative works from, mass duplicate, re-sell, digitize, and reproduce in any other form (print, digital or electric) or commercially apply, embed, share, Email, or redistribution in any other means. Use of any of the above is prohibited without the written permission of Linda Walsh.

However, you may link to my website(s)/blog(s) and the individual page(s)/blog post(s) (including 1 picture) but do not copy, reprint or duplicate my website(s)/blog(s) or individual page(s)/post(s ) without my permission.

Items made from Linda Walsh Originals E-Patterns are intended for personal use for fun or small scale personal and business profit as long as you credit us with the design. Large scale commercial use (i.e. mass production) of items made from Linda Walsh Originals E-Patterns are by permission only.

Please see my Terms and Conditions for additional information.

Copyright © 2004 - 2023 - All Rights Reserved - Written By Linda Walsh of Linda Walsh Originals and Linda's Blog. Linda is a doll maker and doll pattern designer.