Harold is a 4" x 5 1/2" x 3/4" mixed media Victorian scarecrow wood doll with paper-clay painted faces with brushed brown cheeks. His sides and back are sponge painted and his outfit are a multi-layer embellished paper collage with paper center band and black raised dots. Paper patches add charm to his collage outfit. His wild raffia hair is barely controlled under his straw hat. An orange bow is tied under his neck.
5) Cut the wood body out along the outside edges with the band saw. Your wood body and wood body measurements should be similar to the wood body example shown in Diagram #2 above and be able to stand evenly.
6) Sand all edges of the wood body so they are smooth to the touch. Make sure the sanding doesn't affect the ability of the wood body to stand evenly.
7) Once you're satisfied with the sanding wipe all the edges and sides down with a wet piece of paper towel.
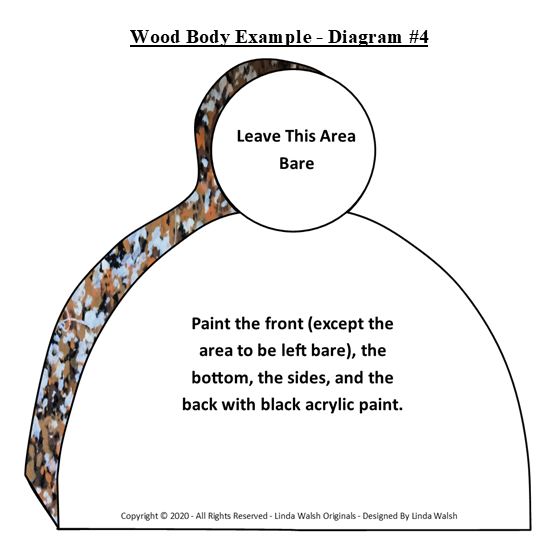
8) Paint the front (except the head area which you need to leave bare), sides, bottom and the back of the wood body with the black acrylic paint. See Diagram #3 above.
9) Using the sea sponges paint the sides and the back of the wood body with the peach, orange, dark taupe, dark brown, and white acrylic paint. See Diagram #4 above.
10) Your sponge painted areas should look similar to the pictures above.
11) Apply Liquitex matte medium to the front (except the head area which you should leave bare), sides, and back of the wood body to seal your sponge painted areas. Let dry completely.
12) Cut a piece of the fall plaid scrapbook paper to fit the front area of the front side leaving the head area bare (as shown in Diagram #5 above) and making sure the edges slightly overhang the side and bottom edges by 1/32”.
13) Apply ModPodge to the front side of the wood body (leaving the head area bare) with a brush.
14) Position the front piece on the front side of the wood body and press down until it is firmly in place.
15) Roll it with the small wallpaper roller until it is securely in place and adheres to the front side.
16) Gently sand the side and bottom edges of the fall plaid scrapbook paper with the small nail files or emery boards until they are flush and smooth with the sides.
17) Apply a thin layer of the ModPodge to the fall plaid scrapbook piece on the front of the wood body to seal it in place.
18) Cut a piece of the fall striped scrapbook paper for the center strip using the shape shown in Diagram #6 above. Cut the bottom edge with the scissors making sure the bottom edge slightly overhang the bottom edge of the wood body by 1/32". Cut the top edge curved so it aligns with the head area that you are leaving bare, as shown in Diagram #6 above.
19) Apply ModPodge to the back side of the center strip.
20) Position the center strip piece on the front side of the wood body and press down until it is firmly in place.
21) Roll it with the small wallpaper roller until it is securely in place and adheres to the front side.
22) Gently sand the bottom edge of the center strip piece with the small nail files or emery boards until it is flush and smooth with the bottom edge pf the wood piece.
23) Apply a thin layer of the ModPodge to the center strip piece on the front of the wood body to seal it in place.
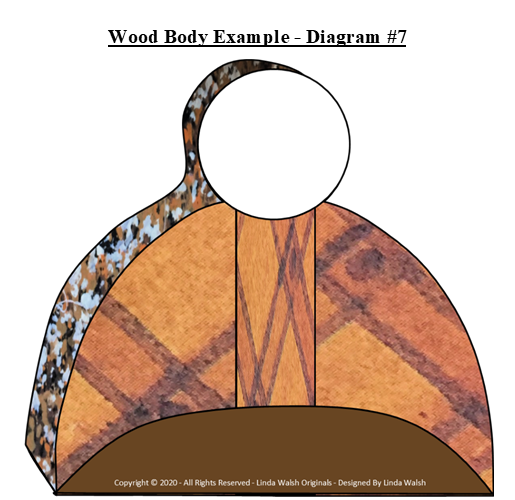
24) Cut a piece of the brown textured scrapbook paper for the pants using the scissors in the shape shown in Diagram #7 above making sure the bottom edge of the pants overhangs the bottom edge of the wood body by 1/32”.
25) Apply ModPodge to the back side of the pants.
26) Position the pants piece on the front side of the wood body and press down until it is firmly in place.
27) Roll it with the small wallpaper roller until it is securely in place and adheres to the front side.
28) Gently sand the bottom side of the pants piece with the small nail files or emery boards until they are flush and smooth with the bottom side of the wood body.
29) Apply a thin layer of the ModPodge to the pants piece on the front of the wood body to seal it in place.
30) Using the hands example from Diagram #8 above draw the hands for the scarecrow on the flesh colored paper sheet making sure your hands will be sized correctly for your scarecrow piece.
31) Using the shirt sleeves example from Diagram #9 above draw the shirt sleeves for the scarecrow out of the fall plaid scrapbook paper making sure your shirt sleeves will be sized correctly for your scarecrow piece.
32) Apply ModPodge to the top front side of each of the hands that will be positioned under the bottom of the sleeves with a brush, as shown in Diagram #10 above and then position them there.
33) Apply ModPodge to the back side of the combined sleeve and hand pieces.
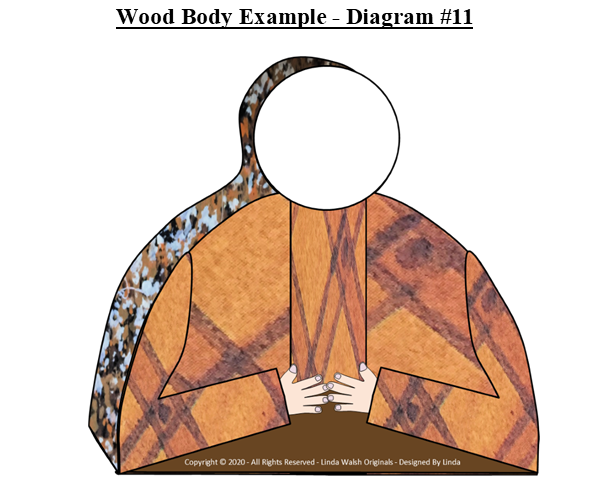
34) Position the sleeves and hands pieces on the front of the body as shown in Diagram #11 above and press down until they are firmly in place.
35) Roll them with the small wallpaper roller until they are securely in place and adhere to the front of the shirt.
36) Apply a thin layer of the ModPodge to the sleeve and hand pieces on the front of the wood body to seal them in place.
37) Cut 2 small square and 2 small rectangle pieces of the orange scrapbook paper for the shirt patches, as shown in Diagram #12 above.
38) Apply ModPodge to the back side of each patch piece with a brush.
39) Position the patches on the front of the doll as shown in Diagram #12 above and press down until they are firmly in place.
40) Roll them with the small wallpaper roller until they are securely in place and adhere to the shirt.
41) Apply a thin layer of the ModPodge to the patch pieces on the front of the wood body to seal them in place.
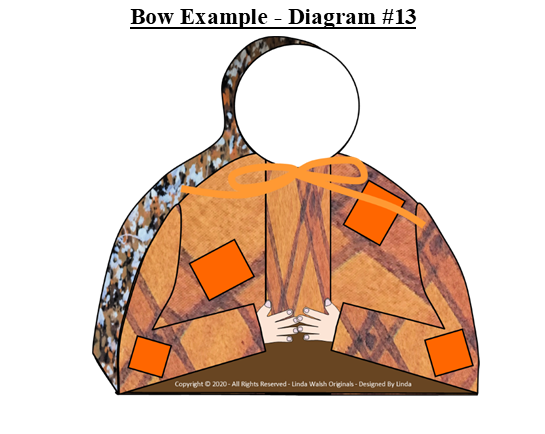
42) Cut a piece of the 1/8” orange ribbon trim 12" long. Form into a bow and using the hot glue, adhere the center of the bow just under the chin and in the middle of the center srrip, as shown in the Diagram #13 above.
43) Using the paper clay sculpting tools, cut a 2” by 2” by 1” deep rectangle of the paper clay out to fit the face area of the scarecrow.
44) Roll the paper clay rectangle with your hands into a flat round shape about 1/4 inch deep that will fit the head area of the scarecrow.
45) Lie your paper clay round flat piece on a piece of wax paper until you add the nose and cheeks.
46) Using the paper clay sculpting tools cut a small piece of the paper clay and roll it into a 1/2” long by 1/4” wide by 1/2” deep tube.
47) When you’re satisfied with the length of the tube cut it in half with the sculpting tools so it is only 1/2” long by 1/4” wide by 1/4” deep
48) Use the sculpting tools and cut a triangle out of the rectangle piece, as shown on Diagram #14.
49) Gently press the triangle nose on the head and using the paper clay sculpting tools blend the paper clay nose edges into the center of the head until you have a smooth intersection and no evidence of two separate pieces of paper clay, as shown in Diagram #14.
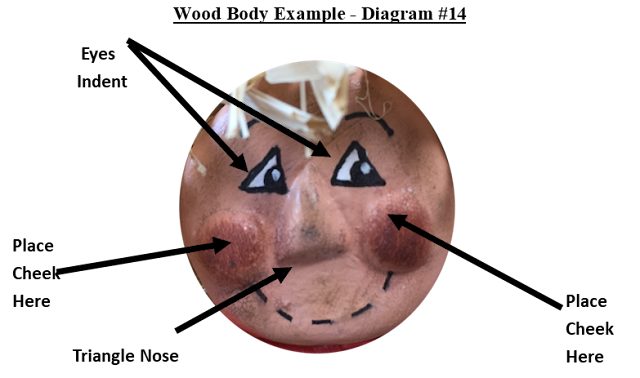
50) Using the paper clay sculpting tools cut a small piece of the paper clay and roll it into a 1/4” round ball and then cut the ball in half to form two cheeks.
51) Gently press the two cheek pieces on the head and using the paper clay sculpting tools blend the paper clay cheek edges on each side of the nose until you have a smooth intersection and no evidence of two separate pieces of paper clay, as shown in Diagram #14.
52) Use your fingers and the paper clay sculpting tools to create two small indent sections for the eyes just above the left and right sides of the nose, as shown in Diagram #14.
53) Leave the paper clay head on the wax paper until it is dry.
54) When the head is completely dry use the paper clay sculpting tools to adjust or remove any excess clay bits there might be on the front of the head. There may or may not be some there.
55) When the head is completely dry look for any cracks on the paper clay. If there are any fill the cracks in with a tiny piece of paper clay making sure it fills the crack but doesn't interfere with the smooth side of the head. Let dry completely.
56) Lightly sand the head with the sand paper until the edges, back, and face are smooth. Make sure the back of the head still lies flat.
57) Paint the front and sides of the head with the dark flesh acrylic paint leaving the back bare, as shown in Diagram #15.
58) Brush some of the Liquitex matte medium on the front and side of the head and nose to secure the dark flesh paint, as shown in Diagram #15 and let dry completely.
59) Apply the wood glue to the back of the head and position the head the wood body as shown in Diagram #15 above. Press down firmly to make sure the face lies flat and adheres to the wood. Remove any excess glue along the sides with a wet paper towel.
60) Let dry until the head is securely set.
61) Using the black micron marker drawn the dashed mouth on the scarecrow face, as shown in Diagram #16.
62) Using the black micron marker drawn the two triangle eyes on the scarecrow face, as shown in Diagram #16.
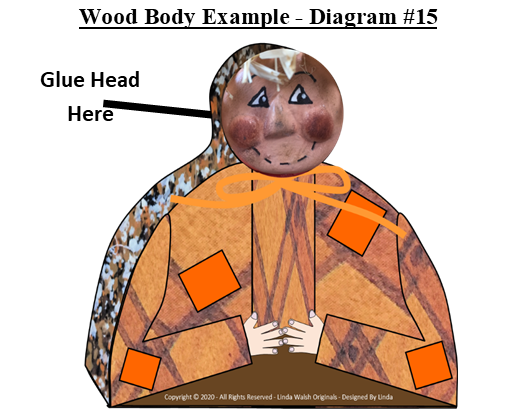
63) Using the black micron marker drawn the two black pupils for the eyes on the scarecrow face, as shown in Diagram #16.
64) Apply a small amount of the dark rust colored blush to the cheeks, as shown in Diagram #16.
65) Apply black blush to the nose and all around the head, as shown in Diagram #16.
66) To make the hair you are going to use loops of the thin raffia, strips glued all over the head, as shown in the picture above.
67) The easiest way to do this is to loop the raffia around 4 fingers 4 – 5 times (See Diagram #17).
68) Take the loops off the hand and, holding the center-point, wrap 2-3 times tightly, knot to secure and then tie it off (See Diagram #17).
69) Hot glue the center-point of the loops all over the head, as shown in Diagram #17.
70) Apply glue to the inside of the 3” round raffia straw hat and affix it to the top and back of the scarecrow’s head, as shown in the pictures above.
71The scarecrow, his hat and his raffia hair should look as shown in the picture above
72) Use the brown stabilo pencil to shade the edges of all the arm sleeves, sleeve edges, and sides of the center strip, as shown in Diagram #18 above.
73) Blend all the stabilo lines with the Tortillions.
74) Make sure the blending is pleasing to the eye. If need be add more shading with the brown stabilo pencil and blend again.
75) Use the black puffy paint to draw the black thread lines on the four shirt patches, as shown in Diagram #19, and let them dry.
76) Use the black puffy paint to draw the black button dots on the center strip of the shirt, as shown in Diagram #19, and let them dry.
77) Use the gold glitter paint to draw a splash of glitter on the bottom edge of the shirt, as shown in Diagram #19, and let it dry.
78) Add pink acrylic paint to the fingernails of the fingers, as shown in Diagram #19 and let them dry.
Congratulations! Your mixed media scarecrow doll is done.
I also created a free e-book for you showing how I made my Harold mixed media collage self sitter scarecrow doll.


No comments:
Post a Comment