Showing posts with label how-to's. Show all posts

Wednesday, May 24, 2023

Another Remake For My Large Silk Floral Dining Room Fire Place Decoration


Back in March of 2014 I decided to create a tutorial of how I made my large silk floral basket for my dining room, as shown in the picture below.  My post is here.


Well, since then I really haven't been happy with it.  I didn't like the size, the large pink daises, the light blue daises and the white daises.  So, I decided to recreate it with some new beautiful white dahlia silk floral I had bought.  It basically was made exactly the same as my original but, with different flowers.

The result of my recreation is shown in the picture at the top of this post and below.  


I was really pleased with the new floral arrangement and the way it turned out and hope you like it too. 

Copyright © 2004 - 2023 - All Rights Reserved - Designed and Written By Linda Walsh

Friday, September 23, 2022

My New Mixed Media Beach House Diorama


Back in 2014 I decided to take the Artful Gathering Session 1 Class - Let's Go For A Ride by Julie Haymaker Thompson. 

This class taught you how to make a mixed media shadowbox "doggie" wall decoration, which was a lot of fun to make.   

Like other classes I've taken I usually make more than one item and this class was no exception.  I created two base shadowbox pieces but, for some reason, only used one of them for the class project.

So, when I was looking at my supplies for the Spring and Summer mixed media shadow box diorama's I wanted to create I decided to use the extra mixed media base I had created for this class.  

As you know, I always save everything. You just never know when you might need the perfect thing for the creation you are making.

This time I wanted to create a wall house decoration with a window beach scene shadowbox diorama, which is shown in the picture above.

Here, too, I decided to use scrapbook papers for the outside and inside of the front and back and all the sides versus sponge painting all of them, like I usually do.

I selected two scrapbook paper collections to use: P13 - Beyond The Sea Scrapbook Paper Collection and Graphic 45 - Catch of the Day Scrapbook Paper Collection as well as bits and pieces from other scrapbook papers as well.


I also decided to use mixed media trims along the house edges, alpaca roving for the bottom of the window frame to create a sand dune, paper flowers, and paper leaves and reeds to create the effect of sand dunes with beach flowers and reeds leading down to the beach.


I was really happy with the way this decoration came out and decided to hang it in my kitchen year round.  It looks great there and compliments the "Let's Go For A Ride" decoration I had made that is also hanging on that kitchen wall.


Copyright © 2004 - 2023 - All Rights Reserved - Designed and Written By Linda Walsh

Thursday, September 22, 2022

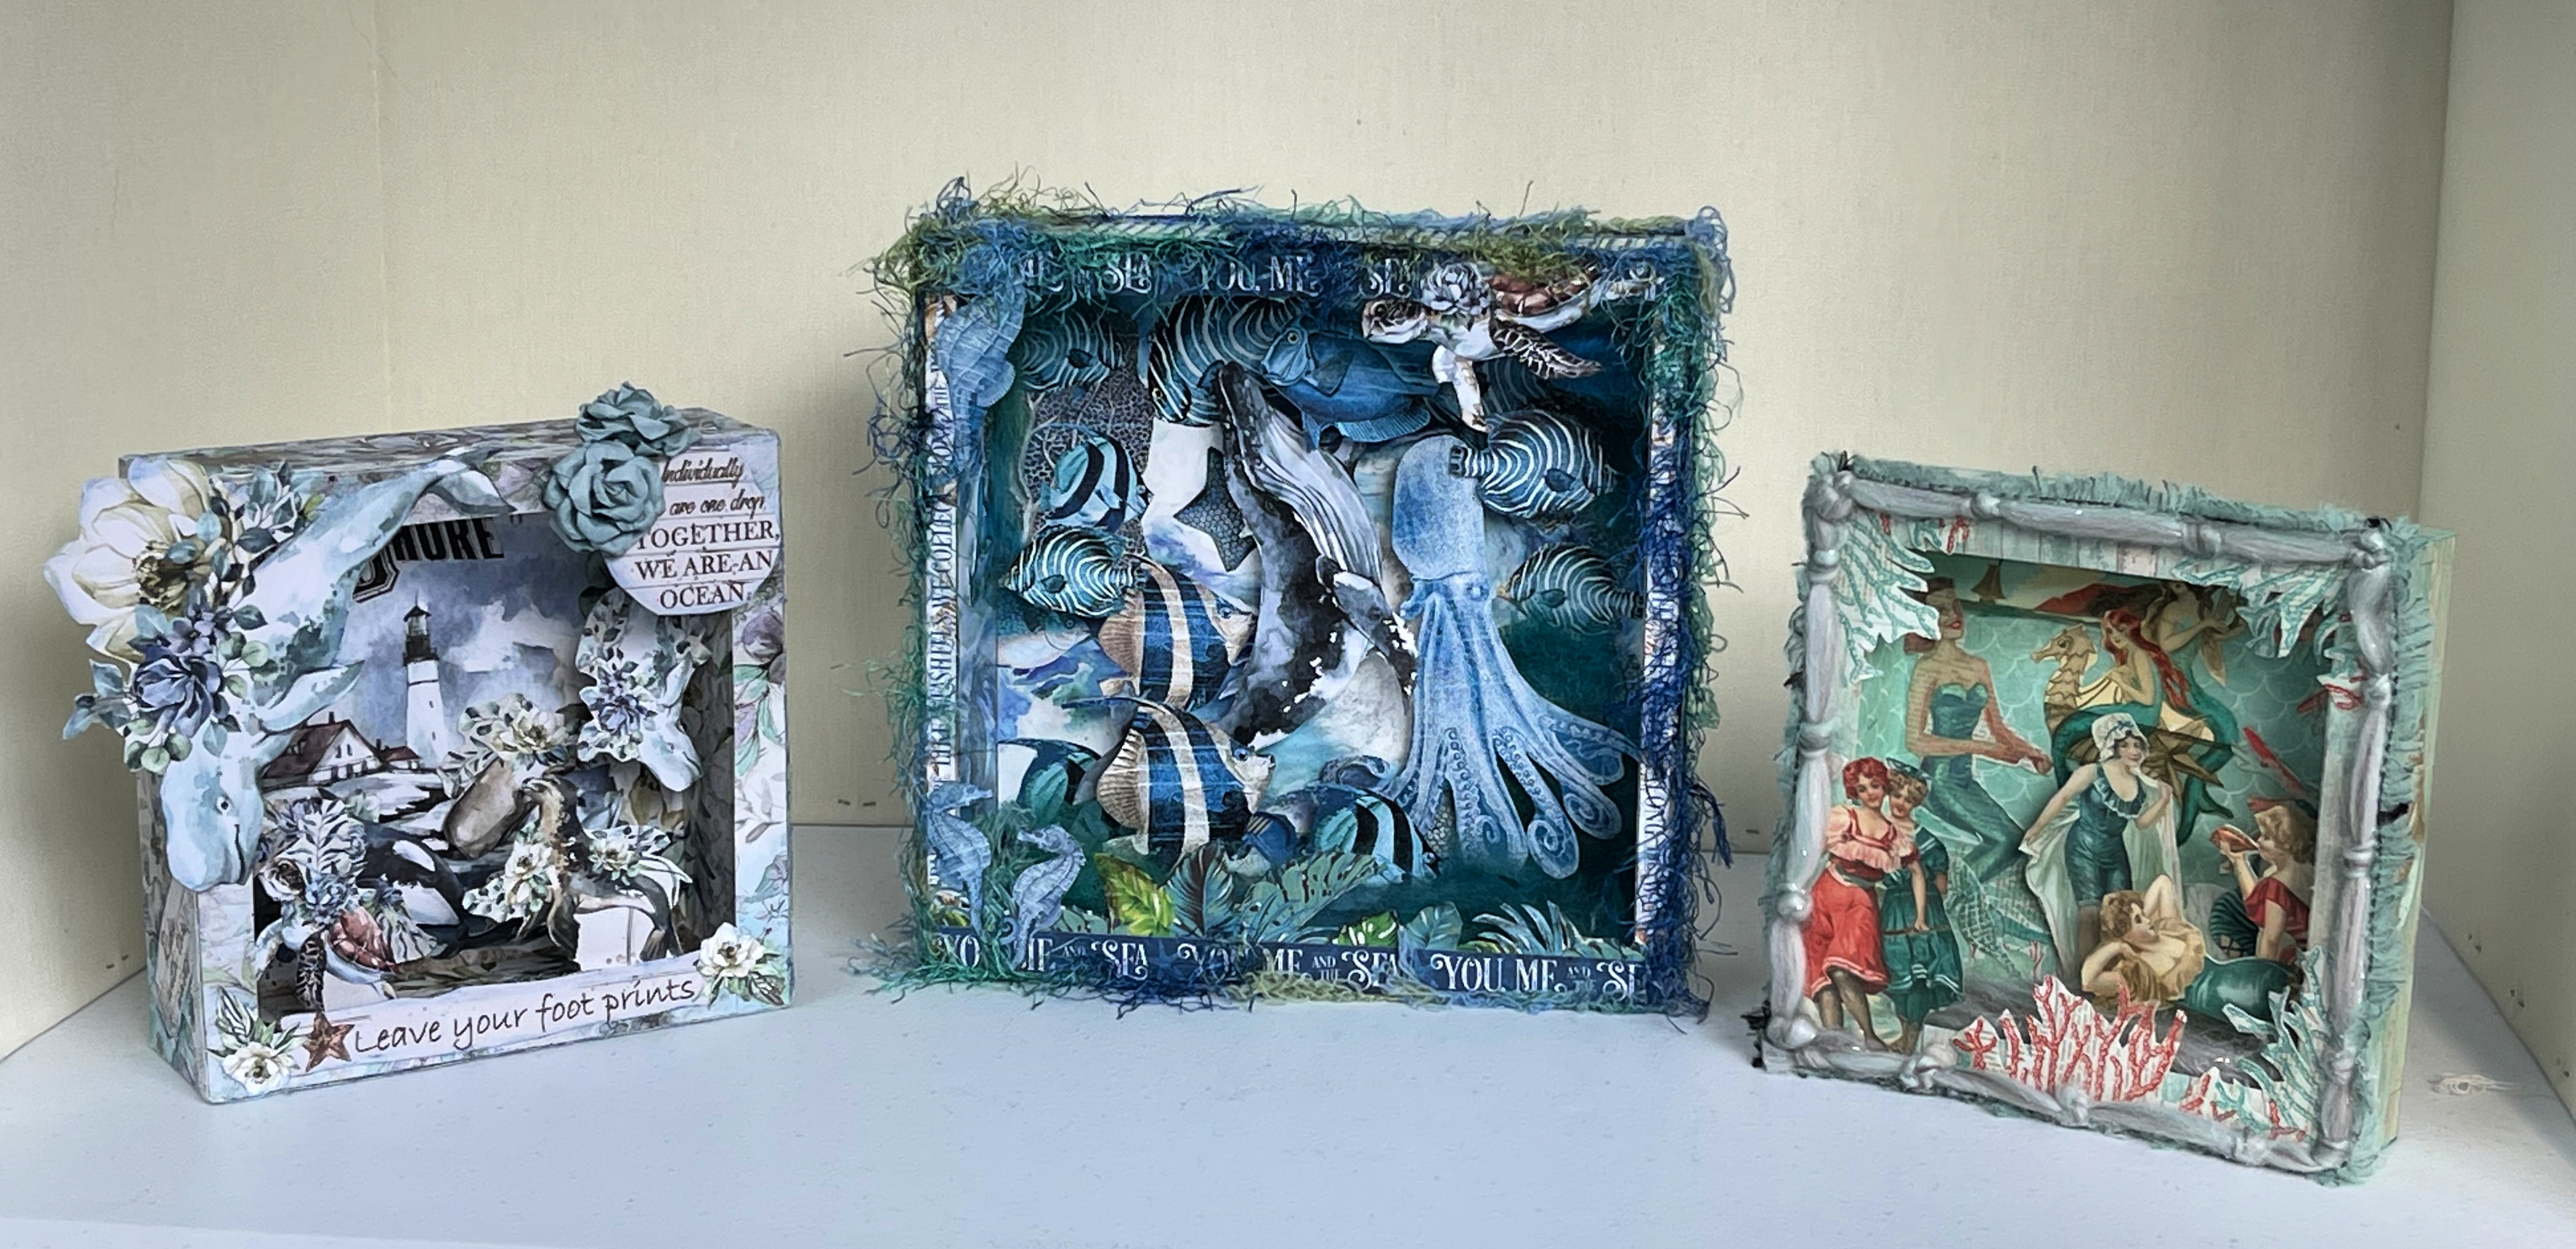
New Mixed Media Shadow Box Diorama Trio For The Summer


I've been crafting my whole life and love the Fall and Christmas holiday season.  As a result I have made more decorations for those two seasons than any other season or holiday.

The Fall and Christmas holiday season only lasts for 3 months from October to December so there are 9 other months that need decorations too.  

Over the years I started adding more decorations for the Winter, Spring and Summer months but always fell short on the Summer decorations for some reason.

So, I decided to make some additional mixed media shadow boxed dioramas for the Spring and Summer seasons.  Of course, I just made them and, of course, the Summer season is basically over.

God forbid I should ever make decorations ahead of the season....lol 

The three new diorama's shown in the picture above will be put away until the next Spring and Summer season.  It'll be a delayed viewing but be enjoyable anyway.

Usually for the shadowbox decorations I make I use wood shadow boxes and, generally, sponge paint them inside and outside for the backgrounds and sides.


This time, however, I decided to use scrapbook papers to cover the wood shadow boxes inside and outside and on all the sides.

I wanted all of these shadow box dioramas to have a 3D effect from the bottoms and sides of the shadow box so I cut some of the figures I wanted to use with bottom or side tabs and glued them in various positions within the 2" bottom and side areas of the shadow boxes.

I also wanted to use mixed media paper flowers, various types of fibers, alpaca roving with and without Angelina fibers, and various other mixed media effects to get the looks I wanted.


I just loved the Stamperia - Romantic Sea Dream Scrapbook Paper Collection and decided to use only this paper for the 4" x 4" wood shadow box diorama shown in the picture above.

Wednesday, January 19, 2022

How I Made My Mixed Media Paper Cube Christmas Ornaments


If you're a crafter like I am sometimes you have good intentions and start something only to be distracted by a supply you found, which results in you starting another project, which results in lots of "UnFinished Objects."

For crafters these are known as UFO's and most of us have multitudes of these waiting to be finished.


Such was the case with some of the supplies I bought from Alphastamps.net a couple of years ago - 2"cube Kraft boxes.  I thought they might make cute paper ornaments for my Christmas tree.  

I imagined cheerful cubes with Christmas scrapbook paper and Christmas sticker embellishments, so I bought six.  They’ve been waiting to be created for several years now.

Back then I thought I'd create cube ornaments that I could decoupage with winter, Christmas, and woodland themed images to create adorable present ornaments.

Finally, this past year seemed to be the right time to finish this project.


I had a lot of fun making them.  They were so quick and easy to do I thought you might like to know how I made mine.

Supplies Needed:

2" Paper Cube Kraft Boxes from Alphastamps.net 
Scrapbook Papers - Winter Woodland Theme
Adhesive Stickers - Winter Woodland Theme
Chipboard Die Cut Stickers - Woodland Theme
Adhesive For Chipboard Images (Depending on the thickness of the chipboard you can use Avery paper glue roll on sticks, Alene’s Tacky Glue, hot glue sticks, double sided tapes, ModPodge, etc.)
Mod Podge - Matte
Brushes
Golden Light Molding Paste
Toothpicks
Cylinder Shaped Stretch Ribbon - Red, Green, Blue, and White (36" for Each Cube)
Scotch Tape
Acrylic Paint - White Metallic

Instructions: 


1) Assemble the cardboard cube and apply scotch tape to hold the top lid closed. 

2) Decide which scrapbook papers, stickers, and chipboard diecut stickers you want to use for each of the six sides for each of the cubes and set them aside.

3) For each cube cut six 2” by 2” squares of the scrapbook paper you have chosen for the first cube and make sure they will fit the six sides of your cube.  

4)  Brush ModPodge on the first side of your first cube and on the back side of the 2” by 2” scrapbook paper you have chosen for this side.

5) Press the back side of the scrapbook paper to the cube side and make sure it adheres.

6)  Do the same for the remaining five 2”  by 2” scrapbook squares you have chosen for this cube and adhere them to their respective side.

7) Brush ModPodge on the outside of the front side of each scrapbook square on the six sides of your cube. 

8) Apply the adhesive stickers you want to use to each side and make sure it adheres.

9)  Apply glue to the back of the chipboard diecut stickers you want to use and adhere it to the cube side you have chosen.  Make sure it adheres firmly.


10) Once you are happy with the scrapbook paper, adhesive stickers, and chipboard diecut stickers you want on each of the sides lightly brush ModPodge over everything to seal it and then let it dry.


11) You are going to use the Golden Light Molding Paste along all sides of the cube to hold the scrapbook paper edges securely.  Using a toothpick apply some of the Golden Light Molding Paste along all four sides of the top of the cube and let it dry completely (See Diagram #1).

12) Once you are sure the top has dried completely turn the cube over and apply Golden Light Molding Paste along all four sides of the bottom of the cube and let it dry completely.

13) Once you are sure the bottom has dried completely apply Golden Light Molding Paste to the four remaining sides of the middle of the cube and let dry completely.

14) Paint the white metallic paints over the dried molding paste along the edges making sure you don’t get paint on the scrapbook papers.

15) Once the metallic paint is dry apply another light layer of the ModPodge on the scrapbook papers and along the edges where you applied the molding paste.

16) Cut a 36” long piece of the ribbon and fold it in half so you have two 18” long sides.


17) Form a 4” long loop and tie a knot so each side is left with 14” See Diagram #2).


18) Position the knot in the center of the top of the cube and then tie the two sides around the cube like you would when adding ribbon to all sides of a gift box (see Diagram #3). 

19) Slide the two ends of the ribbon under the knot that is at the center of the top of the cube and then tie them tightly in another knot and then in a bow.


Congratulations! Your Christmas Ornament Cube Decorations are done.  

Hang them on your Christmas tree.


Here's a close-up of one side of three of the cubes I made...


And, here's a close-up of one side of the other six cube ornaments I made.


I have to tell you they looked great on my tree.  

I also created a free e-book for you showing how I made my Christmas Cube Ornaments.


To view and download my free e-book please CLICK HERE. You'll be brought to Google Drive where you can view my free e-book. Then just download my free .pdf e-book by clicking on the down arrow in the top center.

For more information on all my free e-patterns, e-printables and e-books please CLICK HERE.

Please respect My Terms of Use:  All patterns, e-patterns, printables, e-printables, e-books, graphics, tutorials, how-to's, articles and other e-products © 2004-2023 Linda Walsh Originals-Designs by Linda Walsh. All rights reserved. Commercial selling or reselling by any means prohibited without the written consent of Linda Walsh.

Patterns, e-patterns, printables, e-printables, e-books, graphics, tutorials, how-to's, articles and other e-products are for personal use only. You may not modify, photocopy, download, upload, post, transmit, display, perform, publish, license, reprint, create derivative works from, mass duplicate, re-sell, digitize, and reproduce in any other form (print, digital or electric) or commercially apply, embed, share, Email, or redistribution in any other means. Use of any of the above is prohibited without the written permission of Linda Walsh.

However, you may link to my website(s)/blog(s) and the individual page(s)/blog post(s) (including 1 picture) but do not copy, reprint or duplicate my website(s)/blog(s) or individual page(s)/post(s ) without my permission.

Items made from Linda Walsh Originals E-Patterns and E-Books are intended for personal use for fun or small scale personal and business profit as long as you credit us with the design. Large scale commercial use (i.e. mass production) of items made from Linda Walsh Originals E-Patterns are by permission only.

Please see my Terms and Conditions for additional information.

Copyright © 2004 - 2023 - All Rights Reserved - Written By Linda Walsh of Linda Walsh Originals and Linda's Blog. Linda is a doll maker and doll pattern designer.


Tuesday, January 18, 2022

A Mixed Media Paper Sleigh and Happy Shopping Trip


When I first started making silk floral decorations I started with Christmas decorations and, specifically, started with metal Christmas decorated sleighs in two sizes: large and small.  

I have to blame my mother for this (lol) as we were on a shopping trip and happened to go into a Christmas Tree Shop.  She spotted the metal Xmas sleighs and told me she thought they might make cute decorations for the Christmas holiday season.  So, of course, I bought some.

In looking at the sleighs I thought they might be nice for decorations.  The big ones would be great for the floor and the smaller ones for table decorations.   I wanted to add florals, paper boxes, pinecones, etc. as decorations in the sleigh.  Of course, for some I added a Santa and toys.


Over the years I ended up dismantling the silk floral sleighs and, currently, have the empty metal sleighs in a box somewhere...lol  I would include a picture of them here as they are really cute, even when empty, but I'm not exactly sure where they are right now and what box they are in....lol 


In any event, when looking at the chipboard decorations I wanted to buy I spotted a small chipboard sleigh that I thought might be fun to put together.  So, I bought one and only one.  Now that is a little unusual for me as when I find something I like I usually buy more than one...lol  

This time I didn't.  I only bought one.


So, when I was looking at the Christmas chipboard decorations I wanted to make for this Christmas season I spotted the little sleigh and thought it might make for a cute table decoration.

I didn't want my sleigh to be traditional holiday red.  I thought perhaps an old fashioned burgundy metallic paint color would be nice and gray metallic paint color for the trim would be a nice compliment.

Instead of adding a little Santa I opted just for miniature paper/cardboard presents.  For the sides I added two red ribbon bows and to the front and back I added two chipboard Christmas decorations I had bought.

Putting the sleigh together was rather easy and really didn't take a lot of time, which pleased me to no end, as I had a lot to do this Christmas holiday season.  

In fact, it was so easy I thought that I should buy some more.  And, then I heard "Linda" in my ear and knew my beloved mother was telling me "one is enough!" ....lol


Monday, January 17, 2022

My Two New Mixed Media Christmas Houses


Given my love of houses and love of mixed media decorations you had to know that there was no way I would only create two house images for my Christmas decorations this year.

I'm not sure whether you will remember or not, but in September of 2021 I wrote a Linda's Blog post about how I had made the "Putz" chipboard beach house kits I had bought from AgedWithThyme Etsy Shop. Along with posting about the kits I also posted a little about what "Putz" houses were.  You know how I love history.... lol

In any event, I so enjoyed making the beach houses so much I decided to make more of the "Putz" house kits I had bought.  There were 10 kits left so I decided to make one a haunted house for Halloween and two houses for the Fall season.  The remaining 7 would be for the Christmas and Winter holiday season.  

Some of the kits were larger homes 3" x 2" by 4" and some were tiny 2" x 2" by 2" houses, which would be perfect as ornaments for the Christmas holiday season.

Well, when Christmas rolled around this year things got very busy and I was only able to create two Christmas house scenes.  The remaining 5 are still sitting as WIP's....lol lol They may be WIP's for a very long time.... lol


I decided that I wanted my two Christmas houses to look like chalets or little houses at the North Pole.  Maybe used by some of the elves or other thousands of workers helping Santa and Mrs. Claus with all the Christmas presents for the good boys and girls.  

I knew I would be making mixed media houses but given they were Christmas and winter snow scenes I knew I would be using lots of embellishments.  

I decided that I wanted my first Christmas house to look like a house at the North Pole with a chimney and icicles hanging off the sides of the roof and windows and with lots of snow.  I decided a combination of a red house with green chipboard windows and front door trim would be perfect as I envisioned that this is what most of the houses that the elves lived in at the North Pole would be.  

So, I picked a darker red and burgundy metallic paint for the house sections knowing I was going to paint the chipboard window trim, front door trims with a metallic Christmas green.  I decided to paint the chipboard icicles with a light gray metallic paint and paint the fencing with a medium gray metallic paint.

As I wanted to make the front door stand out a little more I opted to use a white scrapbook paper cover for the front door and misteltoe decoration instead of painting it green.

I had also decided to use a pine rectangle board as the base as it would make my house and scene a little sturdier.  As I was going to be using a lot of snow embellishments I decided to just paint the wood base on the top and bottom and all four sides dark acrylic green.   

As I was creating a little scene on a wood base I decided to add chipboard fencing around all four sides of the wood base and decided to also paint this green.

For this house I was using small window chipboard window trim frames, front door and trim frame and icicles which would be glued to the sides and front of the house and roof after I had painted it.  I opted to paper collage the roof with a dark sage green scrapbook paper and then glue the chipboard icicles to the house and roof.

As this was also meant to be a Christmas winter scene house I decided to paint the chimney the same darker red and burgundy metallic paint as the sides of the house.  

After putting the chipboard house together with the windows, roof, chimney and front door I then glued the bottom of the house to my painted wood base and proceeded to add the mixed media embellishments.

The embellishments I had in mind included paper scrapboard paper words and sayings, paper images, sticker images, Victorian Santa for the chimney, snowflake garland for hanging on the fence, silk floral reeds, silk floral leaves with burgundy berries, miniature cream colored sisal trees, ornate paper trims for the sides of the house, misteltoe decoration, metallic silver fringe and zig zag trim to decorate the sisal trees and bottom of all four sides of the fence.  There would also be a miniature Christmas wreath and minaiture reindeer. 

After all the embellishments were applied and set I added Aleene's True Snow throughout my scene and let it dry overnight.

Here's a view of the left and right sides and back of the first Christmas house:


The right hand side of the house.


The back of the house.


The left hand side of the house.


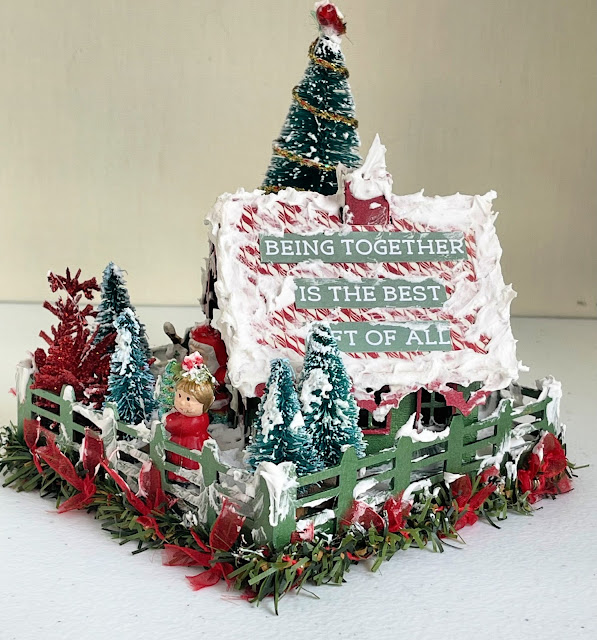
For my second Christmas House I decided that I wanted it to look like a chalet at the North Pole that Santa and Mrs. Claus might live in.  It, too would have a chimney but instead of icicles hanging off the sides of the roof and windows it would have a bright red painted chalet trim and lots of snow.  

I decided a combination of a green house with red chipboard windows and front door trim and red chalet trim would be perfect as I wanted Santa and Mrs. Claus's chalet to be a little different then the ones the elves lived in.  


So, I picked a darker green metallic paint for the chalet sections knowing I was going to paint the chipboard window trim, front door trim and chalet trims, and front door with a metallic bright Christmas red.  I decided to paint  the fencing with a the same dark green metallic paint as the chalet.

I had also decided to use a pine rectangle board as the base as it would make my chalet and scene a little sturdier.  As I was going to be using a lot of snow embellishments I decided to just paint the wood base on the top and bottom and all four sides dark acrylic green.

For this chalet I was using small window chipboard window frame trim, front door frame trim and chalet trim which would be glued to the sides and front of the house and roof after I had painted it.  I opted to paper collage the roof with a festive red and white candy cane scrapbook paper and then glue the chipboard chalet trim to the house and roof.

As this was meant to be a Christmas winter scene chalet I decided to paint the chimney the same red metallic paint as the sides of the chalet.   

After putting the chipboard chalet together with the windows, roof, chimney and front door I then glued the bottom of the chalet to my painted wood base and proceeded to add the mixed media embellishments.

The embellishments I had in mind included paper scrapboard paper sayings, paper images, sticker images, Victorian Santa for the chimney, festive red ribbon bow garland for hanging on the fence, bright red silk floral glitter reeds, miniature artificial tree roping garland for all four sides of the bottom of the fence, miniature green sisal trees, metallic wreaths for the back and front of the house, chipboard  candy cane cutout that I painted red and white, and rope trim to decorate the miniature green sisal trees.  There would also be a miniature ceramic Santa and Mrs. Claus out in the snow in the front yard. 

After all the embellishments were applied and set I added Aleene's True Snow throughout my scene.

Here's a view of the left and right sides and back of the Santa and Mrs. Claus Christmas chalet:


The right hand side of the chalet.


The back of the chalet.


The left hand side of the chalet.

I am always amazed at the amount of work involved in these little houses but the end result always pleases me and makes all the time involved worthwhile. I hope you would agree.

At this point in time I think I'm done with miniature houses for awhile.  They do take a lot of time to create and right now my focus has switched to faeries...lol  So, the miniature paper houses in progress will be put aside until I get the urge to create some more.  With me you never know when that will be...lol 

Copyright © 2004 - 2023 - All Rights Reserved - Designed and Written By Linda Walsh

Sunday, January 16, 2022

You Can't Have Too Many Christmas House Decorations - Or Can You?


After finishing my diorama I was in the mood for a few more house creations.   If you've been following my blog all these years you know I love dolls and houses.  So, I decided to finish another chipboard house image with a ledge on the bottom.  

This time I decided to create a little wintery outdoor scene with two chipboard deer, Victorian girl and bird images, a chipboard tree, chipboard fence, Christmas wreath with red bow, cream colored miniature sisal trees, paper curtains, Christmas present, scrapbook paper door and snow embellishments.

I started by putting my house and ledge together and then painting the front, back, bottom, and sides with a bronze antiquing stain. When that was dry I painted the window, top and sides of the house and top of the bottom ledge with black acrylic paint.  

When that was dry I cut out a scrapbook paper with wood panel imagery to fit the front of the house, leaving a cut out section for the window.  Then I applied mod podge to the back of the wood panel imagery scrapbook paper with a brush and pressed it to the front of the house to make sure it adhered.  When I was sure it was secure I applied mod podge to the front of the wood panel imagery paper with a brush and also applied the mod pod to the back and sides of the house to seal the scrapbook paper, black acrylic paint and bronze stain on the back of the house.

I wanted my house to have a curved front door with curved molding so I cut a piece of green scrapbook paper to fit the front of the house with a curved top allowing for a smaller section of red scrapbook to serve as a door with a curved top.  By gluing the smaller red curved piece to the front of the larger green curved piece the red would create the image of a door surrounded by green molding.

I applied mod podge to the back of the red paper door piece and centered it on the top of the green paper piece.  When that was dry I applied mod podge to the back of the green paper door piece and centered it on the front of the house where I wanted the front door to be.


I cut out a small Victorian girl image that I wanted to place outside the front door and tested her to see if her size would work for the front door.  It did so I added mod podge to the back of her image and centered her on the front door.

After everything was dry and I was happy with the placement I applied another layer of mod podge to the front of the house, front door, and little Victorian girl image.

Before proceeding with the other pieces of the front scene I cut out a double sided piece of scrapbook paper to serve as the curtains for my window.  After making sure it fit within the window frame in the back of the house I applied mod podge to the front of it to secure it to the window frame and then applied mod podge to the back of it to seal the paper and secure it even more to the window frame.

I had a chipboard tree and chipboard fence piece that I had sized to fit my little house scene.  I painted the front, back, sides and bottom of the two pieces with green acrylic paint and then sponge painted the front and back of the tree with white and metallic light gray paint.  After the pieces were dry I applied matte medium to the front, sides and bottom of the tree and fence pieces to seal them.  I did not apply it to the back of the tree or fence pieces as I was going to apply low temperature glue to the back to glue them to the areas I wanted them in my scene.

When I was happy with the sponge painting on the tree I used low temperature hot glue to glue it to the right side of the house near the window.  I set the fence piece aside.

I wanted to use two small deer chipboard pieces (one small and one larger) in my scene so I painted the front, back, sides and bottom of the two pieces with copper metallic paint and let them dry.  After drying I applied matte medium to the front, sides and bottom of the deer pieces to seal them.  I did not apply it to the back of the deer pieces as I was going to use low temperature hot glue to the back to glue them to the areas I wanted them in my scene.  

After my deer pieces were dry I used low temperature hot glue to glue it to the front of the green tree that I had glued near the window.  I set the small deer piece aside.

Next up were the small present and two cream colored miniature sisal trees I wanted to glue within the scene on the ledge.  I applied the low temperature hot glue to the bottom of each piece and then glued them where I wanted them on the ledge.

I had decided I wanted to put the Christmas wreath with red bow above the window and door but centered on the house.  After making sure the wreath would fit I applied low temperature hot glue to the back of it and secured it where I wanted it to be. 

Next I cut out two small paper images of birds that I wanted to use on the green tree and on the top of the wreath.  I applied mod podge to the back of the birds and placed them where I wanted them.  When I was happy with the placement I brushed mod podge on the front of them to seal them to the house and tree.

I glued the fence to the front of the ledge in front of the door with the low temperature hot glue and them glued the small deer to the front of the fence.


When I was sure everything was dry and the low temperature hot glue was set I applied Alene's TruSnow along the edges of the roof, top of the door and window, on the birds, wreath, tree, window ledge, sisal trees, Victorian girl, Christmas present, fence, and front bottom and sides of the house ledge.

I looked at my little house scene and decided it was so cute there was no way you could have too many Christmas decorations - or can you?  Nah!!!

Copyright © 2004 - 2023 - All Rights Reserved - Written By Linda Walsh of Linda Walsh Originals and Linda's Blog. Linda is a doll maker and doll pattern designer.

Saturday, January 15, 2022

Gotta Love Mixed Media Christmas Diorama's and How I Made Mine


For years I have been wanting to try a small diorama and finally had a chance to create one.

If you don't know what a diorama is the definition is as follows: a model representing a scene with three-dimensional figures, either in miniature or as a large-scale museum exhibit.

It's basically a miniature 3d shadowbox. 

That, of course, is right up my alley as I've been writing about the various cross-stitch shadowboxes I've either made or used over the years to finish my cross-stitch, needlepoint, and needle felted creations.  This time, however, I wanted to create a mixed media 3d collage type of shadowbox - i.e. diorama for the Christmas holiday season.

So, I started with putting together a chipboard box that measured 5 1/2" x 1 1/2" x 3 3/4". 

I had found some adorable Victorian children images that I wanted to use and a Victorian Santa image that I thought would work well with what I had in mind.

I had also found a chipboard fireplace cutout, chipboard sleigh cutout, and sisal tree that would be perfect for my scene.


After assembling the chipboard box I painted the outside and inside walls with black acrylic paint.  

After the black acrylic paint was dried I sponge painted the outsides with various green, red, and white acrylic paints, some metallic, some just acrylic.  


When the outside and inside walls were painted and dried I selected the scrapbook papers I wanted to use for the back wall, ceiling, floor and two side walls and proceeded to cut the pieces to size.  

I had selected a white paper for the ceiling, green polka dot paper for the side walls, solid green paper for the floor, and red and white striped paper for the back wall.   When the papers were sized properly I mod podged them to their respective sides.


I wanted the fireplace to be in the center of the back wall so I added a piece of the green polka dot paper to cover the back opening of the fireplace.  When it was securely in place I glued the fireplace to the center of the back wall with hot glue.

After the fireplace was done I cut a piece of 1/8" red/white striped ribbon to fit around the outside edge of the box and hot glued it in place.


For the fireplace I had a strip of pine wood paper that I wanted to use for the mantle as well as as pine garland border that I thought would look nice on top of the pine wood mantle.  After sizing both I brushed  mod podge on the backs of each and pressed them onto the mantle. 

I had also found a border strip of decorative bell, garland, and mistletoe that I thought would look good as a border along the top of the back wall.  After applying mod podge to the back of the strip I pressed it firmly in place.

I had two stocking images, three images of Victorian children, and decorative presents that I thought would look good on the mantle and in front of the fireplace so I cut them out and applied mod podge to their respective backs and then pressed them all in place.  

When I was happy with the way the outside walls and inside walls were I applied matte medium to seal everything.


After the matte medium was dry I sized one of the white sisal trees I had to see if it would be a good fit for my diorama.  It was so I glued it in place on the left side of the diorama with hot glue.  

Two decorative presents seemed a perfect decoration in front of the sisal tree so I glued them in place with hot glue.

There were only a few things left to do.  The first was to paint the front and back of the chipboard sleigh with two coats of burgundy metallic paint and, when dry,  glue it to the outside left side of the diorama with hot glue.


The second thing left to do was to cut out the Victorian children and Victorian Santa that I wanted to use on the outer edge of the diorama.  I was going to place the two children in front of the sleigh and the Santa on the border of the front right corner.  When I was happy with their placement I glued them along the border with hot glue.

I had two decorative ornaments that I also wanted to glue to the front of the sleigh.  One was a decorative chipboard sticker and the other was a decorative wreath.  Both pieces had glue on their backs but I didn't think it would be strong enought to adhere them over time so I opted to hot glue them to the front of the sleigh.


There were only three things left to do.  One was to cut two strips of metallic ribbon and fasten them into two small bows.  When I was happy with their size I glued them to the upper right and upper left hand corner of the front border with hot glue.


I had found  a saying that I liked which was "May you never be too old to search the skies on Christmas Eve" that I wanted to use on the top of the diorama so I applied mod podge to the back of the saying, pressed it onto the top of the diorama and then applied mod podge to the front of the saying to seal it.

Last but not least I applied Alene's True Snow along the top front edge of the diorama, along the bottom edge of the diorama, on the sleigh and wreath, on the bottom of the left and right outsides, and on the bottom right front corner of the box edge near the Santa.

After the snow was dried I took a look at my diorama to make sure I was happy with everything.  I was so I signed the back and pondered where I would put my new decoration this holiday season.

Copyright © 2004 - 2023 - All Rights Reserved - Written By Linda Walsh of Linda Walsh Originals and Linda's Blog. Linda is a doll maker and doll pattern designer.