

Given my love of houses and love of mixed media decorations you had to know that there was no way I would only create two house images for my Christmas decorations this year.
I'm not sure whether you will remember or not, but in September of 2021 I wrote a Linda's Blog post about how I had made the "Putz" chipboard beach house kits I had bought from AgedWithThyme Etsy Shop. Along with posting about the kits I also posted a little about what "Putz" houses were. You know how I love history.... lol
In any event, I so enjoyed making the beach houses so much I decided to make more of the "Putz" house kits I had bought. There were 10 kits left so I decided to make one a haunted house for Halloween and two houses for the Fall season. The remaining 7 would be for the Christmas and Winter holiday season.
Some of the kits were larger homes 3" x 2" by 4" and some were tiny 2" x 2" by 2" houses, which would be perfect as ornaments for the Christmas holiday season.
Well, when Christmas rolled around this year things got very busy and I was only able to create two Christmas house scenes. The remaining 5 are still sitting as WIP's....lol lol They may be WIP's for a very long time.... lol

I decided that I wanted my two Christmas houses to look like chalets or little houses at the North Pole. Maybe used by some of the elves or other thousands of workers helping Santa and Mrs. Claus with all the Christmas presents for the good boys and girls.
I knew I would be making mixed media houses but given they were Christmas and winter snow scenes I knew I would be using lots of embellishments.
I decided that I wanted my first Christmas house to look like a house at the North Pole with a chimney and icicles hanging off the sides of the roof and windows and with lots of snow. I decided a combination of a red house with green chipboard windows and front door trim would be perfect as I envisioned that this is what most of the houses that the elves lived in at the North Pole would be.
So, I picked a darker red and burgundy metallic paint for the house sections knowing I was going to paint the chipboard window trim, front door trims with a metallic Christmas green. I decided to paint the chipboard icicles with a light gray metallic paint and paint the fencing with a medium gray metallic paint.
As I wanted to make the front door stand out a little more I opted to use a white scrapbook paper cover for the front door and misteltoe decoration instead of painting it green.
I had also decided to use a pine rectangle board as the base as it would make my house and scene a little sturdier. As I was going to be using a lot of snow embellishments I decided to just paint the wood base on the top and bottom and all four sides dark acrylic green.
For this house I was using small window chipboard window trim frames, front door and trim frame and icicles which would be glued to the sides and front of the house and roof after I had painted it. I opted to paper collage the roof with a dark sage green scrapbook paper and then glue the chipboard icicles to the house and roof.
As this was also meant to be a Christmas winter scene house I decided to paint the chimney the same darker red and burgundy metallic paint as the sides of the house.
After putting the chipboard house together with the windows, roof, chimney and front door I then glued the bottom of the house to my painted wood base and proceeded to add the mixed media embellishments.
The embellishments I had in mind included paper scrapboard paper words and sayings, paper images, sticker images, Victorian Santa for the chimney, snowflake garland for hanging on the fence, silk floral reeds, silk floral leaves with burgundy berries, miniature cream colored sisal trees, ornate paper trims for the sides of the house, misteltoe decoration, metallic silver fringe and zig zag trim to decorate the sisal trees and bottom of all four sides of the fence. There would also be a miniature Christmas wreath and minaiture reindeer.
After all the embellishments were applied and set I added Aleene's True Snow throughout my scene and let it dry overnight.
Here's a view of the left and right sides and back of the first Christmas house:


The left hand side of the house.

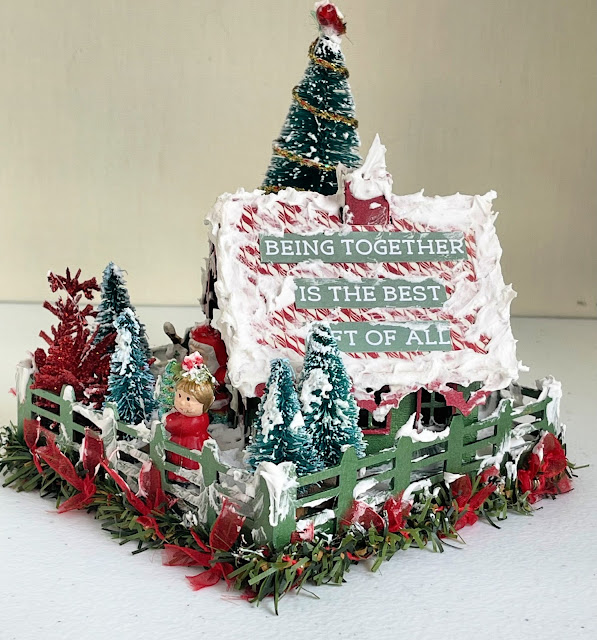
For my second Christmas House I decided that I wanted it to look like a chalet at the North Pole that Santa and Mrs. Claus might live in. It, too would have a chimney but instead of icicles hanging off the sides of the roof and windows it would have a bright red painted chalet trim and lots of snow.
I decided a combination of a green house with red chipboard windows and front door trim and red chalet trim would be perfect as I wanted Santa and Mrs. Claus's chalet to be a little different then the ones the elves lived in.

So, I picked a darker green metallic paint for the chalet sections knowing I was going to paint the chipboard window trim, front door trim and chalet trims, and front door with a metallic bright Christmas red. I decided to paint the fencing with a the same dark green metallic paint as the chalet.
I had also decided to use a pine rectangle board as the base as it would make my chalet and scene a little sturdier. As I was going to be using a lot of snow embellishments I decided to just paint the wood base on the top and bottom and all four sides dark acrylic green.
For this chalet I was using small window chipboard window frame trim, front door frame trim and chalet trim which would be glued to the sides and front of the house and roof after I had painted it. I opted to paper collage the roof with a festive red and white candy cane scrapbook paper and then glue the chipboard chalet trim to the house and roof.
As this was meant to be a Christmas winter scene chalet I decided to paint the chimney the same red metallic paint as the sides of the chalet.
After putting the chipboard chalet together with the windows, roof, chimney and front door I then glued the bottom of the chalet to my painted wood base and proceeded to add the mixed media embellishments.
The embellishments I had in mind included paper scrapboard paper sayings, paper images, sticker images, Victorian Santa for the chimney, festive red ribbon bow garland for hanging on the fence, bright red silk floral glitter reeds, miniature artificial tree roping garland for all four sides of the bottom of the fence, miniature green sisal trees, metallic wreaths for the back and front of the house, chipboard candy cane cutout that I painted red and white, and rope trim to decorate the miniature green sisal trees. There would also be a miniature ceramic Santa and Mrs. Claus out in the snow in the front yard.
After all the embellishments were applied and set I added Aleene's True Snow throughout my scene.
Here's a view of the left and right sides and back of the Santa and Mrs. Claus Christmas chalet:

The right hand side of the chalet.

The back of the chalet.
The left hand side of the chalet.
I am always amazed at the amount of work involved in these little houses but the end result always pleases me and makes all the time involved worthwhile. I hope you would agree.
At this point in time I think I'm done with miniature houses for awhile. They do take a lot of time to create and right now my focus has switched to faeries...lol So, the miniature paper houses in progress will be put aside until I get the urge to create some more. With me you never know when that will be...lol
Copyright © 2004 - 2023 - All Rights Reserved - Designed and Written By Linda Walsh
No comments:
Post a Comment