Showing posts with label Summer. Show all posts

Saturday, June 24, 2023

My Mixed Media Slow Stitching Pictures - Beach House Scene and English Cottage Kits


On my beach scene mixed media slow stitching picture adventure I mentioned that I was looking for beach or spring flower kits.

Even though I am a seasoned crafter I was new to slow stitching so I thought a kit with a picture of the finished item would be helpful.

Tuesday, June 20, 2023

My "Float Along Quietly" Mixed Media Slow Stitching Collage Picture

As you all know over the years I have bought a lot of craft related items and tend to prefer craft kits as I just don't have a lot of time to peruse fabric or craft stores.  That's what makes shopping on the internet a problem for me.  I can't just buy one kit.  I have to buy more than enough figuring I'm saving time in the long run.  

If you remember some of my stories about making dolls and crafts that I always made things in a factory line way.  I'd design a whole bunch of items, cut all the wood for all of them, sand all of them, put the kits together for all of them and then save them in contains for future assembling.

I also wanted to try every single craft there was and have been endeavoring to do this for the past sixty+ years.  The problem is with numerous kits for each craft you want to try you end up with a LOT of containers filled with items waiting to be made....LOL

So, when I read about "Slow Stitching" I couldn't just buy one kit.  I bought MANY of them.

I was particularly interested in ocean and summer themed kits and found several kits that I liked on Etsy.  I should clarify that - I found "many that I liked.....LOL

Monday, June 19, 2023

My "Surprises In The Mail" Package For My Sister


Yesterday I published a post on my Linda's Blog entitled "My "Take Me To The Ocean" Mixed Media Slow Stitching Applique Collage Wall Art Picture." about the new slow stitching picture I had created recently from a slow stitching kit I had bought.

In that post I mentioned that I had enough fabric from that kit to also make a "surprise packages in the mail" for my sister. However, I didn't have enough embellishments so I had to improvise and add some from my stash.

Sunday, June 18, 2023

My "Take Me To The Ocean" Mixed Media Slow Stitching Applique Collage Wall Art Picture

A couple of months ago I saw a Facebook group "Slow Stitching For The Soul" that intrigued me. So, of course, I had to do a little research.

The group which was started by Bev Ramsbotham - Textile Artist, based in Retford intrigued me because it was a group of no judgement on right or wrong ways to sew something - just creativity.  The idea was to relax and spend time hand stitching in different media to achieve a hand made piece of textile art.  

According to Bev, it was meant for members to "soothe their soul or just have some fun and not worry about 'perfection' or criticism from others, and be pleasantly surprised at what they create."

Given how much I love history and research I decided to find out a little more about "Slow Stitching."

According to "The Craft of Oz" Slow Stitching is: "Slow stitching is a relatively new concept that incorporates old hand stitching traditions. It's a craft where ancient practices and creativity collide. Unlike stitching that is used to mend or make a garment, slow stitching is the act of using needle and thread to create art; just as you would paint, draw or sculpt out of clay. I like to think of it as hand stitching with a creative purpose."

Given my curiosity I wondered when this movement started and who started it.  Well, according to my Google search it was started in 2015 by Mark Lipinksi, an internationally known quilting artist.

So, I thought to myself, "where have I been for the last eight years...." LOL

Wednesday, May 24, 2023

Another Remake For My Large Silk Floral Dining Room Fire Place Decoration


Back in March of 2014 I decided to create a tutorial of how I made my large silk floral basket for my dining room, as shown in the picture below.  My post is here.


Well, since then I really haven't been happy with it.  I didn't like the size, the large pink daises, the light blue daises and the white daises.  So, I decided to recreate it with some new beautiful white dahlia silk floral I had bought.  It basically was made exactly the same as my original but, with different flowers.

The result of my recreation is shown in the picture at the top of this post and below.  


I was really pleased with the new floral arrangement and the way it turned out and hope you like it too. 

Copyright © 2004 - 2023 - All Rights Reserved - Designed and Written By Linda Walsh

Friday, September 23, 2022

My New Mixed Media Beach House Diorama


Back in 2014 I decided to take the Artful Gathering Session 1 Class - Let's Go For A Ride by Julie Haymaker Thompson. 

This class taught you how to make a mixed media shadowbox "doggie" wall decoration, which was a lot of fun to make.   

Like other classes I've taken I usually make more than one item and this class was no exception.  I created two base shadowbox pieces but, for some reason, only used one of them for the class project.

So, when I was looking at my supplies for the Spring and Summer mixed media shadow box diorama's I wanted to create I decided to use the extra mixed media base I had created for this class.  

As you know, I always save everything. You just never know when you might need the perfect thing for the creation you are making.

This time I wanted to create a wall house decoration with a window beach scene shadowbox diorama, which is shown in the picture above.

Here, too, I decided to use scrapbook papers for the outside and inside of the front and back and all the sides versus sponge painting all of them, like I usually do.

I selected two scrapbook paper collections to use: P13 - Beyond The Sea Scrapbook Paper Collection and Graphic 45 - Catch of the Day Scrapbook Paper Collection as well as bits and pieces from other scrapbook papers as well.


I also decided to use mixed media trims along the house edges, alpaca roving for the bottom of the window frame to create a sand dune, paper flowers, and paper leaves and reeds to create the effect of sand dunes with beach flowers and reeds leading down to the beach.


I was really happy with the way this decoration came out and decided to hang it in my kitchen year round.  It looks great there and compliments the "Let's Go For A Ride" decoration I had made that is also hanging on that kitchen wall.


Copyright © 2004 - 2023 - All Rights Reserved - Designed and Written By Linda Walsh

Thursday, September 22, 2022

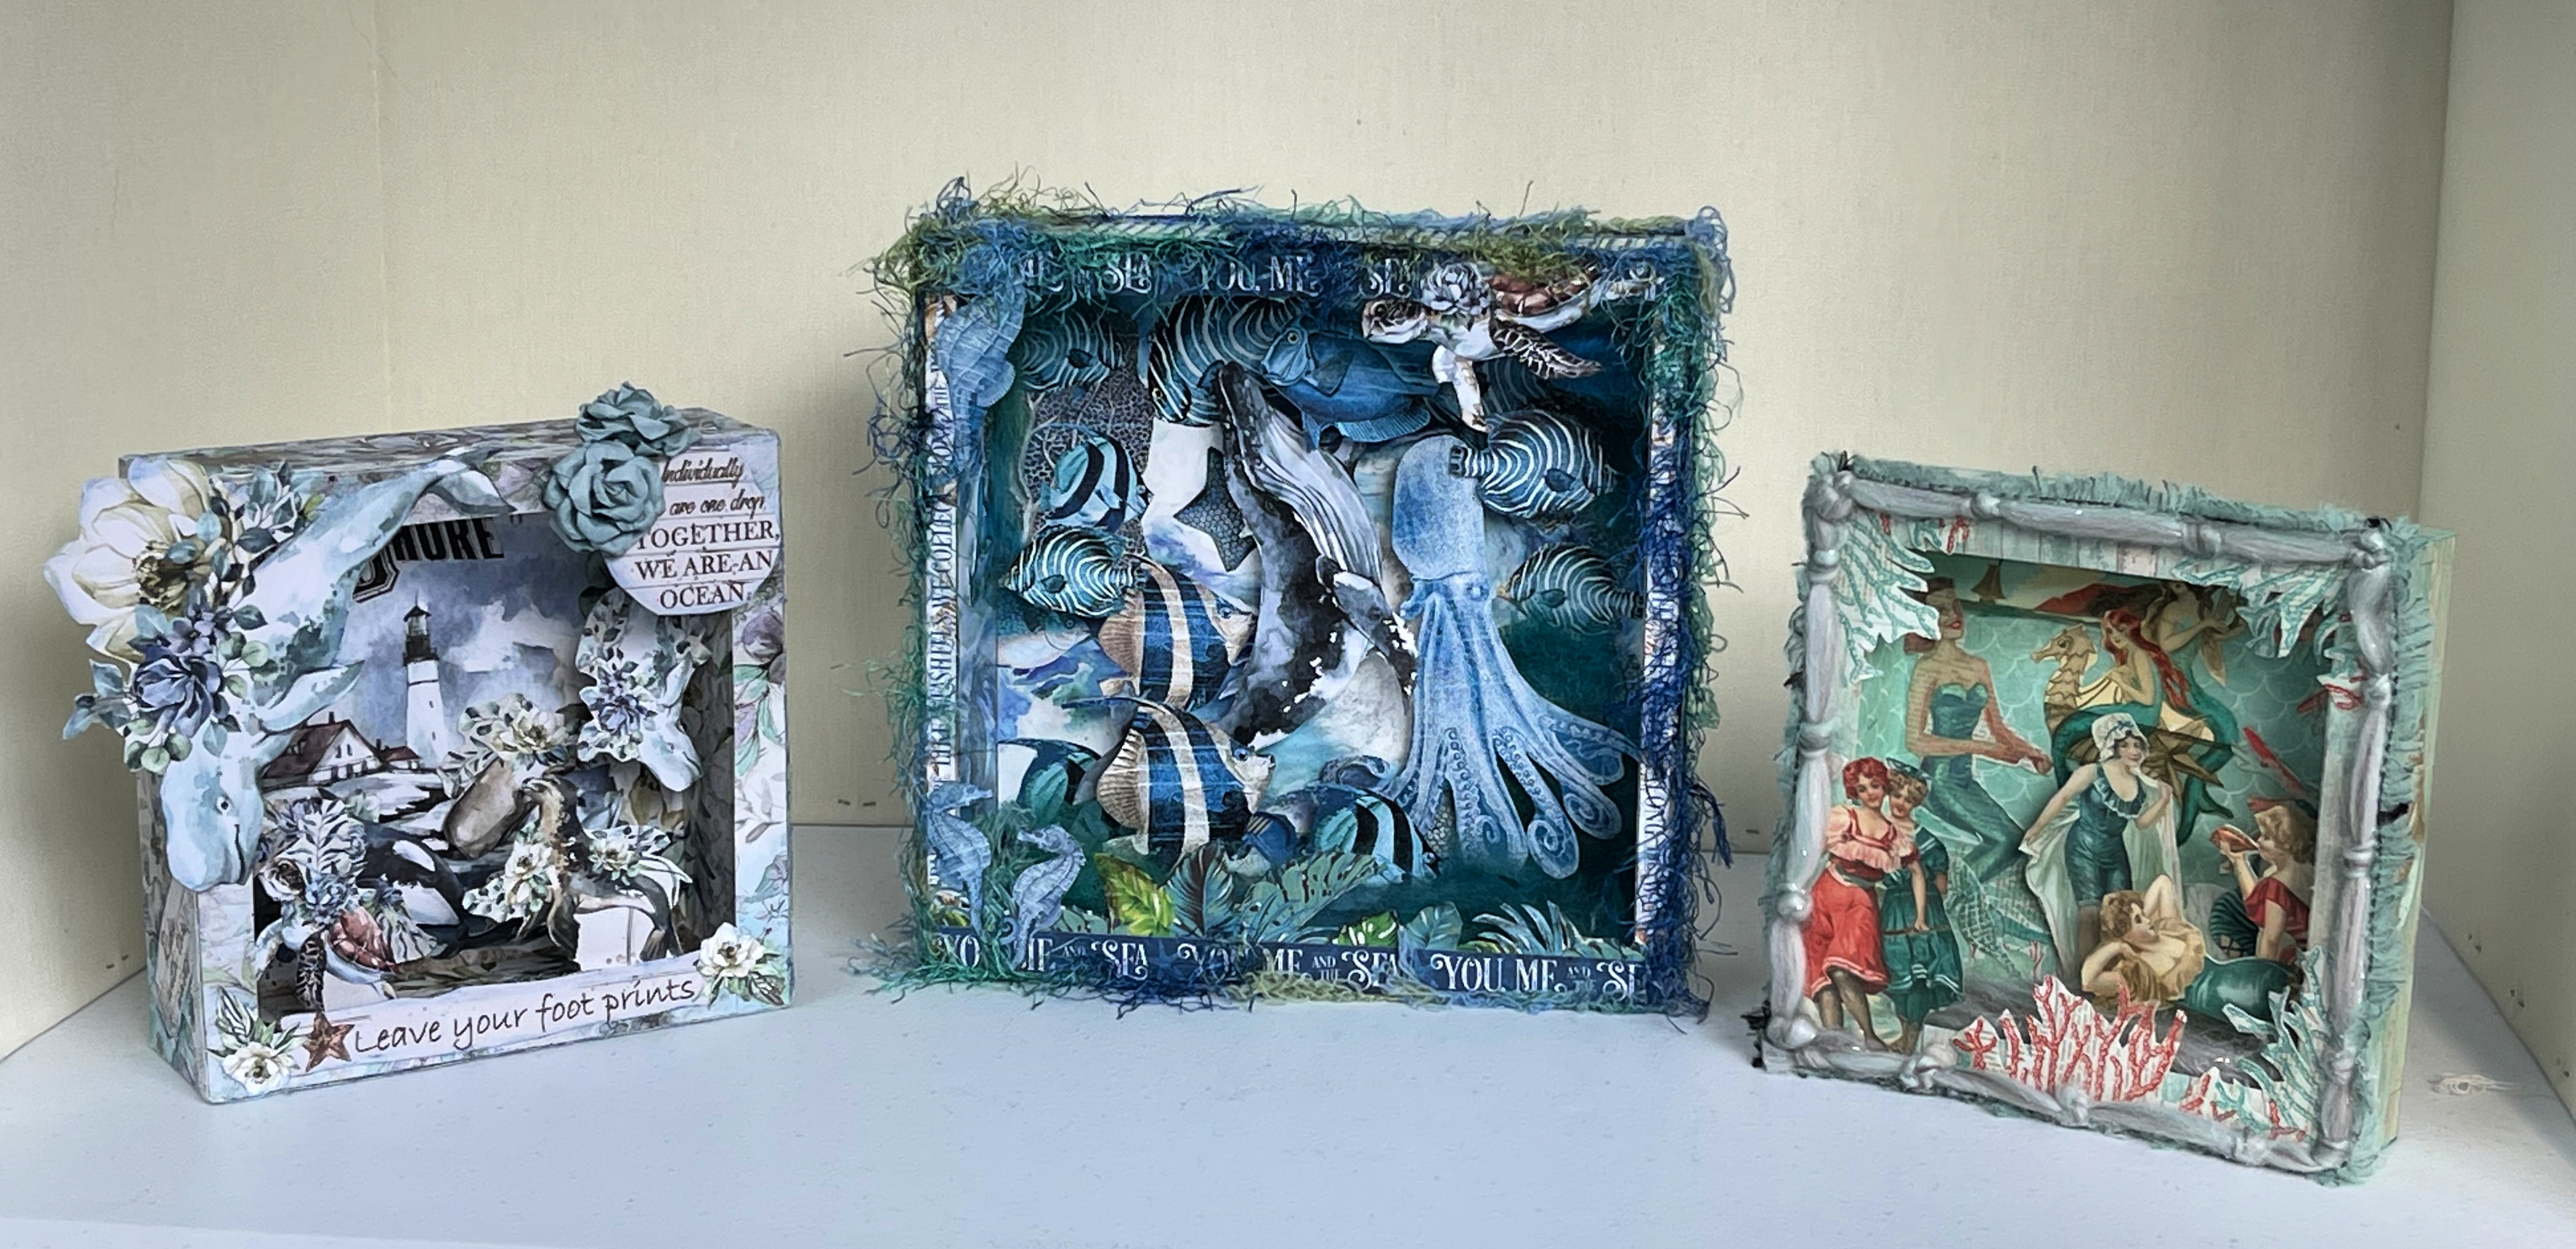
New Mixed Media Shadow Box Diorama Trio For The Summer


I've been crafting my whole life and love the Fall and Christmas holiday season.  As a result I have made more decorations for those two seasons than any other season or holiday.

The Fall and Christmas holiday season only lasts for 3 months from October to December so there are 9 other months that need decorations too.  

Over the years I started adding more decorations for the Winter, Spring and Summer months but always fell short on the Summer decorations for some reason.

So, I decided to make some additional mixed media shadow boxed dioramas for the Spring and Summer seasons.  Of course, I just made them and, of course, the Summer season is basically over.

God forbid I should ever make decorations ahead of the season....lol 

The three new diorama's shown in the picture above will be put away until the next Spring and Summer season.  It'll be a delayed viewing but be enjoyable anyway.

Usually for the shadowbox decorations I make I use wood shadow boxes and, generally, sponge paint them inside and outside for the backgrounds and sides.


This time, however, I decided to use scrapbook papers to cover the wood shadow boxes inside and outside and on all the sides.

I wanted all of these shadow box dioramas to have a 3D effect from the bottoms and sides of the shadow box so I cut some of the figures I wanted to use with bottom or side tabs and glued them in various positions within the 2" bottom and side areas of the shadow boxes.

I also wanted to use mixed media paper flowers, various types of fibers, alpaca roving with and without Angelina fibers, and various other mixed media effects to get the looks I wanted.


I just loved the Stamperia - Romantic Sea Dream Scrapbook Paper Collection and decided to use only this paper for the 4" x 4" wood shadow box diorama shown in the picture above.

Friday, September 10, 2021

How I Made My Mixed Media "Putz" Chipboard Beach House Kit From AgedWithThyme Etsy Shop


Since you're well aware that I like buying pictures of houses and creating houses you shouldn't be surprised that I would venture into creating miniature 3d house models.  

So, what do I mean by that?  Well, if you've been a crafter for awhile and have ventured into any craft store before the holidays you must have seen displays for everything you might need to create a miniature Christmas house village.  

Some of the house supplies were created out of paper, some cardboard, some chipboard, some plastic, some wood and some ceramic.  You could create the houses using a kit or buy them already finished and add other decorations like trees, figurines, miniature Christmas decorations, etc.  The end result for all of this was creating a pretty little village scene to be displayed at the Christmas holiday season.

Several years ago I decided to make some chipboard gingerbread houses of my own for table decorations and wrote about them in a Linda's Blog post entitled: New Mixed Media Christmas Decorations - Adorable Gingerbread Houses.  

I also make some gingerbread ornaments that I could hang on my skinny Christmas tree and wrote about them in a Linda's Blog post entitled: My New Miniature Mixed Media Gingerbread House Christmas Ornaments.

I loved making them and after doing so I decided to see if there were other chipboard house kits I could buy not just for the holiday season but for all year.  So, I went searching online and found a lot of  information on house villages.

It seems that house villages have been around since the late Victorian era, which certainly piqued my interest, and were very popular from the 1920's through the 1950's or so.

I found out that they were called "putz" houses and they had originated from the German word "putzen" which means to clean or polish.

According to Wikipedia - Christmas Villages

A Christmas village (or putz) is a decorative, miniature-scale village often set up during the Christmas season. These villages are rooted in the elaborate Christmas traditions of the Moravian church, a Protestant denomination. Mass-produced cardboard Christmas villages became popular in the United States during the early and mid-20th century, while porcelain versions became popular in the later part of the century.

The tradition of decorative Christmas villages built around the Christmas tree is rooted in the late 18th century holiday traditions of the Moravian church, a Protestant denomination with early settlements in Salem, North Carolina and Bethlehem, Pennsylvania. Karal Ann Marling writes that "This usually took the form of an elaborate landscape with animals, which may or may not have alluded to the creatures in the stable at Bethlehem or the passengers on Noah’s Ark...the typical putz went beyond the limits of any biblical scene into pure, exuberant genre." These grew to encompass much more than a nativity scene, with animations such as working flour mills, jumping dogs, running water with waterfalls and electric trains, and could fill an entire room. Families would organize "putz parties" and compete for the best show.

After World War II, several Japanese companies started mass-producing cardboard or paper houses, churches, and other buildings. These small buildings usually had holes in the back or the bottom through which Christmas lights were placed to provide illumination. The buildings had tiny colored cellophane windows and were decorated with mica-dusted roofs to give the appearance of snow. Since these buildings were made of inexpensive material and were widely available throughout the United States, they became a very popular Christmas decoration.

In the 1970s, ceramic or porcelain Christmas villages were introduced and started to gain popularity. Department 56 was one of the first companies to make these buildings and remains amongst the most well-known. Other companies, such as Lemax, have also produced similar villages, and there are numerous other brands sold. In Europe, Luville and Dickensville are established brands.

Christmas village buildings are not usually made to consistent relative scale. A church building might well be ten times the height of an ordinary house in reality but this would make very cumbersome models and look odd within a Christmas village display. It is only necessary for the church building to be noticeably taller than the house, to give it an imposing stature.

Like many other Christmas traditions, the notion of a village to celebrate a holiday has spread to other holidays, with a few companies making Halloween and Easter villages.

It's no surprise that something that was originally started for religious purposes in the late 19th century  would gain popularity and, therefore, start to be mass produced for commercial purposes by companies several years or decades later.  

As you're well aware I love history so reading all about these little houses was very interesting to me.

However, I've side tracked a little, as I always do....lol

After making my gingerbread houses I set out to see if there were any other cardboard or chipboard kits that were available for making other miniature houses for the various seasons or holidays.  Well, to my delight, it seems there were.

I found a wonderful shop on Etsy called AgedWithThyme that sold chipboard sets for several different styles of "putz" houses, like the one pictured above.  I was delighted.  

So, I bought three chipboard house kits.  One kit was for making six houses including a church.  One kit was for making 3 beach houses which I was intrigued by as I didn't have a lot of summer decorations and one kit was for making 4 houses including a saltbox colonial like the house I live in.  I was thrilled.

That was back in 2018 and, as usual, I didn't get around to making any of these until this past summer.

In looking at the three kits this summer I decided to start with the three beach houses as I had just finished making some mixed media house pictures for the spring and summer and was still in a summer mode.  

I wasn't sure how long my summer mode would last as September was upon us and you know how much I love the Fall and Christmas holiday decorating season.


The beach house kit, shown in the picture above, contained the picture, instructions, and the chipboard pieces for the houses and beach chairs.  Each of the three houses had a picture of the individual house pieces included in the kit and one page of very simple instructions for putting each of the beach houses together.  The kit also included one page of the designers tips for making the "putz" houses.

The instructions for each of the houses called for putting the houses together first and then painting them.  As, I had decided ahead of time that I wanted to make mixed media 3d beach houses that wasn't going to work for me as some of the pieces were going to be embellished versus painted.  I would need to decide ahead of time what embellishments I wanted to use so I could plan the sequence I would need for putting everything together.

I did notice that this particular chipboard kit did not have tabs for helping to align the corners when gluing the houses together so I knew ahead of time this could be a problem - and it was.  The houses in the other two chipboard kits I bought did have tabs.  For some reason the beach houses didn't.

Plus, the chipboard used in these kits for the houses and chipboard embellishments was much thinner than what I was used to from previous chipboard kits I had used from other sellers so I knew this could, potentially, be a problem for assembling the houses - which it definitely was when I put each of the beach houses together.  

I also thought the thinness of the chipboard pieces could be a problem for the small chipboard embellishments, like door frames and window frames, that I would need to paint first and then glue.

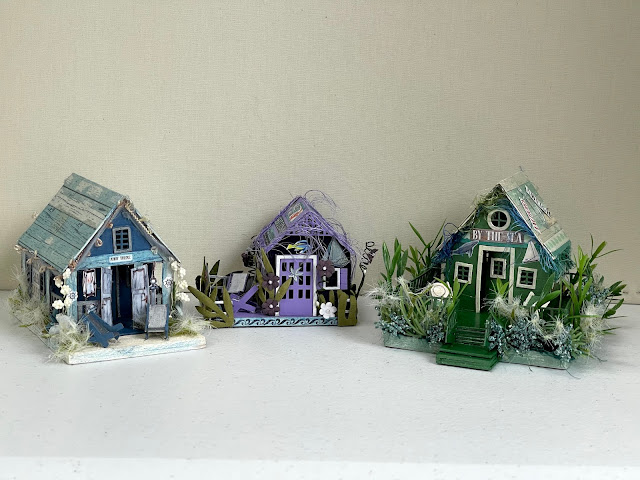
Despite my concerns I plowed ahead and decided to start with the green beach house which I had marked as #1 in the picture above.  

I decided to put each of the houses together in the same manner so the sequence outlined below applies to each house.

I wanted my beach houses to have solid foundations versus chipboard as I thought this would make my houses sturdier over time given the thinness of the chipboard.  For this beach house I had decided to use a rectangular wood base made out of 1/4" pine wood.  

For the gray house #3, in the picture above, I decided to use a square wood base made out of 1/4" pine wood. If you look at the picture above of the house I marked as #3 you'll notice that the house is glued to the deck which is supported above the ground with the deck railings.  

Given my concerns over the thinness of the chipboard I didn't think the support from the thin railings would last over time.  So, I decided to fill the area between the deck and my wood square base with multiple layers of chipboard squares.

For the small blue house #2, in the picture above, I decided to use a solid ATC (artist trading card) chipboard piece I had.  It was slightly bigger than the chipboard rectangle in the kit but this was not going to be a problem for me given how I wanted to finish the house.

In making each of the houses the first thing I did was to paint the wood and chipboard bases and then glued them together.  

Then before gluing the houses and peripherals like the doors, roofs, door frames and window frames together I painted the pieces I was going to paint (inside and outside) and let them dry.   

I noticed when I painted some of the little peripherals that the thinness of the chipboard and size of some of the pieces when  they were wet tended to warp a little.  I would need to adjust for that when gluing them to the house.

On house #1 and #3, in the picture above, I was going to collage a scrapbook paper summer themed piece I wanted to add to the roofs.  I didn;t need to do this for house #2 as I was going to paint it.  I applied mod podge to the back of the scrapbook paper I was using for the individual roofs for house #1 and house #3 and allowed that to dry.  

I had decided to glue the roofs on last to allow for more flexibility with assembling the houses so when they were dry I temporarily set the roofs aside.  When I was staisfied that everything was dry I glued the house sides together and then glued the houses to their chipboard bases.

Each of the houses proved to have some sort of an issue with the thinness of the chipboard and keeping everything aligned.  I had to temporarily add a small piece of tape inside some of the house corners to keep them aligned while the glue dried.  Once everything was set I removed the small piece of tape on the inside of the house.

Then I cut the scrapbook paper pieces I was going to add to the unpainted chipboard embellishment pieces and applied mod podge to the backs of the pieces I was going to collage or embellish with other scrapbook paper pieces to glue them together and then glued these pieces to their respective location on the house.  

After being satisfied that my houses and chipboard embellishments were set I glued the roofs to the houses.

When the houses were dry I brushed matte medium on the outside of thechipboard houses, chipboard embellishments, and scrapbook paper embellishments to set everything.

After everything was dry I colored and blended around all the edges of my scrapbook images and chipboard embellishments with stabilo pencils and tortillions.

Once the houses were set I laid out the mixed media embellishments I was going to add for each house. 

My initial mixed media embellishments for the houses included painted beach themed chipboard pieces, beach themed stickers, beach themed sayings, beach themed scrapbook paper images, paper flowers, paper reeds, silk floral flowers and mixed media fibers.  

Here's how beach house #1 looked when I finished it.


For this beach house I had decided to go with a blue and gray trim theme.  I wanted to paint the house itself blue and paint the window trims, inside door, door trims, and porch support beams and railings gray.  I painted the beach chair backs and seats gray and the chipboard sides blue.

I also wanted to embellish parts of the house and porch support beams with strips of scrapbook papers to compliment the color of the house and roof.  

Plus, I had found two beach themed doors of scrapbook paper that I thought would look good on the outside of the porch entrance.

My initial mixed media embellishments for this house included painted beach themed chipboard pieces, beach themed stickers, beach themed sayings, and beach themed scrapbook paper images.  

Plus I wanted to add paper flowers, paper reeds, silk floral flowers, and mixed media fibers.

So, I applied mod podge individually to the backs of each of the applicable paper pieces and then individually placed them where they were going.  After everything was secure I brushed matte medium on the outside of the entire house to seal everything.

Then I used stabillo pencils to highlight around all of the paper embellishments and blended them with tortillons.  

Once everything was blended the way I wanted it I added the paper flowers, paper reeds, silk floral flowers, and embellishment mixed media fibers I wanted to use with hot glue. 


This is how the front of the beach house looked when finished.


This is how the left side of the beach house looked when finished.


This is how the back of the beach house looked when finished.


This is how the right side of the beach house looked when finished.


Here's how beach house #3 looked when I finished it.


For this beach house I had decided to go with a green and white trim theme.  I wanted to paint the house itself green and paint the window trims, door trims, and porch support beams and railings white.   I painted the beach chair backs and seats green and the chipboard sides white.

The initial plan for this house called for the house to be up held up by the skinny chipboard bottom and fencing around the deck that was included in the kit.  I thought that these pieces were all too flimsy and over time would fail to hold the piece up so I opted to finish this with a square piece of 1/4" pine wood and combination multi-layered pieces of chipboard to fill in the area under the deck.

My initial mixed media embellishments for this house included painted beach themed chipboard pieces, beach themed stickers, beach themed sayings, and beach themed scrapbook paper images.  

Plus I wanted to add paper flowers, paper reeds, silk floral flowers, and mixed media fibers.

So, I applied mod podge individually to the backs of each of the applicable paper pieces and then individually placed them where they were going.  After everything was secure I brushed matte medium on the outside of the entire house to seal everything.

Then I uses stabillo pencils to highlight around all of the paper embellishments and blended them with tortillons.  

Once everything was blended the way I wanted it I added the paper flowers, paper reeds, silk floral flowers, and embellishment mixed media fibers I wanted to use with hot glue. 


This is how the front of the beach house looked when finished.


This is how the left side of the beach house looked when finished.


This is how the back of the beach house looked when finished.


This is how the right side of the beach house looked when finished.


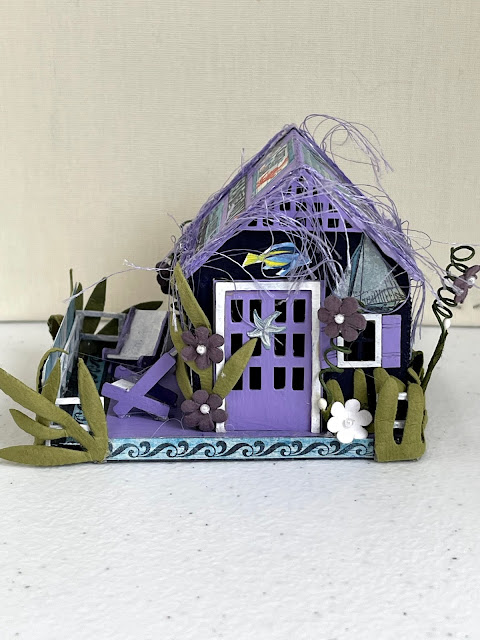
Here's how beach house #2 looked when I finished it.


For this beach house I had decided to go with a dark purple, lilac and white trim theme.  I wanted to paint the house itself dark purple and paint the window trims, door trims, roof, triangle lattice on the front and back of the house and deck lilac and paint the fence sections white.   I painted the beach chair backs and seats white and the chipboard sides lilac.

As this house was the smallest of the houses gluing the corner of the house with the skinny chipboard was definitely a problem and I ended up, once again, applying a piece of tape on the inside of the house corner allowing the edge enough time to dry.  This is definitely where corner tabs would have been helpful.  

My initial mixed media embellishments for this house included painted beach themed chipboard pieces, beach themed stickers, beach themed sayings, and beach themed scrapbook paper images.  

Plus I wanted to add paper flowers, paper reeds, silk floral flowers, and mixed media fibers.

So, I applied mod podge individually to the backs of each of the applicable paper pieces and then individually placed them where they were going.  After everything was secure I brushed matte medium on the outside of the entire house to seal everything.

Then I uses stabillo pencils to highlight around all of the paper embellishments and blended them with tortillons.  

Once everything was blended the way I wanted it I added the paper flowers, paper reeds, silk floral flowers, and embellishment mixed media fibers I wanted to use with hot glue. 


This is how the front of the beach house looked when finished.


This is how the left side of the beach house looked when finished.


This is how the back of the beach house looked when finished.


This is how the right side of the beach house looked when finished.


Here's how my three mixed media beach houses turned out.


This is how the beach houses looked vis-a-vis the kit I bought.

All in all I was very pleased with the way my mixed media beach themed houses turned out.  

I do think that the thin chipboard used for all the pieces in this kit could be improved upon by thickening the chipboard a little and apply tabs to the corners of all the houses - especially the smallest house.  

Other than that the kit worked well for my mixed media beach house intent.

I hope you like how they turned out.

Copyright © 2004 - 2023 - All Rights Reserved - Designed and Written By Linda Walsh

Wednesday, August 11, 2021

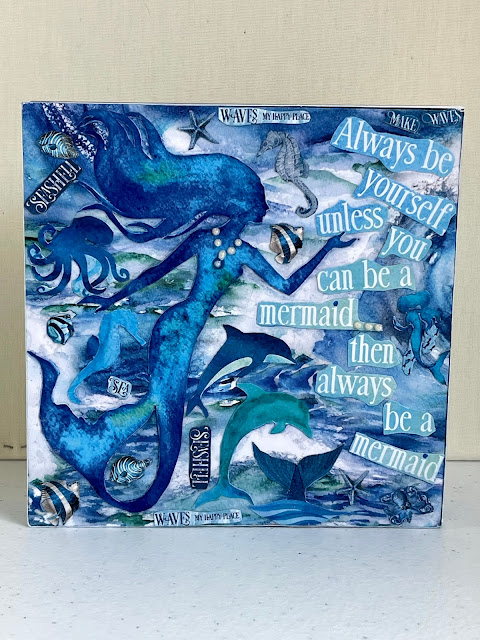
How I Made My Mermaid Collage Shadowbox Picture


Since making my mixed media summer themed paper dolls and art pictures with sponge painted backgrounds I decided to try something a little different.  

I had bought some adorable summer themed scrapbook papers at Scrapbook.com, ASCsupplies shop on Etsy, and ScrapLifeShop on Etsy. 


One of the paper sets I bought at Scrapbook.com was "Reminisce - Mermaid's Tale Collection - 12 x 12 Collection Kit."  Since blue is my favorite color I couldn't help but fall in love with the blue mermaid. I knew I had to create something using her.


So, I decided to take a 6" by 6" unfinished wood shadow box and turn it into a picture that I could hang on my wall.  Instead of creating a mixed media collage picture within the shadow box I decided to create the collage on the back side of the shadowbox and hang it on the wall like a cube.


I wanted to utilize the sides of the cube for some of the sayings that I liked and decided to use a paper that had an abstract summer themed blue wave design that I liked and the sayings pasted in the centers of each side.


Unlike most of the mixed media collage pictures I've created I decided not to sponge paint the background.  The kit had some beautiful blue, teal and white wave paper that I loved and wanted to use for the background.

Before doing anything with the unfinished wood cube I sized the papers I wanted to use for the backside and sides so they would be perfectly sized for the cube and aligned with each other.  Where needed I used a Friskars paper cutter to get my edges perfectly straight.

I cut out the mermaid that I wanted to use and cut out the images and sayings that I thought would be perfect for this collage picture.  I wanted the mermaid to be the main focal point with the saying: "Always be yourself unless you can be a mermaid... then always be a mermaid."  

First I applied Mod Podge to the back of the wave paper I wanted to use for the background on the backside of the cube and then pasted it to the cube.  I did the same for the papers I wanted to use for the four sides.  

After testing the placement of the images I had cut out I brushed Mod Podge on the backs of the scrapbook images I had cut out and then pasted them on my collage.  When it was dry, I brushed matte medium on the backside and sides.  After everthing was dried I hung it on the wall.

I loved how it turned out and it is now hanging in my bathroom along with the other summer themed pictures I made.


I also found two beach themed scrapbook papers from the "Beyond the Sea Collection - 6 x 6 Paper Pad" I had bought at Scrapbook.com that I thought would be perfect for two other 6" by 6" wood summer themed cubes I wanted to make.


Unlike my mermaid collage I just wanted to use the two 6" by 6" scrapbook papers just the way they were as I loved the watercolor images.  I wanted to use one for the bathroom and use one on top of the desk I had in my kitchen. 

Once again, before doing anything with the unfinished wood cube I sized the papers I wanted to use for the backside so they would be perfectly sized for the backside of the cube.  Where needed I used a Friskars paper cutter to get my edges perfectly straight.

Like the mermaid collage I was going to use the backside of the 6" by 6" shadowbox wood cube.  Instead of collaging the sides I decided to leave them plain. So, I just painted the sides and front of the cube with white acrylic paint.  I only used one layer as I wanted the white to be lightly layered on the sides.

After pasting the two images to the backside of their respective cube with mod podge I let them dry.  Then I brushed matte medium on the sides and front of each cube.  After letting them thoroughly dry I placed one on my bathroom wall and one on the top of the desk.  Perfect!

Over the years I've made many holiday and seasonal themed pieces.  Mainly for the fall season and all the holidays that occur between October - December.  I only had a few summer ones so I was pleased that this summer I was finely able to create some more for this season.  

I definitely think I have enough now.  

Then again, I never have enough - do I......LOL

Please respect My Terms of Use:  All patterns, e-patterns, printables, e-printables, e-books, graphics, tutorials, how-to's, articles and other e-products © 2004-2023 Linda Walsh Originals-Designs by Linda Walsh. All rights reserved. Commercial selling or reselling by any means prohibited without the written consent of Linda Walsh.

Patterns, e-patterns, printables, e-printables, e-books, graphics, tutorials, how-to's, articles and other e-products are for personal use only. You may not modify, photocopy, download, upload, post, transmit, display, perform, publish, license, reprint, create derivative works from, mass duplicate, re-sell, digitize, and reproduce in any other form (print, digital or electric) or commercially apply, embed, share, Email, or redistribution in any other means. Use of any of the above is prohibited without the written permission of Linda Walsh.

However, you may link to my website(s)/blog(s) and the individual page(s)/blog post(s) (including 1 picture) but do not copy, reprint or duplicate my website(s)/blog(s) or individual page(s)/post(s ) without my permission.

Items made from Linda Walsh Originals E-Patterns and E-Books are intended for personal use for fun or small scale personal and business profit as long as you credit us with the design. Large scale commercial use (i.e. mass production) of items made from Linda Walsh Originals E-Patterns are by permission only.

Please see my Terms and Conditions for additional information.

Copyright © 2004 - 2023 - All Rights Reserved - Written By Linda Walsh of Linda Walsh Originals and Linda's Blog. Linda is a doll maker and doll pattern designer.

Saturday, April 08, 2017

My First Stamped Cross-stitch Project - "A Season For Everything" Dimensions Cross-stitch Picture and Kit


On the wall in my kitchen I've been displaying different holiday and seasonal wreaths that hubby and I have made over the years.  They're a combination grapevine wreath, silk floral, and painted woodcrafts that I've made from other designers patterns that I've bought over the years.

While I was perusing the web I saw an intriguing cross-stitch picture that was a seasonal wreath.  I fell in love with it and decided I should buy this cross-stitch kit as it would make a beautiful picture for my kitchen wall.  Best of all, I wouldn't have to change it out with the seasonal or holidays.

All of the cross-stitch pictures I've bought and made were counted cross-stitch kits. Truth be told there are a lot of them, which I've posted about here and reviewed on my The Book and Crafts Review Corner blog.  This time I would be working on a stamped cross-stitch picture.

Like the other Dimensions kits I had bought the kit included the pattern, pre-sorted cotton thread, printed white cotton fabric, needle and instructions.

The "A Season For Everything" pattern uses full stamped cross-stitch, satin stitching, french knots and backstitch outline stitching for emphasis and depth and this detailing really makes the picture stand out. The design of this cross-stitch gives the finished picture a 3 dimensional aspect with the satin stitching, french knots and outlining being used for artistic effect.

The pattern came with starting and working order instructions as well as samples of the various stitches required, color coded keys (with code #'s, lengths, color names, and cross-stitch symbols) and a chart with color coded symbols.  However, the kit did not come with instructions for finishing the back of the picture.

While I was very pleased with the end results of this design I had a lot of problems with the kit, stamped fabric, embroidery floss, and the instructions that can be improved upon to make this a better kit.

There were 27 flosses listed on the color chart.  However, there were actually 29 different floss colors in the kit.  The brown #15476 and blue #17150 blue were not on the chart.

The key included instructions for which color floss to use for the satin stitching and cross-stitching. Each season had a large color chart that was large enough and easy to follow.  Each chart included additional instructions for the highlighting stitches.  However, the colors on these instructions were sometimes shown as simple colors which left it up to you to decide which brown, red, or green, etc. floss to use.  They should have included the embroidery floss# with these instructions.

As was the case with previous Dimensions kits the thread sorter was poorly designed. The embroidery threads were glued to foam backed 7" by 1 1/4" strips of cardboard that had a picture of the color of the thread and it's number. In order to get to the threads you had to separate the foam back from the cardboard strip. Very quickly the threads separated from their section and then you no longer knew what the thread number was to tie to your symbols & legends.

As I have done with other cross-stitch kits I've completed I had to alter the thread sorter to suit my needs. I pulled the thread sorter apart to get rid of the foam and then punched holes in the cardboard strip just above each color and color #. I inserted the floss threads that went with that color and color # through the hole and tied them in a loose knot. I then added color coded symbols with colored pens beneath each color so I would know what symbols went with what color.

Short of changing the thread sorter all together to make things even easier for the user the color symbol should at the very least have been shown on the thread sorter strip of cardboard as well. That way you would only need to use the thread sorter strip of cardboard to follow your chart.

I ironed the cotton fabric and then attached it to a 17" by 17" Q-Snap Frame and started my needlework.  Everything was going smoothly until I ran into a few discrepancies between the printed color chart and the stamped fabric.  There were printed sections of the stamped fabric that were not on the color chart.  The instructions said, "On the chart, symbols for partial cross-stitches are not shown.  Determine the color to use from the surrounding stitches or package label."  So, I was expecting that.  However there were more discrepancies than that where I had to determine what to do.

I don't think enough embroidery floss was included for some of the colors of this kit.  Before the highlighting I ran out of the white and gold floss and came close to running out of 3 other floss colors.
As with every cross-stitch kit I've finished I varied from the instructions to either highlight more of the picture or add stitching that was not in the instructions.

After stretching the fabric on the frame I noticed that the double lines for the pre-printed black border with the stretching did not always come out straight.  I thought this would be a problem for the final stretching of a 14" by 14" picture and opted instead to backstitch an appropriate color for each season using 6 strands of embroidery floss.

Here's what I altered per season:


For the Fall season the instructions only called for satin stitching on the red apples, mailbox flag, church steeple and yellow flowers.  Everything else was to be cross-stitched.  I decided to add grey satin stitching to the bridge and church roofs to make them stand out more.  I also doubled the highlighting back stitch on the leaves, bridge, roofs, fence and mailbox.  I added an additional outline for the road on the right side and added French knots for several different colors along the left side of the fence and around the apple barrel. I changed the pre-printed black border to a rust brown colored 6 strand floss back stitched border.


For the Winter season the instructions only called for satin stitching on the parts of the snowflakes. Everything else was to be cross-stitched.  I decided to add white satin stitching to the cabin roof to make it stand out more.  I also doubled the highlighting white back stitch on the leaves, black backstitching on the fence, dark brown on the branches and white stitching along the road.  The tree was to be outlined with one dark brown thread.  I opted to double the brown thread for the branches and use a combination of black and brown threads in several sections of the trunk to highlight the tree more.  I changed the pre-printed black border to a light snow blue/white colored 6 strand floss back stitched border.


For the Summer season the instructions only called for satin stitching in the boat, sail boat masts, windows, blue flowers, purple flowers, doors and chimney. Everything else was to be cross-stitched.  I decided to add red satin stitching to the house roof and combination black/gray lighthouse steeple roof to make them stand out more.  I also doubled the highlighting red back stitch on the red flowers, black and gray backstitching on the boat and oars.  I changed the pre-printed black border to a white colored 6 strand floss back stitched border.


For the Spring season the instructions only called for satin stitching on the doors, windows, and yellow flowers. Everything else was to be cross-stitched.  I decided to add black and gray satin stitching to the barn roof to make it stand out more.  I also doubled the highlighting black back stitch on the branches, red outline stitches on the tree flowers and brown highlighting stitching along the road.  To make the distance between the barn and back fields I added a smaller brown fence in the back fields that was back stitched using two strands of a dark brown floss.  I added more white French knots surrounding the yellow daisies and more lazy daisy loops to the tulip flower cluster,  In order to break up the double border on the right side I added white French knots for the flowers to extend past the border.  I changed the pre-printed black border to a green colored 6 strand floss back stitched border.

The kit did not come with instructions for finishing the back of the picture.  I  decided to mount my picture on a self-stick mounting board and use a natural oak wood frame with a non-glare acrylic cover and foam core backing.  I also decided not to surround my picture with a single or double mat as it would make the frame way too big for the wall space where I would be hanging my picture.  So I kept the unmatted picture 14" by 14" which was 16" by 16" with the natural oak frame.


I tend to favor 1/4" foam backed adhesive mounting boards for the cross-stitch pictures I'm inserting into my picture frames. So, initially I stretched and mounted my picture on a 14" by 14" foam backed adhesive 1/4" mounting board, taped the four corners to square them and then taped the remaining vertical and horizontal sides with masking tape.  However, when I added this to the frame the foam was too thick to add the finished foam core back and the foam made the words "To Everything There Is A Season" puffy and not flat. I didn't like the way this looked so I used a thin self-stick mounting board instead which flattened the wording and allowed me to use the foam core backing that came with the frame.


It took me 110 hours to complete this beautiful picture including the framing. Despite the problems I encountered with the kit I love the way my "A Season For Everything" Dimensions cross-stitch picture turned out. It's absolutely beautiful and the looks wonderful on my kitchen wall. Plus, I never have to change this out with the holidays and season again.  Now where should I put my holiday and seasonal wreaths? Hmmmmmm......