

I had bought some adorable summer themed scrapbook papers at Scrapbook.com, ASCsupplies shop on Etsy, and ScrapLifeShop on Etsy.

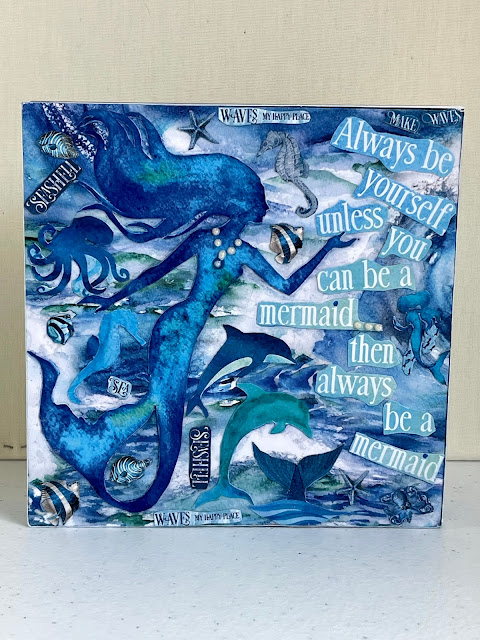
One of the paper sets I bought at Scrapbook.com was "Reminisce - Mermaid's Tale Collection - 12 x 12 Collection Kit." Since blue is my favorite color I couldn't help but fall in love with the blue mermaid. I knew I had to create something using her.

So, I decided to take a 6" by 6" unfinished wood shadow box and turn it into a picture that I could hang on my wall. Instead of creating a mixed media collage picture within the shadow box I decided to create the collage on the back side of the shadowbox and hang it on the wall like a cube.

Unlike most of the mixed media collage pictures I've created I decided not to sponge paint the background. The kit had some beautiful blue, teal and white wave paper that I loved and wanted to use for the background.
Before doing anything with the unfinished wood cube I sized the papers I wanted to use for the backside and sides so they would be perfectly sized for the cube and aligned with each other. Where needed I used a Friskars paper cutter to get my edges perfectly straight.
I cut out the mermaid that I wanted to use and cut out the images and sayings that I thought would be perfect for this collage picture. I wanted the mermaid to be the main focal point with the saying: "Always be yourself unless you can be a mermaid... then always be a mermaid."
First I applied Mod Podge to the back of the wave paper I wanted to use for the background on the backside of the cube and then pasted it to the cube. I did the same for the papers I wanted to use for the four sides.
After testing the placement of the images I had cut out I brushed Mod Podge on the backs of the scrapbook images I had cut out and then pasted them on my collage. When it was dry, I brushed matte medium on the backside and sides. After everthing was dried I hung it on the wall.
I loved how it turned out and it is now hanging in my bathroom along with the other summer themed pictures I made.


Unlike my mermaid collage I just wanted to use the two 6" by 6" scrapbook papers just the way they were as I loved the watercolor images. I wanted to use one for the bathroom and use one on top of the desk I had in my kitchen.
Once again, before doing anything with the unfinished wood cube I sized the papers I wanted to use for the backside so they would be perfectly sized for the backside of the cube. Where needed I used a Friskars paper cutter to get my edges perfectly straight.
Like the mermaid collage I was going to use the backside of the 6" by 6" shadowbox wood cube. Instead of collaging the sides I decided to leave them plain. So, I just painted the sides and front of the cube with white acrylic paint. I only used one layer as I wanted the white to be lightly layered on the sides.
After pasting the two images to the backside of their respective cube with mod podge I let them dry. Then I brushed matte medium on the sides and front of each cube. After letting them thoroughly dry I placed one on my bathroom wall and one on the top of the desk. Perfect!
Over the years I've made many holiday and seasonal themed pieces. Mainly for the fall season and all the holidays that occur between October - December. I only had a few summer ones so I was pleased that this summer I was finely able to create some more for this season.
I definitely think I have enough now.
Then again, I never have enough - do I......LOL
Please respect My Terms of Use: All patterns, e-patterns, printables, e-printables, e-books, graphics, tutorials, how-to's, articles and other e-products © 2004-2023 Linda Walsh Originals-Designs by Linda Walsh. All rights reserved. Commercial selling or reselling by any means prohibited without the written consent of Linda Walsh.
Patterns, e-patterns, printables, e-printables, e-books, graphics, tutorials, how-to's, articles and other e-products are for personal use only. You may not modify, photocopy, download, upload, post, transmit, display, perform, publish, license, reprint, create derivative works from, mass duplicate, re-sell, digitize, and reproduce in any other form (print, digital or electric) or commercially apply, embed, share, Email, or redistribution in any other means. Use of any of the above is prohibited without the written permission of Linda Walsh.
Patterns, e-patterns, printables, e-printables, e-books, graphics, tutorials, how-to's, articles and other e-products are for personal use only. You may not modify, photocopy, download, upload, post, transmit, display, perform, publish, license, reprint, create derivative works from, mass duplicate, re-sell, digitize, and reproduce in any other form (print, digital or electric) or commercially apply, embed, share, Email, or redistribution in any other means. Use of any of the above is prohibited without the written permission of Linda Walsh.
However, you may link to my website(s)/blog(s) and the individual page(s)/blog post(s) (including 1 picture) but do not copy, reprint or duplicate my website(s)/blog(s) or individual page(s)/post(s ) without my permission.
Items made from Linda Walsh Originals E-Patterns and E-Books are intended for personal use for fun or small scale personal and business profit as long as you credit us with the design. Large scale commercial use (i.e. mass production) of items made from Linda Walsh Originals E-Patterns are by permission only.
Please see my Terms and Conditions for additional information.
Copyright © 2004 - 2023 - All Rights Reserved - Written By Linda Walsh of Linda Walsh Originals and Linda's Blog. Linda is a doll maker and doll pattern designer.
No comments:
Post a Comment