
Back in 1999 I wanted to make something a little different than a doll. I had been intrigued with ribbon floral crafts since I had seen some of the absolutely stunning creations of some of my creative embroidery friends. I wanted to try making flowers out of ribbons, too. Not to be added to cloth, but used in some sort of floral arrangement.
While shopping at a local craft store with my mother I had come across a booth selling dried floral shadowbox pictures that contained a half basket and dried floral. The concept and colors were perfect for my half bath so I bought two.
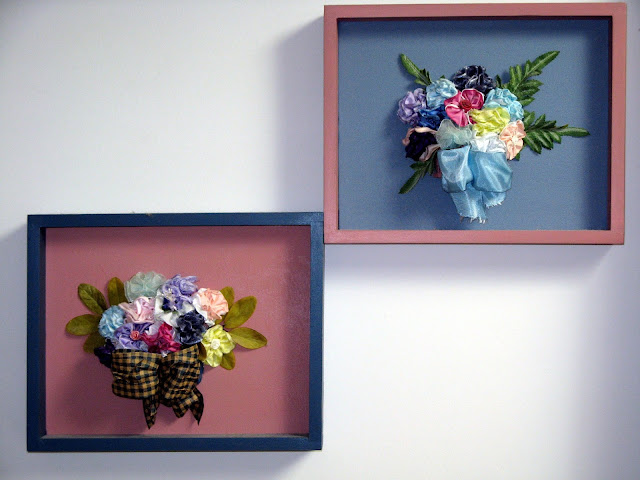
Well, in thinking about creating something utilizing the ribbon floral crafts I thought maybe a half basket filled with wired ribbon floral crafts glued to a painted art board canvas panel and surrounded by a painted wooden shadowbox would fit the bill.
Of course, this also meant that hubby needed to make shadowbox frames for me to attach to the 8" x 10" painted art board canvas.
So, we talked about what I wanted to make and he suggested that we make shadowbox frames that would be routed to hold the art board canvas panel within the shadowbox and nail the wood frames to the sides of the art board canvas panels. I agreed so we started.
As with everything I do we had quite a few wired ribbon floral shadowboxes to make. I figured I could give some away as gifts for the holidays.

We used 1/2" x 2" pine boards to create the shadowbox frames and cut two pieces of wood 9" long and two pieces of wood 11" long to fit around the 8" by 10" art board. We wanted to create mitered corners with each of the four corners at a 45° angle.
We also wanted to prevent the art board from falling through the wood shadowbox frame and thought a routed edge on the inside edge would provide enough support to hold the art board within the frame. For this to happen we used a router to create routed edges on the pine boards of about 1/4" for the art board canvas panels to rest against on the inner side.
When we were done cutting the wood and assembling the frames we sanded them.

I decided what colors I wanted to use for the frames and what colors I wanted to use for the art board canvas panels. Once I knew what colors I wanted to use for each picture I then selected the wired ribbon that I wanted to use for each flower.
I also selected wider wired ribbons and wired paper to be used for a bow on top of the wicker baskets in each picture. To all this I wanted to add some silk floral leaves that would serve as a back drop for the floral baskets.
As I wanted the frames to be different colors than the canvas panels I painted the frames and canvas panels separately with acrylic paints and then when they were dry brushed each with a matte varnish finish to seal them.
Then we nailed the frames to the sides of the art board canvas panels.
When we were done with this we added picture hangers to the top center back of the wood frames and two rubber corner protectors to the bottom corners on the back of the frames.

I cut the miniature wicker baskets I had chosen for each picture in half and spray painted them on the outside. I added a small amount of Spanish Moss to the inside of each and then glued a small block of floral foam to the inside of the baskets. Then I glued my half baskets to their respective art board canvas panels in the center and about 1/4 of the way up the art board. After I was happy with the gluing and positioning of the baskets I added the silk leaves I wanted to use for each picture and glued them into place.

I then proceeded to create the wire ribbon flowers. I had several printouts from various magazines to help me with this and ended up making 2 different styles of wired ribbon flowers in multiple colors and wired ribbon widths. I wanted the different wired ribbon widths to give my arrangements depth. Some of the flowers be gathered wired ribbon flowers and some would be wired petal ribbon flowers. Instructions for making both are shown below.
For some of the flowers I added a tiny miniature ribbon floral to the center in order to finish the center seed section. When the flowers were done I inserted their wires into the floral foam of the basket. I had to cut several of the wires to shorten them based on their positioning within the green floral foam block.

When I was happy with the arrangement of all the ribbon flowers I tied the larger wired ribbons and wired paper into bows and then glued them to the front of their respective baskets.

Both hubby and I were pleased with the way our ribbon floral shadowboxes had come out. They were a little different, but would make great gifts that holiday season.
Instructions for making the gathered wired ribbon flowers and petal wired ribbon flowers are shown below:
Creating Wire Ribbon Floral Stems Guide - Gathered & Petal Flowers


Supplies Needed
1” to 1 1/2” Wide Wired Ribbon Rolls In Various Colors
3/8” Silk Ribbon Floral Roses (Colors To Match Wired Ribbon Rolls)
Upholstery Thread
Sewing Needle
24 - 26 Gauge Wire
Wire Cutters
Gathered Wired Ribbon Flower

1) Cut the 1” to 1 1/2” wired ribbon 10” long.
2) Fold the wired ribbon in half.

3) Using the diagram above as a guide knot the upholstery thread and sew a stitch at Point A. Sew a gathering stitch in a counter clockwise direction with the upholstery thread down the left hand side, across the bottom edge, and up the right hand side to Point B. Gather tightly and secure with back-stitches. Overlap the left hand side to the right hand side at Point A and B and secure with a few stitches.

4) Cut a piece of the 24 - 26 gauge wire 8” long. Fold the wire in half and insert each end into the center of the wired ribbon floral. Pull tightly and twist the wires tightly to secure. Wrap the two wires around each other to create a stem.
5) Fluff the wire ribbon until the flower is pleasing to the eye.

Petal Wired Ribbon Flower
1) Cut the 1” to 1 1/2” wired ribbon 10” long.
2) Fold the wired ribbon almost in half.

3) Using the above diagram as a guide knot the upholstery thread and sew a stitch at Point A. Sew a gathering stitch in a counter clockwise direction with the upholstery thread down the left hand side, across the bottom edge, and up the right hand side to Point B. Continue in this manner until you reach Point E. Gather tightly into four double petals and secure with back-stitches.
4) Join the ends at Point A and Point E creating a small center circle.

5) Insert the 3/8” silk ribbon floral rose into the center of the flower.


Copyright © 2019 - 2020 - All Rights Reserved - Written By Linda Walsh
Please respect My Terms of Use: All patterns, e-patterns, printables, e-printables, e-books, graphics, tutorials, how-to's, articles and other e-products © 2004-2023 Linda Walsh Originals-Designs by Linda Walsh. All rights reserved. Commercial selling or reselling by any means prohibited without the written consent of Linda Walsh.
Patterns, e-patterns, printables, e-printables, e-books, graphics, tutorials, how-to's, articles and other e-products are for personal use only. You may not modify, photocopy, download, upload, post, transmit, display, perform, publish, license, reprint, create derivative works from, mass duplicate, re-sell, digitize, and reproduce in any other form (print, digital or electric) or commercially apply, embed, share, Email, or redistribution in any other means. Use of any of the above is prohibited without the written permission of Linda Walsh.
Patterns, e-patterns, printables, e-printables, e-books, graphics, tutorials, how-to's, articles and other e-products are for personal use only. You may not modify, photocopy, download, upload, post, transmit, display, perform, publish, license, reprint, create derivative works from, mass duplicate, re-sell, digitize, and reproduce in any other form (print, digital or electric) or commercially apply, embed, share, Email, or redistribution in any other means. Use of any of the above is prohibited without the written permission of Linda Walsh.
However, you may link to my website(s)/blog(s) and the individual page(s)/blog post(s) (including 1 picture) but do not copy, reprint or duplicate my website(s)/blog(s) or individual page(s)/post(s ) without my permission.
Items made from Linda Walsh Originals E-Patterns are intended for personal use for fun or small scale personal and business profit as long as you credit us with the design. Large scale commercial use (i.e. mass production) of items made from Linda Walsh Originals E-Patterns are by permission only.
Please see my Terms and Conditions for additional information.
Copyright © 2004 - 2023 - All Rights Reserved - Written By Linda Walsh of Linda Walsh Originals and Linda's Blog. Linda is a doll maker and doll pattern designer.
No comments:
Post a Comment