Monday, December 13, 2010

Our Caroler's Scene and Dining Room Christmas Decorations


I know that I don't have to tell you this as I'm sure you've heard it a thousand,  no make that a million, times before.  I love Christmas and Christmas Decorations. 

So, it should come as no surprise to you that I also LOVE carolers, especially the Bryer's carolers.  A doll maker who loves caroling dolls - what a surprise! 

And, of course, since I love dolls so much hubby and I have created a caroling scene that has grown rather large over the last two decades.  We started with the four carolers shown in the picture below and it just kind of grew from there. 


One year we added an outdoor lamp.  Another year we added a front door.  Then we added more carolers and a fireplace.  As the scene grew we kept moving it from the top of a wet bar to the top of my sewing table.  Then hubby added a two tier platform which he painted white one year so we could have two levels.  After that we created a rectangle frame to surround the carolers and which we could add miniature lights to. 

Well, the scene kept growing and relatives kept giving us carolers as presents until the scene just got too overcrowded for the top of my sewing desk.  So, we bought two fold-able three tier shelves that we could place side by side in front of our dining room fireplace, which has recessed lighting.  We added a small table to house my mother-in-laws favorite ceramic tree and a small table to add a recent addition of spiral stairs.  The end result is the picture shown at the top of this post and shown below: 


If you click on either picture you'll see a much larger picture of our carolers.  It really is quite lovely and one that we are very happy with.  Of course, I'd love to just keep adding caroler after caroler, but I'd eventually run out of room.  Plus, hubby keeps telling me that sometimes less is better, so we'll keep the scene as it is for now. 

So, I thought you might like to see a slideshow of our carolers scene.  Here's what I see from my kitchen: 


Here's a few pictures for you: 


The carolers scene does dominate our dining room decorations, but we have more decorations that I thought you might like to see.  So, here they are: 


This is one of my favorite pine cone trees that I made in October of 2002.  I wrote about my pine-cone trees in a Linda's Blog posted entitled "Dried White Pine - It Was A Good Idea - Or Was It?" This pine-cone tree stands 30" tall and sits as the centerpiece of our dining room table. It's sitting atop a large quilted runner set that my Mother made for me several years ago. She made an exceptionally long and wide runner and 6 matching place mats.  They are shown in the picture below: 


We also have a buffet table against one of the walls and sitting atop it are more of my Mother's place mats, some of my Santa designs, a rather plump Santa gift, a Santa in a sleigh gift from my step-son and my large pine-cone basket that I made in August of 1994. 


My pine-cone basket is rather large at 18" by 25" and is shown in the picture below.  I wrote about some of my pinecone baskets in a Linda's Blog  post entitled "The Pinecone Baskets - Now That's A Good Idea!"  At 16 years and counting my pine-cone basket is still in excellent shape. 
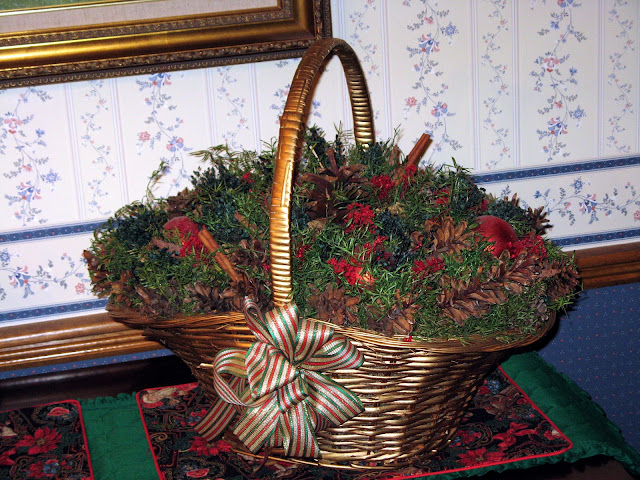

My Santa designs include my  "Morning Walk Karl" handmade doll & design and my terra-cotta Santa's.  The plump Santa was a gift one year.  Unfortunately I can't remember whether it was a gift from my sister or someone else.   


On another wall we have a little scene containing some more of my handmade dolls and a wooden reindeer with a poinsettia floral in its back. 


The wooden reindeer was bought at a craft show that hubby and I went to over 20 years ago.  I like adding the poinsettia to it's back for a little color. 


The doll shown below is called "Mrs. St. Nicholas, A Little Plump But Happy"  and she is one of my handmade dolls & "pleasantly plump" doll designs


The Santa shown below is called "Olde St. Nick - Plump and Happy!" and is another one of my handmade dolls and "pleasantly plump" doll designs


Last , but not least, we have a picture of a vintage Santa and toys that hubby and I got at a craft shown over 20 years ago.  I loved the picture so much that I decided to keep it up all year long. 


Over on the bookshelves we have two ceramic Santa stocking hangers that my sister gave me many, many years ago. 
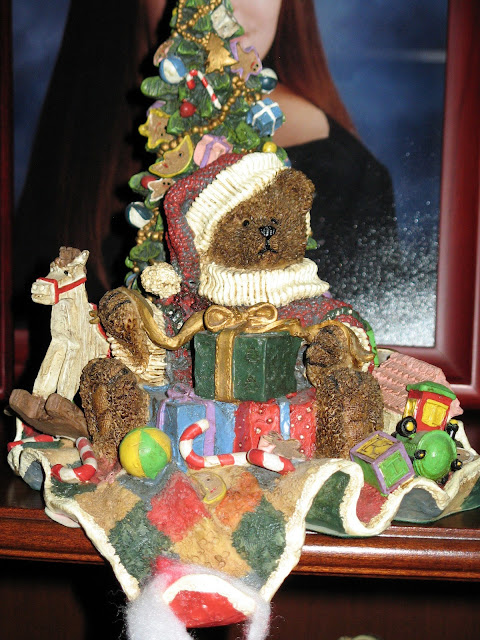


I hope you have enjoyed seeing our carolers scene and dining room Christmas decorations. 

Sunday, December 12, 2010

Don't Forget The Front Hall Christmas Decorations!


At one point in time the front entrance was the most important focal point in the house.  That was when guests would be escorted to the parlor awaiting the host or hostess or whoever they were there to see.  Nowadays the side doors and garage door entrances get more of the traffic. 

However, being the traditionalist that I am I still love to decorate the front hall.  So, I thought you'd like to see some of the decorations that we have in our front hall. 

Most of the decorations sit atop the wonderful cabinet that my younger brother made for me.  I wrote about this in 2008 in a Linda's Blog post entitled "Woodcrafts and Wood Furniture My Brother Made Me."  Shown in the picture below is a large 36" wide silk floral and preserved floral basket that I made in May of 2003. 


To the right of the floral basket are two of the porcelain Santa's I made.  The one on the left is my "Roland, The Mountain Ranger Santa" design and the other is a Scottish Santa that I made from a kit back in August of 2002.  In the bowl is some Christmas potpourri. 


I gave a version of my Roland, Mountain Ranger Santa to my younger brother for Christmas in 2008.


The two wall sconces also get in on all the decorating fun. 


And, on the front door we have my favorite woodcraft.  He's a 24" Santa that hubby and I made back in August of 2002 from a Country Thoughts pattern.  He adorns our front door each and every holiday season. 


Each year we decorate the outside of the house with four very large 48" artificial evergreen wreaths that I bought close to 20 years ago from Michael's.  They were the biggest ones they had at the time. I added berries and pine-cones and a wired bow to them and each and every year we put them out. After twenty years they still look great.  That is definitely a small investment that has paid off well over time.  

I hope you have enjoyed our little tour of the Christmas decorations in our front hall.

Christmas Decorations In Our Sunroom


One of the cheeriest and sunniest rooms in our house is our sunroom. It's one of my favorite rooms and was both my beloved Mother's and our beloved cairn terrier, "Bud's", favorite rooms. I know why it was my Mother's favorite rooms - she just loved sunshine. Since this room is on the south side it gets a lot of sun and because of this can be "hot" at times.

I often wondered why it was "Bud's" favorite room too until one day it dawned on me that the sunroom was the only room in the house that he could see out of. He'd sit in front of the french doors all day just looking out.

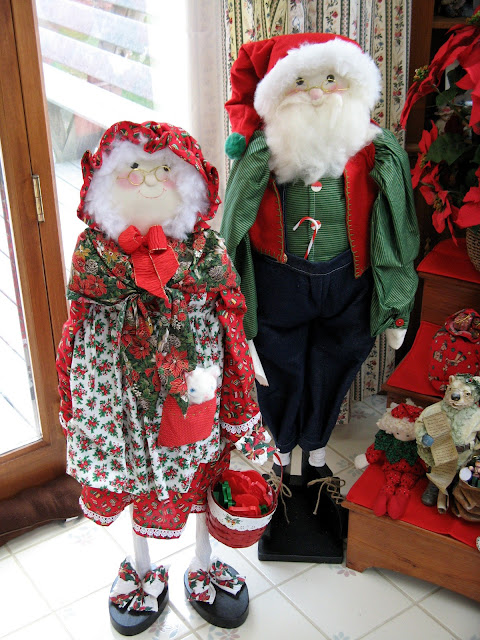
So, I thought you'd enjoy seeing some of the Christmas decorations in our sunroom. The focal point is the grouping of the two large dolls and three tiered plant stand in the corner of the sunroom which is shown in the picture at the beginning of this post

Hubby and I made the large Santa and Mrs. Claus dolls in November of 1998. They both stand 36" tall.

We had a problem with the large Santa. When he was finished he seemed to be a bit top heavy. He kept falling forward. So we decided to add a black platform for him to stand on and then nailed his feet to it. It's not the most attractive to look at, but it works. He doesn't fall over anymore.


Next to the tall dolls is a three tiered plant stand.  On the top of the plant stand this year is a large poinsettia silk floral. Sometimes I hang it from the ceiling and sometimes I put it on the shelf. Just below the poinsettia is one of my favorite primitive Santa snowman handmade dolls called "Snow Me Some Toys, Santa.

On the bottom shelf of the plant stand are two pixie cloth dolls that my sister made me one year. They're little pixies filled with bean bag beads. Between the two pixies is a ceramic and paperclay Christmas Santa wolf that my older brother gave me one year. I just love the wolf because he's so different.


On one of the love-seat's is a Christmas quilt that my sister made me one year.  I actually forgot I had this until I cleaned out one of my closets this year.  Opps........  Sorry baby sister.


Between the two love-seats is a pine-cone basket I made in August of 1994 that is 12" by 16". Sixteen years later it still looks great.


On the side table between the two love-seat's is a festive candle and two of the punchneedle shadowboxes that my brother and I made.


We have a festive coffee table in front of the love-seat's that contains a Yankee Candle, a bowl of Christmas potpourri, and a Santa cookies and milk plate and cup that my brother-in-law and sister-in-law gave us one year.


Next to one of the love-seats is a small table that has one of my favorite silk floral arrangements on it. It's about 20" wide and I created this in May of 2003. One of the reasons while I love this particular silk floral is the rectangular wood logs container that it's in. Plus, I think the arrangement came out well.

Just in from of it are two more of the punchneedle shadowboxes that my brother and I made.


In the corner of the sunroom are some wooden bookshelves that contain some cloth Christmas dolls that my sister made me, some cloth dolls that my Mother gave me, some of my Santa designs, and some of my wooden bowling pin caroler designs.

I'll be talking about some of the handmade gifts my sister gave me in another post. Since I know that my sister reads my blog I can see her squirming in her chair now wondering what I'm going to say.... Hmmmmm..... Will I be kind?


In the corner of the sunroom is a stacking paper Santa that my sister-in-law gave me. Isn't he adorable?


Last, but not least, is another one of the pinecones 11" by 18" baskets that I made in July of 1994.


I hope you have enjoyed your little tour of our festive and sunny sunroom.  Happy holidays.

Friday, December 10, 2010

You Spent How Many Hours On That Cross-Stitch?


If I told you that I had spent over 250 hours on a cross-stitch picture you'd probably think I was nuts.  However,  if you're a follower of my The Book Review Corner blog you already know that I love needlecraft's.  So, spending 250+ hours on a cross-stitch might not be hard to imagine.

I did spend that much time on one cross-stitch during the last few months and I'd do it again as the cross-stitch picture (shown in the picture above and shown framed in the picture below) is absolutely stunning.  If you click on both images you can view an enlarged version of the picture.

To give you a little background on why I would do this, back in July I wrote a Linda's Blog post about my pressed flower pictures entitled "My Pressed Flower Pictures - Now That's A Great Idea!"  In that post I told you about a large pressed flower picture I had made that was hanging in our master bedroom and, sadly, was fading which meant it needed to be replaced.

Well, my husband thought a needlepoint picture like the one I had done in the dining room but much bigger would be nice. I wrote about this needlepoint picture awhile ago in a Linda's Blog post entitled "Needlecraft Picture From A Decade Ago - Or So!"

So, since our house is filled with dolls and pictures of buildings & houses I thought a cross-stitch Victorian scene might be just the thing. So, I set out to find some large cross-stitch kits that would be suitable.

Well, I found several that I liked, but couldn't decide which one would be best suited so, as usual,  I bought a couple of kits.

While I liked all of them I decided to go with the Dimensions Counted Cross Stitch M'Lady's Chateau which was a Dimensions Gold Collection cross-stitch kit.  

I have been a fan of the Dimensions cross-stitch and punch-needle kits for quite some time and have written about them several times on my The Book Review Corner blog before.

The Dimensions Counted Cross Stitch M' Lady's Chateau kit included the pattern, embroidery thread, and 14 count ivory cotton Aida and thread sorter. It also called for all the white sky sections to just be the 14 count ivory cotton Aida but I opted to use white DMC floss and half cross-stitch these areas as well.

The Dimensions Counted Cross Stitch M' Lady's Chateau pattern uses full cross-stitch, half cross-stitch, and outline stitching for emphasis and depth and this detailing really makes the picture stand out. The design of this cross-stitch gives the finished picture a 3 dimensional aspect with the half cross stitch and outlining being used for artistic effect.

While the end results of this design were absolutely stunning the instructions could certainly be improved upon and I'd like to offer the following constructive criticism:

First of all the the chart was so big that it actually fit on four pages which meant that you had to tape one section to the other to get the full chart picture. This would have been okay had the chart sheets been printed one-sided. Unfortunately, the instructions and English symbol list was printed on the back sides so when you taped the chart together you lost some of the information. You could photocopy the instructions and symbol list ahead of time but you'd have to do that on a color photocopy machine or you'd lose the colored symbols with a black and white photocopy.

Secondly, the colors of the symbols and their placement could have been better thought out. Several of the colors and symbols ( like the blue heart and green heart, or blue "e" and green "e") used in the chart were too close in color and when they were placed next to each other in the chart you could not distinguish one from the other - even with a magnifying glass.

Third, the English symbol list and French symbol list were different.  Both the English and French symbol list & legend should have contained the embroidery thread color numbers so you could easily align the thread sorter with the symbols & legends. I had to write the embroidery thread color number on the French version and use that as a guide as the English symbols & legend were on the backside of the chart that I had taped together.  I would have been constantly flipping the chart to follow the symbols & legends, which would have been very time consuming. Plus, I couldn't read several of the colored symbols now as they were underneath the tape of the chart I had to tape together.

Plus, the French list contained the symbols and colors for the outlining while the English version contained text instructions as to what should be placed where. The stitching order or outlining instructions was very confusing.  The chart had 3 thin red lines, 3 thick red lines, 3 thick blue lines, 2 thin blue lines, and 2 thick green lines - each with different instructions. Separate symbols and colors should have been used on the chart and legend to make the outlining less time consuming and easier to understand.

Fourth, the thread sorter was poorly designed.  This was a large cross-stitch kit which meant it contained a lot of threads. The embroidery threads were glued to a foam backed 11 3/4" by 1 1/4" strip of cardboard that had a picture of the color of the thread and it's number.   In order to get to the threads you had to separate the foam back from the cardboard strip. Very quickly the threads separated from their section and then you no longer knew what the thread number was to tie to your symbols & legends. I had to punch a hole in the thread sorter cardboard strip just below the color of the thread & it's number and then insert the threads through the hole and tie them in a loose knot so my threads, colors, and numbers would stay together.  To make things even easier to understand the color symbol should have been shown on the thread sorter strip of cardboard as well.  That way you would only need to use the thread sorter strip of cardboard to follow your taped together chart.

As mentioned, it took me over 250 hours to create this stunning design.  I started this in the beginning of August 2010 and finished it in the end of November of 2010. My husband was keeping track of the hours and I clocked approximately 253 hours on this.  Every afternoon I would spend a few hours working on it.

When my cross-stitch was finished it was stunning all by itself so we decided that it would need a nice mat and frame to really finish the piece. After all the hard labor put into creating the cross-stitch picture we decided it needed to be finished properly.

So, we took it to a little local shop called Art & Frame Emporium.

When they called to tell us that our picture was ready they said it was "gorgeous!"  My husband could tell that they were really proud of their work - and they should be. When we saw it - it was stunning.  Just beautiful.  I put a lot of labor into my cross-stitch and they all put a lot of labor into finishing it properly for me.

Both my husband and I were thrilled with the way it turned out and have it hanging in our master bedroom as we had planned.  It compliments the furniture in the room and is just breathtaking to view. The pictures in this post don't really do it justice.


Despite the problems I encountered after all is said and done the design of Dimensions Counted Cross Stitch M 'Lady's Chateau is absolutely breathtaking. Would I invest 250+ hours again to get this type of result? Absolutely.

However, as mentioned, the instructions, chart, symbols, and thread sorter could all be improved upon. My comments are meant to be constructive to enable future purchasers to benefit from my experience and to enhance their ability to create an astonishing piece of work from an incredible design.

Wednesday, December 08, 2010

My Cardstore.com Cards Arrived


In November I wrote a blog post entitled "I've Been Playing, Again! This Time With A Personalized Card Website" and told you I had ordered some cards and would let you know how they turned out.

Well, I got my cards last week and I have to tell you I am very pleased with them. They are just wonderful.

I ordered my cards on November 22 and received them on November 29, 2010 which I thought was a fantastic turn around time.

I had ordered two sets of holiday cards with my return address on both sets of envelopes and had also ordered holiday gift tags. My order was nicely and neatly packaged. The gift tags were enclosed within their own little match stick type box and the cards and envelopes were separated. As specified our envelopes contained our return address on the back.

I just knew from looking at the package that holiday card giving was going to be much easier this year. And, next year, it will definitely be a breeze as I hope to get all my addresses into my Cardstore.com address book by then.

I ordered two sets of holiday cards, one Christmas and one just Happy Holidays. The card stock for both was great as were the envelope papers for both.  Here's what the Christmas card I picked  looked like:

I just loved the picture of the man and "doggie" hanging their wreaths and knew it would be perfect for us this year.  For the card above I added a picture to the left hand side of the inside of the card and a Christmas message to the right hand side of the inside of the card as well as our names.  I'm not going to show you what they are as that would give away the surprise.

Here's what the Happy Holidays card looked like:


For the card above I just added a holiday message and our names on the inside on the right hand side. 

The envelopes had our return address printed on the back of the envelope.  They looked like this: 


I also wanted to see what their gift tags were like so I ordered the following with a cute picture of our "beloved" cairn terrier: 


The cards were great.  The service was terrific and the response time was wonderful.  I will definitely be using Cardstore.com  next Christmas and plan on using them for the various occasions that arise during the year.  


Saturday, November 27, 2010

Shop Til You Drop Or Your Fingers Do!


I just Love the Victorian era for all it's wonderful fashions, but not for all it's rules of etiquette. A couple of years ago I posted several articles on my Linda's Blog concerning Victorian Traditions and Victorian Etiquette. In re-reading some of them I thought you might like to read some of them, too.

Here's my post concerning Black Friday and Cyber Monday.

Have fun shopping or keying! LOL LOL

Today is the biggest shopping day of the year. The day after Thanksgiving, the traditional start of the holiday shopping season. Plus, Monday is the biggest shopping day of the year for Internet sales. Given that, I thought it might be fun to take a look at some of the Victorian rules of etiquette for shopping to see if they could be applied to today.

According to the Logicmgmt.com website Victorian Shopping Etiquette is as follows:

1) In visiting a store for the purpose of examining the goods or making purchases, conduct yourself with courtesy and amiability. That's always a good idea. Not always practical. Especially when there are only 5 of the latest toy and there are 100 parents waiting in line for hours.

2) Never look over goods without any intention of buying them. Are you kidding? That's the only way to tell if there's an imperfection.

3) Speak to the clerks and employees of the store with courtesy and kindness. Do not order them to show you anything. Request them to do so in a polite manner. In leaving their counter, say pleasantly "Good morning" or "Good Day". It's always a good idea to have manners and treat others with respect. However, if the store clerk is not paying attention to their job or is yacking on the phone with a friend you have the right to speak up.

4) Never take a costly piece of goods -- nor any piece -- into a better light without first asking the clerk's permission to do so. This rule has been changed to "IF YOU BREAK IT-IT'S YOURS!"

5) Should you find another person examining a piece of goods, do not take hold of it. Wait until it is laid down, and then make your examination. This rule definitely was written before they started having the mad rush of bridal gowns on sale at "Macy's" or the last minute rush at Christmas by the parents trying to get their child the "IT" toy of the season.

6) To attempt to "beat down" the price of an article is rude. In the best conducted stores the price of the goods is "fixed", and the salesmen are not allowed to change it. If the price does not suit you, you are not obliged to buy, but can go elsewhere. Didn't the Victorians barter? I bet car salesmen would love to have this rule nowadays.

7) Pushing or crowding at a counter, or the indulgence in personal remarks, handling the goods in a careless manner, or so roughly as to injure them, lounging upon the counter, or talking in a loud voice, are marks of bad breeding. What? The Victorians never experienced the mad rush of last minute shoppers. That's part of the fun.

8) Never let the door of a shop slam in the face of any person, nor permit a stranger to hold it open without any acknowledgement of courtesy. That's just plain rude, but I've seen it happen.

9) Never express your opinion about an article another is purchasing, unless asked to do so. If an item is defective and you know it, then I would think someone would appreciate knowing it. However, don't be surprised if you hear "Who asked you?"

10) You should never ask or expect a clerk waiting upon a customer to leave that person and attend to you. Wait patiently for your turn. A universal rule of shopping that some people do ignore. When they do look out. Talk about "road rage." That's nothing compared to "shopping rage!"

11) It is rude to make unfavorable comparisons between the goods you are examining, and those of another store.Doesn't apply to today. Nowadays with stores all matching their competitors lowest price you'd be a fool not to speak up.

12) Have your parcels sent and so avoid the fatigue of carrying them. Ah, there was a time when stores did this for you. Not anymore. Here's where a foldable shopping carts comes in handy.

I think they forgot a rule. Rule #13) Always let you personal shopper do the walking. You've got better things to do. If you don't have a personal shopper then go on to Rule #14) Always do your shopping in your jammies. Let your fingers do the walking over your keyboard and let the Internet be your guide. Personally, the latter is the best wait to shop. 

So, on Monday while you're out there Internet shopping please don't forget to visit our Linda Walsh Originals website. We have a lot of wonderful doll patterns, "instant download e-patterns", and tons of handmade dolls & crafts for sale. Plus, we follow Rule #12 and send your parcels to you. See, and you thought chivalry was dead!

If you decide to venture out into the wide, mad rush of holiday shoppers please BE SAFE!

Happy shopping to all.

And, remember the most important rule of shopping is - SHOP TIL YOU DROP or your fingers do!

Friday, November 26, 2010

HAPPY THANKSGIVING TO ALL!


Thursday when we sit down for Thanksgiving dinner we will give thanks for all we have, remembrances of our dear and departed loved ones, and prayers of good health for our families and friends. There are so many ways to says thanks and express gratitude for all we have. 

Below are a few famous Thanksgiving quotes: 

Ralph Waldo Emerson said: 
For each new morning with its light,
For rest and shelter of the night,
For health and food, for love and friends,
For everything Thy goodness sends.

Theodore Roosevelt said: "Let us remember that, as much has been given us, much will be expected from us, and that true homage comes from the heart as well as from the lips, and shows itself in deeds."—1901 

John Fitzgerald Kennedy said: "As we express our gratitude, we must never forget that the highest appreciation is not to utter words, but to live by them." 

Johannes A. Gaertner said: "To speak gratitude is courteous and pleasant, to enact gratitude is generous and noble, but to live gratitude is to touch Heaven." 

And for my Father in remembrance of his Father and my Grandfather, John, who came from Estonia, an Estonian proverb: Who does not thank for little will not thank for much. 

HAPPY THANKSGIVING everyone. 

Thursday, November 25, 2010

I've Been Playing, Again! This Time With A Personalized Card Website


If you're a reader of my Linda's Blog and have been following me and all my blogs (yes, I do have a few! LOL LOL) you are well aware that I love to play and experiment. Especially when it comes to interactive websites. 

Well, on November 2nd I received an email from Krystal at Cardstore.com (http://www.cardstore.com) asking me if I'd like to review their website and products.  It seems she had seen my blog post about the fall decorations I had created and thought I might appreciate trying a card website where you basically get to build beautiful and personalized greeting cards. 

So, given my love of playing I thought I'd try it out.  Well, the other day, I decided to play and try out their website.  I have to tell you that this took me awhile, not because the website was hard to maneuver.  To the contrary it was very easy to maneuver.  It took awhile because they have hundreds - no, make that thousands, of cards for every occasion, every holiday, and just about anything else you might want to send a card for. 

You can choose from some of their designs and just add one of your photo's, or choose one of their designs and add your own words, or choose one of their designs and add both a photo and your words.  The words you add can be short or multiple paragraphs depending on the format you choose.  There are six different formats for personalizing your card depending upon where you want your photo and words to appear. 

Plus, for everyone who has a hectic schedule and very little time (like me) you can have your return address printed on your envelopes for no extra charge.  That's a great time saver and deal all by itself.  However, the best time saver is you can create an address book in your account and then they will print the addresses on your envelopes for you.  They'll even add stamps for you or better yet - they'll mail your cards for you (once you've paid for the stamps in the checkout process).  For everyone with busy schedules that's a terrific option. 

I decided to create some holiday cards in a couple of different versions and to create some holiday gift tags.  I didn't have time to create an address book so I could have them printed on my envelopes, but I'm going to do that during the year so next Christmas I'll be in terrific shape. 

What's also great about this website is they also offer a volume discount for ordering multiple cards.  So, you can personalize just one card or create multiple cards.  Plus, you can save your designs in your account and return to them to edit or order them on your own schedule. 

I created, personalized, and saved some business thank you cards and birthday cards in my account that I may order sometime in the future.  After you have saved your cards you can then go back and edit them and/or add them to you cart when you're ready to order.  I did notice that from time to time when I went back to add my saved cards to my order that they didn't always show the picture I had chosen in the preview process.  This only happened with the saved cards and not ones that are created and added to the checkout process initially or when you go back to edit a card from your cart.  I'm not sure if this was due to the browser I was using (Google Chrome) or just a snag in their saved card process.  In any event it was no big deal to go back and add the picture again or just go back to my cart and chose the edit link before checking out. 

For those of you that are designers you can submit designs to them for their consideration.  Plus if you want to become an affiliate of Cardstore.com they also offer an affiliate program with Commission Junction. 

I found Cardstore.com to be very easy to use and was pleased with the large variety of their design selections.  They have photo cards for every occasion and event, invitations, thank you cards, birthday cards, everyday cards, encouragement cards, humorous cards, friendship cards, get well cards, sympathy cards, anniversary cards, congratulations cards, moving announcements, wedding cards, graduation cards, flat cards, folded cards, business cards, and even stationary.  With all that to choose from I hope you can understand why it took me awhile to peruse thru their website. 

So, I decided to order some Christmas cards and did so the other day.    I'll let you know how they turn out. 

I hope you enjoy your 20% discount. 

If you'd like to check out their holiday cards please go to http://www.cardstore.com/holiday-cards.html. If you'd like to check out their photo cards please go to http://www.cardstore.com/

Wednesday, November 17, 2010

What About The Pilgrims?


Thanksgiving Day will soon be on the horizon and our thoughts will turn to giving thanks, family, traditions, and celebrating. 

I prefer to call it gobble, gobble, gobble day. We'll all be feasting until our stomachs are bulging (at least some of us will). I think we should call it calories, gobble, gobble day! Don't you? 

Thanksgiving Day is a huge holiday in the United States. 

Families and friends get together and give thanks for all our blessings. 

We have football games, and the Macy's Thanksgiving Day parade. 

And, the day after Thanksgiving marks the beginning of the Christmas shopping season (black Friday) which is, generally, the busiest shopping day of the year. 

We've been celebrating gobble, gobble, gobble day for a long time. 

We've been eating and shopping, then eating, eating and eating. 

And, finally, gaining weight. 

Are we sure we should be giving thanks for this? LOL LOL 

So, why do we do this? 

Well, we seem to think Thanksgiving was a day of observance for the Pilgrims. A day for them and us to give thanks for all we have and all we enjoy. 

But, the Pilgrims never held customary Thanksgiving Days in the fall. 

In fact, the Pilgrims only had one feast in 1621, after their very first harvest and this was NEVER repeated. 

The pilgrims were deeply religious people. A day of thanksgiving to them was a day for prayers and fasting. It was nothing like we have today. 

However, when we think of Thanksgiving we think of the one Harvest Feast that the Pilgrims did have with 90 people, including their Indian friends. 

So, of course their is a history to how did we got the Thanksgiving Day as we now know it? And, since I just love history, I thought I'd share it with all of you. 

The Pilgrims had landed December 11, 1620 and lost many of their group during the cold, harsh winter. Their first harvest in the fall was bountiful so they celebrated the harvest with the Indians who had helped them survive and the feast lasted three days. 

So, how did it turn into a national tradition? 

Well, that didn't happen until 169 years later when George Washington proclaimed a National Day of Thanksgiving in 1789. 

As is usually the case, some people wanted it, some (like Thomas Jefferson) did not. So, between 1789 and 1863 Thanksgiving was dependent upon whether the President proclaimed it as a National Day or not. 

During the Civil War Sarah Hale, a magazine editor, urged President Abraham Lincoln to reinstate Thanksgiving Day. 

In 1863 President Lincoln proclaimed the last Thursday in November as a National Day of Thanksgiving.

However, it was still dependent upon the President, however, to proclaim the day as a National Day every year. Every President since Lincoln proclaimed Thanksgiving Day as the 4th Thursday in November. 

Seventy-six years later in 1939 Franklin Roosevelt, however, proclaimed Thanksgiving to be the 3rd Thursday in November to lengthen the holiday shopping season. He did this in 1940 and 1941, too. Doing so, however, upset many people. 

So, we have President Roosevelt to thank for linking SHOPPING to Thanksgiving. 

It wasn't until 1941 that congress declared Thanksgiving as a National Holiday. 

However, they changed it back to the 4th Thursday in November. 

Why the 4th? Who knows. Political pandering, probably. Payback for something? Who knows. We're talking about politicians here. 

In any event, Thanksgiving has remained the 4th Thursday in November and is inexplicably linked with shopping, parades, football games, feasting (and gorging, perhaps), Pepto Brismol (definitely after the gorging), and the winter dieting frenzy. 

After all when you eat, shop, eat, eat, and eat you're going to gain weight. 

So, Happy Thanksgiving to all. 

When you sit down on the 4th Thursday of November just remember these words "Gobble, gobble, gobble. 

Oh, how we love to Gobble. 

Eat, eat, and eat! 

Oh, what a wonderful treat! 

Gobble, gobble, gobble. 

Oh, how we love to eat! 

Diet, diet, diet! 

Oh, NO I will NOT try it!" 

Happy Thanksgiving! Gobble, Gobble, Gobble! 

Pilgrims and turkeys are usually associated with Thanksgiving and are also a favorite of doll makers and doll patterns designers alike. I have made many pilgrims and have designed several pilgrim doll patterns over the years.

I have also made many, many different types of pilgrims and turkeys that I have made from other designers patterns. I loved making each and every one.


Saturday, November 06, 2010

The Rest Of The Shadowbox Pictures


In a previous post on my Linda's Blog entitled "Shadowbox Pictures For Fall Decorations" I told you about the shadowboxes hubby and I had made for some of the gifts were were giving one Christmas season. 

We had created enough shadowboxes to give as gifts and enough for decorations for every season. The shadowboxes were mostly made out of 1/2"x1" pine for the frames and 1/2" pine boards for the centers.  The frames were painted one color and the center boards were painted another.  And, rub-on stencils were added to the center boards to complete the pictures. 

There was only one exception to the total wood picture and that was for the snowman picture shown at the beginning of this post.  That shadowbox was created using pine wood for the frames and an 8"x10" canvas panel for the center.  Like the other shadowbox pictures I painted the canvas panel a different color then the frames and then applied the rub-on stencils to create the picture.  Brush on varnish was added to seal everything. 

Shown below are some of the shadowboxes we created for the Christmas holiday and winter season.  


I hope you enjoyed seeing all the pictures.

Thursday, November 04, 2010

Walking Around The Craft Show


There's nothing I like better than walking around a craft show looking at all the wonderful creations.  So, this weekend hubby and I did just that.

Now that isn't exactly hubby's favorite thing to do, but he did it for me.  And, actually to his surprise there were a LOT of really talented artisans at this craft show with some really nice stuff.

So, of course, given that I have never found a craft booth that I didn't like I bought a few presents for the holidays.  My preference for gifts is to always buy handmade if I can.  Of course, my handmade gifts are preferable, but lovely handmade gifts from talented crafters will do.

So, I bought a few things!  All gifts of course - well, most were gifts for my family for the holiday season.  A couple were things I bought for hubby and I.  Well, make that were bought for me! LOL LOL

In any event, it was a terrific craft show this year and I was happy about that.

Truth be told the last few years there have been fewer and fewer craftisans at this show.  This year they had many, many more artisans with wonderful handmade products.  So, I was very pleased with that.

I'd love to tell you what I bought and show you pictures, but I know my sister and sister-in-law will be reading my blog and that would give away the surprise.

However, I will tell you that I was a really good girl and resisted the fudge booth this year.  It really took a lot of will power on my part as the fudge was really inviting.

I should have at least bought some for the holidays, but know it would have never made it out of the car!

Make that - it would have never made it out of the show!

Hubby would have eaten it all!

And if you believe that I have a bridge I could sell you...........