Sunday, December 30, 2018

Here's An Idea - Terracotta Painted and Stenciled Pot Decorations


As you probably know I LOVE to create and decorate with just about anything I find for the various seasons and holidays.  So it should come as no surprise that I'd be looking for different ways to decorate over the years and back in 1999 fell in love with the idea of using painted and stenciled terra-cotta pots.

Whether it's decorating with dolls, floral arrangements, or wood crafts I just love decorating - especially when it comes to decorating my sun-room for the different seasons and holidays.

The reason this is so much fun for me is because I've now limited the seasonal decorations in my home to a couple places in the house.  I used to try and decorate every room for every season and holiday, but that was getting to be a  OF WORK.  And, I just didn't have the time for it.  So, I've been limiting the decorations to a few areas - which I'm very happy with.


Well, several years ago I was looking for something different to decorate my sun-room and thought that maybe I should paint some of the terracotta pots I had bought on one of my many shopping trips. And, I had bought a few - well, make that A LOT!

I don't know why I'm always drawn to the terracotta aisle of the craft store, but I am.  I just love all the different sizes of the terracotta and love experimenting with different ways to use them.  And use them I have.


Whether its terracotta bride and groom wedding shower favors, or baby boy and baby girl terracotta baby shower favors, or a terracotta bunny head for Easter - I just LOVE creating with the terracotta pots.  And, I love creating free e-patterns so you can create some of your own.

Right now I have several free e-patterns and free combo e-patterns (shown above and below) that I've designed featuring terracotta type dolls (if you could call something with a terracotta body a doll!)


There's my "It's Me, Ginny" bunny, my "I Do! Terra Jane" bride favor, my "I Do! Terra Joe" groom favor,  my "It's a Girl! Terra Head" baby shower favor, my "It's A Boy, Terra Head" baby shower favor, my Walsh caroling family, and my trio of Santa's.

They are all fun and easy to make.  The bride and groom e-patterns are part of our "Wedding Shower Favor" group of free e-patterns and the boy and girl are part of our "Baby Shower Favor" group of free e-patterns.


In any event,  during one of the Fall seasons I was looking at the standard pot size terracotta pots I had and thought they might make cute decorations for the Fall. I was thinking that I could paint them and stencil them with seasonal decorations.

So, I decided back then that a shopping trip to the craft store (like I need any excuse to go to the craft store! LOL LOL) was in order to buy the paint and some stencils.

Well, it turned out to be a wonderful shopping trip as I found many Provo Craft First Impressions rub-on stencils that I liked and could use for the various seasons and holidays.

Of course, like everything I do, I never do anything in moderation.  As a result I had many, many pots to decorate with which meant I had lots of paint and stencils to buy.

To my delight the stencil aisle was filled with all sorts of rub-on stencils that I could use for my pots - and use them all I did.


There were scarecrows and snowmen and flowers and Santa's and .....  Well, just about everything for every season and holiday. There were borders and sayings that I could combine with my pictures. The possibilities were endless.

My mind was thinking of so many possibilities at once that I couldn't keep everything straight. I wasn't sure what I was putting with what. It didn't matter anyway - that was part of the fun.

So, of course, I bought a bunch of the rub-on stencils. I figured if I had any extra's I could always use the stencils on something else. That's what I told hubby when he saw how many I actually had! LOL LOL

In any event, first I decided which pot I was going to use and then decided which stencils I would be using.  The stencils would be driving the paint color so I needed to decided on them first.  And, of course for that shopping trip, I was drawn to the Fall stencils and Fall colors.

I had originally thought of using some of my painted pots for some of my household plants, but gave up that idea as I would have to change the pots out for each season and I just didn't want or didn't have time for that.  So, I decided to use the pots to hold potpourri or ornies appropriate for the season or holiday in question.


The pictures shown above are some of the painted terracotta pots I did for the Fall.  In the pictures they're empty, but I fill them with potpourri for the Fall season.  My rooms smell great and they're wonderfully decorated for the Fall. I loved creating them so much I decided to create a free e-book so you could make some of your own.

I ended up making a bunch of painted terracotta pots for all four seasons and even had some for the various holidays.  When I was done I had a bunch of decorations that I could use and a bunch that I could give as gifts.


Since I also have a passion for silk floral decorations I decided to paint some of the large terra-cotta pots for use with some of my silk floral seasonal decorations (like those shown in the pictures above). I painted them different colors and added stencils for decorations.  And, of course, I created free e-books so you could create some of your own.


My mother and I were always looking out for craft projects we could do together to use as decorations for the various holidays and seasons.  In the April 1999 issue of Crafts we saw a picture and instructions for a  craft project called "Clay Pot Bunny Family" designed by Mary Ayres that had the cutest group of terra-cotta painted bunnies using all different sizes of terra cotta pots.

We loved it and decided to create bunny families of our own to decorate during the upcoming spring season and Easter holiday. We ended up making 3 families (like those shown in the picture above) for ourselves and my sister.  The two shown on the bottom of the collage above were made using the tiniest little terra-cotta pots.  I love their hats.  They're bigger than they are.
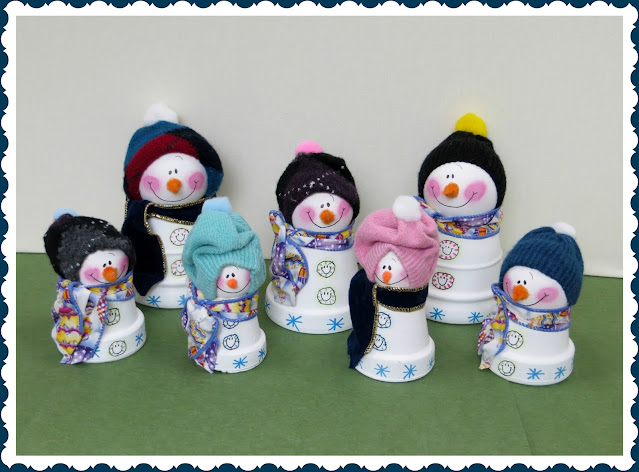

My mother and I loved making the bunnies families so much we decided to create some terra-cotta painted snow people families (like those shown in the picture above) for the following winter season. We decided to paint them white, draw designs on the front with colored markers, add old socks for hats with pompom decorations, and add wired ribbons around their necks for scarves.  Their noses were made from orange pipe cleaners shaped into cones and glued to their faces.


In 1999 I saw a cute Halloween craft project in the September 1999 issue of Crafts N Things that I thought would make a really cute decoration for Halloween.  It was called "Candy Corn Pots and Lollipop Ghosts" and was designed by by Dorothy Egan that used 5" and 6" terra cotta pots.  It was so cute I decided to make them (shown in the picture above) for myself , my mother, my step-daughter and my daughter-in-law.  They loved them so painting and decorating those terra-cotta pots was a big success.  Aren't they adorable?


In the Spring of 2000 I was looking for something for my step-daughter to make for the upcoming Easter holiday and decided terra-cotta pots with painted wood decorations glued to the front and filled with all sorts of Easter craft decorations like painted eggs, bows, and silk floral would be cute. So, we made  two small ones and two large ones (like those shown in the picture above) to decorate our homes during the Easter season.


My favorite terra-cotta pots to use are the little mini pots and I've used many of them in the different craft projects I've done.  I saw an article in the Crafts September 1999 issue for making the cutest pincushions using 2 1/2" clay pots.  It was called Pin Pal Pincushions and was created by Mary Ayres, So, of course I decided to make a few as gifts, like those shown in the picture above.  Tiny little pincushions.  Adorable aren't they?


Back in 1999 while were expecting the birth of our 4th grandchild I saw a picture of a baby craft project in one of the crafts magazines I subscribed to for making baby heads sticking out of tiny terra-cotta pots.  The baby heads were made of cloth and the terra-cotta pots were painted ecru and had a blue heart for a boy and a pink heart for a girl on the front. I decided to make some.

I thought they were adorable but decided to make mine with wood egg shaped painted heads, pink terra-cotta pots for girls and blue painted terra-cotta posts for boys.  I decided to draw a  dashed triangle on the fronts of the posts and write "It's A Girl" for the girls and  "It's A Boy" for the boys. In the area below the dashed triangle I added the date, time, and weight for when my grandson was born and gave it to my step-daughter as a memento.  She loved her trio.

All in all I was pleased with all the decorations I've created over the years.  Painted and stenciled terracotta pots for decorating for all seasons and holidays - now that's a good idea.

Please respect My Terms of Use:  All patterns, e-patterns, printables, e-printables, e-books, graphics, tutorials, how-to's, articles and other e-products © 2004-2023 Linda Walsh Originals-Designs by Linda Walsh. All rights reserved. Commercial selling or reselling by any means prohibited without the written consent of Linda Walsh.

Patterns, e-patterns, printables, e-printables, e-books, graphics, tutorials, how-to's, articles and other e-products are for personal use only. You may not modify, photocopy, download, upload, post, transmit, display, perform, publish, license, reprint, create derivative works from, mass duplicate, re-sell, digitize, and reproduce in any other form (print, digital or electric) or commercially apply, embed, share, Email, or redistribution in any other means. Use of any of the above is prohibited without the written permission of Linda Walsh.

However, you may link to my website(s)/blog(s) and the individual page(s)/blog post(s) (including 1 picture) but do not copy, reprint or duplicate my website(s)/blog(s) or individual page(s)/post(s ) without my permission.

Items made from Linda Walsh Originals E-Patterns are intended for personal use for fun or small scale personal and business profit as long as you credit us with the design. Large scale commercial use (i.e. mass production) of items made from Linda Walsh Originals E-Patterns are by permission only.

Please see my Terms and Conditions for additional information.

Copyright © 2004 - 2023 - All Rights Reserved - Written By Linda Walsh of Linda Walsh Originals and Linda's Blog. Linda is a doll maker and doll pattern designer.

Sunday, December 23, 2018

Merry Christmas To All!


Have Yourself A Merry Little Christmas
(Alecia Elliott)

Have yourself a merry little Christmas,
Let your heart be light
From now on,
our troubles will be out of sight

Have yourself a merry little Christmas,
Make the Yule-tide gay,
From now on,
our troubles will be miles away.

Here we are as in olden days,
Happy golden days of yore.
Faithful friends who are dear to us
Gather near to us once more.

Through the years
We all will be together,
If the Fates allow
Hang a shining star upon the highest bough.
And have yourself A merry little Christmas now.


Saturday, December 22, 2018

My Pinterest Boards Are Getting 1.1 Million Monthly Viewers - WOW!


I don't know about the rest of you, but I fell in LOVE with Pinterest.com back in 2011 and have been in love with it ever since.  It is by far the most wonderful way to organize everything and anything about "you."

What moves you, what you like, what you're keeping tabs on, things you saw online that you want to remember, things you want to try in the future, places you've been, what you consider "beautiful", your creations, your interests, foods you like, websites you like, blogs you like, your dreams, future plans for a wedding, dream home, your decorating style, must haves, things you'd like to make, inspirations, DIY projects to try, tips for everything and anything, tutorials to try, your bucket list, beautiful pictures, beautiful colors, things for your kids, nature at its finest, beautiful animals, decorations for the holidays, and your favorites - whether they are artists, crafters, movies, pictures, collections, music, recipes, favorite hobbies, etc.  The list goes on and on.  Your boards and your page give your followers and the world a pictorial glimpse into the essence of "you."

Back in 2011 I created different boards for all sorts of crafts I liked, such as: some of my handmade Victorian dolls (of course), my cross-stitch projects that I'm very proud of, some of my e-patterns, creative embroidery I'd love to try (if I had a few spare moments), my favorite art doll artists, my favorite mixed media artists, my favorite doll pattern designers, my favorite teddy bear artists, my favorite needle & wool felt designers, doll and craft classes I'd love to take, my favorite "softies" designers, Victorian fashions and Godey's fashion plates I love, my favorite prim and folk-art designers, doll houses and miniatures, crazy quilt designers I love, beautiful art quilts, amazing art, cross-stitch and punch needle designers I love, quilt things I'd like to make, craft books worth reading, felt things I love and would like to create, fun paper crafts, mixed media, items I wish I could paint, sewing ideas and notions, etc.

I also wanted to showcase all the wonderful free crafts e-patterns, tutorials, printables, how-to's and video's I could find on every type of craft or media there is so my viewers could not only enjoy what all the talented crafters were sharing but try making some of the crafts projects themselves.

Prior to Pinterest when I found something I liked or wanted to try I'd print out the project and save it in a manila folder.  Needless to say, with 50+ years of crafting I acquired a lot of manila folders filled with all sorts of craft ideas I wanted to try.

Well, with Pinterest I was able to organize my boards for crafts I liked and wanted to try which enabled me to organize my craft area and get rid of all those manila folders.  Whenever I feel the urge to try something new I just visit my Pinterest boards.

Over the years I've created 253 boards with 55,208 pins.  And, over time, my viewership has increased to 1.1 million monthly viewers.  That's a lot of views and a lot of interest in crafts.  How great is that! Wow!

In my opinion for a small business crafter "pinning" is a win-win. It's a fabulous way to present a visual image to a vast audience whose distribution capabilities are endless.  It's also a fabulous way to generate sales for your website and viewers to your blogs.

But, it's also become a great tool for small business artists and crafters online.  In fact, in my opinion,  it's become a "must" for artists and crafters.  A "must" not just because it is one of the easiest ways to promote your creations online, but one of the best ways today for artists and crafters to promote each other.  In fact, it could easily be called the best link exchange ever.

Talk about a beautiful way for all of us to help promote one another. It doesn't get much better or easier than this.  My motto has always been, "What Helps One of Us Helps All of Us!"  Pinterest.com is a fabulous way to do just  that.


Follow Me on Pinterest

Friday, December 14, 2018

Mr. Jolly Left Me A Note!


When I came downstairs this morning to have breakfast I found a note on my chair.  It was marked "confidential and for Linda's eyes only!" Hmmmmm...... Who could this be from?

The "dollies" have been leaving me notes from time to time over the years so I thought it was from one of them.  They think they're human and can be very temperamental from time to time - especially at the holiday season.  So, I opened the note figuring I would recognize one of the "dollies" handwriting.

To my surprise the handwriting was beautifully written in cursive which the "dollies" don't know how to do and, therefore, a mystery to me as to who wrote it.  So, I read the note.

It said:

To my dearest Linda, 

I want you to be aware of a situation that I don't think you are aware of and which is causing someone much consternation.

Hmmmm...... I thought, who talks like that.  None of the "dollies" that I was aware of. Hmmm....

So, I continued reading.

When I came downstairs this morning I heard muffled sounds of sobbing - like someone was crying and trying not to let themselves be heard.  So, I walked in the direction of the noise and noticed a pile of tissues on the ground in front of a little "doggie" that you had placed under the pencil Christmas tree late last night.

I asked the pencil tree what was going on.  He had no idea.  When he woke up this morning she was there and had been crying all morning.

When the little "doggie" caught sight of me she quickly stopped crying, picked up all her tissues, and hid inside her Santa bag.

So, I walked over to her and asked her why she was crying.

She responded, "This is such a wonderful house with all the dollies, Theo, the Nutcrackers, the pencil tree and you, Mr. Jolly, but, I don't seem to fit in.  No one has come to greet me and I don't even have a name. I know Linda always names the newest addition to the holiday decorating household and the "dollies" are always there to welcome them. Linda just placed me here last night and then nothing happened. No greeting, no dollies, nothing. I think she hates me and is going to return me to where I came from."

She started crying again so I gave her another box of tissues. 

I thought about what she had said and have to tell you what happened to her just wasn't right.  You always name the newest addition and then introduce them to our holiday family and to everyone else.  Plus, there isn't a "dollie" on earth let alone a "doggie" that you haven't loved.  It is so unlike you I thought that it surely has to be an oversight. You just would not be this mean. 

So, I decided to write you this note in the hopes that you would rectify this situation.  We can't have little "doggie's" crying - especially at the holidays. It's just not right. In fact, it's downright inhumane.

Sincerely,
Mr. Jolly


After reading the note I was embarrassed and mortified that I had caused the little "doggie" such distress.  That is not something I would ever knowingly do.  Especially to a little "doggie" at anytime of the year.  Given that I love every "dollie" I've ever seen when I do bring one home it's because it's extremely special.

So, I went over to the little "doggie" and picked her up apologizing profusely to her as I was giving her big hugs and kisses.  When she stopped crying I told her that not introducing her to everyone else was truly an oversight on my part.  I had brought her home so late last night and was so exhausted that I placed her under the pencil tree and went straight to bed.  Plus, it was way too late to introduce her to all the "dollies" and everyone else as they were all sleeping soundly in their beds and the pencil tree was snoring so loudly I knew there was no waking him.

I asked her to please, please, please forgive me which she did by licking my face over and over and over again.  She was licking me so much I thought my face would break out in a rash.

I told her I had decided to call her "Penny" the minute I saw her as I thought it was adorable, like her, and would fit her perfectly.  She was so happy and so pleased with the name that she started licking my face over and over and over once again. I had to stop her at this point because  I knew for sure my face was going to break out if this continued.

When I put her down I saw that the family room was filling up with Theo, the pencil tree, Mr. Jolly,  the nutcrackers, and all the "dollies."

The "dollies" seemed to be  annoyed and were running straight at us.  They all seemed to be muffling something under their breath but I couldn't make it out.  I was afraid they were going to stampede me and that not only would I get hurt but Penny would as well.

So, I picked her up and put her on my shoulders and shouted, "Everyone stop running before someone gets hurt."  With this they stopped short causing a cascading effect with several of the "dollie's" in the middle and back tumbling forward. Penny and I had to jump out of the way or we would have been knocked over as well.

When everyone was helped to their feet I continued, "I don't know what you've been mumbling under your breath and why you're all rushing at me but I'd like to introduce you to Penny - the newest addition to our holiday decorating household."

"She's just the cutest "peek-a-boo" little "doggie" you've ever seen. She just wants to spread joy and Christmas cheer where ever she goes. Plus she's got the most infectious laugh which is totally irresistible. I knew the minute I saw her that she would be a perfect addition to our household and hope you all would agree."

You never know how the "dollies" will react to anything as some can be quite persnickety.  To my delight it was so quiet in the family room that you could hear a pin drop.  I figured they must have thought I was going to return the little "doggie" and were determined to give me their piece of mind as well as prevent me from doing that.  They were going to defend her no matter what the consequences would be for them.

Penny realized this as well and was deeply touched.  Everyone was thrilled to see Penny and welcomed her into the household with open arms.  They started jumping up and down, hugging each other and hugging Penny.

Penny was smiling, Theo was smiling, the pencil tree was trying to smile, the nutcrackers were smiling, ALL the "dollies" had huge grins on their faces, and Mr. Jolly had the  most pleased expression on his face.  It was quite a joyous event.

It took quite a while to introduce Penny to every one but by the time we finished it was standing room only in the kitchen and family room. Everyone was so happy.  Penny's laugh was so infectious that everyone in the room was laughing and laughing and laughing.

Soon everyone was laughing so hard there were tears flowing down everyone's cheeks. There were so many tears of joy I knew I had to get several boxes of tissues before we had a flood in the house.  It was quite an amazing scene to say the least.


As I was trying to make my way to the bathroom to get tissues for everyone I saw that Mr. Jolly was signaling me.  When I got close enough to him he gave me a big hug and told me that Penny was a wonderful addition to our family and he would keep a watchful eye out for her and save a special place for her under the pencil tree.


I thanked him for that and for writing his note and told him he had the best "cursive" penmanship I had ever seen.  That brought a huge smile to his face and the deepest belly laugh I had ever heard.  He told me that with hundreds if not thousands of years of practice writing "naughty and nice" lists it's no surprise that he would be an expert at it.  I definitely agreed.

I was still mortified that I had caused distress to Penny but relieved that another potential holiday situation had been resolved.

And, with that our 2018 Christmas season officially began with the sounds of a little "doggies" infectious laugh and a note from Mr. Jolly.


Monday, December 10, 2018

"Stained Glass" Ornaments Kit by Design Works Crafts


When I first looked at the "Stained Glass" ornaments kit by Design Works Crafts I thought how pretty and how wonderful they would look on my pencil Christmas tree. They looked pretty simple and easy to me.  Turns out looks can be deceptive.   It took me much longer than I first thought to finish the six ornaments in this kit.


What I didn't know before I bought the kit was that there was a lot of black floss highlighting for each ornament that transformed them from a pretty ornament to a beautiful ornament.  The highlighting really makes them stand-out and is well worth the extra time it takes to finish each ornament.  It's quite amazing to see them in person.  What added to the length of time was the black highlighting is done one stitch at a time.

The "Stained Glass" ornament kit contained the color cotton floss, #14 plastic canvas, needle and instructions.  The pattern uses full counted cross-stitch and outline stitching for emphasis and depth.


This is the first time I have worked with the #14 plastic canvas and I have to tell you it was wonderful.  It was flexible enough to just hold it in your hands but also rigid enough to allow you to cross-stitch it without any problem.


The chart was 11 1/2" by 17" and had four of the ornaments vertically aligned in a row along the top of the chart with two of the ornaments horizontally laid in a row along the bottom.  The intent was to cross-stitch the plastic canvas in the same manner.  However, I decided to cut the plastic canvas into six pieces beforehand as it would make it easier to cross-stitch each of the ornaments.


The pattern came with starting, stitching and finishing instructions as well as a sample of the two stitches required and a black and white chart with black and white coded symbols.  The symbols on the keys and chart were basically easy to read and follow but, for some reason, I kept confusing two of the triangle symbols every time I looked at the black and white chart.  If the black and white chart were just a little bigger or were actually color coded I think this could have been avoided.


I did have a few problems with the embroidery floss contained within the kit.  Unfortunately there wasn't enough black, light red, and green embroidery floss contained within the kit so I had to use some from my stash.

Also, the floss color key chart had the number of floss strands included within the kit for each color floss but 8 of colors were different than the actual numbers of floss strands contained within the kit.  For all 8 of these colors there was more floss strands than the key indicated.


I had no problem cross-stitching the "Stained Glass" ornaments and then cutting the plastic canvas close to the sides of the ornaments according to the finishing instructions.  I didn't like leaving the ornaments with the back threads showing so I decided to finish the back of my ornaments with white felt.

I rubbed Glue Stic on the back of my ornaments and then glued a rectangle piece of white felt to the back.  Once the felt was glued on I cut the white felt in the same shape as the ornament and then stitched the plastic canvas to the white felt along the sides of each ornament with two strands of white embroidery floss. I created a hanger for the top of each ornament with two strands of the white embroidery floss.


After I was done with all the ornaments I hung them on my pencil tree.  They all look beautiful there.


I was thrilled with the way my "Stained Glass" ornaments turned out and hope you like them too.


Friday, December 07, 2018

My "The Stockings Were Hung..." Cross-Stitch Picture


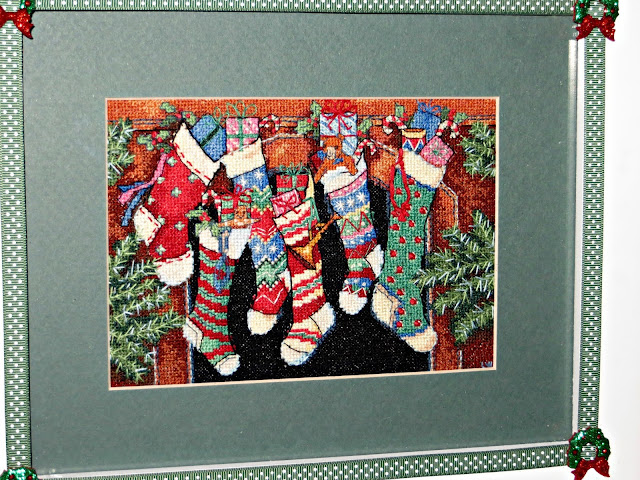
I don't think I've ever found a cross-stitch kit that I haven't loved - especially those regarding the Christmas holiday season.  I was drawn to the colorful fireplace stocking display picture in the Dimensions Gold Collection "The Stockings Were Hung...." the minute I saw it.  So, I decided to buy the kit and add it to my other Christmas cross-stitch decorations on my fireplace mantle.

Like the other Dimensions Gold Collection Petites kits I had bought the kit included the pattern, pre-sorted cotton thread, 18 count white cotton Aida, needle and instructions.

The "The Stockings Were Hung..." pattern uses full counted cross-stitch, french knots and outline stitching for emphasis and depth and this detailing really makes the picture stand out. It also varies the number of threads used with the various stitches to add to the depth emphasis. The design of this cross-stitch gives the finished picture a 3 dimensional aspect with the cross stitch, french knots and outlining being used for artistic effect.


The pattern came with starting and working order instructions as well as samples of the various stitches required and instructions for creating them, color coded keys (with code #'s, lengths, color names, and cross-stitch symbols) and a chart with color coded symbols. The colors and symbols on the keys and chart were easy to read and follow.


While I was very pleased with the end results of this design there are some things in the kit and in the instructions that can be improved upon.

Unlike the problem I had with the size and readability of some of the other cross-stitch charts in the kits I had bought this color chart was large enough and easy to follow.

As was the case with previous Dimensions kits the thread sorter was poorly designed. The embroidery threads were glued to two foam backed 6" by 1 1/4" strips of cardboard that had a picture of the color of the thread and it's number. In order to get to the threads you had to separate the foam back from the cardboard strip. Very quickly the threads separated from their section and then you no longer knew what the thread number was to tie to your symbols & legends.

As I have done with other cross-stitch kits I've completed I had to design my own thread color sorter and symbol key. I took a piece of thin cardboard and cut a long rectangular piece out to use as a thread sorter. I then punched holes in my cardboard strip in which to tie each of the different colors. Just below the hole I wrote the DMC floss # and just above the hole I added the respective color coded cross-stitch symbol. I then inserted the floss threads that went with that # and symbol through the hole and tied them in a loose knot. This kit could be much improved if different thread sorter with respective #'s and color coded symbols was provided.

Short of changing the thread sorter all together to make things even easier for the user the color symbol should at the very least have been shown on the thread sorter strip of cardboard as well. That way you would only need to use the thread sorter strip of cardboard to follow your chart.

I decided to use an 9" round embroidery frame to stitch this embroidery.  The white Aida wasn't big enough to fit into the frame so I sewed 4 muslin strips to the four sides of the Aida to keep the Aida tight and stretched so I could easily cross-stitch this design.

The kit did not include enough of the dark green #16880 embroidery floss.  I ran out before the pine needles were finished and had to use some of the embroidery floss I had from my stash.  I almost ran out of the rust #12338 embroidery floss, too, but was able to finish the area of the picture utilizing this color without having to dig into my stash.

The key split the strands of several of the colors into 1 strand for the highlighting.  I opted for using two strands of the highlighting colors for the pine needles, outside of the stockings, and fireplace sides as I thought they would make the picture stand out even more in the frame I was using.


The pattern included instructions for finishing the piece. I didn't need these as I knew what type of picture frame I was going to use, the  mat I was going to use and the way in which I wanted to finish the picture.

I tend to favor 1/4" foam backed adhesive mounting boards for the cross-stitch pictures I'm inserting into a finished picture frame. I had decided to use a 8" by 10" frame I had bought that had a white double depth mat with a 5" by 7" opening. I had already decided to remove the double depth mat and adhere the cross-stitch to a 1/4" foam backed 5" by 7" adhesive mounting board.  If I tried to use the double depth mat I wouldn't have been able to close the back of the frame as it wouldn't allow the cross-stitch picture on the 1/4" foam backed adhesive mounting board to be inserted into the slot on the back of the frame. So, instead, I opted to utilize a single 8" by 10" mat with a 5" by 7" opening which would provide enough room to insert the picture backing into the slots and allow for securing it to the frame.

I had chosen a white frame with green matting to finish it which I think really brought out the beautiful colors of the fireplace stockings scene.

I centered my cross-stitch picture on the 5" by 7" adhesive foam board and trimmed the excess white Aida cloth by 1/4" to 1/2" around.  The trimming allowed for me to tape the sides of the Aida cloth with masking tape to the back of the mat board I was using while providing enough room for the double folded corners to fit within the depth of the frame.

You can also finish the back of the cross-stitch by taping the center of each side with masking tape to the cardboard and then sewing four mitered corners into the Aida cloth so the picture is taunt to the cardboard.

Last year I had bought some decorative adhesive ribbons and hadn't had a chance to use them as of yet.  When looking at the white frame and the colorful stockings picture I thought one of the tapes I had bought would be perfect to decorate the four sides of this frame and really add to the holiday cheeriness of this picture.  So I cut four strips of the tape and adhered them to the frame.

I had also bought some mixed media miniature Christmas wreath ornaments last year and decided to utilize them at the four corners of the tape.  They came with adhesive backing so they were easy to adhere to the corners.

This picture took longer than usual to stitch as there were a lot of color changes within the stockings themselves and a lot of highlighting stitches, but was well worth the extra time it took to create it.

When the picture was finished I was very happy with the way it turned out. It would be perfect for the Christmas holiday season.  I hope you like it too.


Wednesday, December 05, 2018

A Little "Joy" Outside My House This Year


I know I've mentioned a billion times how much I love finding decorations during the holiday season that say "Joy."  It was my mother's name and every time I look at a "Joy" decoration I can't help but think about my beloved and beautiful mother.  She was a beautiful person inside and out and always brought such "joy" to everyone she met.

Well, during a recent shopping trip with hubby at a local home decor store we stumbled upon the "Joy" sign shown in the picture above.  It was gold and made of some kind of hard plastic with a Victorian type pattern cut onto it.  Gold, Victorian and "Joy" - seems like a perfect fit for me.

Unfortunately, it was large and I didn't have any place inside the house to hang it.  So, I walked away.

Well, to my surprise, hubby said, "Are you sure? It's really quite nice." He knows me too well and knows I might be thinking about it on the way home and decide I did have a place for it after all - which, of course, would require us to go back to the store.

So, I took a second look and "voila!" it dawned on me it would be perfect as an outside decoration for our farmer's porch.  It was quite festive and large enough to be seen from the street and would be a good compliment to my large artificial outdoor Christmas floral decoration, which is placed on the farmer's porch every holiday season.  I wrote about this on my Linda's blog in a post entitled, "I Can Do Better - My Xmas Evergreen Arrangement Decoration." Instructions for making one of your own are here.


It seems like every time we want to put up our outside Christmas decoration  it's freezing.  So, we try to do this ahead of time when it's a little warmer.  Well, the weekend after Thanksgiving the weather was predicted to be a little warmer so we decided to put up the outside decorations and started with our new "Joy" sign.

I was so pleased when I went down the driveway to see how it looked. It was perfect and could definitely be seen from the street. My mother would have loved it.


We used to hang a metal jingle bells candy cane decoration that was given to us years ago by a "dear" friend in the spot where we put the "Joy" sign so I had to find a new spot for that.

We always hang a smaller artificial evergreen wreath between our garage doors.  In looking at that wreath it dawned on me that it would make a perfect decoration for the center of that wreath so I fastened it to the wreath and hubby hanged it on the nail.  Perfect!


We took out the really big artificial wreaths that we always hang in the front of the house.  Usually they don't need to be fixed so we just hang them up.  This year I had to tweak the big bulbs a little as the heavy snow last year had weighed some of them down and loosened their attachment.  So, I tightened some of the balls and we hung them up.  They looked as good as new once again.

Even though they are 27 years old they're still "perfect." And, given they are 27 years old and still as good as new talk about a wise investment......haha Pretty soon their cost will be down to under $1.00...haha

If you want to read about these wreaths back in November of 2011 I wrote a Linda's Blog post entitled "20 Years Later and Still As Good As New!"


Last  but not least, we took out the front door Christmas hanging silk floral spray tower which I made in 2013.  I also wrote about it in a Linda's Blog post entitled" My New Front Door Christmas Hanging Silk Floral Spray Tower."

I was happy with the way our outside decorations came out.  We had a little "Joy" outside as well as inside of the house.  My Mother would be pleased.


Sunday, December 02, 2018

What To Do With All Those Beautiful Christmas Pins?


Over the years I've written many posts about my family's Christmas traditions and handmade Christmas decorations. One of my family's wonderful and sentimental traditions was started by my Dad a long time ago.

My Dad wanted to give "his girls" meaning my Mother, myself, and my sister something special for Christmas. Back then the term "his girls" did not imply the possessive, chauvinistic implications that it does today. To my Dad it was nothing more then a term of endearment. One that separated us from "his boys," my brothers.

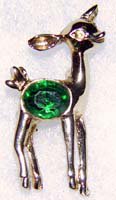
So my Dad decided to buy each of "his girls" a special Christmas pin to wear during the holidays. For my first pin he bought me the reindeer pin shown in the picture to the left.  I loved it.  He bought us pins the first year, and then the second, and so on and so on and so on.

My wonderful husband decided to carry my Dad's tradition on after he passed away. So, every year, for awhile, he gave me Christmas pins. Sometimes he couldn't decide which one he liked best so he'd give me two special Christmas pins. That was okay with me as I cherished each and every one of them.

Not only did my loving husband give me Christmas pins but he gave my mother some as well.  Needless to say, over time, both I and my mother accumulated a lot of Christmas pins.

When my mother passed away I inherited some of her Christmas pins.

Every year I take them all out and look at them. What always amazes me is how little they have changed in design from the first pin I received. And, believe it or not, I don't have any duplicates.

Also (and I know this will be hard to believe), I don't have any "dollies." So, a heartfelt thanks to you Dad for starting this tradition and a heartfelt and sentimental thanks to my husband for continuing his pin tradition.

Several weeks ago I was thinking about all my Christmas pins and thought it was a shame not to see all of them as they really are so pretty to look at - especially as a group.  I wanted to find some way of displaying them for the holiday season and wasn't sure how to accomplish this.


Well, it so happens that hubby and I were browsing through a new home decorations store nearby and I stumbled upon the felt balls wreath shown in the picture above.  I looked at it at first and walked away.  For some reason I turned around and went back to take another look at it.  It was a wreath made of red and white felt balls.  Then it dawned on me it might be a perfect way to display all my Christmas pins.  I could attach the pins to the felt. Hmmm........

So, I mentioned it to hubby knowing full well that he'd probably respond, "You need another Christmas decoration - you've got to be kidding!"  To my delight he said, "If you think it will work - go for it!" So, I bought it.


When I got home I opened the jewelry box that housed all my pins.  There were a lot of them, but I wasn't sure I had enough to cover the whole wreath.  So I took them all out of the jewelry box and started laying them on the wreath to see if I would have enough.


Turns out - I did! Yippee!

The problem was how to affix them to the wreath.  Should I use the closure on the back and just pin them to the felt balls or glue them.  I started pinning them to the felt but quickly realized this wasn't going to work.  They weren't laying right on the wreath and some were a little flimsy.  So, I decided to glue them using hot glue.


I started at the top with the "Joy" pin and the little "doggie" for my Mom and my baby "Bud" and just started gluing them one right after the other.


I glued and pinned down the right side....


Then across the bottom.....


And, finally up the left side and finishing back at the top, where I began......


The wreath came with a really flimsy red felt hanger that was sewn to a metal ring at the top of the wreath.  Since the wreath was quite heavy with all the pins attached I knew this hanger would easily come apart so I needed  to develop something stronger.  You couldn't hang the wreath from the metal ring at the top center of the wreath as it was too far into the middle of the top and wouldn't work for a wall attachment.

So, I decided to to remove the felt and add a heavy metal hanger of my own to the metal ring that I could bend in a way to make it easier to hang on the wall using 17 gauge wire.  With a pair of needle nose pliers I was able to twist and fasten the wire into a hanger into an "l" shape that would work.

When I removed the red felt hanger at the top I was left with a space that needed a bow of sorts.  At first I tried a wired ribbon bow but quickly decided it wasn't right for the wreath.  It was too big and detracted from the pins.

So, I took the red felt hanger piece and cut it in half and then fastened a simple bow out of the felt and glued the pieces together with hot glue.  I then hot glued the little felt bow to the top of the wreath.  Not only did it fill the space, but it didn't detract from the pins.  It was perfect!


I loved the way it turned out as did my darling hubby.  I could hardly wait for the Christmas decorating season to begin as  I have the perfect spot for my new decoration. I want to put this over my family room fireplace mantle.  Not only will it look perfect there but every time I look at it I'll remember my Dad and the wonderful tradition he started so many, many years ago for "his girls."

Well, Christmas decorating season finally began and I was excited to put up my wreath.  Unfortunately when hubby hung it from the hook we discovered the metal hanger I had fastened was not long enough for it to hang on the wall properly.  The bottom of the wreath was  bulging out from the wall.  Yikes!

So I took the red felt bow off, cut off the wire I had fastened to the center loop and constructed a new l-shaped wire hanger and glued it to the wreath with hot glue.  I also added more red felt in the back to hold the hanger securely and glued everything in place.  When I was confident the l-shaped hanger would work I added the red bow and we tried hanging it again.  Voila! It laid flat against the wall.


When I look at the wreath and all the different pins it takes me back to various holiday seasons over the years with my loved ones.  It's a wonderful and sentimental tradition.  Hopefully my blog post will inspire you or someone in your family to start a beautiful family tradition of your own.


In advance of the upcoming Christmas season I wish each and and every one of you a wonderful holiday season filled with beautiful memories and, if you're lucky, a sentimental decoration to remind you of your loved ones and happy times together.  Sentimental memories - what could be better than that.

© 2018  - 2023 Copyright Linda Walsh Originals - Written by Linda Walsh