Monday, October 22, 2012

The Needle Felted Flowers


In anticipation of my sister's visit and our needle felting adventure I had decided to buy some of the Clover needle felting applique molds I had previously seen. 

While my sister was working on her free style needle felted landscape design I decided to try creating a pink rose (shown above) using the Clover Applique Mold, Rose Design (shown above).

The mold contained two large front and back sheets with instructions.  The two sheets looked a little cumbersome at first until I realized there were four different languages on each sheet.  So, I had to find the English section.  While I can understand the cost effectiveness of doing this it's not the most user friendly approach and makes the instructions seem way too complicated.

The instructions were of a text and pictorial nature and once I found the English version they were easy to follow.  They recommended in the instructions using the molds with the Clover Pen Style Needle Felting Tool (shown below) and either the Clover Felting Needle Mat Small or the Clover Felting Needle Mat Large.

I soon realized that some of the pieces of the the molds were pretty tiny so only the single felting needle or Clover Pen Style Needle Felting Tool would work. I had previously bought a large foam felting block but soon realized that the molds did work the best with the Clover Felting Needle Mat Large.

I had no problem putting the pink rose together except I quickly found out that the needles for the Clover Pen Style Needle Felting Tool break very, very easily. I ended up going through 8 needles before I was finished with all my flowers. If you're going to embark on a needle felting adventure be sure to buy lots, and lots of replacement needles as you are going to need them.

I was pleased with the way my pink rose came out but my sister thought it was boring (plus I had used up all the pink roving - bad sister!) so I decided to try a multi-colored purple rose next.


I was pleased with the way both of my roses came out and pleased with the Clover rose mold, despite the 2 page instructions.

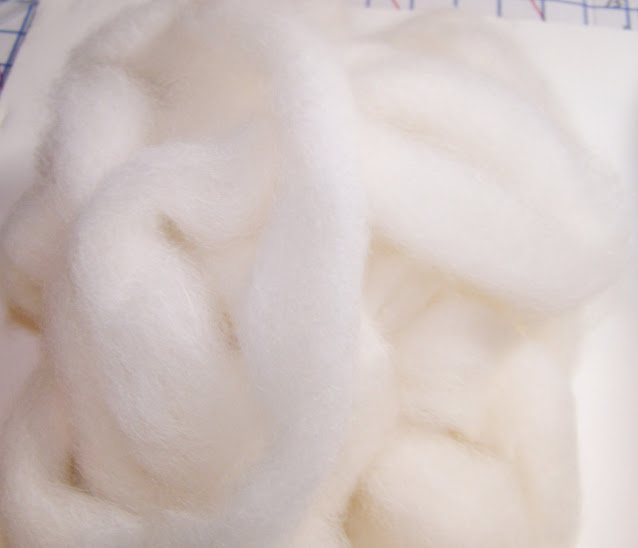
After my sister went home I decided to try creating a daisy using the Daisy Needle Felting Applique Mold By The Each I had bought and using the wonderful alpaca roving from her alpaca Sunflower.  Compared to some of the cheap roving I had been using some of which I really think was dyed raw mohair packaged as 100% wool roving Sunflower's white roving was exceptional.  It was beautifully white, fine, without bits and pieces of non-roving materials, and just plain exceptional to use.


The instructions and packaging of the Daisy Needle Felting Applique Mold By The Each were similar to the instructions and packaging of the Clover Applique Mold, Rose Design mentioned above so please see my comments there as they would be the same for the Clover daisy mold and all the rest of the Clover molds I bought.

I was pleased with the way the daisy came out and decided to use Sunflower's white roving to create a pure white rose.


Since the pure white rose had come out so well I decided to use Sunflower's white roving and some nice  burgundy colored roving I had previously bought to create a multi-colored burgundy and white rose.


My sister and I had some unfinished picture frames that I thought would look nice when finished with my felted flowers.

Since I was having such luck with the roving I was using and with the molds I decided to use a combination of the rose design petals upside down, the daisy design leaves, and the floret and berries berries to create a red Poinsettia.

I had to play around with the shapes a little and improvise here and there with my Poinsettia, but overall I was pleased with the way it turned out.


I decided to write separate blog posts for my flowers and tell you what I had to do, the problems I ran into, and what I was thinking as I went along. My posts will be following so please return to find out how I finished all of the above. I think you'll be a little surprised as to how they all came out.

If you get a chance please check out my sister's Rock Garden Alpacas Etsy Shop where she sells her alpaca fiber and handmade alpaca fiber products.

Copyright © 2004 - 2023 - All Rights Reserved - Written By Linda Walsh of Linda's Blog. Linda is a doll maker and doll pattern designer.

Needle Felted Church Shadow Box Picture Free E-Pattern


One of the free style needle felted pictures that I wanted to create a couple of years ago was a needle felted church scene that I made using the wonderful white roving that my sister had given me from her alpaca Sunflower.  She and her husband are the owners of Rock Garden Alpacas and Rock Garden Alpacas Fiber.

I thought it would be nice to create a mountain type church winter scene with a church, evening stars, mountain range, evergreen trees, and oak tree and then create a free e-pattern so you could create one of your own.


At the last minute I decided to add the Dimensions Needlecrafts Needle Felted Character Kit, Snowman that I had created and blogged about and reviewed in a post entitled Dimensions Needle Felted Snowman Kit as I thought he looked cute with the scene.

However, my free e-pattern does not include directions for making the Dimensions snowman. You will have to purchase the Dimensions Needlecrafts Needle Felted Character Kit, Snowman yourself if you want to add him to your needle felted picture.

My free e-pattern includes tips for needle felting, step-by-step instructions for completing my church winter scene picture (minus the snowman), a colored church picture instruction steps sheet so you can see what piece belongs to what step, a colored church picture layout sheet that is the actual size of your needle felted church picture, and pattern pieces.

Designer - Linda Walsh Originals

I hope you like my needle felted church picture and hope you decide to create one of your own.


To view and download my free e-book please CLICK HERE. You'll be brought to Google Drive where you can view my free e-book. Then just download my free .pdf e-book.

For more information on all my free e-patterns, e-printables and e-books please CLICK HERE.

Please respect My Terms of Use:  All patterns, e-patterns, printables, e-printables, e-books, graphics, tutorials, how-to's, articles and other e-products © 2004-2023 Linda Walsh Originals-Designs by Linda Walsh. All rights reserved. Commercial selling or reselling by any means prohibited without the written consent of Linda Walsh.

Patterns, e-patterns, printables, e-printables, e-books, graphics, tutorials, how-to's, articles and other e-products are for personal use only. You may not modify, photocopy, download, upload, post, transmit, display, perform, publish, license, reprint, create derivative works from, mass duplicate, re-sell, digitize, and reproduce in any other form (print, digital or electric) or commercially apply, embed, share, Email, or redistribution in any other means. Use of any of the above is prohibited without the written permission of Linda Walsh.

However, you may link to my website(s)/blog(s) and the individual page(s)/blog post(s) (including 1 picture) but do not copy, reprint or duplicate my website(s)/blog(s) or individual page(s)/post(s ) without my permission.

Items made from Linda Walsh Originals E-Patterns are intended for personal use for fun or small scale personal and business profit as long as you credit us with the design. Large scale commercial use (i.e. mass production) of items made from Linda Walsh Originals E-Patterns are by permission only.

Please see my Terms and Conditions for additional information.

Copyright © 2004 - 2023 - All Rights Reserved - Written By Linda Walsh of Linda Walsh Originals and Linda's Blog. Linda is a doll maker and doll pattern designer.

Saturday, October 20, 2012

The 1st Placemats I Ever Made


The other day when I posted about my Delightful Fall Decorations I failed to tell you that two of the pictures showed the very first place-mats I ever made.  I made them some 42+ years ago for my Mother for her fall decorating.

Back then I liked to decorate her dining room table with a Fall floral centerpiece.  I didn't have any money to buy something and they didn't quite have the kinds of silk floral back then as they do today so I fashioned something I may have gathered from the woods.  Pine-cones, bark, acorns, ferns, pine needles, etc.

Well, one year after Thanksgiving I decided a set of eight place-mats and a little runner would be nice and thought they would make a nice Christmas present.  So, I made them for her and gave them to her for Christmas.  Of course, she had to wait a year to use them.  So, what's a few months.....

I thought for sure my sister would notice the place-mats in the pictures. I know my Mother would have noticed.


They were my first attempt at sewing linens and I made them out of quilted fall fabrics. There were eight of them in a diagonal shape. I tried to get them to all be the same size, but some were a little bigger and some were a little smaller.


I put them out now with my Fall decorations as they are the perfect color for my dining room and because I know my mother would be pleased.

They All Have A Different Needle Felting Use!


In anticipation of my sister's visit for working on her websites and learning all we could about roving I decided to add to the tools and supplies I had from a few years ago when I had done a small amount of needle felting on a penny rug picture.

If you don't know what needle felting is it is basically using a single or multiple needle tool to mesh the fibers of roving into itself to form an object or shape, mesh the roving into another piece of felted roving to create an object, or mesh the roving into a piece of wool felt to create an object or picture.

You can freely shape the roving yourself using needle felting tools or use needle felt molds or cookie cutters to shape the roving into the desired object.

In looking at needle felting it seemed like there were a lot of different tools and supplies needed to do needle felting. I wondered if I needed them all and soon found out I did as they all have a different use.

I already had a medium size Clover felting mat but wanted a larger one so I bought a Clover Felting Needle Mat Large.

What the mat does is it allows you to place a mold or felting surface on top of it and then felt the roving by using one of the different types of felting needles and just inserting the needle in and out until the roving is felted in a manner that is pleasing to you. It provides the hardness and resistance you need to mesh the roving either by itself or to felt the roving into a small felting surface without breaking your needles.

The felting mat is good for small molds and small felting surfaces. It is not good for larger felting surfaces. If you want to felt larger areas of roving or want to do some free style felting of pictures, etc. then you need to purchase a larger 8" by 9" felting foam mat like a Colonial Needle Felting Foam, 9 by 8 by 2-Inch, which is shown in the picture below:


What I discovered about this felting mat is that while it is big and allows you to cover a wider felting surface it isn't any where near as hard as the Clover Felting Needle Mat Large so you tend to leave a depression in the surface if you're punching hard, have been punching for a few days,  or you've used the same area over and over. If you're using this for molds and the surface has any kind of depression in it already it will affect the felting of your roving.

One of the most important things for felting is not only the quality of the roving, but the felting needles. When it comes to felting needles there are all sorts of different types - each with their own use. Here's what I discovered:

The first thing you need to understand about the felting needles is they are very, very, very sharp and can easily prick your finger drawing blood. As a result I would not recommend this as a craft for young children. If you prick your fingers the needles really HURT!

The Colonial Needle Felting Needle Tool II (which is shown in the picture below) is a great tool for felting large surfaces, for use with the Colonial Needle Needle Felting Foam (shown above) and for felting thick felted objects to other felting surfaces or to a any felting creations that you are backing with Nu-foam.

I found that despite the fact that you can reduce the needles down to one or two this tool wasn't as good for use with felting roving into small molds. It was just too cumbersome for me. Also, it wasn't as good for use with roving that you are trying to felt in your hands as the needles are really way too long and sharp and you can easily prick yourself. If you're going to use this tool be sure to buy plenty of replacement needles as the needles tend to break easily.


The felting needle that provides the most control and which you're less likely to prick yourself with is the purple or blue grip single felting needle. It's very easy to control but does require more work when felting a larger area. When felting a thick felted object to another felting surface or to a felting surface backed with Nu-foam it works the best of all the needles to achieve the result you want. Plus, this is the only type of felting needle that never broke on me.

I bought the Dimensions Needlecrafts Feltworks, Felting Needles & Foam Block, and is shown in the picture below:


You can also use the Colonial Needle Blue Grip Felting Needles, 36, 2-Pack which works just as well and are shown in the picture below:


I also like to use the Clover Pen Style Needle Felting Tool which can hold from one to three needles and is very easy to use and provides good control. However, the needles tend to bend or break easily with this tool especially if you're using molds for your roving. So, if you're going to use this tool be sure to buy plenty of needles.


I also like the Clover Felting Needle Tool (which is shown in the picture below) for punching free style felting pictures and for felting large surfaces. It has a protective retractable cover for the needles so it is not good for use with small molds.


If someone asked me what the weakest needle felting tool was I'd say hands down the needles.They just break way too easily. And, the replacement sets only come with 4 - 6 new needles which is no where near enough.

If you are going to create free style needle felted pictures that you are mounting to a cushioned surface then you need to buy Fairfield Poly-Fil Nu-Foam Pre-Cut, 14 by 14 by 2-Inch (which is shown in the picture below) and which I used for providing backing to some of my free style needle felted pictures. The beauty of the Nu-foam is that you can felt your roving into it so that it holds and you can remove it very easily if the thickness isn't right.


As far as molds are concerned there are lots of them out there. Some specifically for needle felting which work great. However, you can also use stainless steel cookie cutters as molds for your roving, like the ones shown below, and they work just as well.

If you are needle felting with a mold or cookie cutter you want to felt along the outside of the mold and work towards the center of the mold. The depth of the object is achieved based on the amount of roving you use. If the object is not as deep as you want just add more roving and felt it into the felted object you've already created.  If you want less depth or less length just keep needle felting the roving until you achieve the desired results.

As far as the roving is concerned there are lots of people selling roving so it is plentiful. However, there's really good roving and there's crap roving that is packaged as 100% wool roving and is nothing more than dyed raw mohair.  Definitely not roving. So, be careful when choosing your roving. You want roving that is free of debris, finely woven, and packaged in bulk (like the alpaca roving from Rock Garden Alpacas Fiber that is shown in the picture below:


Basically, felting is achieved by pushing the needle in and out of the roving at a straight angle whether it’s straight up and down or straight side to side. You keep doing this until your roving is the shape, size, or desired object you are striving for. The more you puncture the roving with the needle felting tool the more meshed the roving becomes. When to stop felting depends on your design and desired outcome.

Needle felting is a lot of fun. Just be sure to get the right tools for your needle felting needs as they all have a different use.

Just remember this is an art form so there is no right or wrong way. The idea is to have fun and let your imagination run wild. As they say, beauty is in the eye of the beholder or in this case, the eye of the needle felter.

Copyright © 2004 - 2023 - All Rights Reserved - Written By Linda Walsh of Linda Walsh Originals, Linda Walsh Originals E-Patterns, and Linda's Blog. Linda is a doll maker and doll pattern designer.

Friday, October 19, 2012

Free Style Needle Felted Pictures


After my sister of Rock Garden Alpacas and I had gotten a feel for the roving from our Dimensions snowman and penguin needle felting kits we decided we wanted to create some free style needle felted pictures. I decided on a conservative, less challenging winter snowman and tree scene (shown above) while she embarked on a daring landscape scene the beginnings of which is shown below.


After my sister's visit I decided to try my hand at some free style needle felted pictures.  I had wanted to create a flower garden using some of the flower molds I had bought and to create a Fall scene using the pumpkin cookie cutters I had bought.


So, I started with the flower garden first and some of the Clover needle felting applique molds I had bought.

Both my sister and I had heard that cookie cutters worked just as well as molds for felting so we bought a few of those. I wanted to try a pumpkin patch scene using the Wilton cookie cutter pumpkins that were part of the following Wilton Harvest 6 Piece Mini Metal Cookie Cutter Set:


I had decided for my third free style needle felting picture to not use any molds and just free hand design it.


Both my sister and I had thought that the free style needle felted pictures would be nice if we enclosed them in shadow boxes or shadow box trays so we bought some unfinished wood to do so.

I decided to write separate blog posts for each of my designs and tell you what I had to do, the problems I ran into, and what I was thinking as I went along. My posts will be following so please return to find out how I finished all of the above. I think you'll be a little surprised as to how they all came out.

My sister wanted her free style needle felting picture to be some sort of mountain scene with trees, sun, mountains, grasslands and a moose.  I'll leave that up to her to shown you how it came out and blog about what she had to do, the problems she ran into, and what she was thinking as she went along.  Maybe she'll even tell you about her adventures with the needle felted moose.


Thursday, October 18, 2012

What To Do With All The Roving?


Being a crafter and doll maker I'm fortunate now that my sister sells fiber (especially roving) from the alpacas on her Rock Garden Alpacas Farm. It's wonderful for my dolls hair, woodland dolls beards and mustaches and Santa's beards, hair and mustaches.

Last year she gave me several bags of her alpaca roving (shown below) as well as the raw fiber from two of her alpacas (shown in the two pictures above).


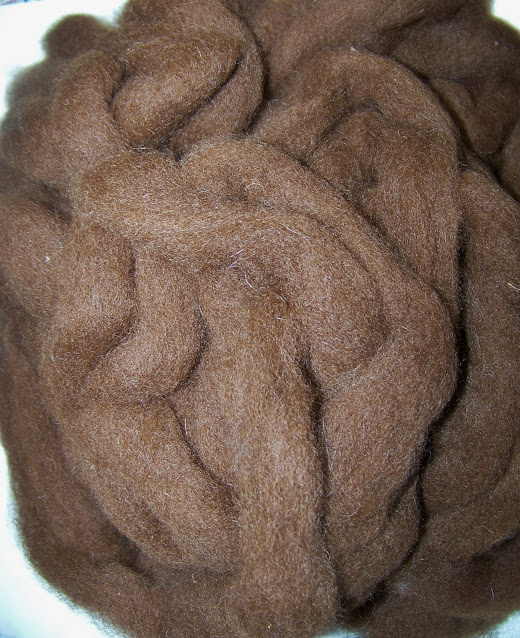
This year she gave me three huge piles of unbelievable roving from her alpacas. White, brown, and dark brown (shown in the three pictures below):


Last week I bought the following roving colors from Colonial Crafts.


So, what do you think I'm going to do with all this roving?  Hmmmm......

I have a few things in mind.  What would you do with it?


Dimensions Needle Felted Snowman Kit


When my sister came to visit one of our objectives was to learn as much as we could about needle felting and working with roving.

I had bought two mini roving kits from Dimensions. One Dimensions Needlecrafts Needle Felted Character Kit, Snowman for making a snowman (shown above) and Dimensions Needlecrafts Needle Felted Character Kit, Penguin for making a penguin (also shown above) that I thought would be a good introduction into working with the fiber so we started there.

We just wanted to get the feel of the fiber and how easy or hard it would be to work with before we embarked on our free style hand creations and working with the molds we had bought. I took the snowman and my sister took the penguin.

The snowman was a no felting mold necessary kit that came with the wool roving (white, black, orange, and blue), felting needle, felting mat, embroidery needle, thread and step-by-step instructions.  It called for twigs for arms which were not included.

The instructions were easy to follow and warned that the single felting needle was sharp, which it certainly was as evidenced by the two photo's below where it actually drew blood on my finger.  This is definitely not a kit or craft for small children.  The needles are just to sharp and when you prick yourself it really hurts.

Basically, the idea was to form three felted balls for the snowman and felt the three balls together.  To felt the balls you rolled the white roving into a small ball using the guide they provided for their size and kept inserting the single felting needle into the ball until it was firm, round and the size required.  This is accomplished by holding the roving in your fingers and inserting the single felting needle into the roving while trying not to prick yourself or inserting the roving into the felting while rolling the ball on the enclosed foam board.  Again, the objective is to not prick your fingers which is easier said than done.


To felt the balls together you keep inserting the single felting needle through the top ball into the ball below it until the roving is felted together and will not pull apart. It's quite amazing how strong the roving gets and how well weaved it is when you've done this.


The next step was to form the orange carrot nose using the roving provided and trying not to prick yourself. I ended up creating several noses before I got one small enough to fit my snowman's head. Then you position the nose on the face and using the single felting needle gently felt the nose into the white roving of the head.

After this they wanted you to thread the needle and embroidery floss to create the snowman's eyes and mouth. I opted instead to roll tiny balls of the black roving and then gently needle felt them into the head for his eyes and mouth. I thought this would look better than the thread.

Next they wanted you to roll the black felt between your fingers to create two tiny buttons for his chest and then needle felt them into the middle ball. I created three black balls for this and needle felted two into the middle ball for his chest and one in the center of the bottom ball.


The blue ear muffs came next. Again, you rolled the blue roving into a small ball the size shown on the snowman pattern and needle felted them until they were firm. I pricked my fingers several times doing this.

Once they were firm the instructions were to needle felt them into the sides of the head for the ear muffs.


Following this the instructions called for using the enclosed embroidery floss to create the ear muffs band.  I opted instead to roll and needle felt the blue roving until I got a flat band that was long enough for the band. Then I gently needle felted the ends of the band into the top sides of the ear muffs that I had already felted onto his head.

The pattern suggested using twigs for the arms and gluing them to the sides for arms. I opted to use small cinnamon sticks for my snowman's arms and glued them into the sides for arms.


I was pleased with how my needle felted snowman came out.  It didn't look exactly like the Dimensions picture, but it looked good none the less and I was happy with it.


Both my sister and I felt that the two Dimensions kits were a good introduction into needle felting, getting used to using the needle, and working with roving. Everything came with the kit so there was no need to buy anything else just to give needle felting a try.

As mentioned, my sister needle felted the penguin from the Dimensions Needlecrafts Needle Felted Character Kit, Penguin (also shown above) so she'll have to blog about her experience with that.

Please respect My Terms of Use:  All patterns, e-patterns, printables, e-printables, e-books, graphics, tutorials, how-to's, articles and other e-products © 2004-2023 Linda Walsh Originals-Designs by Linda Walsh. All rights reserved. Commercial selling or reselling by any means prohibited without the written consent of Linda Walsh.

Patterns, e-patterns, printables, e-printables, e-books, graphics, tutorials, how-to's, articles and other e-products are for personal use only. You may not modify, photocopy, download, upload, post, transmit, display, perform, publish, license, reprint, create derivative works from, mass duplicate, re-sell, digitize, and reproduce in any other form (print, digital or electric) or commercially apply, embed, share, Email, or redistribution in any other means. Use of any of the above is prohibited without the written permission of Linda Walsh.

However, you may link to my website(s)/blog(s) and the individual page(s)/blog post(s) (including 1 picture) but do not copy, reprint or duplicate my website(s)/blog(s) or individual page(s)/post(s ) without my permission.

Items made from Linda Walsh Originals E-Patterns are intended for personal use for fun or small scale personal and business profit as long as you credit us with the design. Large scale commercial use (i.e. mass production) of items made from Linda Walsh Originals E-Patterns are by permission only.

Please see my Terms and Conditions for additional information.

Copyright © 2004 - 2023 - All Rights Reserved - Written By Linda Walsh of Linda Walsh Originals and Linda's Blog. Linda is a doll maker and doll pattern designer.

Tuesday, October 16, 2012

Rock Garden Alpacas Fiber


If you love crafting with fiber, love using roving for dolls, love free style needle felting, love needle felting with penny rugs or wool felt, love needle felting accessories and decorations, and love spinning or dyeing roving you'll be happy to know that my sister and brother-in-laws alpaca farm, Rock Garden Alpacas is now selling their alpaca's fiber.  

Even though it's my baby sister and you might think I'm a little biased I have no problem whatsoever telling you that it's exceptional roving.  I've used it, I've loved using it, and I will continue to use it for my dolls and needle felt creations.


My sister and her husband established Rock Garden Alpacas in 2011 as a new and exciting adventure. They have full Peruvian, Full Accoyo and Perucoyo Huacaya Alpacas and are currently establishing their herd. They sell fiber and fiber products from their herd and their store will continue to grow as their herd does.

My sister's roving is of such fine quality and consistency that it is sought after my spinners and knitters.  If you'd like to read the customer reviews from her Etsy shop please click here.

If you'd like to learn more about her alpaca fiber products please click here for her RockGardenAlpacas Etsy shop.