Friday, August 13, 2010

Something Else I'd Like To Try - Wooden Quilt Pictures


I'm always on the look out for unique and unusual handmade gifts.  Some I find at local craft shows, some I find in craft magazines, and some I find on the Internet.

Well, years ago I saw a picture in a magazine for a wood quilt.  That's right - WOOD QUILT!

So, of course, this piqued my curiosity and I decided to visit their website.  Their website is entitled Uniquely Jewell - Wood Quilts by David and Joannie Wert - Hand Painted Traditional Quilt Designs Made From Wood.


If you don't know what wood quilts are - here's what their website said about them: 
A Wood Quilt??? What is that???  A wood quilt is a form of parquetry in which individual pieces of wood are cut, painted, stained and set one by one in a frame to form a picture or pattern. This is a truly unique art form which results in extremely beautiful objects enhanced even more by the grain and warmth of wood. All are hand cut and finished in the United States.
  
Well, their website had the most beautifully colored wood quilt pictures you'd ever want to see.  I just LOVED them and decided to buy one for me and two for my mother as Christmas presents. 

The one I bought for me is shown in the picture at the beginning of this post. The two I bought for my mother are shown in the picture above and to the right. I just loved the details of the quilts and the vivid colors. And, so did my mother. 

Well, when my mother passed away I ended up with her two small wood quilt pictures and decided to check out their website once again. 

To my dismay they're having a "Going Out Of Business" sale. 

What a shame. I hate when that happens. They do beautiful work and I, for one, will be displaying my wood quilt and my mother's two wood quilts proudly for some time to come.  

I'd love to try making one, but they look like they'd be a lot of work to do. Between the design, the painting, and the precision cutting.... 

Maybe I can convince my younger brother to try and make one. That is, if I can get him away from his scroll saw. 

Tuesday, August 10, 2010

More Woodcrafts Gifts From My Younger Brother - Scroll Saw Pictures


I know I've mentioned many times about my younger brother and his amazing workshop.


Well, it seems, my younger brother has decided that scrolling and scroll saw pictures is his calling. He fell in LOVE with his scroll saw over a year ago and just can't stop making gifts for everyone.  And, well, I guess I'm to blame for that!

You see, while shopping for Christmas gifts two years ago at a local craft show I wandered into a booth of handmade woodland scroll saw pictures and immediately fell in love with them.  They were exquisite and I knew my younger brother would LOVE one.  So, I bought one for him.

Well, I have to tell you that my brother absolutely loved it.  He was enthralled with how the woodcutter had used the scroll saw to create the picture and decided he wanted to learn how to do it himself.  And, well - learn he did!

He spent the better part of the past year creating scroll saw pictures, scroll saw gifts, etc.  Has he perfected his technique?  Absolutely.  And, we have all benefited from his new found love of scroll saw pictures.  Absolutely.  Everyone got them as presents for the past holiday season.

Now I'm not complaining.  I just LOVE getting handmade wood crafts from my younger brother.  I'd fill up my house with them if I could - not that I have any more room for anything.

In any event, this past year for the holiday season he gave both hubby and I the scroll saw pictures that are shown in this post.   I, of course, absolutely LOVED both of them and have them displayed on my walls.

Am I to blame for my younger brothers actions!  Well, not all his actions!  His scroll saw obsession?  Well, I guess I'm guilty as charged.  I don't mind.  I love all his creations.

I wonder what this year's presents will be?

More scroll saw gifts?

Wouldn't make me mad! No sirree!!!!!

Sunday, August 08, 2010

The Little Potpourri Sachet Baskets


I never throw anything away and I'm always looking for way to use left over scraps of fabric and left over potpourri.  My recent post entitled "What To Do With Old Potpourri - Re-purpose It!" reminded me of some little potpourri sachet baskets that I had made years ago.

I had seen little sachet bags at various craft shows and in various craft magazines for years and thought maybe I should use some of my old fabric scraps, some of my little baskets and some of my left over cinnamon sticks or other potpourri sticks to make little potpourri sachets in baskets.   They might be cute. If they were little you could put them just about anywhere in the house as a decoration.

So, I gathered a bunch of miniature baskets, scrap material, and small potpourri sticks as decorations.  I cut the scrap material into 4 1/2" wide by 10" long rectangles for the bags.  I wanted the bags long enough so that I could fold them into themselves to create lined bags that I could then fill with polyfil and then glue to the inside of the baskets.  So, I made enough so as to fit into the little baskets I had selected.

I also cut a bunch of coordinating strips of fabric that I could fasten into bows - each 8" long by 3/4" wide and use these as decorations on the baskets.  Each bag would have a small cinnamon stick or other potpourri stick attached to it for just a small hint of potpourri. 

Some of the baskets with individual bags are shown in the picture above.  The picture below shows a large basket that I filled with 4 bags - each with its own potpourri stick.


I was happy with the way my little potpourri baskets had turned out and gave a couple to my Mom and then placed the rest around the house for decoration. 


How To Make Little Sachet Baskets For Home Decor Free E-Book


Since I had just finished my Linda's Blog post on the little sachet baskets I had made I thought you might enjoy a step-by-step "How-to" on how to make one of your own.

My pattern and instructions for making the little sachet basket shown in the picture above follow.

Supplies Needed

Package of 1" Long Cinnamon Sticks
Miniature 4" Round Basket (With or Without Handles)
Four Scraps of Fabric - 4 1/2" wide by 10" long
Ten Strips of Scrap Fabric - 8" long by 3/4" wide each
Polyfil
DMC Embroidery Floss
Dual Temperature Glue Gun
Glue Sticks

Instructions - Updated March 2015

(Note - These instructions are for ADULT use only as they require the use of a hot glue gun. Always use caution when working with any kind of hot glue gun.)

1. Cut ten strips of coordinating strips of fabric - each 8" long by 3/4" wide and setaside.

2. Cut the four scrap material pieces into 4 1/2" wide by 10" long rectangles for the bags according to the Sachet Lined Bag Pattern shown below. The bags should be long enough so that you can fold them in half into themselves to create lined bags.


3. With RST (Right Sides Together) and using a 1/4" seam allowance stitch each bag down one of the 10" long sides, across the 4 1/2" wide side and up the remaining 10" long side. Leave the remaining 4 1/2" wide side open for turning.

4. Turn the bag right sides out and then fold the bag with wrong sides together in half along the fold in half line, as indicated in the pattern above. This will create a finished bag with a lining.

5. Add polyfil to within 1 1/2" of the finished top of the bag.

6. Sew a running stitch 1" down from the folded edge bag with the DMC embroidery floss. Gather the DMC floss tightly and then knot the DMC embroidery floss to secure.

7. Tie one of the scrap strips around the DMC embroidery floss, knot it to secure, and then tie it into a bow. To finish the bow clip the ends of the bow to form an upside down V.

8. Glue one of the 1" long cinnamon sticks to the knot of the bow using the low temperature of the dual temperature glue gun.

9. Follow steps 1-8 above for the remainder of the three bags.

10. Place each of the bags into the basket and using the low temperature of the dual temperature glue gun glue the bottom of the bag to the inside bottom of the basket to secure it.

11. Tie six of the scrap strips into small bows. To finish the bow clip the ends of the bow to form an upside down V. Glue three of these to the center front of the basket and three of these to the center back of the basket using the low temperature of the dual temperature glue gun. The three bows should be glued one on top of the other.

12. Congratulations - You're Done! Now make as many of the baskets as you would like to decorate around your house.

My "Linda's How-Do-I Series? How To Make A Little Sachet Basket" free e-book includes my Linda's Blog post and my instructions on how to make a little sachet basket of your own.


To view and download my free e-book please CLICK HERE. You'll be brought to Google Drive where you can view our free e-book. Then just download our free .pdf e-book by clicking on the down arrow in the top center.

For more information on all my free e-patterns, e-printables and e-books please CLICK HERE.


Please respect My Terms of Use:  All patterns, e-patterns, printables, e-printables, e-books, graphics, tutorials, how-to's, articles and other e-products © 2004-2023 Linda Walsh Originals-Designs by Linda Walsh. All rights reserved. Commercial selling or reselling by any means prohibited without the written consent of Linda Walsh.

Patterns, e-patterns, printables, e-printables, e-books, graphics, tutorials, how-to's, articles and other e-products are for personal use only. You may not modify, photocopy, download, upload, post, transmit, display, perform, publish, license, reprint, create derivative works from, mass duplicate, re-sell, digitize, and reproduce in any other form (print, digital or electric) or commercially apply, embed, share, Email, or redistribution in any other means. Use of any of the above is prohibited without the written permission of Linda Walsh.

However, you may link to my website(s)/blog(s) and the individual page(s)/blog post(s) (including 1 picture) but do not copy, reprint or duplicate my website(s)/blog(s) or individual page(s)/post(s ) without my permission.

Items made from Linda Walsh Originals E-Patterns are intended for personal use for fun or small scale personal and business profit as long as you credit us with the design. Large scale commercial use (i.e. mass production) of items made from Linda Walsh Originals E-Patterns are by permission only.

Please see my Terms and Conditions for additional information.

Copyright © 2004 - 2023 - All Rights Reserved - Written By Linda Walsh of Linda Walsh Originals and Linda's Blog. Linda is a doll maker and doll pattern designer.

Saturday, August 07, 2010

What To Do With Old Potpourri - Re-purpose It!


My granddaughters always said I had the best smelling bathrooms. "BEST" smelling not "WORST" smelling! The reason being that I love using potpourri in them.

However, potpourri doesn't last forever and you have to replace it with new potpourri.  Well, since I never like to get rid of anything that I think I can reuse again I saved it all in plastic resealable bags until I ran out of room in my storage area.  Well, instead of disposing of all the plastic bags I had saved . I decided I should repurpose the old potpourri!

What do I mean by re-purpose it? Well, that's when you take something that had one particular use and turn it into something else for another use.

In this instance I took some Christmas Eve Yankee Boxed Potpourri that contained large potpourri elements that I had bought at Yankee Candle and turned it into a potpourri basket that could be used to decorate my home all year or just at the holidays.

How did I do that?  Well, it's fairly simple to do.

You take an old wicker basket and place Spanish moss along the inside of the basket so as to cover any openings in the sides of the basket. In this case my wicker basket was a rather large one as I had a lot of this particular potpourri.

Then I started layering the potpourri elements by row and gluing them together using the low temperature setting of a dual temperature glue gun.  When I had fully filled the basket and was pleased with the results I glued the final row in place. 

If you don't have as much potpourri as I did then you would line the basket with Spanish moss to the bottom of the basket using the low temperature setting of a dual temperature glue gun.

Then, using the low temperature setting, you would glue your first row of potpourri elements to the green floral foam.  You would continue adding layers of potpourri elements and gluing them in place until you had completely filled the basket and were pleased with the results. 

The potpourri smell isn't there anymore, but the basket looks nice. What do you think?

Friday, August 06, 2010

An Obsession With Shoes and Socks!


I know that I've mentioned that my family tends to give handmade gifts during the holiday season. And, I, in particular, LOVE receiving them.

Well, I can't say that I don't like receiving store bought gifts - as I do. It's just that the handmade gifts have a little extra meaning associated with them.

In any event, besides an obsession with dolls, the Victorian era, floral arrangements, history, and genealogy I have an obsession with shoes and socks. Or, at least, my family thinks so.

Now I know what you're going to say, "Is she like Imelda Marcos and her obsession with shoes?" I can happily say, "No!" It's not that type of shoe.

It's not shoes for my feet that I'm obsessed with. It's miniature shoes!  I'm obsessed with socks for my feet!

As far as shoes are concerned, I collect all kinds of miniature shoes and have, I have to admit, quite a few of them. It's not totally my fault. I keep getting them as presents during the holiday season.  And, they're all so adorable, I just have to display them.

So, with this obsession in mind along with my Victorian era obsession, my brother and sister-in-law decided one Christmas to make and give me the large wooden Victorian shoe pictured at the beginning of this post. I, of course, absolutely LOVED it.


It's actually a shoe pedestal with a small wood table at the top. I decided that instead of putting it in my sun-room with a plant on top that I'd display it in my family room with one of my handmade dolls on top. I could leave it there all year and just change the doll with the seasons.

One of my Linda Walsh Originals doll pattern designs, "Swing Sweetly Annabelle", from "The Long Sleek Sitting Doll" series is currently sitting on top of my shoe.

She loves it there and isn't sure she's going to give up her seat for a Fall scarecrow. In fact, she's made it quite clear she thinks that she should stay right where she is forever. I don't know about that. We'll see.

As far as my obsession with socks for my feet is concerned I have to blame old age on that.  As a child I used to run around in bare feet.  Whether it was through the water in the ocean where we lived or through the woods where we later moved to- bare feet it was.  Bare feet in the house - bare feet to bed.

However, somewhere along the way my feet started getting cold.  My circulation is fine.  I just have cold feet and cold hands.  It's gotten to the point where I have to wear socks all the time.  In the house, in bed, with sandals, etc.

So, since I have to wear socks all the time - not knee socks - ankle socks or anklets - I might as well wear colorful ones.  In fact, the more colorful the better.

Now the reason why I have so many socks is because everyone keeps giving them to me as presents.  And, a girl can only wear so many socks.  Suffice to say, I won't ever run out of socks.

And, when they do wear out and I get a hole in my toes- well, they become socks for my dolls.  No need throwing a good sock away.  Re-purpose it into a sock for a doll.

Does that qualify as a re-purpose?  Hmmmm.....

It's no longer a sock for me, but a sock (or top of a sock) for a doll!  Re-purposed or recycled?  Hmmmm....

You can decide that.

So, do I have an obsession with shoes - I guess!  So, do I have an obsession with socks - I guess! Better add shoes and socks to my ever growing list of obsessions.

Thursday, August 05, 2010

Shadowbox Pictures For Fall Decorations and Gifts


If you've been following my Linda's Blog posts about family Christmas gifts you know that I just LOVE giving handmade gifts for the holiday season. And, you probably know that I love enclosing my punch needle and cross-stitch gifts in shadowboxes.

These days my younger brother is helping me make my shadowboxes as he has an unbelievable workshop with every tool you can imagine in it. There's no set-up time as every tool has its place. You just walk over and use it. How great is that? As someone who hates set-up time I love it.

In any event, before my brother set up his workshop I had a wonderful idea for creating some painted and stenciled shadowboxes that I could give as gifts during the upcoming holiday season.

I had a ton of rub-on stencils that I had bought during one of my many shopping trips and wanted to utilize them in some fashion. So, I thought that maybe a small painted wooden shadowbox with a stenciled picture might be nice and asked hubby what he thought.

Well, he thought it was a good idea so we set about making a bunch of 5"x5" shadowboxes and some 6"x9" shadowboxes. I think we made 28 in total for all four seasons. I was going to give some as gifts and use some as seasonal decorations.

So, we drew up a little plan that hubby could use for cutting the wood. We had decided that we would use 1/2"x1" pine wood for the sides and 1/2" thick pine boards for the centers. The sides would be painted and the centers would be stenciled and painted.

Hubby decided to use his router to create a 1/2" channel in the frames for the center blocks to rest on. We would use tiny brads to fasten the frames together and then fasten the center blocks to the frames.

I wanted to paint the frames different colors then the center blocks so hubby made the frames first and then I painted them. When all the frames were done I painted the center blocks and then we fastened the center blocks to the frames.

After the shadowboxes were painted and put together I added my rub-on stencils. I applied a brush on varnish to seal the wood and create a nice finish for the stencils.

Of course, since I never do anything in moderation they took us a few days from start to finish to complete them. However, when they were all done we were both pleased with the results.

Shown throughout this post are some of the painted and stenciled shadowbox pictures we made for the Fall, Halloween and Thanksgiving. The stencils shown were all from Provo Craft First Impressions.

Monday, August 02, 2010

Linda's How-Do-I Series? How To Make A Painted and Stenciled Terracotta Pot Decoration

Since I had just finished my Linda's Blog post on the painted and stenciled terracotta pots I had made I thought you might enjoy a step-by-step "How-to" on how to make one of your own.

My instructions on how to make painted and stenciled terracotta pots of your own are shown below.

How To Make A Painted and Stenciled Terracotta Pot Decoration


Supplies Needed

4"-5" Round Terracotta Pot (with or without a tray)
Patio Paint - 1 Bottle
Varnish - 1 Small Can
Provo Craft First Impressions Rub-On Stencils - 1 Each For The Border and Picture
Popsicle Sticks
Brush - 1
Potpourri - 1 Pkg

Instructions

1. Wipe the terracotta pot with a moist paper towel and then let dry.

2. Brush paint the terracotta pot with the Patio Paint inside and out and let dry. Do the same with the terracotta tray if you are using one.

3. Apply a second coat of the Patio Paint to the inside and outside of the terracotta pot and let dry.  Do the same with the terracotta tray if you are using one.

4.  Select the stencil you are going to use for the border at the top of the terracotta pot.  Cut enough of the stencil border to cover the top of the terracotta pot.

5.  Using the popsicle stick gently rub the stencil on to the top of the terracotta pot.

6.  Select the stencil you are going to use for the picture in the center of the pot.    Using the popsicle stick gently rub the stencil onto the center of the pot.

7.  When you are happy with the design and the stencils are adhered to the pot gently brush the entire pot with the varnish.  Do the same with the terracotta tray if you are using one.

8.  When the terracotta pot is completely dry add seasonal potpourri.

9.  Congratulations - You're Done! Now make as many of the painted and stenciled terracotta pots as you would like to decorate around your house.


I also created a free e-book .PDF for this as well.

To view and download my free e-book please CLICK HERE. You'll be brought to Google Drive where you can view our free e-book. Then just download our free .pdf e-book from the File menu in the upper left hand corner.

For more information on all my free e-patterns, e-printables and e-books please CLICK HERE.

Please respect My Terms of Use:  All patterns, e-patterns, printables, e-printables, e-books, graphics, tutorials, how-to's, articles and other e-products © 2004-2023 Linda Walsh Originals-Designs by Linda Walsh. All rights reserved. Commercial selling or reselling by any means prohibited without the written consent of Linda Walsh.

Patterns, e-patterns, printables, e-printables, e-books, graphics, tutorials, how-to's, articles and other e-products are for personal use only. You may not modify, photocopy, download, upload, post, transmit, display, perform, publish, license, reprint, create derivative works from, mass duplicate, re-sell, digitize, and reproduce in any other form (print, digital or electric) or commercially apply, embed, share, Email, or redistribution in any other means. Use of any of the above is prohibited without the written permission of Linda Walsh.

However, you may link to my website(s)/blog(s) and the individual page(s)/blog post(s) (including 1 picture) but do not copy, reprint or duplicate my website(s)/blog(s) or individual page(s)/post(s ) without my permission.

Items made from Linda Walsh Originals E-Patterns are intended for personal use for fun or small scale personal and business profit as long as you credit us with the design. Large scale commercial use (i.e. mass production) of items made from Linda Walsh Originals E-Patterns are by permission only.

Please see my Terms and Conditions for additional information.

Copyright © 2004 - 2023 - All Rights Reserved - Written By Linda Walsh of Linda Walsh Originals and Linda's Blog. Linda is a doll maker and doll pattern designer.

Sunday, August 01, 2010

A Little Pumpkin History!


For some reason I got to thinking about pumpkins the other day.

And, as you probably know - when I get to thinking - well, watch out! There may just be a history lesson coming.

Pumpkins are a big part of the Fall line-up. Whether they are used as food or used as decorations or carved for celebrations they have a big role. So, I got to thinking about pumpkins and the history of pumpkins. How long have they been around and what started the jack-o-lantern craze?

Artists and crafters have long had a fascination with pumpkins. The reason has to be because they are so versatile and no matter what type of arts & crafts you like to create - there is a pumpkin that can be made. They can be cute, delightful, and whimsical. Or, they can be downright scary and frightening. They can be wholesome or a little bit naughty. Kids love to draw them and carve them. I, of course, love to create pumpkin dolls and especially love to create custom pumpkin fabric.

My research tells me that pumpkins originated somewhere in Central America between 5,500 and 7,000 B.C. and have been used as a food staple ever since.

So, what exactly is a "pumpkin?"

Well, according to Wikipedia.com"Pumpkin is the name of a plant that refers to certain cultivars of squash, most commonly those of Cucurbita pepo, that are round, with smooth, slightly ribbed skin and deep yellow to orange coloration. The thick shell contains the seeds and pulp. Some exceptionally large cultivars of squash with similar appearance have also been derived from Cucurbita maxima. Specific cultivars of winter squash derived from other species, including C. argyrosperma, and C. moschata, are also sometimes called "pumpkin". In New Zealand and Australian English, the term "pumpkin" generally refers to the broader category called winter squash elsewhere.

Pumpkins, like other squash, are native to North America. Pumpkins are widely grown for commercial use, and are used both in food and recreation. Pumpkin pie, for instance, is a traditional part of Thanksgiving meals in the United States, although commercially canned pumpkin puree and pumpkin pie fillings are usually made from different kinds of winter squash than the pumpkins frequently carved as jack o'lanterns for decoration around Halloween.

Pumpkins, like other squash, are thought to have originated in North America. The oldest evidence, pumpkin-related seeds dating between 7000 and 5500 BC, were found in Mexico.

Since some squash share the same botanical classifications as pumpkins, the names are frequently used interchangeably. One often used botanical classification relies on the characteristics of the stems: pumpkin stems are more rigid, prickly, and angular (with an approximate five-degree angle) than squash stems, which are generally softer, more rounded, and more flared where joined to the fruit.

The color of pumpkins is derived from the orange pigments abundant in them. The main nutrients are lutein and both alpha and beta carotene, the latter of which generates vitamin A in the body.

In America the pilgrims learned about pumpkins from the Native American Indians who would cut the pumpkins into strips and then cook them over the fire. They called pumpkins "isquotersquash." Very quickly pumpkins were added to the diets of the pilgrims.

However, the pilgrims decided to cut the top of the pumpkin off and scoop out the seeds and then fill the pumpkin with honey, milk, and other spices and then baked it in hot coals. This concoction eventually became pumpkin pie as we know it today.

The pilgrims, in turn, brought pumpkin seeds back to their European countries where it became a popular part of the European diet.

In addition to use as a food staple, pumpkin shells were dried and cut into strips. Then the strips were weaved into mats.


For the Iroquois the pumpkin was grown together with corn and beans and the three became known as the "three sisters." As with many things there is a legend surrounding the "three sisters."

According to Iroquois legend, a pregnant woman who was living in the sky world wanted to have some bark of the root of the great tree that grew in the sky world. Her husband scraped the dirt away from the base of the tree to expose the roots and while doing so created a hole. After her husband had obtained the bark the woman leaned over and peered into the hole that had been created. She lost her balance and fell through the hole to the earth below and subsequently become the first human on earth.

She eventually gave birth to a daughter who grew up and and became pregnant herself with twins by the West Wind. Just before the twins were to be born they got into a fight in the womb about how they were going to be born. The left handed twin did not want to be born in the usual way and, instead, forced himself out through his mother's left armpit which subsequently killed her. The twins buried their mother and after doing so noticed that corn, beans and pumpkins sprouted from the spot where she was buried. The three later became the main food staple of the Iroquois.

Every Spring the Iroquois women would plant corn, bean, and pumpkin seeds together. They would dig holes and into each hole would put one corn seed, one bean seed, and one pumpkin seed along with a dead fish. The dead fish fertilized the ground while the corn stalk provided support for the bean vine to climb. The pumpkin plant provided ground cover to keep the weeds out and the roots of the bean added nutrients to the soil.

Eventually with the arrival of the Irish in the 19Th century the use of pumpkins for "jack-o-lanterns" was born. The Irish already had an ancient tradition of hollowing out the inside of turnips and placing lighted candles inside to scare off the evil spirits. When the Irish came to America, they discovered that the pumpkin was a much larger substitute for the turnip. If it's larger, it's scarier. If it's scarier it will ward off evil spirits.

So now we know about the history of the pumpkin. But, why are they called jack-o-lanterns? Well, it all started with a stingy Irishman (of course) named Jack who was a miserable old drunk. He like to play tricks on everyone including the Devil himself - which, of course, was very foolish. Well, he tricked the Devil into climbing up an apple tree and then placed crosses all around the base of the tree. The Devil couldn't get down from the tree due to the crosses so Jack made the Devil promise not to take his soul when he died. Jack removed the crosses and the Devil climbed down from the tree.

Years later, when Jack died he was told by St. Peter at the gates of heaven that he would not be let into heaven due to the life he had led on earth. Since the Devil had promised Jack he wouldn't take his soul Jack wasn't able to enter hell, either. So he was forced to roam the earth between heaven and hell in darkness with just a burning coal inside his turnip ( i.e. "Jack O'Lantern) to light the way for him.

I, personally, have made many pumpkin dolls and and various decorative crafts using my custom pumpkin fabric for my Linda Walsh Originals website.   All of my pumpkin designs and  handmade decorations made using my custom fabric designs are shown in the picture at the top of this post.

So, pumpkins have been around for a long time. They have become an intricate part of the Fall season and Halloween. I suspect that that they will continue to be a popular tradition of families and children for years to come and, as a result, popular among artists and crafters as well.

Saturday, July 31, 2010

A Gift from My Niece and A Graduation!


I think I've told you a couple of times (yeah, right - make that thousands of time) that I absolutely LOVE handmade gifts. And, I love when that gift is truly unique. 

Well, my recent post on my pressed flowers entitled " My Pressed Flower Pictures - Now That's A Great Idea!" reminded me of a gift that I received over a decade ago from my niece. 

Now given that I am extremely biased when it comes to my loved ones, but I think my niece, who just graduated from a very prestigious art school last month, is an extremely gifted and beautiful artist.  Beautiful with her art and beautiful inside and out.  I couldn't possibly love her more or be prouder of her, her art, and her accomplishments. 

My niece is a very talented and creative artist with an unbelievable imagination. Some of her unique and whimsical creations are of the type where you have to wonder exactly how she came up with that idea. 

Well, the gift that she gave me over a decade ago is shown in the picture at the beginning of this post and it was an amazing and unique gift. The picture doesn't really do it justice as you can't really see the vivid acrylic colors and the pressed flowers. 

I absolutely LOVE it because - well, my niece gave it to me for one thing - and because it combines her love of art with her love of nature and gardening.  And, I think you all know how I love combining ones interests into a single creation! 

The gift from my niece is hanging in my hall and is the first thing you see when you enter my home.  It's a beautiful creation from a loving niece, whom I could not be PROUDER of.    

CONGRATULATIONS GRADUATE!

Friday, July 16, 2010

All Those "Social" Websites? Who Are They?


Back in 2008 I wrote a post about all the social networking, news sharing, cataloging, social shopping, and bookmarking websites out there. Since then much has changed and social networking and social media has literally exploded online.  It's everywhere.

What hasn't changed is the Internet is still growing and adapting. What may have been in a few years, months, or even days ago might not be in now. Not only have all the social networking services, social news sharing services, social cataloging services, social shopping websites, and social bookmarking services websites exploded, but there are social media management tools now to help you manage all your social networking accounts.

While all the social media websites, applications, and services are all just a little different what they do have in common is they are basically social media type websites where you can interact with them and contribute to them in a various number of ways, either by joining their community, suggesting websites you like, sharing your lists and collections, sharing your likes and dislikes, rating various items, commenting on various things, blogging, sharing photo's or video's, sharing news stories, interacting with people who share similar interests, buying products or asking for suggestions as to what to buy, asking questions, looking for suggestions, sending a message, scheduling a get-together, or just telling them what is going on in your life.  You might be asking for advice, sharing some advice, asking where to go for advice, or trying to learn something. Just about anything and everything is handled via social media these days.

If you're unfamiliar with the terms social media, social bookmarking, social networking, social cataloging, social shopping, social news sharing, social network aggregators, or social media management systems and tools here's what they mean:

a) Social media are interactive websites and tools that use the internet to communicate and share information either using: text, audio, video, images, podcasts, blogs, forums, and other means of communicating.  Also known as user-generated content (UGC) websites.  According to Wikipedia, "Social media technologies take on many different forms including blogs, business networks, enterprise social networks, forums, microblogs, photo sharing, products/services review, social bookmarking, social gaming, social networks, video sharing, and virtual worlds."  For more information on social media please CLICK HERE.

b) Social bookmarking websites allow users to share, manage, search, and organize bookmarks of their favorite URL's. Sometimes they contain descriptions, comments, tags, keywords, and votes for or against. Sometimes the bookmarks are public or they have your restrictions on who may see your bookmarks. They may or may not have web feed capabilities, and other social networking features like groups, email capabilities, etc.

c) Social networking websites are usually groups of people who share common interests or activities. Usually they contain individual users profiles, social website links, email or instant messaging capabilities, blog capabilities, photo storage capabilities, etc. Usually there is a sharing of ideas, activities, events, and interests by each user. The focus is individual versus forums which would have a group focus. The social network's niche might be old friends, classmates, books read, music liked, interests, services offered, and more.  Social networking is accessible through desktops computers, laptops, tablets and mobile devices.

d) Social cataloging websites help users to catalog and share things owned or of interest to them, like: books, CDs, DVD's, recipes, photos, hobbies, crafts,  etc.

e) Social shopping and social commerce websites offer shopping and selling over the Internet in a social networking and information sharing setting.

f) Social News sharing services are websites where you can submit and share a news story and have the users of that website vote on it. Social news sharing websites may also be aggregator type news sites that gather and catalog articles by interest and then provide an RSS feed for those interests.

g) Social Network Aggregators are tools and services that collect all the information from multiple social networking services and gather it in one place for you.

h) Social Media Management Systems and Tools are websites, apps, and systems that allow you to easily manage your online social media presence or update and/or schedule posting to all your social media accounts from one application. 

The various social bookmarking, social networking, social news, social shopping and social cataloging websites are always evolving - even to the extent that it's difficult to tell some of them apart. The lines are blurring.  For sure - there are many of them, with many more to come as the trend towards connecting, communicating, and selling over the Internet continues to grow.

You see the buttons everywhere to share this URL, page, comment, or blog post on the various toolbars, blogs, websites, and social networking websites. But, who are all these social networking services, social news sharing services, social cataloging, social shopping, and social bookmarking service websites? Here's a summary of some of the more popular services:

Thursday, July 01, 2010

My Pressed Flower Pictures - Now That's A Great Idea!


I'm always looking for something different to make or give as a gift.  For me there is nothing as wonderful as receiving a handmade gift from someone.

I love receiving them and I cherish and retain all of the handmade gifts I have ever received.

Now you might be wondering "cherish and retain" - what exactly does she mean by that?  Doesn't she throw anything away?  She can't possibly keep everything she has received for decades on end?  Or, can she?

Well, no - I'm not a hoarder, and yes - I don't throw away handmade gifts.  I might not be displaying all of them, but those that aren't on display are safely packed away.  And, yes I still have all of them.

As you know I LOVE dolls, but I also LOVE flowers, flower arrangements and silk floral arrangements.  Well, I've  always loved to garden and one summer I decided that I would love to have a fresh flower arrangement inside everyday so I could really appreciate the beauty of some of the flowers - like the blue iris, peonies, dahlias, etc.  So, every couple of days I changed the cut flowers in the vase I had in my kitchen.  Unfortunately, hubby has allergies and the cut flowers weren't exactly helping them.  So, I had to stop bringing them indoors and had to be happy just looking at them outside.

Well, as you probably can imagine,  I was only happy doing that for a short period of time.  Then I decided that maybe I should try drying them so I could have them as dried floral arrangements.  So, I picked the flowers when they were in full bloom, bunched them together with elastic bands, and hung them upside down on coat hangers from the rafters in my basement.  Unfortunately, to my dismay, most of the natural flowers did not dry well and, well, there was a moth problem.  So, I stopped doing that.

Of course, I wasn't happy that didn't work out and decided that I could preserve my beautiful flowers with their colors intact by pressing them.

I decided that the old, fat yellow page telephone books would be the perfect way to press the flower heads and leaves.  They had hundreds of pages and I could press multiple numbers of flower heads within groups of pages and when done transfer them to a notebook for storing.  I would use paper towels to absorb the moisture and be able to use the yellow pages over and over.  I would use bricks to weight down the pages so the flowers would be pressed correctly.

So, I opened the yellow pages to the back of the book and put a piece of paper towel down on the page and then added some of my flowers.  I added another paper towel over them and them several pages of the yellow pages on top of that.  Then I added another paper towel, some more of my flowers, another paper towel on top of that and then more pages of the yellow pages.  I continued in this manner until the yellow page book was filled up. Then I placed a brick or two on the top of the yellow pages to weight it down.

As with everything I do, nothing in moderation, I ended up with many yellow pages with bricks on them in my basement for a couple of months. When the flower heads were done I transferred them to three ring binders with individual construction paper pages that had clear plastic covers. I was hoping that would preserve my pressed flowers for awhile.  Of course, by the time I was done transferring everything I had many, many three ring binders full of pressed flower heads and leaves.

I had bought a couple of finished boxes that had picture inserts on the covers and thought they might make wonderful pressed flower gifts during the holiday season.  So, I made 6 pressed flower boxes like those shown in the picture to the left and gave them to my mother, sister, and sisters-in-law that Christmas.

I had also decided that I wanted to make pressed flower pictures that I could hang in my house and also give as gifts.

I had an idea for my younger brother that would be 4 individual pictures hung in a square matrix pattern with each picture representing a different season - Spring, Summer, Winter, and Fall.  I had been collecting the pressed flowers from the Spring until the Fall so I had flowers for just about every season.  I had also cut and pressed some of the white pine, evergreen, and spruce tree branches so I could use those for my Winter season.

I decided to use 11"x14" pine frames for the matrix pictures with double matted dark green mats.  The pressed flowers were going to be glued to 11"x14" press-board with the double mats providing enough space for the pressed flower heads and leaves.    When my four season pressed flower pictures were done I was pleased with the result.

I gave it to my brother for Christmas and he was very happy with it.  In fact, he still has some of the pressed flower pictures displayed in his house to this day.  A couple didn't make it.  Some of the flowers lost their color - others turned brown.  But, some have retained their colors.

During this period I also decided that I wanted to give my Mother a present and thought a pressed flower wreath might make a wonderful present.  Her favorite color was blue so I chose a gold frame with a light blue double mat and different blue and white pressed flowers.
I decided to use some pretty printed paper I had bought for the backdrop and placed it on top of my press-board.  I glued the pressed flowers to it in a circle and added a small ribbon bow to the top.  I gave my mother the pressed flower wreath shown in the picture to the left and she loved it.  In fact, it moved from house to house with her and hung in her home until she passed away this winter.  It now hangs in my hall.

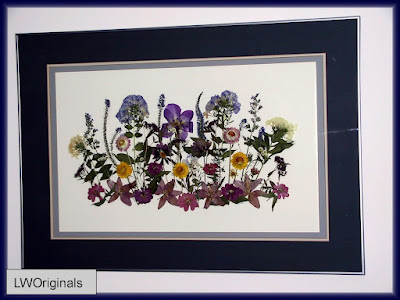
I also decided that I wanted a LARGE pressed flower picture for my master bedroom to hang over the bed and chose a dark blue double mat for it.  I used a combination of hydrangea's, iris, daisy's, mums, and various other flower heads and leaves for the picture.  I was very happy with the way it turned out.

This pressed flower picture is shown in the picture to the right.  It's still hanging in my master bedroom, but, sadly, the flowers are now fading.  So, it needs to be replaced.  Unfortunately, I don't have any pressed flowers left anymore so I can't replace it with a similar picture.  I've decided, however, to replace it with a large Victorian cross-stitch picture.

One of my favorite pressed flower pictures is the one shown at the beginning of this post.  It hangs in my hall and was done in a combination of dark blue and white flowers.  Unlike some of the other pressed flower pictures that have faded or turned brown it still retains its beautiful blue colors.  I don't know why it has been so wonderfully preserved, but it has.

I thoroughly enjoyed making my pressed flowers and have enjoyed seeing how well they have stood up over time. Not only have I been able to enjoy them all these years, but the recipients of the gifts have been able to enjoy them as well. Were the pressed flowers a good idea? I think so.

Copyright © 2004 - 2023 - All Rights Reserved - Designed and Written By Linda Walsh