

As you know, I have been having a delightful time experimenting with glass vases and bottles for the past few months.
Some of the bottles I decided to embellish were small 4" - 6" clear bottles from my crafts stash.
The four bottles shown in the collage picture above will either remain as mixed media embellished bottles or end up with embellished paper flowers in them. I haven't decided as of yet.

I decided I wanted my bottles to not only be Victorian in nature but "pretty." A combination of Victorian, creative embroidery embellishments, collage, and paper-clay stamped images. In other words, a real mixture of "prettiness"....
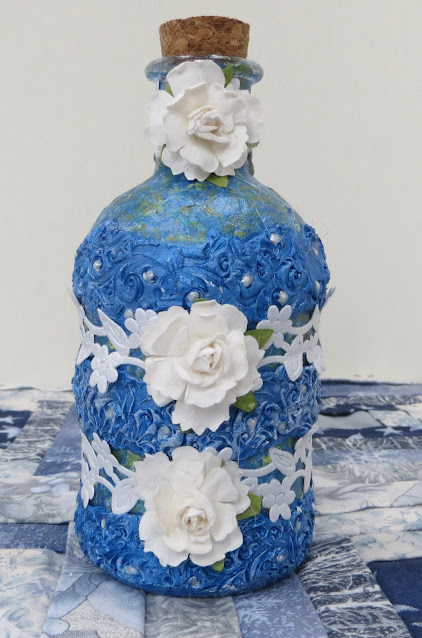
In keeping with the Victorian, creative embroidery embellishments and paper-clay theme I decided to add three paper-clay evenly spaced wide strips that I could stamp with a Victorian flower motif. After the paper-clay was stamped and dry I painted it with a metallic royal blue paint and then brushed it with white acrylic paint. Finally, I added shiny white puffy paint dots throughout the Victorian flower motifs.
After all of this was dry I sealed the whole bottle with a glazing medium.

When the glazing medium was dry I decided to add three strips of white floral ribbon trim around the the top of the bottle and around the two areas between my paper-clay strips.

Once this was all in place I added three 1" paper roses to the top, middle, and bottom of the bottle over the white floral ribbon strips.
In looking at the bottle I have to say it is definitely "pretty."

For the second vase in this group I decided to change the embellishments just a little. For this one I wanted to add a small lace embellishment from my creative embroidery stash.
For the bottle above first I added old book page collage papers to it. Then I painted it with black acrylic paint and added a sponge paint combination of metallic royal blue paint, metallic dark blue paint, metallic green paint, and white acrylic paint. This time, once the sponge painting was dry I sealed it with a glazing medium.

Once the paints were dry I glued the lace creative embroidery embellishment to the top center of the bottle. Then I added splashes of thin layers of paper-clay to the edges of the lace and throughout the bottle until I had a pattern that was pleasing to my eye.
I stamped all the paper-clay sections and then painted them with a metallic white paint. This time I did not seal the paper-clay splashes with a glazing medium as I didn't want this to ruin my creative embroidery lace embellishment.
I wrapped a sheer light green 1" ribbon around the top of the bottle and tied it in a bow.

The final touch was to add clear white glitter paint to the middle of all the flowers on the creative embroidery lace embellishment and to several sections of the paper-clay splashes.
I was happy with the way this bottle came out. It, too, is certainly "pretty."

For the third vase in this group I wanted to add paper-clay embellishments is a haphazard type pattern as well as creative embroidery embellishment ribbon trim.
So, first I added old book page collage papers to it. Then I painted it with black acrylic paint and added a sponge paint combination of metallic royal blue paint, metallic dark blue paint, metallic green paint, metallic red paint and white acrylic paint. This time, once again, when the sponge painting was dry I sealed it with a glazing medium.

Once everything was dry I added two thin layers of paper-clay around the bottom of the bottle and then along the top of the bottle in a small octopus type pattern until I had a pattern that was pleasing to my eye. I stamped all the thin layer of paper-clay with a Victorian stamp design and then brushed them with white acrylic paint. Finally, I added shiny white puffy paint dots throughout the Victorian flower motifs on the top of the bottle.

I glued the lace creative embroidery embellishment ribbon trim in a wave pattern around the middle of the bottle and around the top of the bottle.
I have to say this bottle, too, is definitely "pretty."

For the fourth vase in this group I decided to change the embellishments just a little. For this one I wanted to add metallic teal blue stretch ribbon, lace trim and some beautiful creative embroidery flower trim from my creative embroidery stash to this bottle.

For the bottle above first I added old book page collage papers to it. Then I painted it with black acrylic paint and added a sponge paint combination of metallic royal blue paint, metallic dark blue paint, metallic green paint, metallic purple paint, and white acrylic paint. Once the sponge painting was dry I sealed it with a glazing medium.
Once everything was dry I glue a piece of lace trim around the center of the bottle. I was adding this lace trim to supply texture to the center of the bottle after I had painted it. Then I added a thin strip of paper-clay around the top edge of the lace and then I added a thin strip of paper-clay to the bottom edge of the lace. I stamped the paper-clay with a Victorian stamp design, painted the paper-clay and lace with a metallic dark blue paint and then brushed it with white acrylic paint.

Once the paints were dry I added white dots along the row of circles in the middle of the lace with white puffy paint. Then I glued the creative embroidery flower trim just below the top edge of the paper-clay strip in the middle of the bottle and just above the bottom of the edge of the paper-clay strip in the middle of the bottle. I also glued some of the creative embroidery ribbon trim around the top of the bottle.

I cut a small piece of the metallic teal blue stretch ribbon, tied it in a bow and then glued it to the middle of the paper-clay strip around the middle of the bottle. Then I tied a piece of the metallic teal blue stretch ribbon around the top edge of the bottle and tied it in a bow.
I was happy with the way this bottle came out. It, too, was certainly "pretty."
I don't know whether I will keep all of these as embellished bottles or add embellished paper flowers to them so they function as vases. We'll see.......
Copyright © 2004 - 2023 - All Rights Reserved - Designed and Written By Linda Walsh
Please respect My Terms of Use: All patterns, e-patterns, printables, e-printables, e-books, graphics, tutorials, how-to's, articles and other e-products © 2004-2023 Linda Walsh Originals-Designs by Linda Walsh. All rights reserved. Commercial selling or reselling by any means prohibited without the written consent of Linda Walsh.
Patterns, e-patterns, printables, e-printables, e-books, graphics, tutorials, how-to's, articles and other e-products are for personal use only. You may not modify, photocopy, download, upload, post, transmit, display, perform, publish, license, reprint, create derivative works from, mass duplicate, re-sell, digitize, and reproduce in any other form (print, digital or electric) or commercially apply, embed, share, Email, or redistribution in any other means. Use of any of the above is prohibited without the written permission of Linda Walsh.
Patterns, e-patterns, printables, e-printables, e-books, graphics, tutorials, how-to's, articles and other e-products are for personal use only. You may not modify, photocopy, download, upload, post, transmit, display, perform, publish, license, reprint, create derivative works from, mass duplicate, re-sell, digitize, and reproduce in any other form (print, digital or electric) or commercially apply, embed, share, Email, or redistribution in any other means. Use of any of the above is prohibited without the written permission of Linda Walsh.
However, you may link to my website(s)/blog(s) and the individual page(s)/blog post(s) (including 1 picture) but do not copy, reprint or duplicate my website(s)/blog(s) or individual page(s)/post(s ) without my permission.
Items made from Linda Walsh Originals E-Patterns are intended for personal use for fun or small scale personal and business profit as long as you credit us with the design. Large scale commercial use (i.e. mass production) of items made from Linda Walsh Originals E-Patterns are by permission only.
Please see my Terms and Conditions for additional information.
Copyright © 2004 - 2023 - All Rights Reserved - Written By Linda Walsh of Linda Walsh Originals and Linda's Blog. Linda is a doll maker and doll pattern designer.
No comments:
Post a Comment