Friday, December 07, 2018

My "The Stockings Were Hung..." Cross-Stitch Picture


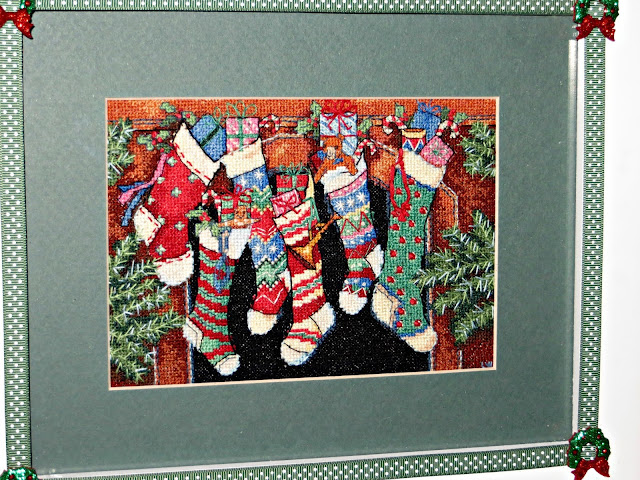
I don't think I've ever found a cross-stitch kit that I haven't loved - especially those regarding the Christmas holiday season.  I was drawn to the colorful fireplace stocking display picture in the Dimensions Gold Collection "The Stockings Were Hung...." the minute I saw it.  So, I decided to buy the kit and add it to my other Christmas cross-stitch decorations on my fireplace mantle.

Like the other Dimensions Gold Collection Petites kits I had bought the kit included the pattern, pre-sorted cotton thread, 18 count white cotton Aida, needle and instructions.

The "The Stockings Were Hung..." pattern uses full counted cross-stitch, french knots and outline stitching for emphasis and depth and this detailing really makes the picture stand out. It also varies the number of threads used with the various stitches to add to the depth emphasis. The design of this cross-stitch gives the finished picture a 3 dimensional aspect with the cross stitch, french knots and outlining being used for artistic effect.

The pattern came with starting and working order instructions as well as samples of the various stitches required and instructions for creating them, color coded keys (with code #'s, lengths, color names, and cross-stitch symbols) and a chart with color coded symbols. The colors and symbols on the keys and chart were easy to read and follow.


While I was very pleased with the end results of this design there are some things in the kit and in the instructions that can be improved upon.

Unlike the problem I had with the size and readability of some of the other cross-stitch charts in the kits I had bought this color chart was large enough and easy to follow.

As was the case with previous Dimensions kits the thread sorter was poorly designed. The embroidery threads were glued to two foam backed 6" by 1 1/4" strips of cardboard that had a picture of the color of the thread and it's number. In order to get to the threads you had to separate the foam back from the cardboard strip. Very quickly the threads separated from their section and then you no longer knew what the thread number was to tie to your symbols & legends.

As I have done with other cross-stitch kits I've completed I had to design my own thread color sorter and symbol key. I took a piece of thin cardboard and cut a long rectangular piece out to use as a thread sorter. I then punched holes in my cardboard strip in which to tie each of the different colors. Just below the hole I wrote the DMC floss # and just above the hole I added the respective color coded cross-stitch symbol. I then inserted the floss threads that went with that # and symbol through the hole and tied them in a loose knot. This kit could be much improved if different thread sorter with respective #'s and color coded symbols was provided.

Short of changing the thread sorter all together to make things even easier for the user the color symbol should at the very least have been shown on the thread sorter strip of cardboard as well. That way you would only need to use the thread sorter strip of cardboard to follow your chart.

I decided to use an 9" round embroidery frame to stitch this embroidery.  The white Aida wasn't big enough to fit into the frame so I sewed 4 muslin strips to the four sides of the Aida to keep the Aida tight and stretched so I could easily cross-stitch this design.

The kit did not include enough of the dark green #16880 embroidery floss.  I ran out before the pine needles were finished and had to use some of the embroidery floss I had from my stash.  I almost ran out of the rust #12338 embroidery floss, too, but was able to finish the area of the picture utilizing this color without having to dig into my stash.

The key split the strands of several of the colors into 1 strand for the highlighting.  I opted for using two strands of the highlighting colors for the pine needles, outside of the stockings, and fireplace sides as I thought they would make the picture stand out even more in the frame I was using.


The pattern included instructions for finishing the piece. I didn't need these as I knew what type of picture frame I was going to use, the  mat I was going to use and the way in which I wanted to finish the picture.

I tend to favor 1/4" foam backed adhesive mounting boards for the cross-stitch pictures I'm inserting into a finished picture frame. I had decided to use a 8" by 10" frame I had bought that had a white double depth mat with a 5" by 7" opening. I had already decided to remove the double depth mat and adhere the cross-stitch to a 1/4" foam backed 5" by 7" adhesive mounting board.  If I tried to use the double depth mat I wouldn't have been able to close the back of the frame as it wouldn't allow the cross-stitch picture on the 1/4" foam backed adhesive mounting board to be inserted into the slot on the back of the frame. So, instead, I opted to utilize a single 8" by 10" mat with a 5" by 7" opening which would provide enough room to insert the picture backing into the slots and allow for securing it to the frame.

I had chosen a white frame with green matting to finish it which I think really brought out the beautiful colors of the fireplace stockings scene.

I centered my cross-stitch picture on the 5" by 7" adhesive foam board and trimmed the excess white Aida cloth by 1/4" to 1/2" around.  The trimming allowed for me to tape the sides of the Aida cloth with masking tape to the back of the mat board I was using while providing enough room for the double folded corners to fit within the depth of the frame.

You can also finish the back of the cross-stitch by taping the center of each side with masking tape to the cardboard and then sewing four mitered corners into the Aida cloth so the picture is taunt to the cardboard.

Last year I had bought some decorative adhesive ribbons and hadn't had a chance to use them as of yet.  When looking at the white frame and the colorful stockings picture I thought one of the tapes I had bought would be perfect to decorate the four sides of this frame and really add to the holiday cheeriness of this picture.  So I cut four strips of the tape and adhered them to the frame.

I had also bought some mixed media miniature Christmas wreath ornaments last year and decided to utilize them at the four corners of the tape.  They came with adhesive backing so they were easy to adhere to the corners.

This picture took longer than usual to stitch as there were a lot of color changes within the stockings themselves and a lot of highlighting stitches, but was well worth the extra time it took to create it.

When the picture was finished I was very happy with the way it turned out. It would be perfect for the Christmas holiday season.  I hope you like it too.


Wednesday, December 05, 2018

A Little "Joy" Outside My House This Year


I know I've mentioned a billion times how much I love finding decorations during the holiday season that say "Joy."  It was my mother's name and every time I look at a "Joy" decoration I can't help but think about my beloved and beautiful mother.  She was a beautiful person inside and out and always brought such "joy" to everyone she met.

Well, during a recent shopping trip with hubby at a local home decor store we stumbled upon the "Joy" sign shown in the picture above.  It was gold and made of some kind of hard plastic with a Victorian type pattern cut onto it.  Gold, Victorian and "Joy" - seems like a perfect fit for me.

Unfortunately, it was large and I didn't have any place inside the house to hang it.  So, I walked away.

Well, to my surprise, hubby said, "Are you sure? It's really quite nice." He knows me too well and knows I might be thinking about it on the way home and decide I did have a place for it after all - which, of course, would require us to go back to the store.

So, I took a second look and "voila!" it dawned on me it would be perfect as an outside decoration for our farmer's porch.  It was quite festive and large enough to be seen from the street and would be a good compliment to my large artificial outdoor Christmas floral decoration, which is placed on the farmer's porch every holiday season.  I wrote about this on my Linda's blog in a post entitled, "I Can Do Better - My Xmas Evergreen Arrangement Decoration." Instructions for making one of your own are here.


It seems like every time we want to put up our outside Christmas decoration  it's freezing.  So, we try to do this ahead of time when it's a little warmer.  Well, the weekend after Thanksgiving the weather was predicted to be a little warmer so we decided to put up the outside decorations and started with our new "Joy" sign.

I was so pleased when I went down the driveway to see how it looked. It was perfect and could definitely be seen from the street. My mother would have loved it.


We used to hang a metal jingle bells candy cane decoration that was given to us years ago by a "dear" friend in the spot where we put the "Joy" sign so I had to find a new spot for that.

We always hang a smaller artificial evergreen wreath between our garage doors.  In looking at that wreath it dawned on me that it would make a perfect decoration for the center of that wreath so I fastened it to the wreath and hubby hanged it on the nail.  Perfect!


We took out the really big artificial wreaths that we always hang in the front of the house.  Usually they don't need to be fixed so we just hang them up.  This year I had to tweak the big bulbs a little as the heavy snow last year had weighed some of them down and loosened their attachment.  So, I tightened some of the balls and we hung them up.  They looked as good as new once again.

Even though they are 27 years old they're still "perfect." And, given they are 27 years old and still as good as new talk about a wise investment......haha Pretty soon their cost will be down to under $1.00...haha

If you want to read about these wreaths back in November of 2011 I wrote a Linda's Blog post entitled "20 Years Later and Still As Good As New!"


Last  but not least, we took out the front door Christmas hanging silk floral spray tower which I made in 2013.  I also wrote about it in a Linda's Blog post entitled" My New Front Door Christmas Hanging Silk Floral Spray Tower."

I was happy with the way our outside decorations came out.  We had a little "Joy" outside as well as inside of the house.  My Mother would be pleased.


Sunday, December 02, 2018

What To Do With All Those Beautiful Christmas Pins?


Over the years I've written many posts about my family's Christmas traditions and handmade Christmas decorations. One of my family's wonderful and sentimental traditions was started by my Dad a long time ago.

My Dad wanted to give "his girls" meaning my Mother, myself, and my sister something special for Christmas. Back then the term "his girls" did not imply the possessive, chauvinistic implications that it does today. To my Dad it was nothing more then a term of endearment. One that separated us from "his boys," my brothers.

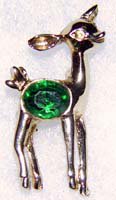
So my Dad decided to buy each of "his girls" a special Christmas pin to wear during the holidays. For my first pin he bought me the reindeer pin shown in the picture to the left.  I loved it.  He bought us pins the first year, and then the second, and so on and so on and so on.

My wonderful husband decided to carry my Dad's tradition on after he passed away. So, every year, for awhile, he gave me Christmas pins. Sometimes he couldn't decide which one he liked best so he'd give me two special Christmas pins. That was okay with me as I cherished each and every one of them.

Not only did my loving husband give me Christmas pins but he gave my mother some as well.  Needless to say, over time, both I and my mother accumulated a lot of Christmas pins.

When my mother passed away I inherited some of her Christmas pins.

Every year I take them all out and look at them. What always amazes me is how little they have changed in design from the first pin I received. And, believe it or not, I don't have any duplicates.

Also (and I know this will be hard to believe), I don't have any "dollies." So, a heartfelt thanks to you Dad for starting this tradition and a heartfelt and sentimental thanks to my husband for continuing his pin tradition.

Several weeks ago I was thinking about all my Christmas pins and thought it was a shame not to see all of them as they really are so pretty to look at - especially as a group.  I wanted to find some way of displaying them for the holiday season and wasn't sure how to accomplish this.


Well, it so happens that hubby and I were browsing through a new home decorations store nearby and I stumbled upon the felt balls wreath shown in the picture above.  I looked at it at first and walked away.  For some reason I turned around and went back to take another look at it.  It was a wreath made of red and white felt balls.  Then it dawned on me it might be a perfect way to display all my Christmas pins.  I could attach the pins to the felt. Hmmm........

So, I mentioned it to hubby knowing full well that he'd probably respond, "You need another Christmas decoration - you've got to be kidding!"  To my delight he said, "If you think it will work - go for it!" So, I bought it.


When I got home I opened the jewelry box that housed all my pins.  There were a lot of them, but I wasn't sure I had enough to cover the whole wreath.  So I took them all out of the jewelry box and started laying them on the wreath to see if I would have enough.


Turns out - I did! Yippee!

The problem was how to affix them to the wreath.  Should I use the closure on the back and just pin them to the felt balls or glue them.  I started pinning them to the felt but quickly realized this wasn't going to work.  They weren't laying right on the wreath and some were a little flimsy.  So, I decided to glue them using hot glue.


I started at the top with the "Joy" pin and the little "doggie" for my Mom and my baby "Bud" and just started gluing them one right after the other.


I glued and pinned down the right side....


Then across the bottom.....


And, finally up the left side and finishing back at the top, where I began......


The wreath came with a really flimsy red felt hanger that was sewn to a metal ring at the top of the wreath.  Since the wreath was quite heavy with all the pins attached I knew this hanger would easily come apart so I needed  to develop something stronger.  You couldn't hang the wreath from the metal ring at the top center of the wreath as it was too far into the middle of the top and wouldn't work for a wall attachment.

So, I decided to to remove the felt and add a heavy metal hanger of my own to the metal ring that I could bend in a way to make it easier to hang on the wall using 17 gauge wire.  With a pair of needle nose pliers I was able to twist and fasten the wire into a hanger into an "l" shape that would work.

When I removed the red felt hanger at the top I was left with a space that needed a bow of sorts.  At first I tried a wired ribbon bow but quickly decided it wasn't right for the wreath.  It was too big and detracted from the pins.

So, I took the red felt hanger piece and cut it in half and then fastened a simple bow out of the felt and glued the pieces together with hot glue.  I then hot glued the little felt bow to the top of the wreath.  Not only did it fill the space, but it didn't detract from the pins.  It was perfect!


I loved the way it turned out as did my darling hubby.  I could hardly wait for the Christmas decorating season to begin as  I have the perfect spot for my new decoration. I want to put this over my family room fireplace mantle.  Not only will it look perfect there but every time I look at it I'll remember my Dad and the wonderful tradition he started so many, many years ago for "his girls."

Well, Christmas decorating season finally began and I was excited to put up my wreath.  Unfortunately when hubby hung it from the hook we discovered the metal hanger I had fastened was not long enough for it to hang on the wall properly.  The bottom of the wreath was  bulging out from the wall.  Yikes!

So I took the red felt bow off, cut off the wire I had fastened to the center loop and constructed a new l-shaped wire hanger and glued it to the wreath with hot glue.  I also added more red felt in the back to hold the hanger securely and glued everything in place.  When I was confident the l-shaped hanger would work I added the red bow and we tried hanging it again.  Voila! It laid flat against the wall.


When I look at the wreath and all the different pins it takes me back to various holiday seasons over the years with my loved ones.  It's a wonderful and sentimental tradition.  Hopefully my blog post will inspire you or someone in your family to start a beautiful family tradition of your own.


In advance of the upcoming Christmas season I wish each and and every one of you a wonderful holiday season filled with beautiful memories and, if you're lucky, a sentimental decoration to remind you of your loved ones and happy times together.  Sentimental memories - what could be better than that.

© 2018  - 2023 Copyright Linda Walsh Originals - Written by Linda Walsh

Sunday, November 25, 2018

My Spoonflower Design Challenges Entries


I just love designing custom fabric designs.  Over the past few years I decided to enter some of my fabric designs into the Spoonflower Design Challenges and have entered 30 into their contests so far.  I didn't win any but I definitely had fun designing them.

I hope you like all of my designs.

 The 1950' S Design Challenge

 The 1960'S Design Challenge

 The 1920'S Design Challenge

The Victorian Era Design Challenge

Sisterhood Challenge

Food Frenzy Lake Coloring Challenge

 Cycling Challenge Design

 Animals By Air Challenge

 Elegant Holiday Limited Color Palette Design Challenge

 The Gardening Challenge

 Monochrome Blue Challenge

 Circles Are New Triangles Challenge

The Summer Cookout Challenge

Gingerbread Design

Year Of The Dog Victorian Animals

Polar Bear Victorian Animals Contest

Love Mom Tattoo Contest

Elmer You're A Star Contest

Spanish Designs Challenge Custom Fabric

Orchid and Navy Limited Color Design Challenge

 Victorian Burgundy Dresses Collage Fabric

 Spiders, Spider Webs, Bats and Jack O Lantern Fabric

 Four Alpacas Group Animals Fabric

 Alpacas Group White Fabric

 We Love Books Fabric

We Love Books Hawk Dolls Fabric

 Babies Splashing In The Rain Umbrellas, Rain Drops and Carriages Fabric

Babies In The Pumpkin Patch With Pumpkins and Stars

Quilt Patterns Fabric

© 2004 - 2023 Copyright Linda Walsh Originals - Fabric Designs By Linda Walsh.