
I love bunnies so much and love 'Patience" that I thought you'd love her, too.
So, I'd like to introduce "Patience - Is a Virtue.
Patience is a primitive bunny and is so happy-go-lucky that she has a hard time controlling herself.
She just hops from here to there without a care in the world.
Hop, hop, hop! Down the lane she goes.
Hop, hop, hop!
La dee da!
La dee da!
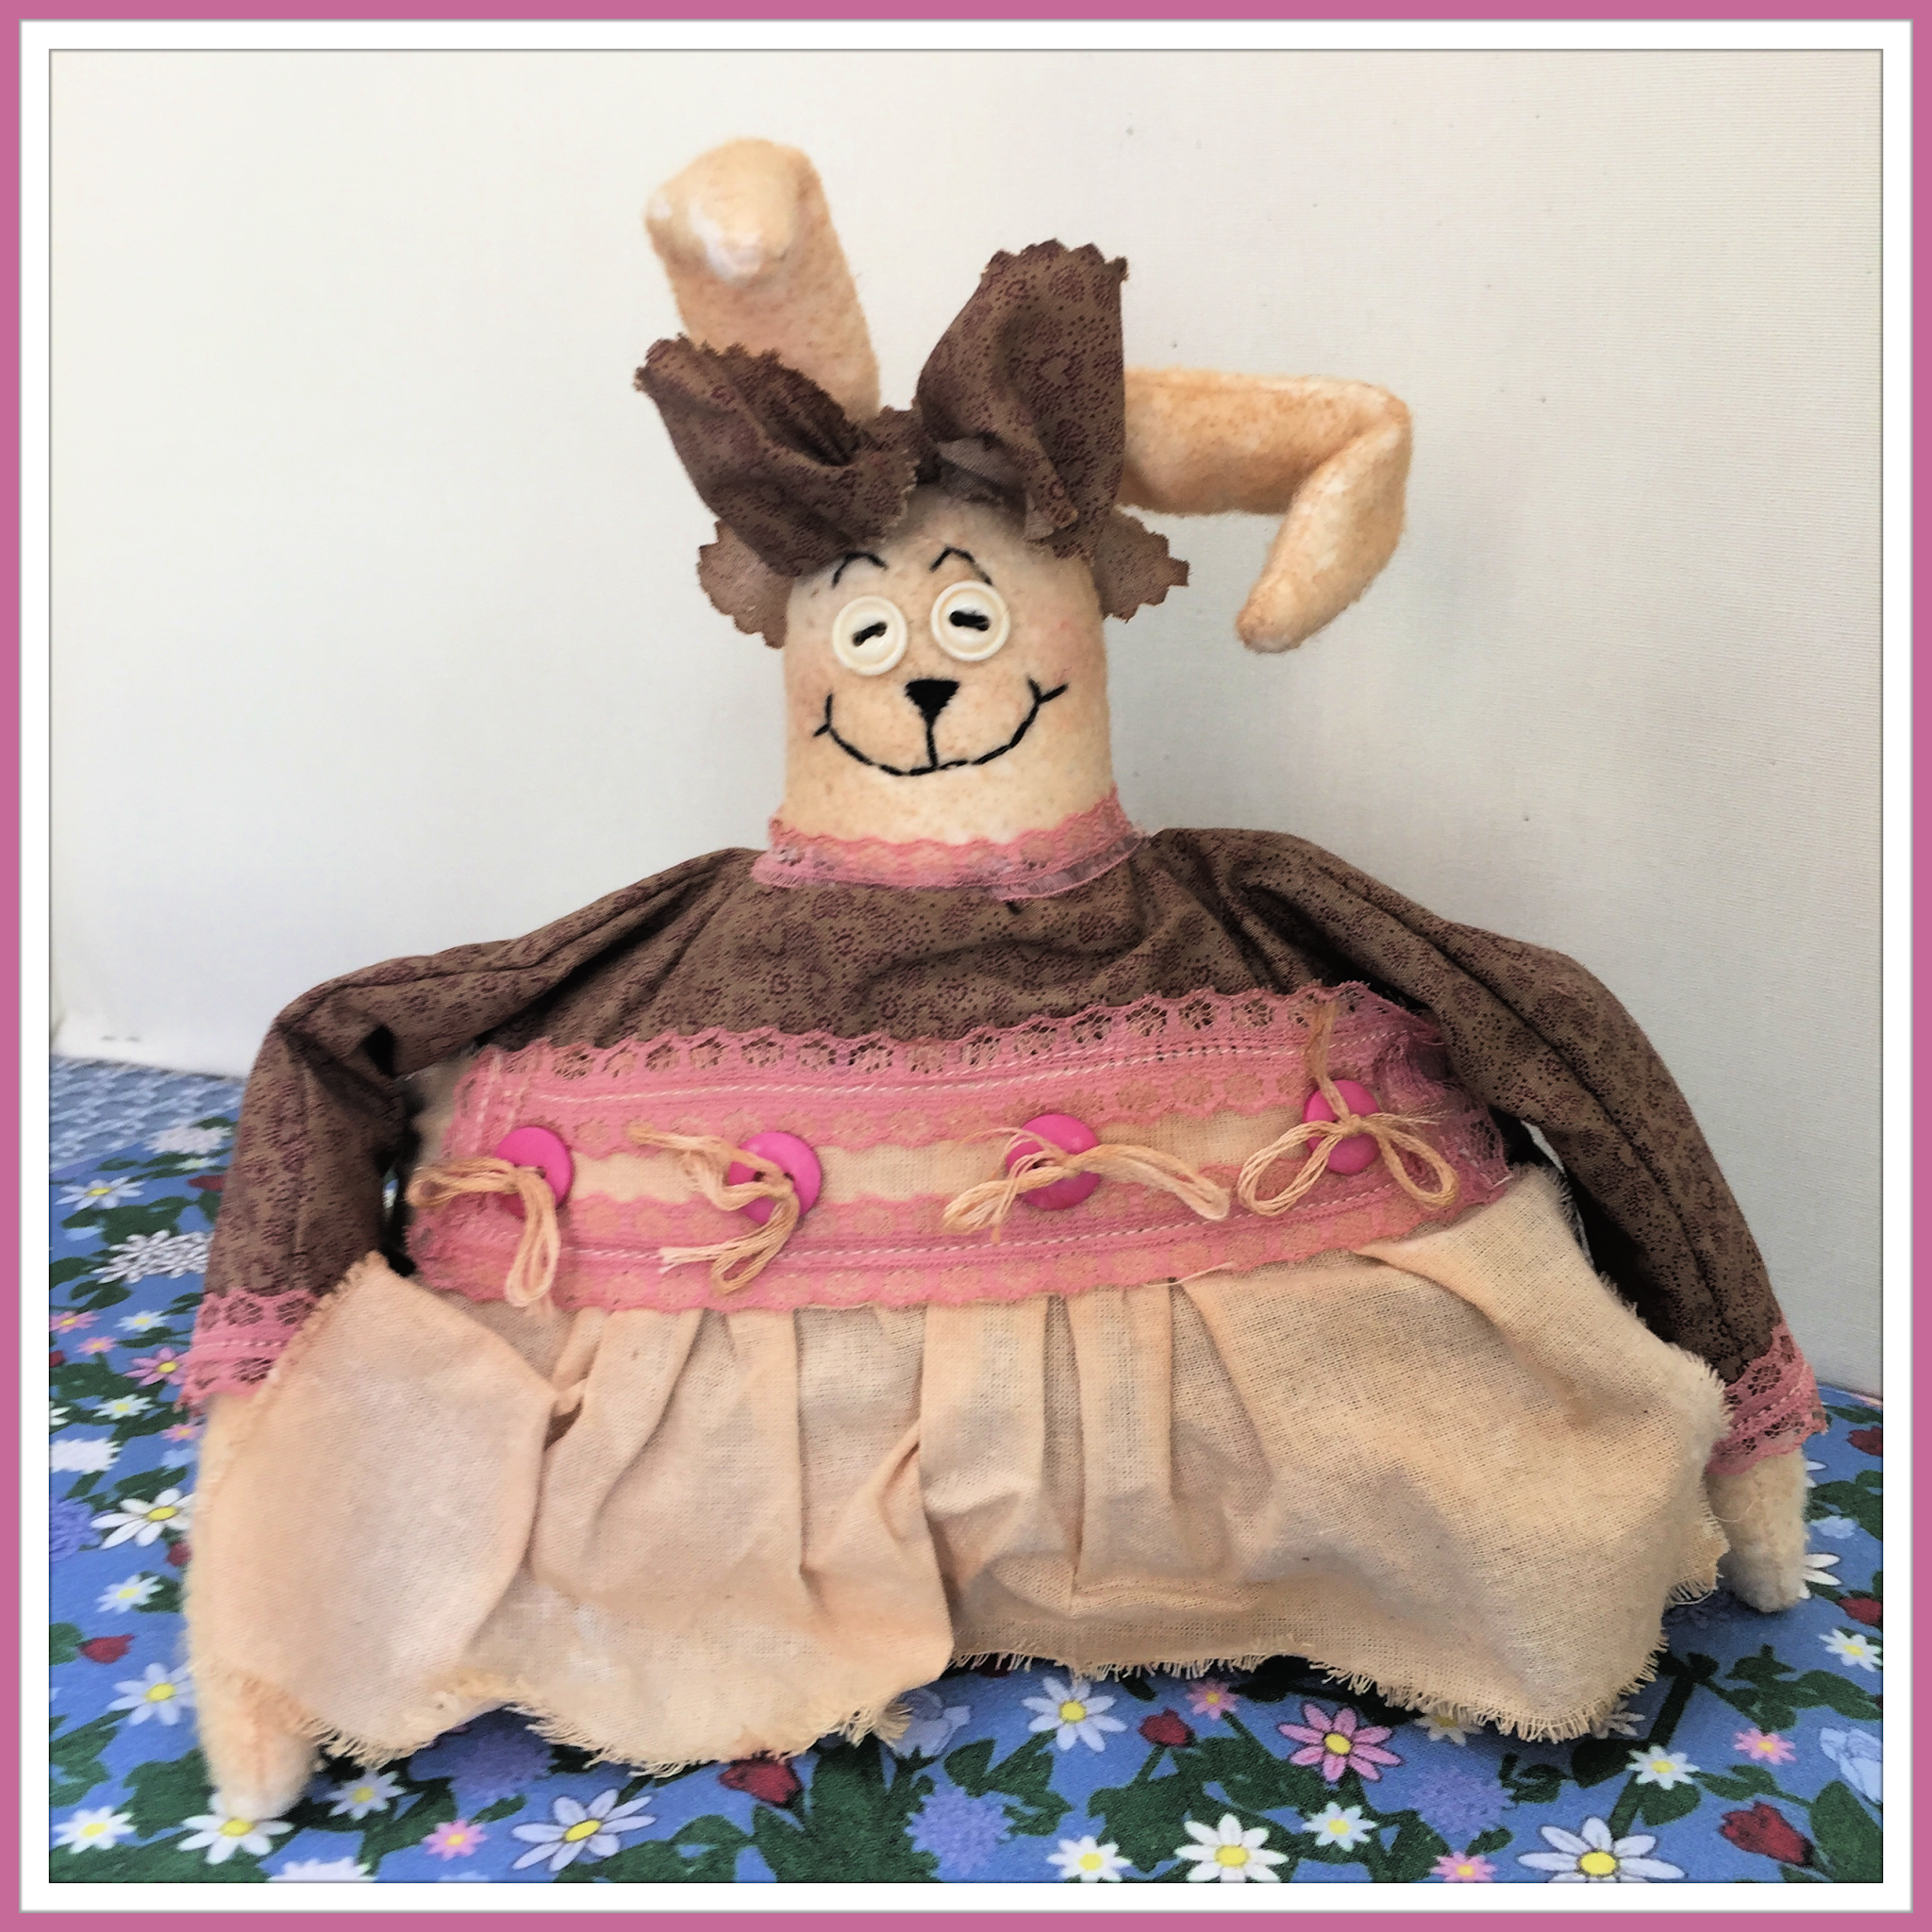
She is a free-standing primitive bunny with a warm & natural body with an embroidered face, white buttons for eyes, lace trimmed dress, and lace trimmed apron adorned with 4 large pink buttons. She is coffee stained throughout.
If you ask her, "Patience, where are you going?" she replies, "Just anywhere!
Hop, hop, hop!
If you ask, "Why are you going?" she just replies,
"To make everyone happy!"
Hop, hop, hop!
If you respond, "That's impossible!" she just smiles and replies, "I have all the time in the world.
Hop, hop, hop!
Down the lane she goes.
Hop, hop, hop!
La dee da!
La dee da!
Designer - Linda Walsh Originals


To view and download my "Patience Is A Virtue" free e-pattern (LW151) please CLICK HERE. You'll be brought to Google Drive where you can view my free e-pattern. Then just download my free .pdf e-pattern by clicking on the down arrow in the top center. Or, just print off the two pattern pieces sheets at the end of the e-pattern.
For more information on all my free e-patterns, e-printables and e-books please CLICK HERE.

Supplies Needed…..
¼ Yard Warm & Natural (for body, arms, ears & head)
¼ Yard Fabric (for dress and hair-bow)
¼ Yard Fabric (for apron)
Poly-fil (for body, arms & head)
DMC Embroidery Floss (black and white)
3/8” Flat Lace Trim With One Straight Side (for neck) –10 “ long
1/2” Fancy Flat Lace Trim With Two Decorated Edges (for dress and apron) - 5 feet long
7/8” Two Holed White Buttons (for eyes) - 2
½” Two Holed Pink Buttons (for apron waistband) - 4
White Pipe Cleaners (for ears) - 2
Iron On Interfacing
4” Embroidery Hoop
Instant Coffee
Upholstery Thread
Glue Sticks and Glue Gun
Thread
Blush (rose)
Linda Walsh Originals – LW51 “Patience – Is A Virtue “ – 7” Primitive Bunny Pattern Instructions

IMPORTANT: PLEASE READ ALL INSTRUCTIONS BEFORE BEGINNING.
1. All seam allowances are ¼” unless otherwise stated.
2. RST = Right Sides Together WST = Wrong Sides Together WS = Wrong Side
3. RSO = Right Sides Out WSO = Wrong Sides Out RS = Right Side
4. Clip all curves and corners.
5. Glue is hot glue unless otherwise noted.
6. Iron fabric pieces and seams as required. Seam edges should be ironed flat.
7. Trace all pattern pieces onto tracing paper or tissue paper, or use the enclosed pattern pieces directly.
8. Trim seams as required with pinking shears.
9. Cut all fabric pieces outside the black lines shown on the pattern.

FACE: You are going to embroider the dolls face using an embroidery hoop.
Cut a piece of the warm and natural 10” by 11” and a piece of the iron on interfacing 5” by 5”.
Center the warm and natural over the pattern piece for the dolls body and trace the doll’s eyebrows, nose and mouth onto the warm and natural piece using a light pencil (See Diagram #1a).
Do not trace the eyes or the #’s. They are there only to show where the eyes and blush should be applied later on in the pattern.
Mark a small dot with the pencil to indicate where the center of each eye will be.
Iron the interface to the back of the muslin following the instructions for the interfacing you purchased.
Insert and center the warm and natural piece into the embroidery hoop and tighten so the fabric is taut. Do not tighten the warm and natural too much.
You are going to embroider the face with 2 strands of the black DMC embroidery floss.
Backstitch the outline of the eyebrows, as indicated on the head (front and back) pattern, with the black DMC embroidery floss (See Diagram #1a).
Satin stitch the inside of the eyebrows with the black DMC embroidery floss (See Diagram #1a).
Backstitch the outline of the nose with the black DMC embroidery floss and then satin stitch the inside of the nose with the black DMC embroidery floss (See Diagram #1a).
Straight stitch the mouth and nose line with the black DMC embroidery floss (See Diagram #1a).
Remove the warm and natural piece from the embroidery hoop and iron the piece on the wrong side.

Center the body pattern piece on top of the warm and natural aligning the embroidered face with the face on the body pattern piece and then cut the body pieces out as indicated on the pattern piece sheet (See Diagram #1b).
BODY: As mentioned above, cut the body (front and back) out of the warm and natural, as indicated on the body (front and back) pattern.

Mark the Points A, B, C, D and E on the body (front and Back), as indicated in the body (front and back) pattern (See Diagram #2a).
Mark and cut the slit in the body (back) as indicated in the body (front and back) pattern (See Diagram #2a).
With RST sew the side seams and bottom edge of the body (front and back) together.
Clip the curves, as indicated in the body (front and back) pattern (See Diagram #2a).

You want to square the bottom left and right corners of the body (front and back) bottom edge and side seams (See Diagram #2b).
With RST bring Point B, as indicated on the body (front and back) pattern, to meet Point A, as indicated on the body (front and back) pattern (See Diagram #2b).
Sew straight across on the right hand side from Point C on the front side to Point C on the back right hand side (See Diagram #2b).
Do the same for the left hand side of the body (front and back).
This should create a triangle on the sides (See Diagram #2b).
Fold the triangle up towards the side seams and hand stitch to hold (See Diagram #2b).

Turn the body RSO (See Diagram #2c).
Stuff the head and body (front and back) tightly with poly-fil (See Diagram #2c).
Make sure that the doll’s neck is not wobbly. Hand stitch the back slit opening closed (See Diagram #2c).
ARMS: Cut the arms out of the warm and natural, as indicated on the arms pattern.

With RST sew the arms together along the side seams (See Diagram #3a).
Leave the body edge open for stuffing, as indicated in the arm pattern.
Clip the curves and turn RSO (See Diagram #3a).
Stuff the arms with poly-fill to the stuff to here line, as indicated in the arm pattern (See Diagram #3a).
Don’t stuff the arms too tightly.
With WST fold the body edge of the arms under ¼” and stitch closed (See Diagram #3a).

With RST position the arms on the shoulders of the body Points D and Points E, as indicated in the body (front and back) pattern and arms pattern (See Diagram #3b).
Hand-stitch the arms to the body front between points D and Points E (See Diagram #3b).
The arms should be hanging across the front of the body.
EARS: Cut the ears out of the warm and natural, as indicated on the ears pattern.

With RST sew the ears together along the side seams (See Diagram #4).
Leave the head edge open for turning, as indicated in the ears pattern.
Clip the curves and turn RSO (See Diagram #4).
Twist and bend the ends of each of the two pipe cleaners until they form two ovals, each 4” long.
Put the pipe cleaners inside the ears, turn the head edge of the ears under 1/8” and sew a gathering stitch along the head edge with the upholstery thread until the head edge measures ½” (See Diagram #4).
Pin the turned under and gathered head edge of the ears to the head in the ear placement areas, as indicated in the body (front and back) pattern (See Diagram #4).
Hand stitch the turned under and gathered head edge of the ears to the head in the ear placement areas, as indicated in the body (front and back) pattern with blind stitches (See Diagram #4).

EYES: Sew the 7/8” two holed white buttons to the face for the eyes with 6 strands of the black DMC embroidery floss, where indicated in the body (front and back) pattern (See Diagram #5).
DRESS: Make sure the dress piece is cut out on a double fold, as indicated in the dress (front and back) pattern.

Clip the neck edge between Point A on the left hand side of the dress, as indicated in the dress (front and back) pattern and Point A on the right side of the dress, as indicated in the dress (front and back) pattern (See Diagram #6a).
You want the sleeve hem edge of the dress to have a finished look to it.
In order to do this you are going to turn the sleeve hem edge over RST towards the shoulders of the dress and sew it in place (See Diagram #6a).
The ½” fancy flat lace trim is going to be positioned directly on top of this which will cover the sleeve hem edge.
The lace portion of one of the sides of the ½” fancy flat lace trim will be hanging 1/8” below the turned under sleeve hem edge and the other lace portion will be facing up towards the head (See Diagram #6a).
The underside of the sleeve will then have a finished look to it.
Cut two pieces of the ½” fancy flat lace trim 5” long.
Stitch the WS of the ½” fancy flat lace trim to the RS of the turned over sleeve hem edge 1/4” down from the top edge of the ½” flat lace trim and 1/4” up from the turned over sleeve hem edge of the dress (See Diagram #6a).
Do the same for the other sleeve.
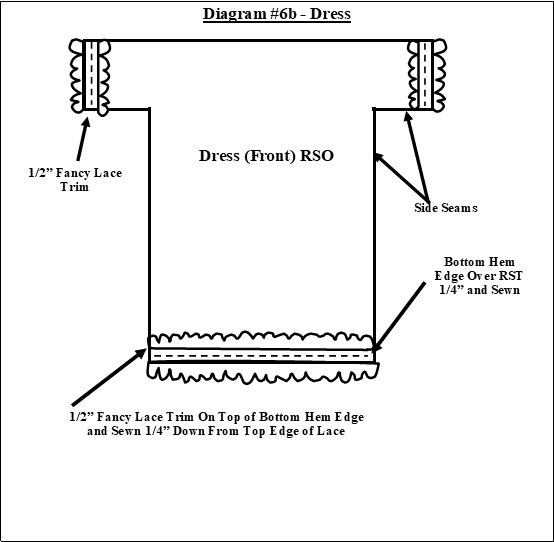
With RST sew the side seams of the dress (front and back) and side seams of the sleeves (See Diagram #6b).
Clip the underarms and turn RSO (See Diagram #6b).
You also want the bottom hem edge of the dress to have a finished look to it just like the sleeve hem edge of the dress.
In order to do this you are going to turn the bottom hem edge of the dress over RST towards the neck edge and sew it in place (See Diagram #6b).
The ½” fancy flat lace trim is going to be positioned directly on top of this which will cover the bottom hem edge.
Cut one piece of the ½” fancy flat lace trim 22” long.
Place the WS of the top edge of the ½” fancy flat lace trim over the WS of the turned over bottom hem edge (See Diagram #6b).
Stitch the ½” fancy flat lace trim to the turned over bottom hem edge of the dress 1/4” down from the top edge of the ½” fancy flat lace trim and 1/4” up from the turned over bottom hem edge of the dress (See Diagram #6b).

Put the dress on the doll (See Diagram #6c).
With WST turn the neck edge under1/8” and sew a gathering stitch along the neck edge with the upholstery thread (See Diagram #6c).
Gather the neck edge of the dress until it is tight to the neck (See Diagram #6c).
Knot the upholstery thread to secure.
Cut a piece of the 3/8” fancy flat lace trim with a straight side to fit around the doll’s neck and glue it in place (See Diagram #6c).
The 3/8” fancy flat lace trim should overlap in the back and the lace portion of the 3/8” fancy flat lace trim should be facing up towards the dolls head (See Diagram #6c).

APRON: The apron waistband and ties and apron skirt are made out of the same fabric.
Cut the apron waistband and ties pieces out, as indicated in the apron waistband and ties pattern.
Cut the apron skirt out on the fold, as indicated in the apron skirt pattern.
You are going to fray the bottom hem edge and side edges of the apron skirt before you sew the apron waistband and ties to the apron skirt (See Diagram #7a).
Fray the bottom hem edge of the apron skirt by pulling 5-6 pieces of horizontal thread out of the bottom hem edge (See Diagram #7a).
Fray the side edges of the apron skirt by pulling 5-6 pieces of vertical thread out of the side edge (See Diagram #7a).
You are going to fray the bottom hem edge and top edge of the apron waistband before you sew the apron waistband to the apron skirt (See Diagram #7a).
Fray the bottom hem edge of the apron waistband by pulling 3-4 pieces of horizontal thread out of the bottom hem edge (See Diagram #7a).
Fray the top edge of the apron waistband by pulling 3-4 pieces of vertical thread out of the top edge (See Diagram #7a).
You are also going to fray the bottom edge, top edge and one of the side edges of the two apron tie pieces before you sew the apron ties to the apron waistband (See Diagram #7a).
Fray the bottom edge and top edge of the apron waistband and ties by pulling 3-4 pieces of horizontal thread out of the bottom and top edges (See Diagram #7a).
Fray one of the side edges of the apron ties by pulling 3-4 pieces of vertical thread out of the side edges (See Diagram #7a).

With RST sew the side edge of one of the apron ties to one of the side edges of the apron waistband (See Diagram #7b).
With RST sew the side edge of one of the remaining apron tie to remaining side edge of the apron waistband (See Diagram #7b).
Gather the top edge of the apron skirt until it measures 5 ½” wide (See Diagram #7b).
Place the WS of the bottom edge of the apron waistband and ties over the RS of the top edge of apron skirt overlapping by ¼” and making sure the side edge of the apron skirt matches the side edge of the apron waistband (See Diagram #7b).
Stitch in place (See Diagram #7b).

Cut a piece of the ½” fancy flat lace trim 18” long. You are going to create a rectangular lace decoration on the apron waistband with the ½” fancy flat lace trim that frames the top edge, bottom edge, and side edges of the apron waistband (See Diagram #7c).
Starting at Point A of the apron waistband pin the WS of the ½” fancy flat lace trim to the top edge of the RS of the apron waistband (See Diagram #7c).
The top edge of the ½” fancy flat lace trim should be even with the top edge of the apron waistband (See Diagram #7c).
Continue pinning the remaining section in a clockwise direction across the top edge, down the right side edge, across the bottom edge, and up the left side edge until you reach Point A again making sure to square the corners (See Diagram #7c).
Sew the ½” fancy flat lace trim to the apron waistband starting at Point A of the apron waistband and stitching ¼” from the top edge of the ½” fancy flat lace trim and ¼” down from the top, bottom, and side edges of the apron waistband until you reach Point A again (See Diagram #7c).
Sew the four ½” two holed pink buttons to the apron waistband with the white DMC embroidery floss at the X’s, as indicated in the apron waistband pattern (See Diagram #7c).
Knot the whit DNC embroidery floss in a knot and then tie it in a bow on top of the ½” two holed pink buttons (See Diagram #7c).

Put the apron on the doll and tie the ties in a knot on the back of the doll (See Diagram #7d).
Adjust the apron so that it sits on the dolls waistline properly.

HAIR-BOW: Tie the hair-bow into a bow and then glue it to the top of the dolls head between the ears with hot glue (See Diagram #8).
Glue the ends of the hair-bow to the back of the dolls head just below the ears (See Diagram #8).
FINISHING: TEA OR COFFEE STAINING:
Tea or coffee stain all fabrics using instant coffee, tea, or coffee.
I prefer instant coffee and prefer to stain the finished doll (except the face - clothes and all) after it is made.
Just add 1 cup of boiling water to one teaspoon of instant coffee and mix well.
Brush the instant coffee onto the doll (except the face) either after the body of the doll is complete or after the doll has been completely made (clothes on and all) with a kitchen basting brush.
Do not stain the face after it has been embroidered, colored, or blushed. In this instance stain the muslin fabric first and then embroider, color, or blush the dolls face.
Let dry completely.
If the doll is not dark enough for your taste then brush a second coat on the finished doll or add 1 tablespoon of the instant coffee to the cup of boiling water.
Finally, brush a tiny amount of blush on the doll’s cheek.
Congratulations. “Patience – Is A Virtue” is done.
We hope you enjoyed making her.
Patience is a Virtue's free e-pattern (see link below) contains the two pattern piece sheets at full size that you will need to cut out her pieces.

To view and download my "Patience Is A Virtue" free e-pattern (LW151) please CLICK HERE. You'll be brought to Google Drive where you can view my free e-pattern. Then just download my free .pdf e-pattern by clicking on the down arrow in the top center. Or, just print off the two pattern pieces sheets at the end of the e-pattern.
For more information on all my free e-patterns, e-printables and e-books please CLICK HERE.
Please respect My Terms of Use: All patterns, e-patterns, printables, e-printables, e-books, graphics, tutorials, how-to's, articles and other e-products © 2004-2023 Linda Walsh Originals-Designs by Linda Walsh. All rights reserved. Commercial selling or reselling by any means prohibited without the written consent of Linda Walsh.
Patterns, e-patterns, printables, e-printables, e-books, graphics, tutorials, how-to's, articles and other e-products are for personal use only. You may not modify, photocopy, download, upload, post, transmit, display, perform, publish, license, reprint, create derivative works from, mass duplicate, re-sell, digitize, and reproduce in any other form (print, digital or electric) or commercially apply, embed, share, Email, or redistribution in any other means. Use of any of the above is prohibited without the written permission of Linda Walsh.
Patterns, e-patterns, printables, e-printables, e-books, graphics, tutorials, how-to's, articles and other e-products are for personal use only. You may not modify, photocopy, download, upload, post, transmit, display, perform, publish, license, reprint, create derivative works from, mass duplicate, re-sell, digitize, and reproduce in any other form (print, digital or electric) or commercially apply, embed, share, Email, or redistribution in any other means. Use of any of the above is prohibited without the written permission of Linda Walsh.
However, you may link to my website(s)/blog(s) and the individual page(s)/blog post(s) (including 1 picture) but do not copy, reprint or duplicate my website(s)/blog(s) or individual page(s)/post(s ) without my permission.
Items made from Linda Walsh Originals E-Patterns are intended for personal use for fun or small scale personal and business profit as long as you credit us with the design. Large scale commercial use (i.e. mass production) of items made from Linda Walsh Originals E-Patterns are by permission only.
Please see my Terms and Conditions for additional information.
Copyright © 2004 - 2023 - All Rights Reserved - Written By Linda Walsh of Linda Walsh Originals and Linda's Blog. Linda is a doll maker and doll pattern designer.
No comments:
Post a Comment