Wednesday, June 08, 2011

315 Hours On Another Cross-Stitch Picture - WOW!


I don't know if you remember or not, but last December I wrote a blog post entitled  "You Spent How Many Hours On That Cross-Stitch?" that talked about my spending over 250 hours on a cross-stitch picture. Back then you may have thought that 250 hours is a long time to spend on one project. Well, if I told you that I just spent 315 hours on another cross-stitch picture you might think I really have lost my mind.

I started this Dimensions Needlecrafts Counted Cross Stitch, In Her Garden on December 29, 2010 and finally finished it on May 14, 2011. Hubby painstakingly documented my progress day by day so we'd have a detailed breakdown. I worked on this a few hours every day - every chance I got. I quickly learned that there were a lot of color changes due to all the flowers and, as a result, this was going to take a lot of time. And, for sure, it did.

So, was the 315 hours worth it? Absolutely! I'd do it again as the cross-stitch picture framed (shown in the picture above) is absolutely stunning.

To give you a little background on why I would create yet another massive cross-stitch picture I have to take you back to the rationale for my previous cross-stitch picture.  In July, 2010 I wrote a Linda's Blog post about my pressed flower pictures entitled "My Pressed Flower Pictures - Now That's A Great Idea!" In that post I told you about a large pressed flower picture I had made that was hanging in our master bedroom and, sadly, was fading which meant it needed to be replaced.

Well, my husband thought a needlepoint picture like the one I had done in the dining room but much bigger would be nice. I wrote about this needlepoint picture awhile ago in a Linda's Blog post entitled "Needlecraft Picture From A Decade Ago - Or So!"

So, since our house is filled with dolls and pictures of buildings & houses I thought a cross-stitch Victorian scene might be just the thing. So, I set out to find some large cross-stitch kits that would be suitable.

Well, I found several that I liked, but couldn't decide which one would be best suited so, as usual,  I bought a couple of kits.


While I liked all of them I decided to go with the Dimensions Counted Cross Stitch M Lady's Chateau for our bedroom as it was a beautiful Victorian scene and would fit perfectly in our bedroom. My finished and framed picture is shown above.

Well, during that shopping trip I also bought Dimensions Gold Collection In Her Garden Counted Cross-Stitch Kit which is a wonderful picture of a Victorian woman in a garden. It's a 9 1/2" x 13.2" picture so it isn't quite as big as the one I had just finished. The finished cross-stitch is shown below and my finished picture, which I had framed, is shown in the picture at the beginning of this post.


My husband and I had been so pleased with the way our Dimensions Counted Cross Stitch M Lady's Chateau picture had turned out that we thought it would be nice to use the Dimensions Needlecrafts Counted Cross Stitch, In Her Garden in our dining room.

In our dining room we have a large print picture of a Victorian woman in her garden and thought it would be nice to create a three picture scene of three Victorian woman in their gardens. We decided that the Dimensions Gold Collection In Her Garden Counted Cross-Stitch Kit would look great on the left and that the Dimensions Needlecrafts Counted Cross Stitch, A Summer Stroll shown below would be a good picture to put on the right hand side.


I have been a fan of the Dimensions cross-stitch and punch-needle kits for quite some time and have written about them several times on my The Book Review Corner blog before.

The Dimensions Needlecrafts Counted Cross Stitch, In Her Garden included the pattern, embroidery thread, and 18 count ivory cotton Aida and thread sorter.

The Dimensions Gold Collection In Her Garden Counted Cross-Stitch Kit pattern uses full cross-stitch, half cross-stitch, and outline stitching for emphasis and depth and this detailing really makes the picture stand out. The design of this cross-stitch gives the finished picture a 3 dimensional aspect with the half cross stitch and outlining being used for artistic effect.

While the end results of this design were absolutely stunning some things in the kit and in the instructions could be improved upon. I'd like to offer the following constructive criticism:

First of all the the chart was so big that it actually fit on four pages which meant that you had to tape one section to the other to get the full chart picture.  This would have been okay had the chart sheets been printed one-sided.  Unfortunately, the instructions and English symbol list was printed on the back sides so when you taped the chart together you lost some of the information.  You could photocopy the instructions and symbol list ahead of time but you'd have to do that on a color photocopy machine or you'd lose the colored symbols with a black and white photocopy.  Since I didn't have a color copy machine I photocopied the chart in black and white and then used markers to color over the symbols.

I did not run into the same problem that I had the last time with the colors of the symbols and their placement or the English and French symbol list containing different information.  Last time several of the colors and symbols ( like the blue heart and green heart, or blue "e" and green "e") used in the chart were too close in color and when they were placed next to each other in the chart you could not distinguish one from the other - even with a magnifying glass.  This time there was no issue.  The colors and symbols on the chart were easy to read and follow.

With this kit there were a lot of flowers with different colors.  This meant either constantly changing the threads or stretching the threads from one section to the other.  If you choose the latter, like I did sometimes, you tend to run out of threads. I ran out of several of the flower colors, but did not make a note as to which ones they were.  I did, however, make a note of running out of some of the background colors.  Most notably,  the black (#18403), dark green (#16880) and blue green (#16878) threads.

As was the case with my last Dimensions kit the thread sorter was poorly designed. This was a large cross-stitch kit which meant it contained a lot of threads. The embroidery threads were glued to a foam backed 11 3/4" by 1 1/4" strip of cardboard that had a picture of the color of the thread and it's number.   In order to get to the threads you had to separate the foam back from the cardboard strip. Very quickly the threads separated from their section and then you no longer knew what the thread number was to tie to your symbols & legends. I had to punch a hole in the thread sorter cardboard strip just below the color of the thread & it's number and then insert the threads through the hole and tie them in a loose knot so my threads, colors, and numbers would stay together.  To make things even easier to understand the color symbol should have been shown on the thread sorter strip of cardboard as well.  That way you would only need to use the thread sorter strip of cardboard to follow your taped together chart.

Despite the problems I encountered after all is said and done the design of Dimensions Gold Collection In Her Garden Counted Cross-Stitch Kit  is absolutely beautiful.  The outlining of just the Victorian woman really makes her stand out from the flowers and really makes her fringed shawl seem intricate. Would I invest 315+ hours again to get this type of result?  Absolutely.

However, some things can be improved upon. My comments are meant to be constructive to enable future purchasers to benefit from my experience and to enhance their ability to create an astonishing piece of work from an incredible design.

Like the picture I just finished it will take me a long time to complete the final picture for our series. However, I don't plan on starting that until next winter. I've just got too many other things that I need to get done and don't have the time to devote to such a lengthy project right now. I will complete my series as I just love to cross-stitch and, once I start a project, I do see it through to its completion.

I was very pleased with the results of my 315 hours of blood, sweat, and tears.  The Cross-stitch itself was absolutely gorgeous. So, once again, we decided that it would need a nice mat and frame to really finish the piece. After all the hard labor put into creating the cross-stitch picture we decided it needed to be finished properly.

So, once again, we took it to a little local shop called Art & Frame Emporium.  Their website is at http://www.artandframeemporium.com/.

This shop has been in business since 1982 and we have been buying things from them for over 20 years. They may be a little art shop, but it is filled with wonderful art supplies, kits, picture frames, etc. But, best of all, it's the staff there that makes the difference. The owner, Ed Turner, and several of the employees like Jean Pellerin, James McAlice, and Mickie Ayleward are all gifted artists in their own right. Over the years we have found that all of the members of the staff always offer terrific advice or suggestions. That's why we keep going back and why a small shop can remain in business all these years. You get quality products, quality advice, and quality service.

This time we talked to Jean about the framing for our cross-stitch. The large print picture in our dining has an ornate gold frame so we wanted something to compliment it as well as compliment the cross-stitch picture. Jean made excellent suggestions and we decided to use a green velour mat, gold brocade trim framing the cross-stitch to give the picture depth and to draw you in, and a gold ornate frame. We also decided to use museum glass instead of regular glass - which makes an enormous difference in the viewing of the picture.

When Jean called to tell us that our picture was ready she said it was "gorgeous!" and the "guys" thought it was "gorgeous, too!"   I could tell that she was very proud of her work and she should be. When we saw it - it was stunning. Just beautiful. I put a lot of labor into my cross-stitch and Jean put a lot of labor into finishing it properly for me.

Both my husband and I were thrilled with the way it turned out and have it hanging in the dinning room as we had planned. It compliments the large print picture in the room and is just breath taking to view. The pictures in this post don't really do it justice.

Sunday, June 05, 2011

What Have I Really Been Up To?


You may have noticed that I haven't been posting as frequently lately as you may be used to on my Linda's Blog. Well, there's a really good reason for that. Actually, there's many good reasons for that. You see, I've had my hand in a lot of different projects during the last few months - all of which have taken an enormous amount of time.

So, if you're wondering what I've been doing  - here's what I've been up to:

First, I've been creating two brand new websites/blogs for my baby sister. I alluded to this in my recent post entitled "A Delightful Surprise From My Baby Sister!"  She had sent me a bouquet of beautiful flowers as a "thank-you" for all I had been doing for her.

If you're wondering what her new websites/blogs are - well, the first has to do with alpacas and the second has to do with her new patterns. Now the latter (ie: patterns) should come as no surprise for something my baby sister might do. Given my creative juices never take a break and given how many patterns I've created I would hope some of that might rub off on my sister. When she was young she wanted to do everything I did and I didn't always let her. This time, I helped her.

This past winter her creativity went into overdrive. Make that super overdrive. She had decided that she wanted to combine her love of flowers with her love of quilting and sewing so she designed several framed flower appliquéd wall pieces.

She was not only creating like crazy, but wanted to put the fruits of her creative endeavors to good use by creating patterns. And, of course, I told her that on the net "e-patterns" were the name of the game. So, since she didn't know how to create patterns - let alone e-patterns, I helped her a bit. After all, what are big sisters for?

And, since she had created patterns - well, she needed websites/blogs to sell them. So, of course, "the blogging queen" eagerly volunteered to create those for her. 

Inspired Creations By D sells FRAME or QUILT - FABRIC WALL ART PATTERNS. According to my sister, "Inspiration comes from many areas and one of mine comes from my love of the great outdoors, nature & flowers. I love to craft, sew, quilt and design patterns."


I hope you get a chance to visit my baby sister's new website/blog. If you do please leave a comment to let her know what you think.

So, I've explained the latter.  You might be wondering "what's up?" with the alpacas. Well, it seems my baby sister and her husband have decided to try their hands at alpaca farming. I really should say that my baby sister fell in love with "alpacas" (how could you not - they're just so ADORABLE) and managed to convince her "hubby" that this would be a great thing for them to do. Raise and sell alpacas and alpaca fiber. So, they are.

Right now they're in the process of getting their "alpaca farm" ready for the two alpacas and their 2 offspring that will arrive in September. My baby sister bought two "girls" that she named Sunflower and Ivy - who are both pregnant and will deliver their babies in July.

In case you haven't guessed by now baby sister's thing is flowers and gardening which is why she named her alpacas after flowers and which is why she named her new adventure "Rock Garden Alpacas."

So, since she and her husband are now in the alpaca business they needed a website/blog.  And, of course, I had no problem volunteering to create another website/blog for them.
Rock Garden Alpacas is not only their selling website, but also their blog as it tells about their journey into alpaca farming. According to my sister, "We decided that it would be helpful to document our journey into alpaca farming as a way of "paying it forward" for all the help we received along the way. If you're thinking of alpaca farming we hope "Our Journey" helps you."


I hope you get a chance to visit my baby sister and brother-in-law's new website/blog. If you do please leave a comment to let them know what you think.

On top of all of that I've also been in the process of revising all 272 of my patterns.

The first of the year I decided I wanted to revise my patterns to create computer assisted diagrams and pattern piece pages. I tried one pattern to see how difficult it would be and how long it would take using Microsoft Publisher. I've been using it for years upon years now and would be lost without it.

So, I thought I'd see how difficult it would be to use their computer assisted drawing tools to help me create some of the images on my diagrams pages and pattern pieces sheets. After a few mangled attempts at drawing curves I finally got the knack of it. And, it worked really well once I got used to drawing lines, circles, curves, arrows, different size text, and different positioning of the text and images.

In fact, everything looked so wonderful. So nice and neat (not that my drawn diagrams weren't neat) and organized (not that my drawn diagrams weren't organized - as they were). It really made a difference in my pattern. I just LOVED how they looked - how professional - that I decided to revise all of my patterns.

Well, with 272 patterns this is a HUGE endeavor to undertake. Depending on the size of the pattern it might take me anywhere from one day to three days just to complete the changes. That's a HUGE undertaking to say the least and one that takes up a lot of my time.

So, I decided to take it one pattern at a time and over time eventually they'd all be done. I've got 76 of them done now and they're all updated in my Linda Walsh Originals shop.

Thirty five of those I've posted about on my Linda's Blog .

I've got 41 of the revised e-patterns done just waiting for new blog posts. So, that leaves 196 left to go. It will probably take me the rest of the year to revise all of them, but they're coming out really well and it's well worth the effort.

So, you're probably saying, "with all the above I can understand why she's been a little blog absent."

Well, that's only part of the story. I've been doing something else too that has taken me 315 hours to complete. I started it on December 29th, 2010 and finished it on May 14, 2011. Hubby has painstakingly recorded the days and hours it has taken for me to complete this project.

However, I can't tell you what's taken me 315 hours. It's a surprise for another Linda's Blog post. I will say that it came out absolutely beautiful and was well worth the effort. When I finally reveal it to you I hope you will all agree.


Wednesday, May 18, 2011

A Delightful Surprise From My Baby Sister!


I just love unexpected surprises - especially when they take the form of flowers. So, I was surprised and delighted by what I received yesterday.  A beautiful bouquet of exceptionally colorful flowers from my baby sister.

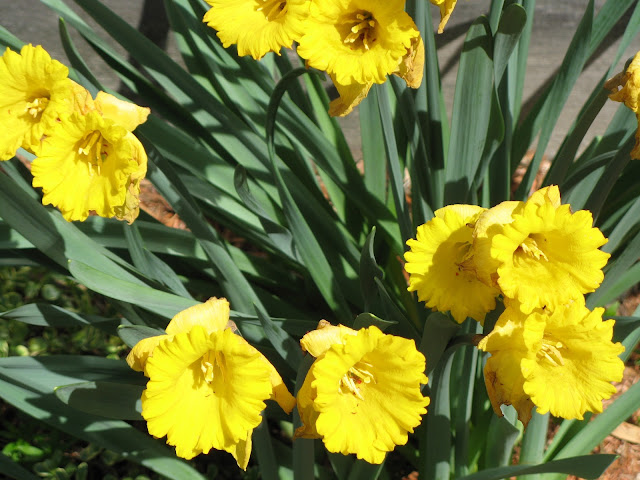
We have iris (my favorite flower), yellow roses, pink carnations, mums, and the most unusual dark purple with white border lilacs that I've ever seen.  If you look carefully at the picture below you can see the white border around the individual lilac petals.  Very pretty indeed.

Now you might be wondering why my baby sister would send me such a beautiful bouquet out of the blue.  Well, she wanted to surprise me and thank me for some things I have been doing for her lately.  I'd love to tell you what I've been doing, but that's a surprise for now.  Suffice it to say it involves blogs, crafts, and websites.


I was going to put my sister's lovely bouquet on my kitchen counter but that spot is currently taken by the beautiful basket of flowers that I received on Mother's Day.  Every year I look forward to the flowers that my grandchildren send me and this year the flowers were not only beautiful but exceptional.  They were a beautiful array of flowers in a rectangular basket.  Very different and very, very nice.  And the best part is the most of the flowers are still fresh and beautiful two weeks later.

So now I get to enjoy two beautiful bouquets in my kitchen. I just love delightful surprises.  Especially when they take the form of flowers.


Monday, April 25, 2011

Love The Hat, Mom! Wink! Wink!


If you are a baby boomer, like I am, then you probably have many fond memories associated with dressing up in your finest attire (hopefully, new clothes) for Easter Day. I know that I do.

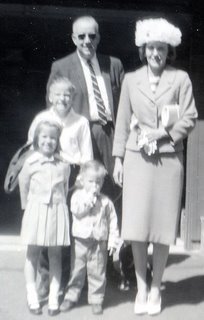
On of my favorite Easter Day pictures is the one to the left. The picture is of my mother, father, older brother, younger sister and younger brother just before going to church on Easter Day. I was taking the picture.

You might be wondering why it's one of my favorites. Well, just look at my older brother's smile - or grimace might be a better description.

And, then, of course there's my mother's hat. It was this big, white, floral, lace, ribbon concoction. Oh, sorry, mom. I meant hat. It was lovely... WINK! WINK!

Every time I look at this picture and my mother's hat I can't help but think about the words from Irving Berlin's 1948 song "Easter Parade."

"In your Easter bonnet, with all the frills upon it
You'll be the grandest gal in the Easter parade.
I'll be all in glover, and when they look us over
We'll be the proudest couple in the Easter parade."

If you're a reader of my Linda's Blog then you know that I just love historical traditions. So, of course this got me to thinking about the tradition of Easter clothes and the Easter parade. Where and when did this all begin? Where did the wearing of new clothes come from?

Early Christians believed the week before Easter was a good time to be baptized and called it "White Week." They dressed in new white robes, which they wore during the entire Easter week to symbolize their rebirth and new life. People who had been baptized previously wore new clothes on Easter to symbolize they shared in this rebirth and new life.

Subsequently, Europeans came to believe that a new piece of clothing on Easter Sunday would bring good luck. Old or used garments would bring a year of misfortune. So new clothes became a symbol of Easter. It's unbelievable how many traditions we still have based upon superstition.

It wasn't until the Middle Ages that people in their new clothes began to take walks after their Easter service. This eventually evolved into the tradition of Easter Parades, of which New York's 5th Avenue is probably the most famous.

After the Civil War Easter was known as the "Sunday of Joy." Women and girls who had worn dark colors of mourning during the war decided to start wearing the bright and wonderful colors of spring. Their hats were decorated with fresh flowers. If the fresh flowers weren't available then they would make flowers out of paper, fabric, ribbons, feathers, hairs, etc.

The Easter Parade in New York began in 1860 - the Victorian Era, of course. The elite of society would attend Easter Service at one of the churches along 5th Avenue and then parade down 5th Avenue afterwards to give every one a chance to view their new Easter hats and dresses. I would have loved to have seen that. Some of the dresses had to be absolutely gorgeous. And, of course, there were the hats.

The hats were elaborate and kept getting bigger and bigger and bigger with each passing year. Flowers, lace, bird's nests (that's something I definitely want in my hat), ribbons, etc. were all used to decorate the hats. The more elaborately decorated the hat, the better.

Of course, the first Easter bonnets were worn way before Easter was even celebrated. They weren't even bonnets at all. They were circles of wreaths of leaves and flowers and were worn atop the head to celebrate Spring. The round shape symbolized the sun and the life cycle.

In essence the Easter Parade along 5th Avenue was the forerunner of what is known today as a "fashion show." Many seamstresses would bring their sketch pads with them to the Easter Parade so that they could go back and create knockoff's for their less wealthy clients.

Even as a child I loved Easter. Why? For me it had to do with my fascination for beautiful dresses. My mother would buy me the most beautiful little girl's dress for Easter. I'd have my hat or bonnet (of course), my black patent leather shoes, white lace socks (the tops had to be lace, of course), my white gloves (oh, yes I wore gloves), and my little purse. I don't remember what I carried in that purse. What possible needs did a little girl have. Maybe I kept my candy in there. In any event, as you can imagine I loved it.

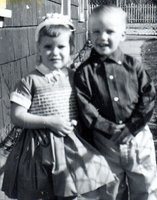
The picture to the right is of my older brother and I on Easter Sunday. Just look at my dress. I actually remember that dress. The front bodice had the most beautiful smocking and there were several layers of tulle underneath to keep the skirt puffed out. If you've never worn a dress with tulle you can't imagine how itchy it was. If you look closely my hat was a headband adorned with flowers and I think I was carrying a lollipop. Maybe that's what I kept in my purse. My brother, of course, was all decked out in his finest too. We probably walked around our house for our Easter Parade.

Another fond memory I have of Easter attire is the first year I wore high heels. What a disaster that was. I never got the hand of it and still don't know how women wear them. I kept falling off the side of the high heels. For me, given that I'm a tall women, that was comical to say the least. So flats or shoes with wide heels became my shoes of choice.

As with many wonderful traditions, new Easter outfits are a thing of the past. Some people do buy new clothes and some places have Easter parades as a lark. For me, I will always have the fond memories of my beautiful Easter dresses, and then there's my mothers hat. That hat! She could have had an eagles nest in it. Just kidding, Mom. It was lovely... WINK! WINK!

Saturday, March 05, 2011

It's Graduation Day All Around and We Are Thrilled For "James" and "Anna"


This is the story behind my "James" and "Anna" graduation doll patterns and involves my Dad, my niece, and my twin granddaughters.

When both my twin granddaughters and my niece were graduating from high school and college, respectively, I wanted to give them something special. For me, that usually involves something crafty that I'd made or, and this may come as a surprise to all of you, a doll. So, I decided on a doll. But, I didn't want just any graduation doll. I thought how about taking their graduation picture and transposing that onto a doll's head using iron on transfer paper. It was a nice idea, but a bad application from the start.

So, I set about to design a stand alone graduation doll that would have each of their respective graduation gown colors. I knew I wanted the doll to be stand alone and wanted the body bottoms to be made out of denim. I decided that I would use popcorn kernels to weight the bodies down. So, I began by scanning in their respective graduation pictures and then setting about to crop the images and adjust the image size until their faces would fit on my graduation doll patterns head. I should have known right from the start that this was going to be a disaster. I just couldn't seem to get the right size face with the right size head. In any event, I finally had something I could work with and transferred the face to my cloth head piece.

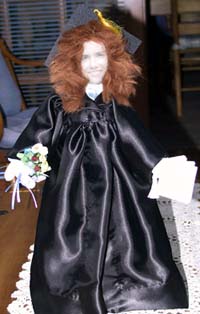
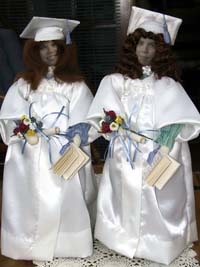
Then I put the three dolls together using my rough draft pattern pieces. The doll's bodies and graduation gowns came out wonderful. Their faces were an entirely different story almost bordering on scary. See for yourself. What do you think? Scary, frightening, yuck?

The first person to receive her doll was my niece. Well, the graduation doll was the talk of the graduation barbecue until my niece arrived and I gave it to her. Everyone thought the doll was creative and unique. My niece loved it but thought it was "CREEPY!"

She wasn't sure whether she should thank me and keep it or thank me and hide it at the back of her closet. I have to admit it was pretty "creepy" and pretty scary looking. I suppose having ones face on a doll is "creepy" and just the looks of the doll was pretty scary. Not that her face is scary or anything. It's just the flat dimensions on what's supposed to be a three dimensional face just didn't work. Flat faces look great on pillows. On dolls, that's another story.

My twin granddaughters were the next group to receive their graduation dolls. Once, again, everyone thought they were unique, exceptional, and downright scary. My grandsons wouldn't even look at them. They were too scared. My granddaughters just laughed and got a kick out of showing all their friends their "frightening" graduation dolls.

So, I decided I had to make something positive out of this disaster and decided to design the graduation doll with an embroidered face. After all I already had the rough draft pattern. All I needed was a face. Instead of doing just one doll pattern I decided to do two: a male graduation doll pattern and a female graduation doll pattern. I could easily alter the clothes underneath the gown to suit either a male or female.


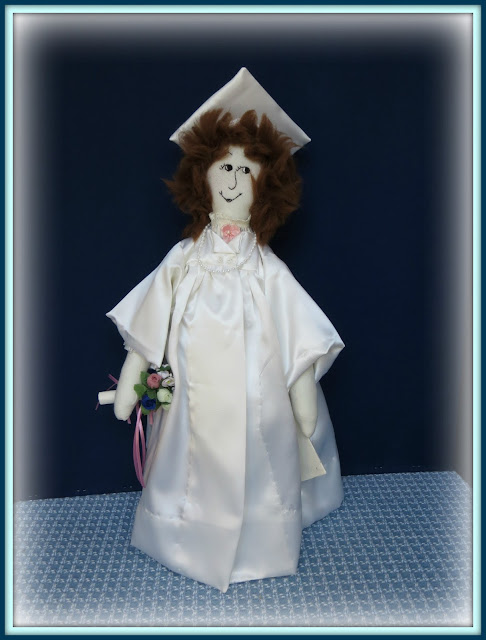
Anna is so happy to be finally graduating. It seems like it's been a long time coming and she's looking forward to her summer vacation. Of course, it won't be a vacation for her as she has to prepare for moving into college all the way across the country from where she lives. She wanted the best school in her field and it was far away. While Anna and her parents weren't really happy that she'd be this far from home they want her to have the best education possible - so they agreed. So, Anna has a lot to do before she goes on to college.

Anna has been waiting a long time for her Graduation Day and is a free-standing cloth doll with a square bottom denim base. She has a long tunic shirt with fringed 3/4 gathered sleeves and square-bottomed denim pants. Her face is embroidered and she has round black button eyes. She is wearing a white satin graduation gown with 3/4 sleeves and is holding a bouquet of silk ribbon flowers with streamers and diploma in her right hand and her commencement exercise booklet in her left hand. She has long flowing red hair framing her face and has a white graduation cap on her head. A string of pearls and ribbon bow decorate her outfit.


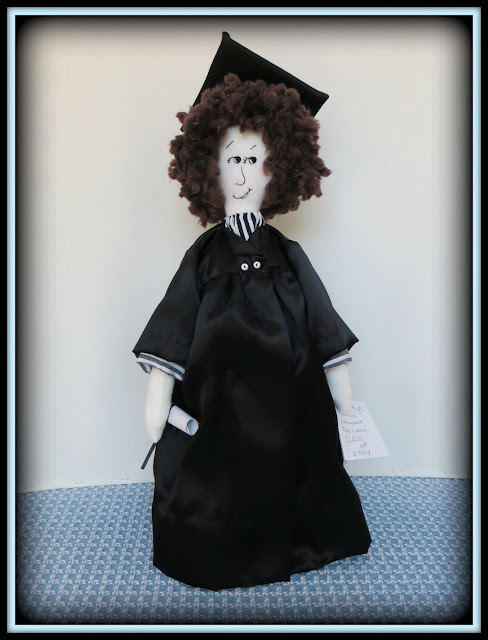
James has been preparing for his Graduation Day for quite some time. He decided that he wanted to take the summer off after his graduation and travel around the country. He wants to have some fun before he has to settle down into a real job in the real world. He's not sure his parents will approve the summer off. He certainly is going to give them all the reasons why this is a good thing, maybe, even throw in an "impish" smile of two. That will sway them to his way of thinking. He can be a charmer when he wants to.

James has been impishly awaiting his Graduation Day and is a free-standing cloth doll with a square bottom denim base. He sports a long cotton shirt with rolled sleeves and square-bottomed denim pants. His face is embroidered and he has round black button eyes. He is wearing a black satin graduation gown with 3/4 sleeves and is holding his diploma in his right hand and his commencement exercise booklet in his left hand. He has wild curly brown hair framing his face and has a black graduation cap on his head.

Well, this story had several phases. It was a nice idea whose application was downright frightening and was rescued by creative embroidering. Hopefully, you'll agree.

If you'd like to try your hand at transferring the face of a graduate you know please do so. Maybe you'll have better luck then I did.

If not, the embroidered faces in my "Anna" and "James" graduation doll patterns are just adorable and make great centerpiece decorations for any graduation party. At least, they won't cause nightmares.

Copyright © 2004 - 2023 - All Rights Reserved - Designed and Written By Linda Walsh

Wednesday, March 02, 2011

Sometimes You Have A Favorite - Josephine Is One Of Them! - Victorian Lady Doll


Sometimes even designers have to admit they have favorite creations. They don't like to because they like to think that all of their creations are their favorites. It's kind of like mothers who when asked: "Mom, am I your favorite child?" reply with, "I love you all the same."

So, while I do love all my creations I do have to admit that some more than others just appeal to me. Just don't tell the "dollies" I said that. There will be sibling rivalry like unbelievable in our house if they find out.

In any event, Josephine is one such creation. I don't know whether it's her red hair or her green outfit with all the filly lace or both. There's just something beautifully appealing about her.

Josephine is a free-standing Victorian lady doll who can hardly wait for spring to show off her new toilette. When she saw it in the Godey Fashion Magazine she knew she had to have it. It was in her favorite color, after all. And, not too many outfits that season were in green. But, she knew that it would look wonderful on her and really highlight her beautiful red hair. So she ordered it and asked that it be sent as soon as possible.

Josephine is a 13" Victorian wood and cloth doll. Her arms are wire-shaped and covered. She also has a painted wood head and covered round wood base. Her inner body is made from a dowel covered with fabric and eyelet lace which is also covered by a gathered and lace trimmed slip.

Josephine is wearing a coordinated green outfit which consists of a lined jacket with large puffy sleeves, lined & fitted vest, large lace trimmed ruffled blouse with bow, and a multi-tiered lace trimmed and gathered skirt with floral decorations. Her beautiful red hair is fastened in a bun and is highlighted by a ribbon & floral trimmed lined hat with a large bow on the back. She is carrying a multi-tiered lace trimmed parasol.

Josephine thinks she looks quite fetching in her beautiful green outfit and hopes you agree. She doesn't mind being one of Linda's favorites. Just don't tell the other "dollies."

Copyright © 2004 - 2023 - All Rights Reserved - Designed and Written By Linda Walsh

Tuesday, March 01, 2011

Dee In Her 1870 Prairie Dress E-Pattern


My "Dee" Victorian doll pattern is named after my Grandmother Doris (who is shown below). My Grandmother "Dee" was born in 1896, went on to college and graduated with a teaching degree in 1917.


My great, great Aunt "Flossie" was a true believer of women's rights, as was my Grandmother "Dee". Both women were very intelligent and were very strong women. Both were very confident in themselves and both held strong beliefs and convictions. They both were believers in women's rights. Their beliefs definitely had a profound affect on my mother which, in turn, had an affect on me.

As an aside. I just love asides, don't I? The only weakness in my Grandmother as far as women's rights were concerned had to do with the wearing of pants. She strongly disagreed with this fashion statement and was very critical of my Mother for wearing them. I never saw my Grandmother in anything but a dress or skirt. God forbid a bathing suit. Yikes!


When I was designing my Victorian Ladies collection I wanted to make a simple Victorian Lady yet somewhat country doll in nature. Someone who you'd see strolling in a garden or park. Elegant but simple at the same time. With this in mind my "Dee" Victorian Lady doll design was born. Dee is a free-standing doll all ready for her Sunday picnic. She just loves to stroll among the flowers just enjoying the country air. Without a care in the world. Searching out the perfect spot to place her blanket for her country picnic.

Dee is a 16" Old Lady" Victorian, yet country doll. She is a cloth and wood doll with a painted wood head and covered round wood base. Her arms are wire-shaped and covered. Her inner body is made from a dowel covered with fabric and eyelet lace. A lace trimmed slip frames her inner body and is gathered around her waist. She is wearing a 3-tiered gathered lace trimmed dress with lace trimmed long sleeves and has a ribbon tied sash wrapped around her waist. Her shawl is crocheted and wrapped beautifully around her shoulders. Her blonde hair is tied in a bun in the back and her bonnet is decorated with ribbons and silk floral. She is carrying a basket of flowers.

Most of the time Dee she likes to be near the lake. But, today, she prefers a spot next to the flower gardens. It's a lovely day and the flowers are all in full bloom. What could be better than tea and biscuits next to the flower garden on a beautiful day? Just a perfect day for a picnic. Wouldn't you agree?

Dee is the third Victorian doll I designed and is named after my Grandmother.

Copyright © 2004 - 2023 - All Rights Reserved - Designed and Written By Linda Walsh


For Sheer Elegance Take A Look At Joy and Her Beautiful Victorian Outfit


My Mother was a beautiful woman inside and out so when I was thinking of a design for a doll named after my mother I wanted to create something beautiful. Something elegant. Something to define the beauty of my Mother. So, "Joy" was born.

Joy is a 14" free-standing doll all dressed up and waiting to impress her friends with the latest in Paris fashion. She's been itching to wear her new outfit for weeks now but was waiting for the weather to get a little warmer for a nice stroll down the avenue. But, mother nature hasn't been cooperating and this wasn't an outfit that could be worn in the snow. So, Joy has been patiently awaiting the arrival of Spring. And, today it finally arrived.

"Joy" is a cloth and wood doll with a painted wood head and covered round wood base. Her arms are wire-shaped and covered. Her inner body is made from a dowel covered with fabric and eyelet lace. She has a lace trimmed slip that is gathered at the waist. She is wearing a very fancy lace trimmed dress with puffed sleeves and both a large & small lace and ruffled trimmed over skirt. Her beautifully coordinated lined jacket with puffed up long sleeves has double tiered lace trim along the front edge and lace & ribbon trim along the bottom edge. Covering her shoulders is a fancy lace trimmed and lined shawl. Her lined jacket and lined shawl are both tied at the front with ribbons. She has long curly hair which is tied at the nape of her neck. Her bonnet is lined and has fancy lace & floral trim along the cap. She is carrying a fancy lace trimmed parasol.

It's a beautiful day for a stroll along the avenue and Joy is hoping that all her friends will be out so she can impress them with her beautiful new fancy outfit. She's got her fingers crossed. Mother nature better not disappoint her today.


Copyright © 2004 - 2023 - All Rights Reserved - Designed and Written By Linda Walsh


Scarier Per Pound David Has A Revised E-Pattern


"Scarier Per Pound, David" is a happy ghost and a right proud "DAD GHOST." And, right now he has his "Baby" ghosts with him. They were born just a few days ago and are still just "infant ghost heads." The rest of their ghostly bodies will develop over time. For now, they're healthy "infant ghost heads" and "Scarier Per Pound, David" is very happy over that.

"Scarier Per Pound, David!" is a free-standing cloth and wood happy ghost. His arms are wire-shaped and covered. He has a square-bottomed body and covered rectangular wood base. His inner body is supported by a dowel and is covered by his squared–bottom body piece. He has a fabric covered and wire shaped head and embroidered face. He has a worn and shredded gown with gathered long sleeves, pinking sheared cut vest, and long fringed scarf. He is carrying a “Boo!” bag filled with 2 small baby wire-shaped ghost heads. Orange and black raffia is tied around his neck, his sleeves and his “Boo!” bag.

He might be named "Scarier Per Pound, David" but he us anything but. In fact, he'd be better suited to the name "Prouder Dad Per Pound, David.

"Scarier Per Pound, David" was the 2nd large wood and cloth doll that I designed and was named after my baby brother who is anything but "scarier per pound." In fact, he's just one big teddy bear.

Copyright © 2004 - 2023 - All Rights Reserved - Designed and Written By Linda Walsh


Wickedly Plump Dot Is All Set With Her New E-Pattern


Watch out Ladies and Gentleman! Don't get too close to the runway! Dot can be quite scary. 

That is - when she puts her "scary" face on. And, she has it on for "The Dollie Fashion Show." 

After all, she and all the rest of the dolls have been waiting a long, long time for their blog post. She wants to make the best of it for it might not happen again for awhile. 

So, watch out - BOOO!!!!!!! 

Dot's strutting (or should be say half-flying half-strutting) down the catwalk. 

She considers herself quite "the fashionable witch" and dares anyone to prove otherwise. 

Go ahead - see if she'll cast a spell on you?

Wickedly Plump, Dot is a 25" free-standing cloth and wood happy witch.

 Her inner body is supported by a dowel and wood base and is covered by her square-bottomed orange body slip. 

Her head is fabric covered and face is embroidered and dirtied with black blush. 

She is a witch after all and they do get into some messy stuff. 

Her arms are wire-shaped and covered. 

She has a worn and shredded dress with long gathered sleeves, shredded multi-layered overskirt with tulle and shredded shoulder caps. 

Her scallop trimmed vest is embroidered and fastened with a large button. 

She has an embroidered and lined cape which is folded back along the edges. Black tulle is hanging from her waist and arms. 

She has black mohair hair which is barely controlled underneath her embroidered, lined and wired ribbon & tulle decorated witches hat which is pose-able. 

She is carrying a witches brew bag filled with orange and black raffia and a decorated broom. 

Orange and black colored raffia is tied around her hat, broom, sleeves, waist, and her neck for decoration.

Copyright © 2004 - 2023 - All Rights Reserved - Designed and Written By Linda Walsh

Primitive Scarecrow Andy Considers Himself Casanova


Primitive Andy Scarecrow considers himself to be the "Casanova" of the scarecrow set. Certainly the most desirable model of the "dollie" fashion shows.

Why, all the girls just love him. They adore him. They want him. Just ask them. They'll tell you.

They just love his button eyes and raffia strips. They love his floppy hat and all his clothes. They love his smile and his "primitiveness." Why, they just love everything about him. He's just so little and so cute!

Copyright © 2004 - 2023 - All Rights Reserved - Designed and Written By Linda Walsh