

Sometimes creating something works. Sometimes it doesn't. Wouldn't it be nice if all creations turned out beautiful each and every time? Even 8 out of 10 times would be great. The reality for me is more like 5 out of 10 times.
I don't know about the rest of you but when I make something that I'm just not happy with I don't just throw it away. I hold on to the piece, sometimes for years on end. I figure that it's a shame to waste a craft supply and if it can be re-designed then why not. So, I hold on to it until I get a brain storm.

Well, back in July of 2015 when I was taking a class at Artful Gathering we were making some mixed media house creations using different media. After taking that class I decided to make some mixed media house creations of my own.

What I wanted to create was a mixed media tree surrounded by a village of 4 houses. I got that, as shown in the picture above, but just wasn't happy with how the tree turned out so I never used it. This year, however, I got a brainstorm and decided to change it.
During the Christmas holiday season I like to decorate my fireplace mantles and usually place my Victorian cross-stitch village in the shadow boxes my brother and I had created back in December of 2009. I wrote about them in a blog posts entitled, "My Victorian Houses - I Had To Keep Them!"
I wanted to put them on my dining room fireplace mantle this year and thought a small tree placed in the middle of my village would look nice. I could have created a brand new artificial tree and placed it there but remembered I had the mixed media house village and tree I had created back in 2015 that I never used as I really didn't like it.
The Styrofoam tree was already mounted and glued on a square stained wood base with a wood center peg. So I took it out and looked at it. Size wise it was a good height for the mantle and for the Victorian cross-stitch shadow box village. The problem was I hated the tree.
I had previously added 4 miniature houses I had made out of chipboard pieces to each of the four corners. Each house was embellished with paper and natural or silk floral stems.
I hated the tree but the houses were fine. I thought, "why create something new when a little tweaking can make a previously unused piece workable?" So, I removed the center star and all the plastic, metallic, and felt snowflake embellishments I had glued on the tree. I left the mixed media papers I had glued on the Styrofoam tree and set to creating something better.
I had decided to make the center tree an artificial Christmas tree with a new center star, decorative embellishments, miniature garlands and snow.


Then I cut fifty 3" to 4" lengths of artificial evergreen Christmas garland and then folded them in half. I glued the center of each of these pieces to the Styrofoam cone starting at the bottom and working up with low temperature hot glue. I had left the paper I had previously glued to the Styrofoam cone on the tree so gluing them with the low temperature hot glue was no problem.

After I was satisfied with the artificial evergreen Christmas garland pieces I had glued on the cone I decided to add two miniature garlands to my tree. The first was a miniature silk floral ivy leaf and poinsettia garland I had bought many years ago and had used from time time before. Luckily I had just enough of the garland to wrap around the tree.
The second garland was a miniature red bead strand I had bought decades ago when they were on sale at A.C. Moore or Michaels. Luckily, here too, I had just one strand left of the red color, length and bead size I wanted.

The garland strands looked great but the tree still needed some embellishments so I looked through my Christmas craft supplies stash and found some plastic multi-colored beads that were the right size. I glued each of them to the end of the artificial Christmas garland branches using low temperature hot glue.

I was pleased with the way the multi-colored beads looked but the tree still needed something so I decided to add Aleenes True Snow paint to the tree.


It took a little while to add all the snow but was well worth it in the end. I ended up with a pretty little snow covered evergreen tree.
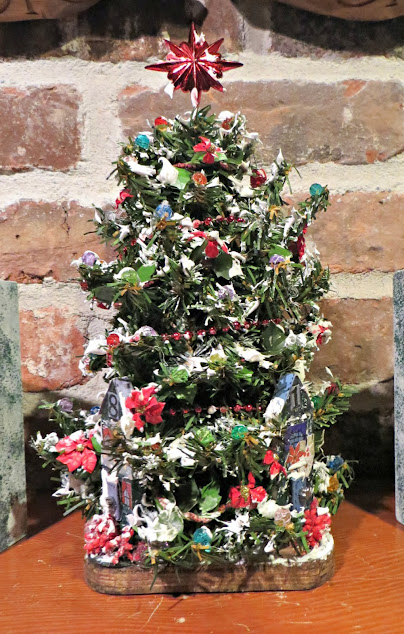
I was pleased with the way the tree turned out. It was very festive, very wintry and perfect for my Victorian house scene.
I had salvaged something I had made but didn't like and turned it into something I actually liked. See, sometimes not throwing something out ends up being a good thing. Why throw something out when you can hold on to it and re-design it. Makes sense to me.
Copyright © 2004 - 2023 - All Rights Reserved - Designed and Written By Linda Walsh
No comments:
Post a Comment