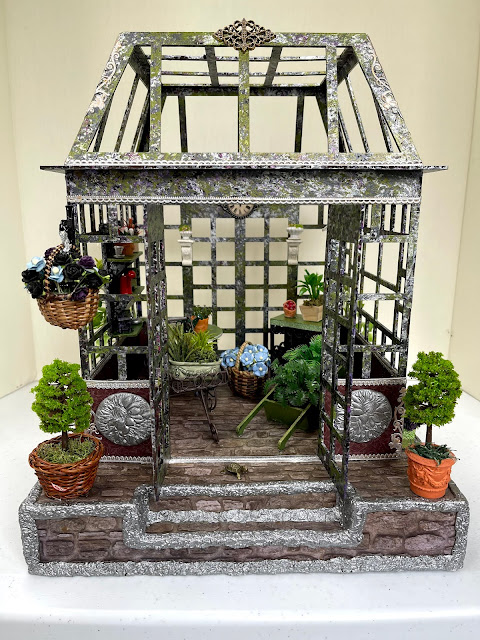
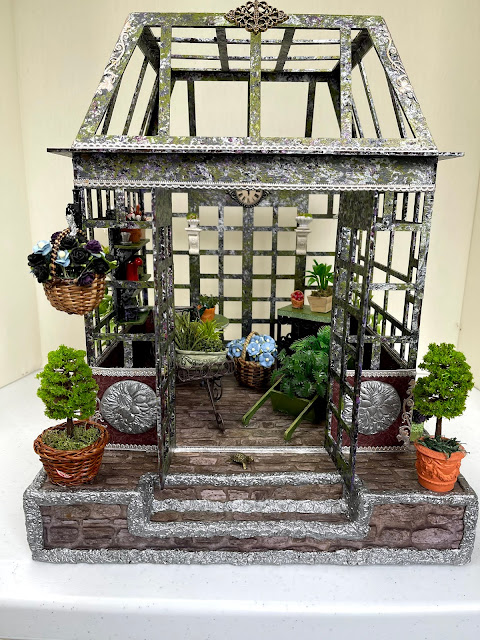
For most of my life I have wanted to build a Victorian dollhouse. As far as I was concerned the more Victorian and ornate the better. I wanted to build everything in the dollhouse from the Queen Anne furniture to the traditional Victorian furnishings.
I was not naïve as to how much work was involved, or so I thought. I knew it would be a LOT of work starting from the wood kits to the adding of all the embellishments like the wallpaper, buildable furniture, floors, rugs, lighting, ceilings, and all the accessories associated with a dollhouse.
I wanted everything to be handmade.
Well, time definitely gets ahead of you the older you get and over the years life kept happening. I never did build my dream dollhouse. Well, here I was at 67 years of age, in the in the middle of a Covid pandemic and thinking about building that dollhouse.
I was intrigued by this and thought it might be a good introduction into miniatures and a good example as to what was involved with creating a doll house which I knew would be much more elaborate and time consuming than a Victorian conservatory.
I was drawn to this conservatory as it was Victorian and involved plants, which I also happen to love and thought it would be perfect in my sunroom.
Well, to my delight the conservatory itself was still available in laser-cut 3D chipboard, as was a platform foundation of laser-cut 3D chipboard. I was thrilled.
Getting the craft supplies and actually finding the time to put everything together don't always go hand in hand. It would be over a month before I was able to start the conservatory.
I figured it would take me a day or so. Au contraire! I couldn't have been any more naïve as to the amount of work involved in creating and finishing my conservatory. Two weeks later I finally finished it.
I had decided I wanted to sponge paint the laser cut platform and conservatory chipboard with metallic green, burgundy, white, silver and dark green paints. You know me - I love to sponge paint...lol
Before I assembled the chipboard I took a piece of dry paper towels and wiped the edges and fronts and backs of all the chipboard pieces as I've learned from experience if you don't you'll get charcoal residue all over you.
After wiping everything down I assembled the chipboard platform and applied wood glue to the edges that required gluing. I had decided ahead of time to fill the bottom of the platform with cardboard pieces until it was filled and then glued a piece of heavy decorative paper to the bottom to finish it.
The center doors on the back side of the conservatory.
For the conservatory I assembled the back, left side, right side and bottom and glued them to the platform. I left the back side doors closed as I intended to glue the back of the conservatory flush with the back of the platform, leaving no lip.
I put the front side with front doors and the top ledge of the conservatory aside until I had pasted all the paper embellishments I wanted inside the conservatory. I assembled all sides of the top of the conservatory and glued it where required with the wood glue and then put it aside as well until I had pasted all the paper embellishments I wanted inside the conservatory.
Once all of the pieces were glued that I had intended to glue at this point I painted everything except the bottom of the platform with black acrylic paint. I also painted the front side and front doors that I had set aside with the black acrylic paint as well. When the black paint was dry I sponge painted everything with the metallic green, burgundy, white silver and dark green paints.
I had decided to use decorative
Cobblestone Scrapbook Paper for the inside bottom of the conservatory and top, front side, back side, left side and right side of the platform. I needed the paper to fit perfectly so I measured everything and then cut the pieces I needed with a paper cutter.
I made sure all the cobblestone paper pieces were all sized correctly and then applied mod podge to the backs and glued them all in position. Once the cobblestone paper pieces were set I applied mod podge to the papers to seal them.
I had previously decided that I wanted to add a Victorian style
Dark Red Victorian Floral Scrapbook Paper to the bottom of the sides of the insides and outside of the conservatory to match the burgundy in my sponge painting and to give the conservatory a Victorian contrast. I needed the paper for the front side, back sides, left side and right sides (inside and outside) to fit perfectly so I measured everything and then cut the pieces I needed with a paper cutter.
I made sure all the burgundy paper pieces were all sized correctly and then applied mod podge to the backs and glued them all in position. When gluing the burgundy pieces to the front side that I had set aside temporarily I made sure not to paste the paper where it would interfere with the construction of the front side and conservatory. Once the burgundy paper pieces were set I applied mod podge to the papers to seal them.
I had decided ahead of time that I wanted to finish all the edges of the platform and steps where the cobblestone papers met with Apoxie Sculpt Modeling Clay - 2 Part (A and B) Modeling Compound to give it a cobblestone like finish.
So I pulled about 1" of clay out of the Part A and Part B containers, rolled them into a ball, and then thoroughly mixed them together until they were blended. Then I applied the clay to the edges and steps covering about a 1/4" of the edges. After flattening the clay in the manner I wanted I proceeded on to mixing the next grouping, and so on until the platform edges were covered.
After the clay was applied in the manner I wanted and flattened I stamped it with a floral stamp and set the conservatory aside until the clay had thoroughly dried.
When I was waiting for the Apoxie clay to dry I assembled the other laser cut 3D chipboard pieces I had decided to buy for my conservatory and glued the edges, where appropriate, with the wood glue and set them aside to dry. I had decided to buy the following:
I set the chipboard pieces I had glued aside to dry and then I tested the Apoxie clay along the edges of the conservatory to see if it was dry enough. Once the clay was thoroughly dried I painted it with silver metallic paint.
When the wood glue for the chipboard pieces I had bought had dried I painted all of them with green metallic paint and set them aside to dry.
Between drying times for the chipboard pieces and Apoxie clay I glued the various silk or paper floral flowers to their respective pots, glued the two trees to their respective basket and pot, glued the miniature silk floral hydrangea stems to their respective baskets, and glued the indoor leafy plants to their respective pots with hot glue.
I decided to glue leafy plants to the lion head fountain I had bought that I wanted to glue to the outside of the outside window section on the left side of the conservatory.
When the green paint on the chipboard tiny plant table, round table, and planter box with trellis was dry I applied decorative washi tape to the edges. I had also purchased miniature metal watering cans, flower pots, garden tools, ceramic flowers and pots, ceramic apples in baskets, etc.
After I had decided exactly where the miniature embellishments I had bought were going to go I glued them to the tops of the miniature chipboard pieces with hot glue so they were secure and affixed to the pieces. I did the same with the miniature embellishments I wanted for the chipboard garden shelf that I wanted to hang in the center of the windows on the inside on the left side of the conservatory. I put the chipboard birdhouses on the shelf.
I had also bought a rustic wire display cart and glued the miniature embellishments I wanted in the cart to it as well with the hot glue.
I removed the front doors from the front chipboard piece and then glued the front piece without the doors to the front of the conservatory with the wood glue. Once all four sides were in place I applied wood glue to the top of the four sides and then attached the top ledge piece to secure the conservatory sides in place.
I had decided ahead of time to add different antique gold Dresden border edges to the bottom outside of the sides, to the top of the burgundy wall papers along the edges of the windows (inside and outside), along the top edge of the windows on the outside, and along the outside of the bottom edge of the top roof piece of the conservatory.
Before attaching the trim I decided to paint the antique gold with metallic silver paint. The gold was just too shiny for my sponge painted colors. So, I decided to tone it down a little with the silver metallic paint. It wouldn't totally cover the gold but would be a good blend of gold and silver.
Once that was thoroughly dry I glued the trim to the the bottom outside of the sides, to the top of the burgundy wall papers along the edges of the windows (inside and outside) and along the top edge of the windows on the outside with the wood glue. I did not glue the antique gold trim painted silver strip to the bottom of the top roof piece yet.
The picture above is a close-up of the trim and sponge painting on the front of the conservatory.
Once I was satisfied with all the embellishments I wanted to add to the inside of the conservatory I glued the top roof in place with the wood glue. When the wood glue was dry and set I glued the antique gold trim painted silver strips along the bottom of the front side, back side, left side and right sides of the top roof with wood glue.
I had been saving the elaborate gold plastic embellishment for years and finally had the perfect place to glue it on the front center top of the conservatory roof. I also had been saving the rustic metal wall clock for years and found the perfect place for it on the center back side of the inside of the conservatory. Both pieces were glued with hot glue.
The last two pieces to be glued to the inside of the back side of the conservatory were two wall bracket shelves that I had glued the white ceramic pots with flowers to. I wanted them on the inside left and right sides of the mounting for the back doors which were closed so I glued them there with hot glue.
I had decided to add several other antique gold embellishments to the outside of the conservatory which included the Dresden scrolls and rosettes shown above. Before I added them I also painted them with the silver metallic paints.
Close-up of the left hand side of the conservatory and the silver painted rosette.
When the silver paint was dry I glued one of the silver painted rosettes to the outside center bottom of the right side of the conservatory and the other silver painted rosette to the outside center bottom of the left side of the conservatory with wood glue.
Right hand front side of the conservatory with the corner silver painted Dresden scroll and rosette.
The front of the left hand side of the conservatory showing the corner Dresden silver painted scroll.
There were eight sections to the Dresden scrolls and I needed eight separate pieces for the outside corners of the bottom of the conservatory and for the corners of the top roof. So, I cut the Dresden scroll into eight pieces and then glued the individual silver painted pieces to the outside four bottom corners and outside four top roof corners with wood glue.
The back right hand side of the conservatory and metal embellishment.
The back left hand side of the conservatory and metal embellishment.
There were only three metal embellishments that I had purchased that I needed to glue to the outside of the conservatory: two gold metal rosette heads and a black metal flower basket hanger. I wanted the two metal rosette figure heads to be glued to the outside of the bottom of the back side with hot glue and the black flower basket hanger to be glued to the left corner of the window on the outside front side of the conservatory with hot glue. Once the hanger was secure I added the hanging silk flower basket to it.
I had two leafy plants in plastic holders that I wanted to glue to the front of the left side of the platform of the conservatory and one to the back of the right side of the platform of the conservatory. Both were glued with hot glue.
For the left and right hand sides of the front of the conservatory I wanted to create two large sunflower medallions with the Apoxie clay. So I pulled about 1" of clay out of the Part A and Part B containers, rolled them into a ball, and then thoroughly mixed then together until they were blended. Then I flattened it into a circle just big enough for the sunflower stamp.
Close up of the clay sunflower medallion I made for the right hand side of the front door of the conservatory.
Close up of the clay sunflower medallion I made for the left hand side of the front door of the conservatory.
When I was satisfied with the circle I stamped it with the sunflower stamp and then waited for it to dry. After my sunflowers were dry I painted them with the silver metallic paint and then waited for the paint to dry. When it was dry I glued one to the bottom of the outside right hand bottom side of the front and the the other to the outside left hand bottom side of the front with hot glue.
The picture above is a view of the right hand side of the front door with the sunflower medallion and tree in pot.
The picture above is a view of the left hand side of the front door with the sunflower medallion and tree in pot.
For the outside platform corners I glued the two trees in their respective pots to the left and right hand sides of the front of the platforms with hot glue.
Hanging shelf on the left hand side of the conservatory.
As mentioned previously I wanted the garden shelf to hang on the center inside of the windows on the inside of the left side of the conservatory so when I was happy with its' placement I glued it in place with the hot glue.
The center and back side of the left side of the conservatory showing the lion head fountain and ivy.
As you could see the back of the garden shelf through the windows I decided to glue the lion head fountain with the leafy plants I had glued to the bowl on the outside of the left hand side of the conservatory so the back of the garden shelf was basically covered.
Close-up of the tulip box on the right hand side of the conservatory.
All that was left for the outside platform embellishments was the chipboard planter with trellis that I had glued paper roses to. I placed it on the outside of the right hand side front corner on the platform and glued it in place with hot glue.
I had purchased miniature ivy that I wanted to cut and place on the back left hand side of the outside of the conservatory as a climbing vine and on the back right hand side as a climbing vine as well. When I was happy with the size of the pieces I glued them in place with hot glue.
Back of the right hand side of the conservatory showing the planter and ivy.
What was left to do was the two front doors and placement of the chipboard wheel barrel with glued embellishments, round table with glued embellishments, chipboard tiny table with glued embellishments, flower basket with blue hydrangea's, and wire cart with glued embellishments that I wanted to place inside the conservatory.
When I was happy with the placement of the pieces I wanted on the inside of the conservatory I glued them in place with hot glue.
The picture above shows the glued front doors and embellishments I glued inside the conservatory.
Inside on the right hand side of the conservatory.
Inside on the left hand side of the conservatory.
Inside the conservatory from the front door.
The bronze turtle on the front steps.
All that was left was to glue the two front doors to the front of the conservatory and glue a little bronze turtle to the center top of the steps in the front of the conservatory. When I was happy with the placement of the two front doors and their opening position I glued them in place with the hot glue. I placed the miniature turtle where I wanted him to be and glued him in place with hot glue.
All that was left to do was to take pictures, which are shown below:
The picture above is a view from the front.
The right hand side of the front door.
The left hand side of the front door.
The right hand side of the conservatory.
The left hand side of the conservatory.
The back of the conservatory.
The top of the conservatory.
Another view of the top of the conservatory.
And, looking down from the top of the conservatory.
While it took a lot longer than I thought it would I was thrilled with the results. It came out beautifully and both hubby and I love seeing it in our sunroom.
I was glad I had decided to use this as a test case for a Victorian dollhouse I wanted to make, which I knew would be a LOT more involved and would be a LOT more time consuming.
I didn't know until I created my Victorian conservatory exactly how much more involved and how much more time consuming embarking on that adventure would be. I had definitely been way too naïve all these years as to easily creating a dollhouse. The blinders were off now and I now know it will take an enormous amount of effort and time to do so.
However, I'm not discouraged. I still want to make a Victorian dollhouse and I'm still hoping that at some point in the remainder of my life I will find the time to do so. I have my fingers crossed.
Please respect My Terms of Use: All patterns, e-patterns, printables, e-printables, e-books, graphics, tutorials, how-to's, articles and other e-products © 2004-2023 Linda Walsh Originals-Designs by Linda Walsh. All rights reserved. Commercial selling or reselling by any means prohibited without the written consent of Linda Walsh.
Patterns, e-patterns, printables, e-printables, e-books, graphics, tutorials, how-to's, articles and other e-products are for personal use only. You may not modify, photocopy, download, upload, post, transmit, display, perform, publish, license, reprint, create derivative works from, mass duplicate, re-sell, digitize, and reproduce in any other form (print, digital or electric) or commercially apply, embed, share, Email, or redistribution in any other means. Use of any of the above is prohibited without the written permission of Linda Walsh.
However, you may link to my website(s)/blog(s) and the individual page(s)/blog post(s) (including 1 picture) but do not copy, reprint or duplicate my website(s)/blog(s) or individual page(s)/post(s ) without my permission.
Items made from Linda Walsh Originals E-Patterns and E-Books are intended for personal use for fun or small scale personal and business profit as long as you credit us with the design. Large scale commercial use (i.e. mass production) of items made from Linda Walsh Originals E-Patterns are by permission only.
Copyright © 2004 - 2023 - All Rights Reserved - Written By Linda Walsh of Linda Walsh Originals and Linda's Blog. Linda is a doll maker and doll pattern designer.