

Back in 2014 I decided to take Julie Haymaker's "Let's Go For A Ride" class at Artful Gathering. The project called for making an adorable little mixed media shadow box scene with 3 pets sticking their heads out the window of a car that was driving over a hill. The class looked like it would be a lot of fun to take so I decided to take it.
A kit was available for purchase from Julie's Etsy shop "Bisbeebliss" so I ordered one as it's a lot easier to do that than run around to get supplies. The kit came with everything you needed to create the project including thread and needle. It was fabulous.
Well, in looking at Julie's kits for sale she had some unusual unfinished wood pieces for making several different types of mixed media dolls.
Julie is a remarkable mixed media artist who has an eye for unusual art doll creations and her unfinished wood kits were available as a tool to help you with this.
So, of course I bought a few. If you know me you know that a few translates to "a lot of them."
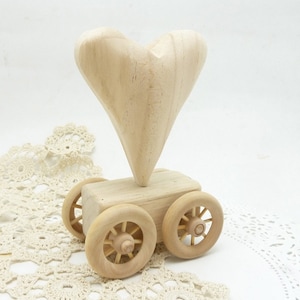

I've used a few over the years when the application seemed to fit something I wanted to create. I used the heart and wood carriage above for my "Don Juan Romeo" mixed media art doll creation that I created this summer.
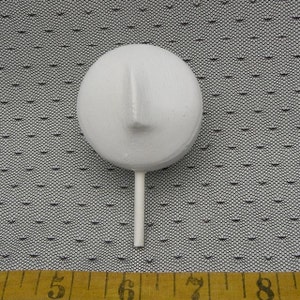
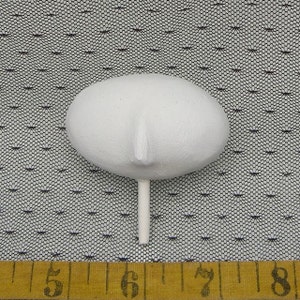
I've been wanting to use the two plaster doll heads since I bought them and decided they would be the perfect application for some mixed media Christmas elves I wanted to make now. In September of 2019 I decided to use them and made my "Mixed Media Christmas Elves."
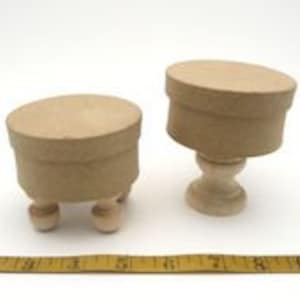

I used the two papier-mâché box stand above for the Fall season "Tinytopia Mixed Media Fairy Houses" I made back in 2015.
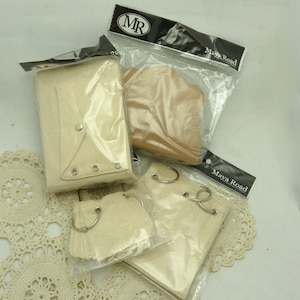


I haven't used the unfinished wood pieces and kits shown above and I'm very happy to have them as I don't believe she sells them anymore.
I've used a few over the years when the application seemed to fit something I wanted to create. I used the heart and wood carriage above for my "Don Juan Romeo" mixed media art doll creation that I created this summer.
I've been wanting to use the two plaster doll heads since I bought them and decided they would be the perfect application for some mixed media Christmas elves I wanted to make now. In September of 2019 I decided to use them and made my "Mixed Media Christmas Elves."
I used the two papier-mâché box stand above for the Fall season "Tinytopia Mixed Media Fairy Houses" I made back in 2015.
I haven't used the unfinished wood pieces and kits shown above and I'm very happy to have them as I don't believe she sells them anymore.
I've been holding on to several of her 8” unfinished art doll kits for awhile and I decided to use three of them for some ideas I had in mind now. Here's how I envisioned I would use the unfinished art doll kits:
I had wanted to create some mixed media art doll faeries for awhile with a winter snow theme and decided the unfinished paper, wood, and paper-clay art doll kits might be perfect for this.
Plus, I had some teal green metallic glitter sprayed grass reeds floral sprays that I had been saving for a few years. This seemed like the perfect time to use them.
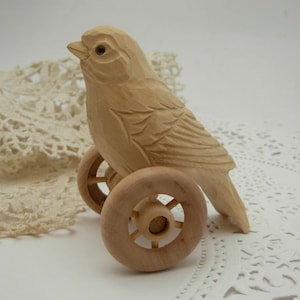
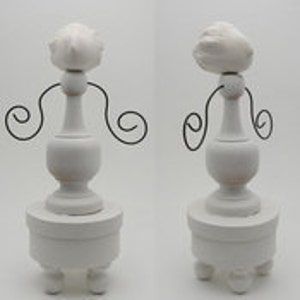
The 8” unfinished art doll kit was already painted white and was, basically, comprised of three sections:


The head was made out of plaster with a pre-shaped head, nose, and hair with bun. I figured I could paint the hair a combination of silver and white metallic paints to give it a shine and glow. The face I could paint with light skin tone acrylic paints and then paint the face itself with acrylic or watercolor paints.

The body was a wood finial that was painted white. The arms were formed from copper distressed wire and were perfect for what I had in mind for my winter snow faeries. I figured I could sponge paint the bodies and apply snow and winter themed embellishments.

The base was a papier-mache box with lid that was painted white with wood beads that were also painted white and had been glued on the bottom of the papier-mache box for legs. I figured I could sponge paint the top of the round box to match the wood finial body and then collage the paper-mache box and lid and apply snow and winter themed embellishments as well.
I also wanted to apply some of the various fiber embellishments and trims I had that would fit right in with my snow and winter themed faeries.
Several years ago I had bought some adorable and colorful teal blue glitter silk floral stems and have been wanting to use them ever since. Finally, the right application came along. I thought they would be perfect in the backs of the faeries to make it seem like the faeries were stepping out from amongst the reeds of a winter woodland forest.
I also wanted to create a wind blown snow and winter theme for my faeries and thought the teal green metallic glitter sprayed grass reeds floral sprays in the back of the doll would be perfect to create the wind blown effect.
The art dolls themselves were about 8” tall and with the teal green metallic glitter sprayed grass reeds floral sprays would be about 13” tall.
I thought they would end up being pixyish winter themed mixed media snow art doll fairies so I decided to call them Pixie, Dixie, and Mixie. I decided to, basically, make them all the same except but use different embellishments or scrapbook collage papers to showcase their individual personalities.
Once I had decided what I wanted to do it seemed like they would be fairly easy to finish.

I decided to start with their faces and painted them with a combination of acrylic paint and watercolor paints. I used the acrylic paints for the eyes and mouth and used blue watercolor for the icy blue eye shadow effect that I wanted. Pastels were used for blush on their cheeks.
As I wanted the snow faeries to be winter themed I decided to use modeling paste to create a snow texture to their hair (See Diagram #1). So, I applied modeling paste to their hair (See Diagram #1). Then I painted their hair with a combination of silver and white metallic paint (See Diagram #1).
After all the paints were thoroughly dried I applied clear gesso to seal their faces and heads (See Diagram #1).

Their arms were already fashioned out of wire and into a swirl pattern which was perfect for my winter snow theme and worked out well with the snow accents so when I was finished with the faeries I added Alene's True Snow accents to them as well as to their noses and throughout their bodies when each section was finished(See Diagram #2).
The reason I decided to add snow accents to their wired metal arms was to create the effect of fallen snow.

As the art doll kits already had unfinished wood finial bodies which were already painted white I decided to sponge paint them with winter metallic paint colors like light and dark teal blue, light blue and royal blue See Diagram #3).
As I was sponge painting the wood finial bodies already I also sponge painted the papier-mache round boxes and lids that the wood finial bodies were glued to with the same pattern and colors as I wasn't going to add scrapbook paper there (See Diagram #3).
After the sponge paints on the wood finial bodies and papier-mache round boxes were dried I sealed the sponge paints on both areas with clear gesso (See Diagram #3).

For awhile now I’ve had unfinished wood snowflakes and Christmas themed unfinished wood words waiting to be painted or embossed so I decided to use some of them as an embellishment for my snow faeries.
I embossed one of the snowflakes and the word “Joy” with light teal blue metallic powder (See Diagram#4).
For the 2nd snowflake I embossed it with copper metallic powder (See Diagram #4).
For the light teal blue snowflake and the “Joy” word I embellished it with metallic puffy white paint drops (See Diagram #4).
For the copper snowflake I embellished it with dark teal blue metallic puffy paint drops and then let all three dry thoroughly before gluing them to the fronts of the wood finial bodies (See Diagram #4).
Before adding the embellished unfinished pieces to the front of the wood finial bodies I added three snowflake paper stickers to the center of the front of each of the wood finial bodies and three snowflake paper stickers to the center of the back of each of the wood finial bodies (See Diagram #4).
I glued the snowflakes and “Joy” piece on top of the center of the paper sticker I had placed on the center of the wood bodies with hot glue (See Diagram #4).
After that I created three bows out of a length if 1/4” sheer glittery ribbon and glued each to the center front of the waistline of each wood finial bodies just above the top of the paper snowflakes (See Diagram #4).

I cut three pieces of decorative fringe fiber to fit around the finial bodies just under the top lid and wrapped each around the finial bodies overlapping them in the back and securing them with hot glue (See Diagram #5).
For the neck line under the heads and just above the top of the wood finial I bodies decided to wrap long lengths of medium teal blue fiber strands around and around the neck lines until I was happy with the look and secured the end pieces with hot glue in the back (See Diagram #5).

For the bottom lips of the wood finial bodies I cut three strips of decorative scrapbook papers or word phrase strips long enough to go around the bottom lips and meet in the back (See Diagram #6).
I brushed modpodge on the back of the scrapbook strips and then pressed them against the bottom lips until they were secure and met evenly in the back (See Diagram #6).
Then I rolled the strips with a small wallpaper roller until they were securely in place and adhered to the bottom lips (See Diagram #6).
After rolling the pieces with a wallpaper roller I brushed modpodge on them to secure them to the bottom lips (See Diagram #6).
I cut three long strips of decorative mixed media fibers to fit around the bottom of the wood finial bodies just above the bottom lip sections and wrapped them around the bottom several times then hot glued the ends in the back to secure them (See Diagram #6).

I was pleased with the way the wood finial bodies came out and after finishing the round boxes and covered lids added the snow accents.

Before finishing and embellishing the bottom of the snow faeries I measured the height of the papier-mache round boxes and lids and cut the three teal green metallic glitter sprayed grass reeds floral sprays so the bottom of the sprays would match the height of the papier-mache round boxes with covered tops (See Diagram #7).
I cut a small hole in the top back of the lids of the papier-mache boxes and inserted the stem of each of the teal green metallic glitter sprayed grass reeds floral sprays until they met the bottom of the papier-mache round boxes (See Diagram #7).
Then I applied hot glue to the hole I had cut to secure the floral stem to the papier-mache round box top lid (See Diagram #7).

The wood finial pieces for their bodies were affixed to white painted papier-mâché round boxes with covered tops that were all painted white. I had previously sponge painted the lid tops so I didn’t need to do anymore there (See Diagram #8).
I decided to use different scrapbook collage papers to decorate the round boxes and decided to decorate the bottoms of the snow faeries with snow and winter themed woodland scrapbook papers (See Diagram #8).
For these purposes I needed a wide strip for the side of the round boxes and a thin strip for the side of the round lids (See Diagram #8).
I did not have to worry about scrapbook papers for the top of the papier-mache round lids as I had already sponge painted the top of the papier-mache round boxes and lids when I had sponge painted the wood finial bodies (See Diagram #8).
For the narrow strip of the side of the round lids I cut three strips of decorative scrapbook papers or word phrase strips long enough to go around the side of the round lids and meet in the back (See Diagram #8).
I brushed modpodge on the back of the scrapbook strips and then pressed them against the side of the round lids until they were secure and met evenly in the back (See Diagram #8).
Then I rolled the strips with a small wallpaper roller until they were securely in place and adhered to the side of the round lids (See Diagram #8).

Then I cut three strips of the winter woodland themed scrapbook paper long enough to go around the sides of the round boxes and meet in the back (See Diagram #9).
I brushed modpodge on the back of the scrapbook strips and then pressed them against the sides of the round boxes until they were secure and met evenly in the back (See Diagram #9).
Then I rolled the strips with a small wallpaper roller until they were securely in place and adhered to the sides of the round boxes (See Diagram #9).
After rolling the strips around the sides of the round lids and rolling the strips around the sides of the round boxes with a wallpaper roller I brushed modpodge on them to secure each of them to the sides of the round lids and sides of the round boxes (See Diagram #9).

I had decided to embellish the papier-mache round boxes with winter woodland themed stickers and scrapbook images (See Diagram #10).
After deciding which sticker and scrapbook images to use I applied modpodge to the back of each and placed them where I wanted them on the sides of the round box (See Diagram #10).
Once I was happy with their placement I brushed modpodge on them to seal them to the sides of the round box (See Diagram #10).

After all the stickers and scrapbook images were applied I added some fiber around the top and bottom of the round lid (See Diagram #11).
I cut two strips of teal blue fibers for each of the lids to fit around the top of the lids and to meet in the back and then hot glued them to the top of the lid (See Diagram #11).
I did the same with the teal blue fiber and bottom of the lids (See Diagram #11).

To finish the bottom of the round box I added 1/2” glittery plastic trim to the bottoms of the round boxes (See Diagram #12).
I cut one strip of white glittery fiber for each of the round boxes to fit around the bottom of the round boxes and to meet in the back and then hot glued them to the bottom of the round boxes (Se Diagram #12).

After all the embellishments were added I applied Alene's True Snow accents to the faerie dolls starting with snow on their noses, on their wired arms and then to the rest of their bodies, as well as to the round boxes and lids (See Diagram #13).
I added a lot of the snow as I wanted to create the effect of recently fallen snow (See Diagram #13).
I was really pleased with the way all three of the mixed media winter snow faeries came out.
They are cheery and will make a great winter season decorations.
Now where should I put them........

I also created a free e-book for you showing how I made my mixed media snow faeries art dolls.

To view and download my free e-book please CLICK HERE. You'll be brought to Google Drive where you can view my free e-book. Then just download my free .pdf e-book by clicking on the down arrow in the top center.
For more information on all my free e-patterns, e-printables and e-books please CLICK HERE
Copyright © 2004 - 2023 - All Rights Reserved - Designed and Written By Linda Walsh
Please respect My Terms of Use: All patterns, e-patterns, printables, e-printables, e-books, graphics, tutorials, how-to's, articles and other e-products © 2004-2023 Linda Walsh Originals-Designs by Linda Walsh. All rights reserved. Commercial selling or reselling by any means prohibited without the written consent of Linda Walsh.
Patterns, e-patterns, printables, e-printables, e-books, graphics, tutorials, how-to's, articles and other e-products are for personal use only. You may not modify, photocopy, download, upload, post, transmit, display, perform, publish, license, reprint, create derivative works from, mass duplicate, re-sell, digitize, and reproduce in any other form (print, digital or electric) or commercially apply, embed, share, Email, or redistribution in any other means. Use of any of the above is prohibited without the written permission of Linda Walsh.
Patterns, e-patterns, printables, e-printables, e-books, graphics, tutorials, how-to's, articles and other e-products are for personal use only. You may not modify, photocopy, download, upload, post, transmit, display, perform, publish, license, reprint, create derivative works from, mass duplicate, re-sell, digitize, and reproduce in any other form (print, digital or electric) or commercially apply, embed, share, Email, or redistribution in any other means. Use of any of the above is prohibited without the written permission of Linda Walsh.
However, you may link to my website(s)/blog(s) and the individual page(s)/blog post(s) (including 1 picture) but do not copy, reprint or duplicate my website(s)/blog(s) or individual page(s)/post(s ) without my permission.
Items made from Linda Walsh Originals E-Patterns are intended for personal use for fun or small scale personal and business profit as long as you credit us with the design. Large scale commercial use (i.e. mass production) of items made from Linda Walsh Originals E-Patterns are by permission only.
Please see my Terms and Conditions for additional information.
Copyright © 2004 - 2023 - All Rights Reserved - Written By Linda Walsh of Linda Walsh Originals and Linda's Blog. Linda is a doll maker and doll pattern designer.
No comments:
Post a Comment