Saturday, April 24, 2021

Free E-Book of Mixed Media and Collage Scrapbook Pages From the 1880 Little Women Book


Last July I posted about my love of books and my grandmother's and great Aunts influence on me. Two of the first books I got from my grandmother back in 1966 when I was a young lady were Little Women and Little Men by Louisa May Alcott.  

I loved the books and especially loved Jo because she was so fiercely independent.  I also admired Louisa May Alcott as she was an abolitionist, feminist and involved in the women's suffrage movement.  


For several months in 2020 I had been looking for illustrations in some of the free e-books that are in the public domain on the Project Gutenberg website.  To my surprise I found the Little Women free E-Book (cover shown above) on the Project Gutenberg website from 1880 that had more than 200 illustrations by Frank T. Merrill and a picture of the Home of the Little Women by Edmund H. Garrett. 

Even though they were all black and white I was still thrilled.

The books my grandmother had given me had 4 color illustrations for Little Women and 5 color illustrations for Little Men, which is certainly not a lot of illustrations. Plus, they currently aren't in the public domain.

As I started looking through the pages, looking at the beautiful black and white illustrations, and reading some of the chapters again I felt inspired and thought they'd make for some adorable mixed media, collage, decoupage  or paper-craft creations. 

Just like Louisa May Alcott "I want to do something splendid...." however, unlike Louisa my creations would involve crafts not writing books.

I thought you might get inspired by the books and illustrations too, so I decided to post the illustrations back then for you all to enjoy.

In thinking about my post from 2020 I thought it would be a lot easier for all of you if I created a free e-book with all the illustrations in it that you could save and download to your own computer, which would make it easier for all of you to use the illustrations in your mixed media or collage crafting projects.

So, shown below is my free E-Book.   

(Based on the Project Guttenberg 1880 Little Women Free E-Book with illustrations by Frank T. Merrill and a picture of the Home of the Little Women by Edmund H. Garrett.)

To view and download my free e-book please CLICK HERE. You'll be brought to Google Drive where you can view my free e-book. Then just download my free .pdf e-book by clicking on the down arrow in the top center.

For more information on all my free e-patterns, e-printables and e-books please CLICK HERE

Please respect My Terms of Use:  All patterns, e-patterns, printables, e-printables, e-books, graphics, tutorials, how-to's, articles and other e-products © 2004-2023 Linda Walsh Originals-Designs by Linda Walsh. All rights reserved. Commercial selling or reselling by any means prohibited without the written consent of Linda Walsh.

Patterns, e-patterns, printables, e-printables, e-books, graphics, tutorials, how-to's, articles and other e-products are for personal use only. You may not modify, photocopy, download, upload, post, transmit, display, perform, publish, license, reprint, create derivative works from, mass duplicate, re-sell, digitize, and reproduce in any other form (print, digital or electric) or commercially apply, embed, share, Email, or redistribution in any other means. Use of any of the above is prohibited without the written permission of Linda Walsh.

However, you may link to my website(s)/blog(s) and the individual page(s)/blog post(s) (including 1 picture) but do not copy, reprint or duplicate my website(s)/blog(s) or individual page(s)/post(s ) without my permission.

Items made from Linda Walsh Originals E-Patterns are intended for personal use for fun or small scale personal and business profit as long as you credit us with the design. Large scale commercial use (i.e. mass production) of items made from Linda Walsh Originals E-Patterns are by permission only.

Please see my Terms and Conditions for additional information.

Copyright © 2004 - 2023 - All Rights Reserved - Written By Linda Walsh of Linda Walsh Originals and Linda's Blog. Linda is a doll maker and doll pattern designer.


Sunday, April 11, 2021

Snow Me Red, White, and Blue 4th of July Country Snowman Free E-Pattern


"Snow Me Red, White, and Blue!" wants to show everyone how patriotic he is and is going to do so by wearing his favorite red, white, and blue outfit when he marches in the "Winter Carnival" parade. 

He doesn't care if they're the colors of summer and that it's winter time. He wants to wear them in the parade.

"Snow Me Red, White, and Blue!" is a 15" self-standing patriotic snowman doll. He has white felt body. His face is outline embroidered with black floss and he has black bead eyes, a resin carrot nose, and blushed cheeks. He is wearing his favorite outfit. His coat is lined and cuffed, and has fold down lapels and a red heart front button for closure. His bow tie is red, white, and blue and his lined top hat is, too. 

"Snow Me" is carrying two flags that he hopes to wave during the Winter Carnival parade.

"Snow Me Red, White, and Blue!" is a proud citizen - that is, if snowmen can be citizens - and wants everyone to know it. So, let's hear it for the red, white, and blue.

Designer - Linda Walsh Originals
“Snow Me Red, White, and Blue!”, 15” Patriotic Snowman Doll E-Pattern - Patriotic Series - Pattern Category - Skill Level - Beginner 

To view and download my free e-pattern please CLICK HERE. You'll be brought to Google Drive where you can view my free e-book. Then just download my free .pdf e-book by clicking on the down arrow in the top center.  

For more information on all my free e-patterns, e-printables and e-books please CLICK HERE.

Please respect My Terms of Use:  All patterns, e-patterns, printables, e-printables, e-books, graphics, tutorials, how-to's, articles and other e-products © 2004-2023 Linda Walsh Originals-Designs by Linda Walsh. All rights reserved. Commercial selling or reselling by any means prohibited without the written consent of Linda Walsh.

Patterns, e-patterns, printables, e-printables, e-books, graphics, tutorials, how-to's, articles and other e-products are for personal use only. You may not modify, photocopy, download, upload, post, transmit, display, perform, publish, license, reprint, create derivative works from, mass duplicate, re-sell, digitize, and reproduce in any other form (print, digital or electric) or commercially apply, embed, share, Email, or redistribution in any other means. Use of any of the above is prohibited without the written permission of Linda Walsh.

However, you may link to my website(s)/blog(s) and the individual page(s)/blog post(s) (including 1 picture) but do not copy, reprint or duplicate my website(s)/blog(s) or individual page(s)/post(s ) without my permission.

Items made from Linda Walsh Originals E-Patterns are intended for personal use for fun or small scale personal and business profit as long as you credit us with the design. Large scale commercial use (i.e. mass production) of items made from Linda Walsh Originals E-Patterns are by permission only.

Please see my Terms and Conditions for additional information.

Copyright © 2004 - 2023 - All Rights Reserved - Written By Linda Walsh of Linda Walsh Originals and Linda's Blog. Linda is a doll maker and doll pattern designer.

Saturday, April 10, 2021

Uncle Warren - A True Patriot! Primitive Uncle Sam Doll Free E-Pattern


"Uncle Warren" truly is a true red, white, and blue patriot. 

He loves his country and, even now, at the age of 82 is still willing to serve his country. 

If they need him to serve, he'll be ready. 

Of course, at his age he can't fight, but he can still serve. 

Paperwork, no problem. 

Cooking for the GI's, no problem. 

Cleaning the mess hall, no problem. 

Encouragement and moral, no problem. 

Uncle Warren is ready and able to serve.


Uncle Warren, A True Patriot! loves his country. He is a self-sitting Primitive Uncle Sam doll with a cloth body and drawn face. He sports a long beard, moustache, and white hair. He is wearing a shirt with long cuffed sleeves, lined vest, and long cuffed pants. His patriotic stove pipe hat is lined and rests on his head. His right arm is saluting and he is holding a flag in his left hand. His boots are adorned with bows.

Designer - Linda Walsh Originals

To view and download my free e-pattern please CLICK HERE. You'll be brought to Google Drive where you can view my free e-book. Then just download my free .pdf e-book by clicking on the down arrow in the top center.  

For more information on all my free e-patterns, e-printables and e-books please CLICK HERE.

Please respect My Terms of Use:  All patterns, e-patterns, printables, e-printables, e-books, graphics, tutorials, how-to's, articles and other e-products © 2004-2023 Linda Walsh Originals-Designs by Linda Walsh. All rights reserved. Commercial selling or reselling by any means prohibited without the written consent of Linda Walsh.

Patterns, e-patterns, printables, e-printables, e-books, graphics, tutorials, how-to's, articles and other e-products are for personal use only. You may not modify, photocopy, download, upload, post, transmit, display, perform, publish, license, reprint, create derivative works from, mass duplicate, re-sell, digitize, and reproduce in any other form (print, digital or electric) or commercially apply, embed, share, Email, or redistribution in any other means. Use of any of the above is prohibited without the written permission of Linda Walsh.

However, you may link to my website(s)/blog(s) and the individual page(s)/blog post(s) (including 1 picture) but do not copy, reprint or duplicate my website(s)/blog(s) or individual page(s)/post(s ) without my permission.

Items made from Linda Walsh Originals E-Patterns are intended for personal use for fun or small scale personal and business profit as long as you credit us with the design. Large scale commercial use (i.e. mass production) of items made from Linda Walsh Originals E-Patterns are by permission only.

Please see my Terms and Conditions for additional information.

Copyright © 2004 - 2023 - All Rights Reserved - Written By Linda Walsh of Linda Walsh Originals and Linda's Blog. Linda is a doll maker and doll pattern designer.

Wednesday, April 07, 2021

Eleven Adorable Cloth Stump Dolls Free E-Patterns


Recently I got to thinking about some of the cloth stump doll e-patterns I designed and thought you might like to make some stump dolls of your own.  So, I decided to make their e-patterns free and created blog posts on how to make them as well as a link to their free e-patterns.

If you don't know what stump dolls are they are dolls made of anything (i.e. wood, cloth, etc.) that are basically a body and head.  Sometimes they have arms, sometimes they don't.  Most are capable of standing on their own but don't have to be in order to be considered stump dolls.  Primitive stump dolls sometimes have little arms and legs.

My cloth stump dolls, shown above, could also be classified as shelf sitter dolls which are small dolls that can sit by themselves on a shelf.  Sometimes they have dangling legs, sometimes they don't.  The cloth stump dolls of mine, shown above, do not have dangling legs but have square bottoms so they can sit on a shelf by themselves.

My cloth dolls are stump dolls but on my e-patterns I classified my cloth stump dolls as stout dolls because they are bulky in their bodies and their middle section is wider than their length.  

No matter what - whether they are stump, shelf sitters, or stout dolls they're easy to make so I hope you have fun making yours.

Just click on the links below:


For more information on all my free e-patterns, e-printables and e-books please CLICK HERE.

Please respect My Terms of Use:  All patterns, e-patterns, printables, e-printables, e-books, graphics, tutorials, how-to's, articles and other e-products © 2004-2023 Linda Walsh Originals-Designs by Linda Walsh. All rights reserved. Commercial selling or reselling by any means prohibited without the written consent of Linda Walsh.

Patterns, e-patterns, printables, e-printables, e-books, graphics, tutorials, how-to's, articles and other e-products are for personal use only. You may not modify, photocopy, download, upload, post, transmit, display, perform, publish, license, reprint, create derivative works from, mass duplicate, re-sell, digitize, and reproduce in any other form (print, digital or electric) or commercially apply, embed, share, Email, or redistribution in any other means. Use of any of the above is prohibited without the written permission of Linda Walsh.

However, you may link to my website(s)/blog(s) and the individual page(s)/blog post(s) (including 1 picture) but do not copy, reprint or duplicate my website(s)/blog(s) or individual page(s)/post(s ) without my permission.

Items made from Linda Walsh Originals E-Patterns are intended for personal use for fun or small scale personal and business profit as long as you credit us with the design. Large scale commercial use (i.e. mass production) of items made from Linda Walsh Originals E-Patterns are by permission only.

Please see my Terms and Conditions for additional information.

Copyright © 2004 - 2023 - All Rights Reserved - Written By Linda Walsh of Linda Walsh Originals and Linda's Blog. Linda is a doll maker and doll pattern designer.

Tuesday, April 06, 2021

Hazard A Guess What I Am? Primitive Ghost Stump Doll Free E-Pattern


Who can resist a scary but adorable ghost?  Especially one who is a little confused.

Hazard A Guess What I Am? seems to have a bit of a problem in that people aren’t sure he’s a ghost. 

He can’t understand this because he thinks he’s scary. He scares himself. 

Hazard is a free standing ghost doll with a cloth body, and an embroidered face with button eyes. He is wearing a vest and multi-colored fringed scarf. “Hazard A Guess What I Am?” is coffee stained throughout.


He's a little confused, but he's not scary. What's up with that? 

You see, "Hazard A Guess What I Am?" has a problem with his heritage. 

He isn't even sure he is from a ghostly line. If you can't tell he's a ghost and his heredity is in question - how is he ever going to know? 

Sometimes he looks like a ghost, he feels like a ghost, and he walks like a ghost. But, is he really a ghost?

Designer-Linda Walsh Originals

To view and download my free e-pattern please CLICK HERE. You'll be brought to Google Drive where you can view my free e-book. Then just download my free .pdf e-book by clicking on the down arrow in the top center.  

For more information on all my free e-patterns, e-printables and e-books please CLICK HERE.

Please respect My Terms of Use:  All patterns, e-patterns, printables, e-printables, e-books, graphics, tutorials, how-to's, articles and other e-products © 2004-2023 Linda Walsh Originals-Designs by Linda Walsh. All rights reserved. Commercial selling or reselling by any means prohibited without the written consent of Linda Walsh.

Patterns, e-patterns, printables, e-printables, e-books, graphics, tutorials, how-to's, articles and other e-products are for personal use only. You may not modify, photocopy, download, upload, post, transmit, display, perform, publish, license, reprint, create derivative works from, mass duplicate, re-sell, digitize, and reproduce in any other form (print, digital or electric) or commercially apply, embed, share, Email, or redistribution in any other means. Use of any of the above is prohibited without the written permission of Linda Walsh.

However, you may link to my website(s)/blog(s) and the individual page(s)/blog post(s) (including 1 picture) but do not copy, reprint or duplicate my website(s)/blog(s) or individual page(s)/post(s ) without my permission.

Items made from Linda Walsh Originals E-Patterns are intended for personal use for fun or small scale personal and business profit as long as you credit us with the design. Large scale commercial use (i.e. mass production) of items made from Linda Walsh Originals E-Patterns are by permission only.

Please see my Terms and Conditions for additional information.

Copyright © 2004 - 2023 - All Rights Reserved - Written By Linda Walsh of Linda Walsh Originals and Linda's Blog. Linda is a doll maker and doll pattern designer.

Monday, April 05, 2021

Mabel I Won’t Cast A Spell?” Primitive Witch Stump Doll Free E-Pattern


Mabel I Won't Cast A Spell! can’t decide whether to be a good witch or a bad witch. 

She’s watched “The Wizard of Oz” so many times your head would spin. 

And, sometimes, hers does. 

She is a witch after all.


Mabel is a free standing primitive witch doll with a cloth body, an embroidered face, and a full head of curly gray. She is wearing a lined cape, dress, fringed scarf, and lined witches hat. “Mabel I Won’t Cast A Spell?” is coffee stained throughout.

There is no confusion with Mabel. She knows she's a witch. 

In fact, she's a "teasing, taunting witch!" 

She may or may not cast a spell on her depending upon her mood.  

Lucky for us she's in a "Hey, Look At Me! I'A Model!" mood today and a little distracted. 

Otherwise we'd all be "frozen" in our chairs, literally.

Designer - Linda Walsh Originals

To view and download my free e-pattern please CLICK HERE. You'll be brought to Google Drive where you can view my free e-book. Then just download my free .pdf e-book by clicking on the down arrow in the top center.  

For more information on all my free e-patterns, e-printables and e-books please CLICK HERE.

Please respect My Terms of Use:  All patterns, e-patterns, printables, e-printables, e-books, graphics, tutorials, how-to's, articles and other e-products © 2004-2023 Linda Walsh Originals-Designs by Linda Walsh. All rights reserved. Commercial selling or reselling by any means prohibited without the written consent of Linda Walsh.

Patterns, e-patterns, printables, e-printables, e-books, graphics, tutorials, how-to's, articles and other e-products are for personal use only. You may not modify, photocopy, download, upload, post, transmit, display, perform, publish, license, reprint, create derivative works from, mass duplicate, re-sell, digitize, and reproduce in any other form (print, digital or electric) or commercially apply, embed, share, Email, or redistribution in any other means. Use of any of the above is prohibited without the written permission of Linda Walsh.

However, you may link to my website(s)/blog(s) and the individual page(s)/blog post(s) (including 1 picture) but do not copy, reprint or duplicate my website(s)/blog(s) or individual page(s)/post(s ) without my permission.

Items made from Linda Walsh Originals E-Patterns are intended for personal use for fun or small scale personal and business profit as long as you credit us with the design. Large scale commercial use (i.e. mass production) of items made from Linda Walsh Originals E-Patterns are by permission only.

Please see my Terms and Conditions for additional information.

Copyright © 2004 - 2023 - All Rights Reserved - Written By Linda Walsh of Linda Walsh Originals and Linda's Blog. Linda is a doll maker and doll pattern designer.

Sunday, April 04, 2021

William Come or Won’t They? Primitive Scarecrow Stump Doll Free E-Pattern


There's just something very charming about a trio of shelf sitter cloth dolls - don't you think?  Even if we're talking about a scarecrow in April.  

A little early for the Fall season - don't you think, Linda?

Nah! I love using stump dolls to decorate for every season and holiday.  

If you do, too then you're going to love my “William Come or Won’t They? primitive scarecrow stump doll free e-pattern.

Why not make a couple now in time for next Fall's scarecrow season.  Who says scarecrows can only come out in the Fall.


William Come Or Won't They? can’t figure out whether the crows are going to come or not. 

If they do, he’s prepared. 

He is a free standing scarecrow doll with a cloth body, an embroidered face with button eyes. He is wearing a patched coat with buttons and pockets, two scarves, and a hat. His hair is made of raffia and he’s holding a stained wooden rake. “William Come or Won’t They?” is coffee stained throughout.

He's scarecrow. And, he knows he's a scarecrow through and through. 

He comes from a long line of scarecrows. 

William Come or Won't They? has a different problem. 

He just can't figure out whether the crows are going to come or not. 

If they do, he wants to be prepared. After all, that's what they taught him in the "Scarecrow Boy Scouts" and the "Scarecrow Army." 

"Always Be Prepared!" 

So, he's ready. 

Come on all you crows. 

Hey, all you crows! 

Williams ready for ya!!! 

Come and get him.

Designer - Linda Walsh Originals


To view and download my free e-pattern please CLICK HERE. You'll be brought to Google Drive where you can view my free e-book. Then just download my free .pdf e-book by clicking on the down arrow in the top center.  

For more information on all my free e-patterns, e-printables and e-books please CLICK HERE.

Please respect My Terms of Use:  All patterns, e-patterns, printables, e-printables, e-books, graphics, tutorials, how-to's, articles and other e-products © 2004-2023 Linda Walsh Originals-Designs by Linda Walsh. All rights reserved. Commercial selling or reselling by any means prohibited without the written consent of Linda Walsh.

Patterns, e-patterns, printables, e-printables, e-books, graphics, tutorials, how-to's, articles and other e-products are for personal use only. You may not modify, photocopy, download, upload, post, transmit, display, perform, publish, license, reprint, create derivative works from, mass duplicate, re-sell, digitize, and reproduce in any other form (print, digital or electric) or commercially apply, embed, share, Email, or redistribution in any other means. Use of any of the above is prohibited without the written permission of Linda Walsh.

However, you may link to my website(s)/blog(s) and the individual page(s)/blog post(s) (including 1 picture) but do not copy, reprint or duplicate my website(s)/blog(s) or individual page(s)/post(s ) without my permission.

Items made from Linda Walsh Originals E-Patterns are intended for personal use for fun or small scale personal and business profit as long as you credit us with the design. Large scale commercial use (i.e. mass production) of items made from Linda Walsh Originals E-Patterns are by permission only.

Please see my Terms and Conditions for additional information.

Copyright © 2004 - 2023 - All Rights Reserved - Written By Linda Walsh of Linda Walsh Originals and Linda's Blog. Linda is a doll maker and doll pattern designer.

Saturday, April 03, 2021

My Isabell Cross My Heart Primitive Snow-lady Stump Doll Free E-Pattern


Benjamin's sister, "Isabell Cross My Heart", is forever telling "Benjamin Cross My Heart" not to make promises he can't keep. But, he keeps doing it and, every time, come Spring, all his friends are disappointed. It seems Benjamin will never learn.

"Isabell - Cross My Heart!" just loves to make little girls smile. Unlike her brother, Benjamin, she never makes promises she can’t keep.


She has a white/gray hair that sticks up from the sides of her head. She is a free standing snow-lady and has a warm & natural body with an embroidered face, lined vest with four pockets which ties in a bow in the front, a fringed scarf tied around her neck, and old lace hanker-chief tied around her neck. She is coffee stained throughout.

All the little snow girls love to gather around Isabell as she is just so sweet and, unlike her brother, Benjamin Cross My Heart" never tells them she'll be around forever. 

She knows better. 

She tells them she'll see them next winter and they are happy with that thought.

Isabell is too. 

She would hate to tell a lie.


To view and download my free e-pattern please CLICK HERE. You'll be brought to Google Drive where you can view my free e-book. Then just download my free .pdf e-book by clicking on the down arrow in the top center.  

For more information on all my free e-patterns, e-printables and e-books please CLICK HERE.

Please respect My Terms of Use:  All patterns, e-patterns, printables, e-printables, e-books, graphics, tutorials, how-to's, articles and other e-products © 2004-2023 Linda Walsh Originals-Designs by Linda Walsh. All rights reserved. Commercial selling or reselling by any means prohibited without the written consent of Linda Walsh.

Patterns, e-patterns, printables, e-printables, e-books, graphics, tutorials, how-to's, articles and other e-products are for personal use only. You may not modify, photocopy, download, upload, post, transmit, display, perform, publish, license, reprint, create derivative works from, mass duplicate, re-sell, digitize, and reproduce in any other form (print, digital or electric) or commercially apply, embed, share, Email, or redistribution in any other means. Use of any of the above is prohibited without the written permission of Linda Walsh.

However, you may link to my website(s)/blog(s) and the individual page(s)/blog post(s) (including 1 picture) but do not copy, reprint or duplicate my website(s)/blog(s) or individual page(s)/post(s ) without my permission.

Items made from Linda Walsh Originals E-Patterns are intended for personal use for fun or small scale personal and business profit as long as you credit us with the design. Large scale commercial use (i.e. mass production) of items made from Linda Walsh Originals E-Patterns are by permission only.

Please see my Terms and Conditions for additional information.

Copyright © 2004 - 2023 - All Rights Reserved - Written By Linda Walsh of Linda Walsh Originals and Linda's Blog. Linda is a doll maker and doll pattern designer.

My Benjamin Cross My Heart Primitive Snowman Stump Doll Free E-Pattern


"Benjamin - Cross My Heart" is always making promises he can’t keep. He always says he’ll be around forever but every spring he’s gone.

He has a mass of white/gray hair on the top of his head that sticks straight up. He is free standing and has a warm & natural body with an embroidered face, lined coat with four pockets, two fringed scarves around his neck, and a large bow. He is coffee stained throughout.


Benjamin's sister, "Isabell Cross My Heart", is forever telling "Benjamin Cross My Heart" not to make promises he can't keep. 

But, he keeps doing it and, every time, come Spring, all his friends are disappointed. 

It seems Benjamin will never learn.

To view and download my free e-pattern please CLICK HERE. You'll be brought to Google Drive where you can view my free e-book. Then just download my free .pdf e-book by clicking on the down arrow in the top center.  

For more information on all my free e-patterns, e-printables and e-books please CLICK HERE.

Please respect My Terms of Use:  All patterns, e-patterns, printables, e-printables, e-books, graphics, tutorials, how-to's, articles and other e-products © 2004-2023 Linda Walsh Originals-Designs by Linda Walsh. All rights reserved. Commercial selling or reselling by any means prohibited without the written consent of Linda Walsh.

Patterns, e-patterns, printables, e-printables, e-books, graphics, tutorials, how-to's, articles and other e-products are for personal use only. You may not modify, photocopy, download, upload, post, transmit, display, perform, publish, license, reprint, create derivative works from, mass duplicate, re-sell, digitize, and reproduce in any other form (print, digital or electric) or commercially apply, embed, share, Email, or redistribution in any other means. Use of any of the above is prohibited without the written permission of Linda Walsh.

However, you may link to my website(s)/blog(s) and the individual page(s)/blog post(s) (including 1 picture) but do not copy, reprint or duplicate my website(s)/blog(s) or individual page(s)/post(s ) without my permission.

Items made from Linda Walsh Originals E-Patterns are intended for personal use for fun or small scale personal and business profit as long as you credit us with the design. Large scale commercial use (i.e. mass production) of items made from Linda Walsh Originals E-Patterns are by permission only.

Please see my Terms and Conditions for additional information.

Copyright © 2004 - 2023 - All Rights Reserved - Written By Linda Walsh of Linda Walsh Originals and Linda's Blog. Linda is a doll maker and doll pattern designer.

Friday, April 02, 2021

My Brian Snow Buddy Snowman Stump Doll Free E-Pattern


With the birds chirping and the smell of spring in the air I decided to release a few free snowman e-patterns.  

Now I know you might say, "Come on, Linda! Snowmen and snow-lady's, now!"  

My response is, "Why not!"  

So, here's the first of three snow people shelf sitter doll free e-patterns I'm releasing.   

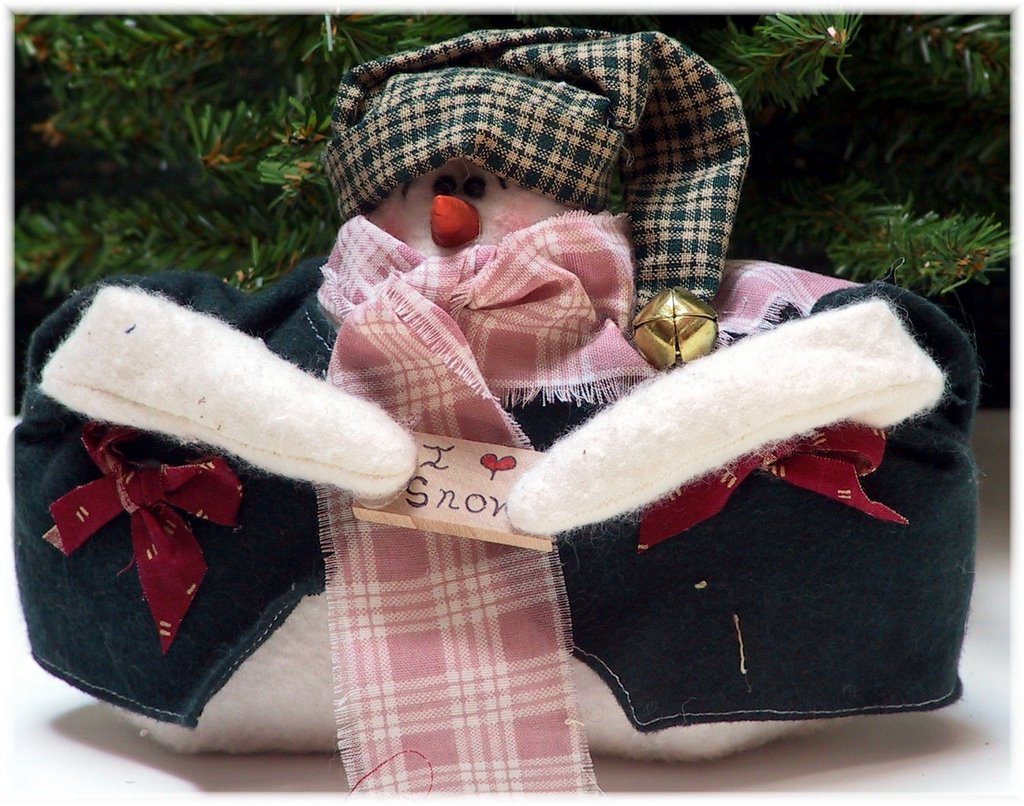
Brian Snow Buddy was the first shelf sitter doll that I designed and is one of my favorites. The reason couldn't be because he has a story associated with him regarding one of my grandson's - or could it?

"Brian Snow Buddy" loves to snowboard and is always looking for a challenge. He looks for the toughest and steepest hill he can find. The steeper and rockier the better. He is a bit of a dare devil and, so far, has broken any bones.

He is also a bit of a flirt. All you have to do is look at his "Facebook" page to attest to that.

Here's his story:

The snowguy to the left is called "Brian Snow Buddy" and is named after one of my grandsons. 

I named him that because he is just so adorable, as is my grandson. 

He's my buddy, as is my grandson. 

He's my pal, as is my grandson. 

He's so squeezable, as is my grandson. 

He's just so huggable, as is my grandson. 

He's just so lovable, as is my grandson. 

He's so......Stop it, Nana. You're embarrassing me. 

Who said that? "Brian Snow Buddy" or my grandson Brian? 

Both. Nah! They both love compliments.

"Brian Snow Buddy" is a 5" snowman doll pattern and is actually the first doll pattern in my "stout" doll pattern series. 

When I was designing this doll he kept telling me "make me like Brian." 

I know, you think I'm crazy that the dolls talk to me. 

It's bad enough that they talk to me after they're created but before too. Well, yah. 

Anyway, I had to make something that was as adorable, squeezable, lovable and excitable as Brian was as a little boy. 

Still is for that matter. 

He had the cutest fiery red cheeks. 

Talk about excitable. 

At Christmas time he could barely control himself. 

Back to the story. 

So, "Brian Snow Buddy" became the most adorable lovable, excitable, and squeezable snowman around. 

Go on, give him a squeeze or a hug. 

He'll love it. 

So will you.


Brian is a free-standing snowman with a warm & natural cloth body, embroidered face with black eyes, flannel vest, fringed scarf, snow cap with bell, and carries a small I (heart) snow sign. Small bows decorate his vest. 

Brian Snow Buddy just loves the snow, as does my grandson. 

"Brian Snow Buddy" is strong in body, as is my grandson. 

He's determined, bold and brave, as is my grandson. 

He's stubborn, staunch and firm, as is my grandson. 

He's powerful and forceful, as is my grandson. 

He's bulky in figure, thick set and corpulent, as is.......OOPS! 

That's not my grandson. 

He's a lean, mean fighting machine and I LOVE HIM. 

Stop it, Nana! You're embarrassing me. 

Who said that? 

My grandson or "Brian Snow Buddy?"


To view and download my free e-pattern please CLICK HERE. You'll be brought to Google Drive where you can view my free e-book. Then just download my free .pdf e-book by clicking on the down arrow in the top center.  

For more information on all my free e-patterns, e-printables and e-books please CLICK HERE.

Please respect My Terms of Use:  All patterns, e-patterns, printables, e-printables, e-books, graphics, tutorials, how-to's, articles and other e-products © 2004-2023 Linda Walsh Originals-Designs by Linda Walsh. All rights reserved. Commercial selling or reselling by any means prohibited without the written consent of Linda Walsh.

Patterns, e-patterns, printables, e-printables, e-books, graphics, tutorials, how-to's, articles and other e-products are for personal use only. You may not modify, photocopy, download, upload, post, transmit, display, perform, publish, license, reprint, create derivative works from, mass duplicate, re-sell, digitize, and reproduce in any other form (print, digital or electric) or commercially apply, embed, share, Email, or redistribution in any other means. Use of any of the above is prohibited without the written permission of Linda Walsh.

However, you may link to my website(s)/blog(s) and the individual page(s)/blog post(s) (including 1 picture) but do not copy, reprint or duplicate my website(s)/blog(s) or individual page(s)/post(s ) without my permission.

Items made from Linda Walsh Originals E-Patterns are intended for personal use for fun or small scale personal and business profit as long as you credit us with the design. Large scale commercial use (i.e. mass production) of items made from Linda Walsh Originals E-Patterns are by permission only.

Please see my Terms and Conditions for additional information.

Copyright © 2004 - 2023 - All Rights Reserved - Written By Linda Walsh of Linda Walsh Originals and Linda's Blog. Linda is a doll maker and doll pattern designer.

Sunday, March 28, 2021

"Peter - The Primitive Farmer & Margaret - The Dutiful Farmer's Wife" Primitive Stump Dolls Free E-Patterns


If you love making whimsical cloth shelf sitter dolls then you're going to love our "Peter - The Primitive Farmer and Margaret - The Dutiful Farmer's Wife" free  e-patterns.

Peter The Primitive Farmer believes that every day should be spent working hard and providing for your family. There is nothing like a good hard day of labor.  He gets up in the wee hours of the morning to start working on his farm. 

Margaret, being the dutiful farmer's wife that she is, gets up even earlier than her husband.

Why?

Because she has to prepare his breakfast so he has plenty of energy for working all day.

Margaret The Dutiful Farmer's Wife believes that she should do everything that she can to help her husband, Peter. 

So, she always has a home cooked meal ready for him at the end of a hard day of labor and at the beginning of the day so he has enough energy for all the demands of the farm.

Margaret gets up so early in the morning to prepare breakfast for Peter that at the end of the day she is a little tired. 

Peter understands this and when Margaret falls asleep on the sofa he just lets her sleep. 

She works so hard. 

She deserves her rest, too.


To view and download my free combo e-pattern please CLICK HERE. You'll be brought to Google Drive where you can view my free e-book. Then just download my free .pdf e-book by clicking on the down arrow in the top center.  


To view and download my free e-pattern please CLICK HERE. You'll be brought to Google Drive where you can view my free e-book. Then just download my free .pdf e-book by clicking on the down arrow in the top center.  

Friday, March 19, 2021

How I Made My Lacy Mixed Media Victorian Collage Stump Art Doll Free Tutorial


I fell in love with mixed media art dolls several years ago after taking online courses at Artful Gathering.  I loved those classes as I learned so much and they really had a delightful effect on my
 creative soul. 


When I first started creating my Victorian "Lady" dolls I decided to make them stump dolls as I wanted to focus on their outfits.  So, it's totally understandable that after falling in love with mixed media art dolls, I would experiment with mixed media stump dolls as well.  

Well, experiment I did! The Lucy, Lacy, and Lilly dolls, shown above, are a trio of "stump doll" sisters who are as different as they are beautiful.


 Lucy, who is on the left in the pictures above, is a delicate flower who has an over abundance of compassion.  Lacy, who is on the right in the pictures above, is whimsical and flirtatious while Lilly, who is in the middle in the pictures above, is a deep thinker who cares about everyone and everything.

They are mixed media Victorian collage stump art dolls that I made back in September of 2014. 

I had so much fun making these mixed media stump art dolls I thought you might like to know how I made them. So, I decided to create a free tutorial on how I made Lacy.  

I hope my free tutorial inspires you to create a mixed media stump art doll of your own.


Lacy - 4 1/2" x 6" x 3/4" Handmade Mixed Media Victorian Collage Stump Art Doll

Lacy is a 4 1/2" x 6" x 3/4" mixed media Victorian stump wood doll with a paper face, sponge painted wood body, paper collage and embellished outfit. Her fabric gathered and covered bamboo bonnet with paper floral and silk floral embellishments is fastened with a purple check ribbon that is tied in a bow under her chin. Her sides and back are sponge painted and her outfit  is an embellished paper collage dress with a two tier cape with raised black dots. White lace trim adorned with a beautiful pearl and silk ribbon flower is wrapped around her neck.

Her beautiful brown thick alpaca yarn hair from Rock Garden Alpacas Fiber is wrapped in a bun. A bouquet of flowers and butterfly add charm to her collage outfit.

Supplies Needed:

3/4" wood pine - 6" by 6" by 3/4"
Acrylic Paint - Dark Green, Light Teal Green, Yellow, Coral, Pink
Low Temperature Hot Glue Gun and Hot Glue Sticks
Various Mixed Media and Scrapbook Papers - Lilac, Light Teal Green, Silver and Other Colors
Victorian Lady Graphic Image For Face
Victorian Graphic Image Paper Embellishments For Front of Body
3/8" Purple and White Checkered Decorative Ribbon Trim - 30" Long For Bonnet Tie
Blush for Cheeks - Coral Color
4” Bamboo Hat
Purple Fabric - 12”Square For Bonnet
1/2” Scalloped White Lace Trim - 12” Long For Neck Line
1” Cream Colored Ribbon & Bead Embellishment For Under The Neck Decoration
1” Lilac Paper Flowers - 3 For Bonnet Decorations 
1/2” Silk Ribbon and Flower Trim For Bonnet Decoration - 12” Long
Light Brown Alpaca Handspun Yarn For Hair
Metallic Marker - Silver
Puffy Paint - Black
Sandpaper
ModPodge
Liquitex Matte Medium
Paint Brushes
Lead Pencil
Stabilo Pencil - Black (for shading)
Tortillions (for blending stabilo lines)
Band-saw and Table Saw to Cut The Wood
Paper Towel
Small Nail Files or Emery Boards
Scissors
Sea Sponges
Small Wallpaper Roller
Pencil
Black Micron Markers
Decorative Paper Edger Scissors

Instructions:


1) Using the paper body template example and measurements from Diagram #1 draw a body template on a white piece of paper with the lead pencil.  Adjust as necessary so your measurements match the ones in the Paper Body Template Example - Diagram #1.

2) Highlight the outside edges with the black micron markers and then cut the paper body template outside the black marker edge lines.

3) Cut a piece of 3/4 " pine 6" by 6" square with the table saw.

4) Center the paper body template on the 6" by 6" wood square and draw along the outside edge with the lead pencil.  


5)  Cut the wood body out along the outside edges with the band saw. Your wood body and wood body measurements should be similar to the wood body example shown in Diagram #2 and be able to stand evenly.

6) Sand all edges of the wood body so they are smooth to the touch.  Make sure the sanding doesn't affect the ability of the wood body to stand evenly.

7) Once you're satisfied with the sanding wipe all the edges and sides down with a wet piece of paper towel.


8)  Paint the front (except the head area which you need to leave bare), sides, bottom and the back of the wood body with the dark green acrylic paint (See Diagram #3).


9)  Using the sea sponges paint the sides and the back of the wood body with the light teal, green, yellow, coral, pink and then dark green acrylic paint (See Diagram #4). 


10) Your sponge painted areas should look similar to the pictures above.

11)  Apply Liquitex matte medium to the front (except the head area which you should leave bare), sides, and back of the wood body to seal your painted areas.  Let dry completely


12) Cut a piece of scrapbook paper to fit the front area of the front side leaving the head area bare (as shown in Diagram #5) and making sure the edges slightly overhang the side and bottom edges.

13) Apply ModPodge to the front side of the wood body (leaving the head area bare) with a brush.

14)  Position the front piece on the front side of the wood body and press down until it is firmly in place.  Roll it with the small wallpaper roller until it is securely in place and adheres to the front side.

15)  Gently sand the side and bottom edges of the scrapbook paper with the small nail files or emery boards until they are flush and smooth with the sides.

16) Apply a thin layer of the ModPodge to the scrapbook paper piece on the front of the wood body.


17) Cut a piece of the scrapbook paper for the left vest using the shapes shown in Diagram #6 making sure the side edges slightly overhang the side edges of the wood body by 1/32" and that the bottom edge is cut with the decorative paper edger scissors for the scalloped edge.

18) Apply ModPodge to the back side of the left side of the vest with a brush.

19)  Position the left side of the vest scrapbook paper piece on the left front side of the wood body and press down until it is firmly in place.  Roll it with the small wallpaper roller until it is securely in place and adheres to the front side. Make sure the left side of the vest piece slightly overhangs the left side of the wood body by about 1/32".

20)  Gently sand the left side of the vest scrapbook paper piece with the small nail files or emery boards until it is flush and smooth with the side wood. 

21) Apply a thin layer of the ModPodge to the scrapbook paper piece on the front of the wood body.


22) Cut a piece of the scrapbook paper for the right vest using the shapes shown in Diagram #7 making sure the side edges slightly overhang the side edges of the wood body by 1/32" and that the bottom edge is cut with the decorative paper edger scissors for the scalloped edge.

23) Apply ModPodge to the back side of the right side of the vest with a brush.

24)  Position the right side of the vest scrapbook paper piece on the right front side of the wood body and press down until it is firmly in place.  Roll it with the small wallpaper roller until it is securely in place and adheres to the front side. Make sure the right side of the vest piece slightly overhangs the right side of the wood body by about 1/32".

25)  Gently sand the right side of the vest scrapbook paper piece with the small nail files or emery boards until it is flush and smooth with the side wood. 

26) Apply a thin layer of the ModPodge to the scrapbook paper piece on the front of the wood body.


27) For the face you may need to re-size and re-print the image you will be using several times before you are able to get the right proportions for the round section of the front of the head which you have left bare until now.

28)  Apply ModPodge to the area where the face will be placed.

29)  Position the face on the wood body as shown in Diagram #8 above and press down until it is firmly in place.  Roll it with the small wallpaper roller until it is securely in place and adheres to the front side. 

30)  Gently sand the face paper piece along the round edges with the small nail files or emery boards until it is flush and smooth with the head wood. 

31) Apply a thin layer of the ModPodge to the scrapbook face paper piece on the front of the wood body.


32) Cut a piece of the 1/2” scalloped white lace trim to fit around the neck edge overlapping by 1/2” in the back (See Diagram #9).

33) Glue the lace trim around the neck edge overlapping 1/2” in the back with the hot glue and making sure the top edge of the lace trim covers the neck edge of the face graphic and is positioned just under the chin of the face graphic (See Diagram #9).


34) The lace trim around the neck should look similar to the pictures shown above.


35) Glue the 1” cream colored ribbon & bead embellishment in the center front of the body just under the neck edge and on top of the lace trim that you just glued around the neck with the hot glue See Diagram #10). 
 
36) For the hair you want to use the light brown alpaca handspun yarn and will be unwinding some of the yarn to frame the face, You will also be using the woven yarn to cover the sides, top and back of the head and creating a bun on the back of the head.

37) To frame the face cut several pieces of the yarn about 3/4” long and then separate the weave so the yarn is like roving.


38)  Apply hot glue to the wood side of the head on the bottom of the right side up to the right side of the face graphic and then apply one of your 3/4” pieces of separated yarn so it adheres to the head (See Diagram #11).

39)  Work your way up the head gluing the 3/4” pieces from the right hand side across the forehead to the left hand side making sure the sides and edges of the face graphic are covered (See Diagram #11).

40) Fluff the ends of the yarn roving so the hair looks natural and flyaway and only the face itself on the graphic is showing (See Diagram #11).


41) Now you want to cover the back, sides, and top of the head with rows of the yarn glued simultaneously one row after the other starting at the back bottom nape of the neck as shown in Diagram #12 and working your way from the right hand side up the back and side of the head to the top center back of the head making sure the whole area is firmly glued and covered (See Diagram #12).

42)  Cut a long piece of the yarn and hot glue it to the the back bottom nape of the neck as shown in Diagram #12 and while gluing as you go work your way from the right hand side up the back and side of the head to the top center back of the head making sure the whole area is firmly glued and covered (See Diagram #12).


43) After the face is framed and the back, sides and top of the head are covered with the yarn you want to glue more yarn to the back of the head to create the effect of a bun on the back of the head (See Diagram #13).

44) Cut another really long piece of the yarn and starting at the center back of the head start gluing and apply the yarn in a tight counter-clockwise direction until the whole back of the head is covered with a bun  See Diagram #13).

45) Finish gluing the bun at the top of the head (See Diagram #13).


46) Before you put the bonnet on Lacy you want to add the finishing embellishments to the front of the body.

47) Cut two Victorian graphic images out of the paper for the lower front of the body (See Diagram #14). For my Lacy this was a cluster of flowers and a butterfly.

48) Apply ModPodge to the back side of the flower cluster and press down until it is firmly in place (See Diagram #14).  Apply ModPodge to the back side of the blue butterfly overlapping the flower cluster  and press down until it is firmly in place (See Diagram #14).

49) Roll the flower cluster and butterfly paper embellishments with the small wallpaper roller until they are securely in place and adhere to the front side. 

50) Apply a thin layer of the ModPodge to the flower cluster and butterfly on the front of the wood body. 


51) Use the black stabilo pencil to shade the edges of the flower cluster and butterfly, as shown in Diagram #15 above and then blend the stabilo lines with the Tortillions. 

52) Make sure the blending around the tie is pleasing to the eye.  If need be add more shading with the black stabilo pencil and blend again.


53) Use the black puffy paint to add black dots to the center of the scalloped loops on the bottom edge of both sides of the vest making sure they are pleasant to the eye (See Diagram #16).  Let dry.

54) Use the metallic silver marker to draw a  silver line under the bottom edge of both sides of the vest (See Diagram #16).


55) You want to add a decorated hat to the top of Lacy’s head using the 4” bamboo hat.

56) Position the bamboo hat in the center of the wrong side (WS) of the 12” purple fabric.    

57) Using the bamboo hat as a guide cut a 7” purple fabric circle around the bamboo hat.  

58) Remove the hat and then apply a little hot glue to the top center of the bamboo hat (See Diagram #17). 


58) Turn the bamboo hat upside down in the center of the wrong side (WS) of the purple hat and hot glue it in place (See Diagram #18).


 59) Now you want to glue the purple fabric edges inside the hat pulling the fabric edges tightly against the brim edge of the hat and overlapping all along the edges.  

60)  Apply hot glue to the wrong side (WS) edge of the fabric and pulling the right side (RS) of the fabric tightly against the brim edge of the hat glue the edge of the wrong side (WS) of the fabric to the inside of the hat (See Diagram #19).


61) Continue gluing the wrong side (WS) of the fabric edges to the inside of the hat overlapping the fabric around the round brim of the hat creating folds in the fabric as you move along the brim edge (See Diagram #20).  

62) Continue in this manner until you reach your starting point making sure the fabric is tight against the brim edge of the hat and the fabric edges are all hot glued inside the hat (See Diagram #20).


63) Cut a piece of the 1/2” silk ribbon and flower trim to fit around the bottom of the hat cap and glue it in place with the hot glue (See Diagram #21). 


64) Glue the three paper flowers evenly around the hat on top of the 1/2” silk ribbon and flower trim with hot glue (See Diagram #22). 

65) Hot glue the center point of the 3/8" purple and white checkered decorative ribbon trim  to the center inside of the hat (See Diagram #22).

66) Apply hot glue all inside the cap of the hat and glue the hat to the top of Lacy's head (See Diagram #22).  


67) Tie the ribbon in a bow on the right side and then trim the excess ribbon ends (See Diagram #23).

68) Congratulations! Lacy is done.


I also created a free e-book for you showing how I made Lacy.  Enjoy!


To view and download my Lacy free E-Book please CLICK HERE. You'll be brought to Google Drive where you can view my free e-book. Then just download my free .pdf e-book by clicking on the down arrow in the top center.  

For more information on all my free e-patterns, e-printables and e-books please CLICK HERE.

Copyright © 2004 - 2023 - All Rights Reserved - Designed and Written By Linda Walsh


Please respect My Terms of Use:  All patterns, e-patterns, printables, e-printables, e-books, graphics, tutorials, how-to's, articles and other e-products © 2004-2023 Linda Walsh Originals-Designs by Linda Walsh. All rights reserved. Commercial selling or reselling by any means prohibited without the written consent of Linda Walsh.

Patterns, e-patterns, printables, e-printables, e-books, graphics, tutorials, how-to's, articles and other e-products are for personal use only. You may not modify, photocopy, download, upload, post, transmit, display, perform, publish, license, reprint, create derivative works from, mass duplicate, re-sell, digitize, and reproduce in any other form (print, digital or electric) or commercially apply, embed, share, Email, or redistribution in any other means. Use of any of the above is prohibited without the written permission of Linda Walsh.

However, you may link to my website(s)/blog(s) and the individual page(s)/blog post(s) (including 1 picture) but do not copy, reprint or duplicate my website(s)/blog(s) or individual page(s)/post(s ) without my permission.

Items made from Linda Walsh Originals E-Patterns are intended for personal use for fun or small scale personal and business profit as long as you credit us with the design. Large scale commercial use (i.e. mass production) of items made from Linda Walsh Originals E-Patterns are by permission only.

Please see my Terms and Conditions for additional information.

Copyright © 2004 - 2023 - All Rights Reserved - Written By Linda Walsh of Linda Walsh Originals and Linda's Blog. Linda is a doll maker and doll pattern designer.