Thursday, December 31, 2015

My Twin Granddaughter's Mixed Media Tutu Dress Picture Gifts


This past summer I told you about taking Debby Anderson's "A Romantic Journey On Canvas" at Artful Gathering and starting a mixed media tutu dress canvas picture adventure.  The course involved creating  3 mixed media tutu dress canvas picture projects which are shown below:


I knew before taking this class that I would love it so as I was going along I anticipated making more then the number of projects required for the course. After sculpting the tutu for the class I decided to sculpt a few extra's in various sizes.  I love giving handmade gifts so making a few extra tutu's was the smart thing to do.

I ended up making five additional tutu's - which resulted in five other mixed media tutu dress canvas pictures being made.


In my previous post entitled "My Mixed Media Tutu Dress Canvas Pictures Adventure" I told you about making the three tutu pictures shown above and also told you that two additional tutu pictures were in the process of being made.


What I couldn't tell you at that time was that the two additional tutu dress pictures were being made as gifts for my granddaughters for the holidays and are shown at the beginning of this post and above.

If you've been a follower of my Linda's Blog you know that I've posted about little girl dresses before.  That post contained two of my favorite pictures of my twin granddaughters who took many dancing classes over the years.  The mixed media tutu's reminded me of them so I thought I would make two tutu collage pictures containing those two pictures and one other picture for each of them and give them as Christmas gifts this year.  You know how much I love giving handmade Christmas gifts.

Here's the five additional tutu's I made:


And, here's all the tutu pictures I made this year.


Will I be making any more? Hmmmm.... You never know....

Tuesday, December 29, 2015

How To Make Our Trio Of Carolers Free E-Book


Who doesn't love an adorable trio of carolers?  Especially at Christmas time.

Our trio of carolers just love to carol and aren't bother at all by a little bit of snow.  As long as it's not a blizzard they'll sing their little hearts out.

How can you not love a trio of carolers like that?

If you would like to learn how to make our Trio of Carolers just download ourfree e-book.  Enjoy!

To view and download my free e-book please CLICK HERE. You'll be brought to Google Drive where you can view my free e-book. Then just download my free .pdf e-book by clicking on the down arrow in the top center.

For more information on all my free e-patterns, e-printables and e-books please CLICK HERE.

Please respect My Terms of Use:  All patterns, e-patterns, printables, e-printables, e-books, graphics, tutorials, how-to's, articles and other e-products © 2004-2023 Linda Walsh Originals-Designs by Linda Walsh. All rights reserved. Commercial selling or reselling by any means prohibited without the written consent of Linda Walsh.

Patterns, e-patterns, printables, e-printables, e-books, graphics, tutorials, how-to's, articles and other e-products are for personal use only. You may not modify, photocopy, download, upload, post, transmit, display, perform, publish, license, reprint, create derivative works from, mass duplicate, re-sell, digitize, and reproduce in any other form (print, digital or electric) or commercially apply, embed, share, Email, or redistribution in any other means. Use of any of the above is prohibited without the written permission of Linda Walsh.

However, you may link to my website(s)/blog(s) and the individual page(s)/blog post(s) (including 1 picture) but do not copy, reprint or duplicate my website(s)/blog(s) or individual page(s)/post(s ) without my permission.

Items made from Linda Walsh Originals E-Patterns are intended for personal use for fun or small scale personal and business profit as long as you credit us with the design. Large scale commercial use (i.e. mass production) of items made from Linda Walsh Originals E-Patterns are by permission only.

Please see my Terms and Conditions for additional information.

Copyright © 2004 - 2023 - All Rights Reserved - Written By Linda Walsh of Linda Walsh Originals and Linda's Blog. Linda is a doll maker and doll pattern designer.

Friday, December 25, 2015

A Great Way To Use Up Old Potpourri


I love using potpourri in my bathrooms and throughout the house. However, potpourri doesn't last forever and you have to replace it with new potpourri.

Well, since I never like to get rid of anything that I think I can reuse again I save all the potpourri in plastic resealable bags. I did this until I ran out of room in my storage area. Well, instead of disposing of all the plastic bags I had saved I decided I should re-purpose the old potpourri!

If you haven't heard of re-purposing that's when you take something that had one particular use and turn it into something else for another use.

In this instance I took some potpourri that contained large potpourri elements that I had bought at Yankee Candle over the years and turned it into a potpourri basket that could be used to decorate my home at the holidays.

How did I do that? Well, it's fairly simple to do.

You take an old wicker basket and spray paint it whatever color you want. Since I had a lot of potpourri that I wanted to use I had to choose a LARGE wicker basket to hold it.

Then you place Spanish moss along the inside of the basket so as to cover any openings in the sides of the basket. Since my wicker basket was rather large I had to use a lot of moss.

Depending on how much potpourri you have and the size of your basket after lining the inside of the basket with Spanish moss you would glue green floral foam to the bottom of the basket using the low temperature setting of a dual temperature glue gun. Then, you would glue your first row of potpourri elements to the green floral foam. You would continue adding layers of potpourri elements and gluing them in place until you had completely filled the basket and were pleased with the results.

As I had a LOT of potpourri to use I decided instead to just layer mine.  I started layering the potpourri elements row by row and gluing them together. I alternated the different colors and sizes of the potpourri I was using until I had a pleasing result. When I had fully filled the basket and was pleased with the results I glued the final row in place.

I added a large wired ribbon loopy bow to the top center of my basket.

It's a little heavy - make that very heavy with all the potpourri in it, but I think it looks nice. What do you think?


How Adorable Is She? Happy Hollidays


Happy holidays!


Graphics - Ellen Clapsaddle - Courtesy of The Graphics Fairy


Thursday, December 24, 2015

I Love The Look Of The Mixed Media Christmas Ornaments On The Christmas Tree


Earlier this year I posted about a mixed media phase I was in where I decided to finish some wooden ornaments I had cut out years before and which were still waiting to be finished in a post entitled, "Fourteen Years Later I Finally Had Time To Finish The Wood Christmas Ornament Pieces."

I had decided to finish these using the mixed media techniques I had been learning during the past few years. I would be painting, collaging, embellishing, sculpting, stenciling, gluing and sewing the ornaments in various mixed media ways.

I ended up making two sets of six ornaments each.  One set was to be a gift for my daughter-in-law and the other set would be kept for decorating hubby's and my tree.  So, I thought you'd like to see how the ornaments looked on our tree.


Most of the ornaments on my tree have either been handmade by me or are handmade gifts given to me over the years. My new handmade mixed media ornaments are a little larger than most of the other ornaments on our tree, but I like how they look. I hope you do too.

Penelope - The Rocking Horse Doggie Finally Has Her Santa


Penelope, the rocking horse doggie, has been patiently waiting for her Santa.  After all, she was made a year ago so he could sit on her and create a new Christmas display in the dining room.    So you can imagine her delight when it came time for the Christmas decorations to be put out this year.

A year ago I wrote a post entitled, "No Sooner Was The Rocking Doggie In The Door ........." about bringing Penelope home.

If you remember she was a beautiful wooden rocking dog that my brother had made for me.   My brother had made one for our new grand nephew and I had loved it so much I, of course, wanted one.

When I told my brother this hubby gave me a look of "you've got to be kidding. Where are we going to put that?" I, of course, gave him a look of " I have someplace in mind. You'll see."

This Christmas season he finally found out what I had in mind.


Santa couldn't be happier sitting on Penelope and she is thrilled to finally have him there.  He's a perfect fit.

Penelope, of course, would love for Santa to stay out all year, but isn't quite sure that will happen. We'll see.


Wednesday, December 23, 2015

My Dining Room Fireplace Christmas Display This Year


One of the things I absolutely love about my house is the living room rumford fireplace that I like to decorate for the various seasons and holidays. This year I decided to once again utilize some of the Christmas silk florals I had made a couple years ago.


I also decided to utilize some of the Nutcrackers and cross-stitch shadowboxes I had made as well as a few new decorations.


This year I found two bright, cheery, red and green glittery metals trees at Michaels this year. While I prefer handmade the trees were as glittery as the red bows I was using and I thought they'd be a good compliment. I placed one on each end of the mantel.


Next to the tree on the left end of the mantel I decided to add a beautiful handmade wooden Santa and sleigh that my brother had made.


Next to the Santa wood sleigh I added one of the mixed media houses I had made during the Tinytopia Artful Gathering class I had taken this summer.


In the middle of the mantel I decide to place the three glittery nutcrackers I had bought years,

In between I placed two of the Victorian Village shadowboxes I had cross-stitched and made years before.


Next to the white nutcracker I added the other mixed media house I had made during the Tinytopia Artful Gathering class I had taken this summer.


Next to that I added the other four Victorian Village shadowboxes I had made.  On the end was the other  bright, cheery, red and green glittery metal tree I had found at Michaels this year.


In the middle of the mantel hanging off one of the wood pegs I hung a new "Joy" wooden ornament I had also found at Michaels this year.  I love finding items that say "Joy" as this was my mother's name and I like to think she's smiling down at us when I display them.


In the front of the fireplace I once again placed the four Christmas silk floral decorations I had made.


I placed the BIG Santa and Mrs. Claus dolls I had made a long time ago to the left and right sides of the fireplace opening and placed one of the large Christmas silk floral baskets I had made in 2003 on a table in between the two.

My BIG Santa and Mrs. Claus wood and cloth dolls (shown in the picture above) were actually made to decorate the area just outside my mother's apartment.  They were both created based on Shari's Country Classic patterns by Shari Johnson.  Santa was supposed to be holding a bear and a list and Mrs. Claus was supposed to be holding a doll and small bear in the pocket of her apron.  I opted to have my Mrs. Claus holding a basket filled with Christmas cookie molds and Santa just holding a "naughty or nice" list.

When my mother lived in an apartment building for senior citizens each and every year my mother and I would decorate an area just outside her apartment for Christmas. She loved it as did all her neighbors. Many of them commented to her about how much they loved our display.

Santa and Mrs. Clause have their place in our dining room at Christmas time. Sometimes Mrs. Claus even helps me bake the Christmas cookies. Never Santa. He's too tired.....

Hubby and I made the large Santa and Mrs. Claus dolls in November of 1998. They both stand 36" tall.

We had a problem with the large Santa. When he was finished he seemed to be a bit top heavy. He kept falling forward. So we decided to add a black platform for him to stand on and then nailed his feet to it. It's not the most attractive to look at, but it works. He doesn't fall over anymore.


In the right hand corner of the fireplace sits "Theo."  He is very BIG bear and is the master of ceremonies every Christmas now.  He came to us during a magical Christmas season several years ago. 

Theo would love to stay out all year, but he is just too big for that. So we lovingly put him away every year and bring him out for the holiday season.

I love how the dining room fireplace turned out this year and hope you do, too.

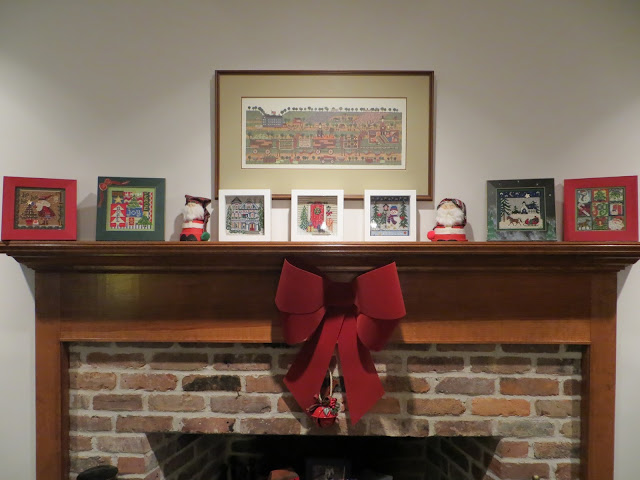
My Family Room Fireplace Christmas Decorations - Gotta Love The Cross-Stitch


For the past several months I've been working on some Christmas cross-stitch kits I had bought and thought you'd like to see what I did with them.

I wanted to make four of the kits to include on my family room mantel this Christmas along with three other shadowbox cross-stitch kits I had made previously.

To this I added two of the Terra-Cotta Santa's I had made decades ago as well as a large red bow.

I made the Terra-Cotta Santa's as Christmas presents and recently decided to offer them as a free e-pattern.  If you would like to learn how to make the Terra-Cotta Santa's my free e-pattern is here.


I wrote about the two cross-stitch kits shown in the picture above in the following posts:


I wrote about the three shadowbox cross-stitch kits shown in the picture above in the following posts:


I wrote about the two cross-stitch kits shown in the picture above in the following posts:


Standing guard over the cross-stitch pictures are my BIG nutcrackers which I wrote about in the following posts:


Two of the pinecone baskets that I wrote about in the following posts add to the decorations in front of the fireplace:


If you'd like to learn how to make a pinecone basket of our own please see my "How To Make A Green Painted Pinecone Basket - Free How-To" post and e-book.

I like how the family room mantle turned out this year and hope you do, too.

Wednesday, December 16, 2015

I Finally Decided To Take Some Craftsy Online Classes - Here's What I Chose


As a pattern designer I'm always on the look out for great websites to sell my e-patterns and have been a big fan of Craftsy since January 2012.  In fact, I sell some of my e-patterns there.  If you'd like to see my e-patterns shop at Craftsy please click here.   Unfortunately, as of 12/28/18 Craftsy is closing all indie designers pattern stores including mine.

I'm also a big fan of websites that offer online classes and have been eyeing Craftsy's online classes for quite some time.  They have so many wonderful classes to choose from.  My problem has always been lack of time.

Well, in November and early December I finally decided to purchase 4 of their online classes. I figured that over the holidays and winter snow season I would certainly have some time to take some of the classes I've been wanting to take.


Here's what I chose and the reason why:

Stupendous Stitching: Adventures in Surface Design

I decided to purchase the Stupendous Stitching: Adventures in Surface Design as I've been interested in fiber arts for years and wanted to learn more about how different fiber applications can really enhance my quilt creations.

Re-Piecing the Past: Civil War Blocks Then & Now

With my passion for history and the Victorian era how could I resist the Re-Piecing the Past: Civil War Blocks Then & Now class.

Stumpwork: Raised Embroidery Essentials

I've been a needlecrafter since I was a little girl and have created cross-stitch, crewel, needlework, stitchery, and crazy quilt creations over the years.  Recently I've fallen in love with 3D quilts and have wanted to see how stumpwork would enhave some of my 3D quilts. So, of course, I had to take the Stumpwork: Raised Embroidery Essentials class.

Embroidering With Ribbon

And, last but not least, I have also been a huge fan of SRE (Silk Ribbon Embroidery) and the beautiful floral embroidery creations you can make using silk ribbons for decades.  I know a few of these techniques but wanted to learn some more so, of course, I had to choose the Embroidering With Ribbon class.

I'm hoping that this week I can start watching the video's for these classes. The problem is which to pick first. I'll let you know what I think so stay tuned.


Sunday, December 13, 2015

Have You Checked Out My Free E-Patterns, Tutorials, and Printables Lately?


I love to create free e-patterns, free e-printables, and free e-books for my customers and blog readers and have created several of each.

All of my "freebies" are on my "My Free E-Patterns, E-Printables, E-Tutorials, and E-Books" Pinterest board.

All of my "freebies" are also on a page at the top of my Linda's Blog and on the right hand sidebar of my Linda's Blog. If you'd like to check out the Free E-Patterns, E-Books and E-Printables page of my Linda's Blog please CLICK HERE

All of my free e-patterns, e-printables, e-books & tutorials are also shown below and viewable and downloadable on my Google Drive.

If you'd like to read or download any of my free e-patterns, e-printables, or e-books just click on the image you want below. You'll be brought to Google Drive where you can view my free e-products. Then just download my free .pdf e-product by clicking on the down arrow in the top center.

Once my e-product is downloaded to your computer you can save it and print it. You can also save my e-products to your Google Drive. I hope you enjoy my "freebies."

Please respect My Terms of Use:  All patterns, e-patterns, printables, e-printables, e-books, graphics, tutorials, how-to's, articles and other e-products © 2004-2023 Linda Walsh Originals-Designs by Linda Walsh. All rights reserved. Commercial selling or reselling by any means prohibited without the written consent of Linda Walsh.

Patterns, e-patterns, printables, e-printables, e-books, graphics, tutorials, how-to's, articles and other e-products are for personal use only. You may not modify, photocopy, download, upload, post, transmit, display, perform, publish, license, reprint, create derivative works from, mass duplicate, re-sell, digitize, and reproduce in any other form (print, digital or electric) or commercially apply, embed, share, Email, or redistribution in any other means. Use of any of the above is prohibited without the written permission of Linda Walsh.

However, you may link to my website(s)/blog(s) and the individual page(s)/blog post(s) (including 1 picture) but do not copy, reprint or duplicate my website(s)/blog(s) or individual page(s)/post(s ) without my permission.

Items made from Linda Walsh Originals E-Patterns are intended for personal use for fun or small scale personal and business profit as long as you credit us with the design. Large scale commercial use (i.e. mass production) of items made from Linda Walsh Originals E-Patterns are by permission only.

Please see my Terms and Conditions for additional information.

Copyright © 2004 - 2023 - All Rights Reserved - Written By Linda Walsh of Linda Walsh Originals and Linda's Blog. Linda is a doll maker and doll pattern designer.

Saturday, December 12, 2015

What Does Laughing My Head Off Have To Do With My Primitive Dolls


When I look at primitive doll faces I can't help but melt. They are so darn cute.  I was first introduced to primitive dolls many years ago during a shopping trip to Sturbridge with my mother.  In one of the crafts stores we liked to visit I was looking at a box filled with patterns and just started laughing my head off.  Of course, my mother asked, "what's so funny?" So, I showed her the pattern I was looking at and she burst out laughing, too.  It was for a primitive cloth doll which was so ugly it was actually beautiful.  So there we were - two grown women standing in the middle of a store laughing our heads off.

As I scanned through the box I found other patterns for primitive dolls that were just as ugly and just as beautiful.  So, of course, I bought a few and could hardly wait to get them home so I could make them.   And, make them I did.  I was definitely smitten with primitive dolls.

So, when Pinterest came along I was thrilled.  I could store all the free primitve doll tutorials, patterns, and how-to's I found on my Pinterest board and get rid of all my piles. Yippee!


I fell in love with primitives, Raggedy Anne and Raggedy Andy, rag dolls and folk-art dolls over a decade ago. If you would like to learn how to make them I hope you find the tutorials, patterns, articles, projects, and how-to's helpful.
If you love my Primitive Doll Tutorials, Rag Doll & Folk-Art Tutorials Video's, Patterns, and How-To's board please follow my board by clicking on the link above.

Happy cloth doll making.

Thursday, December 10, 2015

It's Us! Ma, Pa, Sis, Bro, and Baby Walsh Terra Cotta Carolers - Free Carolers E-Pattern


I just love working with terracotta and creating all sorts of wonderful decorations.  Several years ago I decided to experiment and try making Christmas carolers and Santa decorations out of terracotta. They turned out wonderful so I made a bunch to give away as gifts. Everyone loves them so I thought I'd create e-patterns so you can make your own group of terracotta carolers and Santa's.

"It's Us! Ma, Pa, Sis, Bro, and Baby Walsh" is a pattern to create a family of terracotta carolers. There's Ma and Pa, and Sis and Bro, and a baby. All have painted terracotta bodies, painted wood knob heads, yarn or roving for their hair, knit caps, and scarves of various materials.

"It's Us! Ma, Pa, Sis, Bro, and Baby Walsh" are fun and easy to make and are adorable decorations for the holiday season.

To view and download my free e-pattern please CLICK HERE. You'll be brought to Google Drive where you can view our free e-pattern. Then just download our free .pdf e-pattern by clicking on the down arrow in the top center.

For more information on all my free e-patterns, e-printables and e-books please CLICK HERE.

Please respect My Terms of Use:  All patterns, e-patterns, printables, e-printables, e-books, graphics, tutorials, how-to's, articles and other e-products © 2004-2023 Linda Walsh Originals-Designs by Linda Walsh. All rights reserved. Commercial selling or reselling by any means prohibited without the written consent of Linda Walsh.

Patterns, e-patterns, printables, e-printables, e-books, graphics, tutorials, how-to's, articles and other e-products are for personal use only. You may not modify, photocopy, download, upload, post, transmit, display, perform, publish, license, reprint, create derivative works from, mass duplicate, re-sell, digitize, and reproduce in any other form (print, digital or electric) or commercially apply, embed, share, Email, or redistribution in any other means. Use of any of the above is prohibited without the written permission of Linda Walsh.

However, you may link to my website(s)/blog(s) and the individual page(s)/blog post(s) (including 1 picture) but do not copy, reprint or duplicate my website(s)/blog(s) or individual page(s)/post(s ) without my permission.

Items made from Linda Walsh Originals E-Patterns are intended for personal use for fun or small scale personal and business profit as long as you credit us with the design. Large scale commercial use (i.e. mass production) of items made from Linda Walsh Originals E-Patterns are by permission only.

Please see my Terms and Conditions for additional information.

Copyright © 2004 - 2023 - All Rights Reserved - Written By Linda Walsh of Linda Walsh Originals and Linda's Blog. Linda is a doll maker and doll pattern designer.