
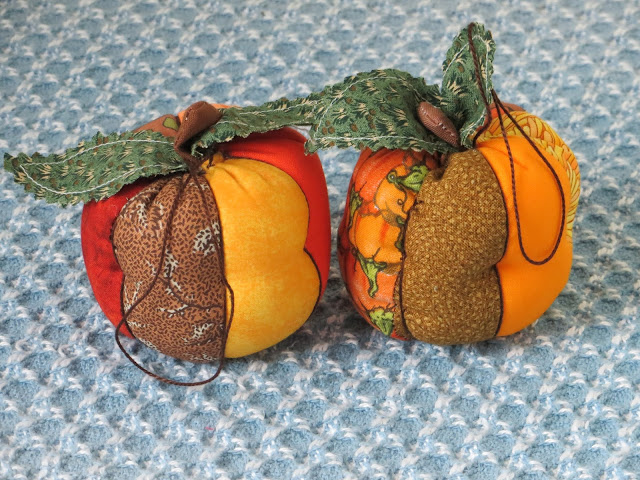
So, of course, when designing some of my new Fall dolls I had to create some colorful and adorable pumpkins and thought you might like to know how I made them.


For more information on all my free e-patterns, e-printables and e-books please CLICK HERE.
Supplies Needed…..
Gotta Love Pumpkin Ornaments - 3” Pumpkins
8” by 12” Scraps Fall Fabrics - 6 Different Fabrics For Each Pumpkin
8” by 8” Scraps Fall Green Fabric (For Pumpkin Leaves)
4” by 4” Scraps Brown Fabric (For Pumpkin Stems)
DMC Embroidery Floss (dark brown)
Upholstery Thread
Thread
IMPORTANT: PLEASE READ ALL INSTRUCTIONS BEFORE BEGINNING.
1. All seam allowances are ¼” unless otherwise stated.
2. RST = Right Sides Together, WST = Wrong Sides Together, WS = Wrong Side
3. RSO = Right Sides Out, WSO = Wrong Sides Out, RS = Right Side
4. Clip all curves and corners.
5. Glue is hot glue unless otherwise noted.
6. Iron fabric pieces and seams as required. Seam edges should be ironed flat.
7. Trace all pattern pieces onto tracing paper or tissue paper, or, use the enclosed pattern pieces directly.
8. Trim seams as required with pinking shears.
9. Cut all fabric pieces outside the black lines shown on the pattern.
PUMPKINS: The pumpkins each have six different fabric sections sewn together for the main body of the pumpkins.
Both of the pumpkins are made the same way so following the following directions for each.
Cut 6 different fabric scraps for each of the two pumpkins.
With RST sew the side seam of one of the pumpkin sides to the side seam of another one of the pumpkin sides matching the top and bottom edges (See Diagram #1).
With RST sew the side seam of another one of the pumpkin sides to the side seam of the combined pumpkin piece you just stitched matching the top and bottom edges (See Diagram #1).
Set your first section of three aside.
With RST sew the side seam of one of the remaining pumpkin sides to the side seam of another one of the remaining pumpkin sides matching the top and bottom edges (See Diagram #1).
With RST sew the side seam of the last pumpkin side to the side seam of the combined pumpkin piece you just stitched matching the top and bottom edges (See Diagram #1).
With RST sew the side seam of the two pumpkin piece sections together to form the six section body of the pumpkin matching the top and bottom edges (See Diagram #2).
Stuff the pumpkin with polyfil almost to the top edge (See Diagram #2).
Place two of the pumpkin leaves WST and then stitch 1/4” from side and bottom edges (See Diagram #3).
Along the edges with pinking shears (See Diagram #3). Do the same for the other two leaf pieces.
With RST stitch the pumpkin stem pieces together along the side seams and top seam
leaving the bottom edge open for turning (See Diagram #4).
Clip the corners and then turn the pumpkin stem RST (See Diagram #4).
Baste the pumpkin stem along the bottom edge (See Diagram #4).
With RST place the pumpkin stem in between the two pumpkin leaves matching the bottom edges nd then stitch across the bottom edge thru all 6 layers (See Diagram #5).
With WST turn the bottom edge under 1/4” and baste (See Diagram #6).
Sew a gathering stitch along the gathering line as indicated in the pumpkin pattern with the upholstery thread and leave open until the leaves and stems are inserted.
Insert the leaves and stems into the top of the pumpkin (See Diagram #7).
Add more polyfil to the top edge if needed (See Diagram #7).
Pull the gathering stitch tightly to secure and then tie a knot (See Diagram #7).
Thread a sewing needle and then tie a large knot on the end of a long strand of black DMC embroidery floss.
Insert the needle and thread into the center bottom of the pumpkin and exit at the center of the gathered top edge pulling tightly to indent the bottom of the pumpkin (See Diagram #8).
Secure the thread by sewing a stitch along the top of one of the side seams (See Diagram #8).
Position the black DMC embroidery floss along one of the side seams and then insert the needle and thread into the center bottom of the pumpkin and exit at the center of the gathered top edge pulling tightly to indent the side seam of the pumpkin (See Diagram #8).
Do the same for the remaining 5 side seams until all are covered with the black DMC embroidery thread and indented (See Diagram #8).
Thread a sewing needle and then tie a large knot on the end of another long strand of black DMC embroidery floss.
Insert the needle and thread into the center bottom of the pumpkin and exit at the center of the gathered top edge (See Diagram #9).
Insert the needle into the top edge again and then exit out half way down on of the side seams (See Diagram #9).
Stitch and indent a dimple at the half way mark by stitching across the DMC embroidery thread on the side seam and inserting the needle and thread on the opposite side of the floss and then exiting out the opposite side seam of the pumpkin pulling the thread tightly to create a dimple (See Diagram #9).
Continue in this manner until all six of the DMC embroidery flosses and side seams have been dimpled (See Diagram #9). Tie a knot to secure the thread.
You are going to provide a hanger for hanging your pumpkin s using the black DMC Embroidery floss (See Diagram #10). Cut a piece of the black DMC Embroidery floss 14” long.
Knot one end of the black DMC Embroidery floss and insert your needle on the right hand side of the top of the pumpkin at the leaves and stem (See Diagram #10).
Pull tightly, leave enough slack for the hanger and then insert your needle on the left hand side of the pumpkin top at the leaves and stem, knot to secure and then tie off (See Diagram #10).
Do the same fore the other pumpkin.
FINISHING: Congratulations! Your pumpkins are done. We hope you enjoyed making them.
Copyright © 2014 - 2020 Linda Walsh Originals – Designs by Linda Walsh

For the pattern piece sheet just click on the picture above for the full image size. Then save to your computer and print out a full size image on an 8 1/2" by 11" sheet. If the image isn't sized for a 8 1/2 " by 11" sheet when you open it in your computer viewer zoom in and re-size it until it fits on a full size sheet and then print it out.
If you prefer to download and print my free e-pattern just click here.
For more information on all my free e-patterns, e-printables and e-books please CLICK HERE.
Please respect My Terms of Use: All patterns, e-patterns, printables, e-printables, e-books, graphics, tutorials, how-to's, articles and other e-products © 2004-2023 Linda Walsh Originals-Designs by Linda Walsh. All rights reserved. Commercial selling or reselling by any means prohibited without the written consent of Linda Walsh.
Patterns, e-patterns, printables, e-printables, e-books, graphics, tutorials, how-to's, articles and other e-products are for personal use only. You may not modify, photocopy, download, upload, post, transmit, display, perform, publish, license, reprint, create derivative works from, mass duplicate, re-sell, digitize, and reproduce in any other form (print, digital or electric) or commercially apply, embed, share, Email, or redistribution in any other means. Use of any of the above is prohibited without the written permission of Linda Walsh.
Patterns, e-patterns, printables, e-printables, e-books, graphics, tutorials, how-to's, articles and other e-products are for personal use only. You may not modify, photocopy, download, upload, post, transmit, display, perform, publish, license, reprint, create derivative works from, mass duplicate, re-sell, digitize, and reproduce in any other form (print, digital or electric) or commercially apply, embed, share, Email, or redistribution in any other means. Use of any of the above is prohibited without the written permission of Linda Walsh.
However, you may link to my website(s)/blog(s) and the individual page(s)/blog post(s) (including 1 picture) but do not copy, reprint or duplicate my website(s)/blog(s) or individual page(s)/post(s ) without my permission.
Items made from Linda Walsh Originals E-Patterns are intended for personal use for fun or small scale personal and business profit as long as you credit us with the design. Large scale commercial use (i.e. mass production) of items made from Linda Walsh Originals E-Patterns are by permission only.
Please see my Terms and Conditions for additional information.
Copyright © 2004 - 2023 - All Rights Reserved - Written By Linda Walsh of Linda Walsh Originals and Linda's Blog. Linda is a doll maker and doll pattern designer.
No comments:
Post a Comment