Thursday, September 02, 2021

Incredible Workmanship in the Reconstruction of a c. 1847 Mansion


For the last seven years there is an old stone mansion near us that has been in the local news and, currently, in the process of being renovated.  

Why was it in the local news?  Well, it started with the old stone mansion being torn down and sold and replaced with several new houses.  

It was such a shame as this old stone mansion was built in 1847 and had quite the history associated with it regarding the town and even one of the presidents.

In 2014 a group of teenagers heard about this old mansion being torn down and decided to do something about it.  They decided to protest the demolition of the mansion and used all their social media skills to help them with protesting it.  

They created signs and stood outside the mansion waving their signs for motorists passing by, created online petitions, and posted where ever they could online to educate the community about what was going on with the demolition of this mansion and why it shouldn't be demolished.

Their efforts quickly spread throughout the community and many residents joined in on the protest.

Well, as you can imagine, several weeks into the protest the current owner changed his mind and decided not to sell the property.  After that several groups concerned with historic preservation got involved with the end result being the residents approving utilizing funds to help preserve the mansion at their town meeting.

In 2016 after weeks of discussions the owner and town had an agreement on preserving the mansion and renovating it.

So, for the last few years we have been watching the meticulous and amazing process of renovating this historic property.  Every day we drive by it and marvel at the workmanship involved with creating this unbelievable mansion to it's original glory.  The stone and masonry work involved has been nothing short of astonishing.

The mansion was registered with the Massachusetts Historical Commission in 1999 and, according to the Friends of the Burnett-Garfield House, which worked with the owner and the town to preserve this old mansion, it is considered a historic property for many reasons.

 If you're interested in reading about why this house is considered historic please visit their Friends of the Burnett-Garfield House Facebook page.

Well, this past spring when my husband and I were driving by and marveling at the workmanship I decided to take some pictures as I found all of the renovations remarkable and thought you all might agree.

To put all of this in perspective you first need to see how the old mansion looked before they started renovating it.  

The property consisted of the old stone mansion, a carriage house, a chapel, and a summer house - all of which would be renovated.

The picture at the beginning of this post shows the renovated chapel, mansion being renovated and part of the carriage house being renovated.


Photos courtesy of PM (Preservation Massachusetts) https://www.preservationmass.org/

Here's how the mansion looked before the renovation. 
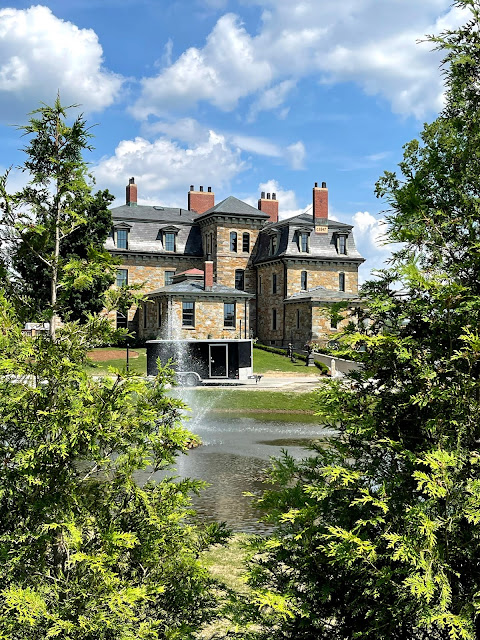


Here's how it looks now while being renovated.


Here's how the chapel looked before the renovation. 


Here's how the chapel looks now after being renovated.

Photo courtesy of PM (Preservation Massachusetts) https://www.preservationmass.org/

Here's how the carriage house looked before the renovation.


Here's how the carriage house looks now as it's being renovated.
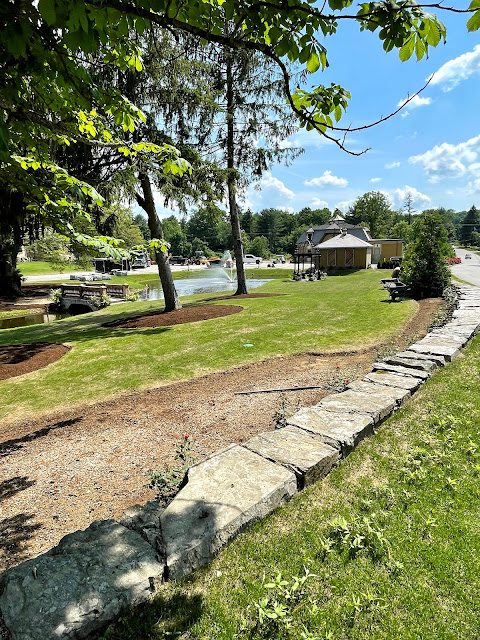

The incredible workmanship didn't just extend to the buildings.  It also extended to the beautiful landscaping all along and within the property.


I love all the roses and the garden just outside the chapel, which is shown in the pictures above.


Shrubs have been planted all along the property.


A watersprout was built in the pond.


A beautiful gazebo, shown in the picture above and a bridge across the pond, shown in the photo below were added.


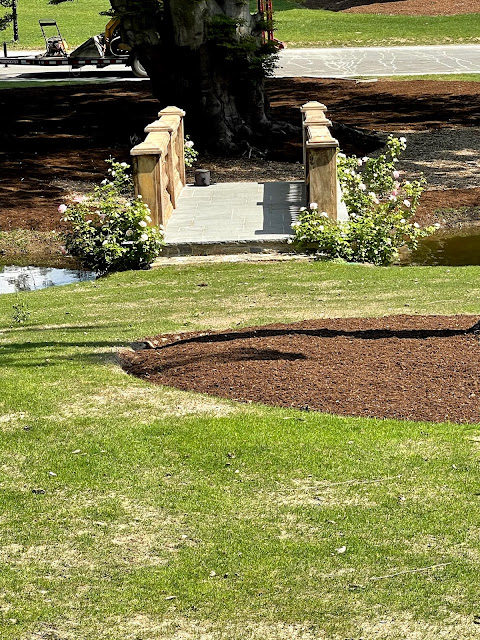

They also decided to renovate the corner along the street at the end of the road where the mansion was.  

Every day for the 33 years my husband and I have lived here the corner was nothing but a big mud pit filled with weeds and dirt. 

So, we were so happy when they started to renovate the corner.  I don't have a picture of how it used to look but the picture below is how it looks now.


We just love the way the corner has been finished and love seeing all the improvements to the old stone mansion. 

We can hardly wait to see what it looks like when it is done. For sure, it is a huge improvement to the town and this area.

We're hoping when it's finished that they will have tours for the residents of the town so we all can see the beautiful renovations that were done outside and inside this remarkable mansion.


Wednesday, August 11, 2021

How I Made My Mermaid Collage Shadowbox Picture


Since making my mixed media summer themed paper dolls and art pictures with sponge painted backgrounds I decided to try something a little different.  

I had bought some adorable summer themed scrapbook papers at Scrapbook.com, ASCsupplies shop on Etsy, and ScrapLifeShop on Etsy. 


One of the paper sets I bought at Scrapbook.com was "Reminisce - Mermaid's Tale Collection - 12 x 12 Collection Kit."  Since blue is my favorite color I couldn't help but fall in love with the blue mermaid. I knew I had to create something using her.


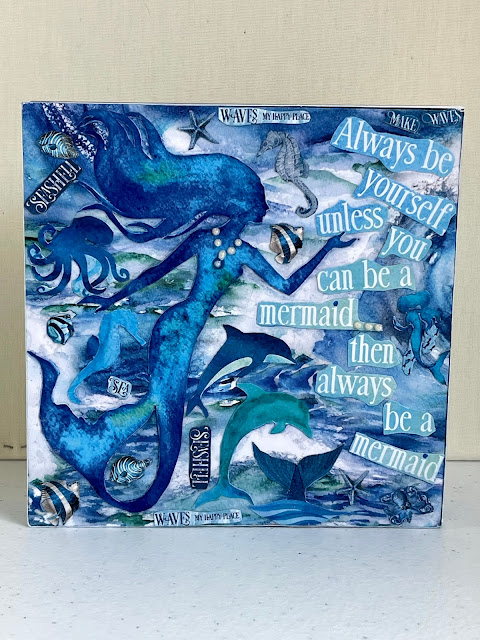
So, I decided to take a 6" by 6" unfinished wood shadow box and turn it into a picture that I could hang on my wall.  Instead of creating a mixed media collage picture within the shadow box I decided to create the collage on the back side of the shadowbox and hang it on the wall like a cube.


I wanted to utilize the sides of the cube for some of the sayings that I liked and decided to use a paper that had an abstract summer themed blue wave design that I liked and the sayings pasted in the centers of each side.


Unlike most of the mixed media collage pictures I've created I decided not to sponge paint the background.  The kit had some beautiful blue, teal and white wave paper that I loved and wanted to use for the background.

Before doing anything with the unfinished wood cube I sized the papers I wanted to use for the backside and sides so they would be perfectly sized for the cube and aligned with each other.  Where needed I used a Friskars paper cutter to get my edges perfectly straight.

I cut out the mermaid that I wanted to use and cut out the images and sayings that I thought would be perfect for this collage picture.  I wanted the mermaid to be the main focal point with the saying: "Always be yourself unless you can be a mermaid... then always be a mermaid."  

First I applied Mod Podge to the back of the wave paper I wanted to use for the background on the backside of the cube and then pasted it to the cube.  I did the same for the papers I wanted to use for the four sides.  

After testing the placement of the images I had cut out I brushed Mod Podge on the backs of the scrapbook images I had cut out and then pasted them on my collage.  When it was dry, I brushed matte medium on the backside and sides.  After everthing was dried I hung it on the wall.

I loved how it turned out and it is now hanging in my bathroom along with the other summer themed pictures I made.


I also found two beach themed scrapbook papers from the "Beyond the Sea Collection - 6 x 6 Paper Pad" I had bought at Scrapbook.com that I thought would be perfect for two other 6" by 6" wood summer themed cubes I wanted to make.


Unlike my mermaid collage I just wanted to use the two 6" by 6" scrapbook papers just the way they were as I loved the watercolor images.  I wanted to use one for the bathroom and use one on top of the desk I had in my kitchen. 

Once again, before doing anything with the unfinished wood cube I sized the papers I wanted to use for the backside so they would be perfectly sized for the backside of the cube.  Where needed I used a Friskars paper cutter to get my edges perfectly straight.

Like the mermaid collage I was going to use the backside of the 6" by 6" shadowbox wood cube.  Instead of collaging the sides I decided to leave them plain. So, I just painted the sides and front of the cube with white acrylic paint.  I only used one layer as I wanted the white to be lightly layered on the sides.

After pasting the two images to the backside of their respective cube with mod podge I let them dry.  Then I brushed matte medium on the sides and front of each cube.  After letting them thoroughly dry I placed one on my bathroom wall and one on the top of the desk.  Perfect!

Over the years I've made many holiday and seasonal themed pieces.  Mainly for the fall season and all the holidays that occur between October - December.  I only had a few summer ones so I was pleased that this summer I was finely able to create some more for this season.  

I definitely think I have enough now.  

Then again, I never have enough - do I......LOL

Please respect My Terms of Use:  All patterns, e-patterns, printables, e-printables, e-books, graphics, tutorials, how-to's, articles and other e-products © 2004-2023 Linda Walsh Originals-Designs by Linda Walsh. All rights reserved. Commercial selling or reselling by any means prohibited without the written consent of Linda Walsh.

Patterns, e-patterns, printables, e-printables, e-books, graphics, tutorials, how-to's, articles and other e-products are for personal use only. You may not modify, photocopy, download, upload, post, transmit, display, perform, publish, license, reprint, create derivative works from, mass duplicate, re-sell, digitize, and reproduce in any other form (print, digital or electric) or commercially apply, embed, share, Email, or redistribution in any other means. Use of any of the above is prohibited without the written permission of Linda Walsh.

However, you may link to my website(s)/blog(s) and the individual page(s)/blog post(s) (including 1 picture) but do not copy, reprint or duplicate my website(s)/blog(s) or individual page(s)/post(s ) without my permission.

Items made from Linda Walsh Originals E-Patterns and E-Books are intended for personal use for fun or small scale personal and business profit as long as you credit us with the design. Large scale commercial use (i.e. mass production) of items made from Linda Walsh Originals E-Patterns are by permission only.

Please see my Terms and Conditions for additional information.

Copyright © 2004 - 2023 - All Rights Reserved - Written By Linda Walsh of Linda Walsh Originals and Linda's Blog. Linda is a doll maker and doll pattern designer.

Monday, August 09, 2021

My Mixed Media Paper Doll Art Pictures


Back in May I posted about some mixed media paper doll art pictures I had made based on JoAnn Robinson's mixed media digital paper doll images I had purchased from her waifsNwhatnots Etsy store.   I saw them and just fell in love with them.  They were just adorable and I knew I had to create something with them.  

As I usually do I got carried away and ended up buying a lot of her digital images and making mixed media paper doll art pictures with them.  My Linda's Blog post is here.

If you've been following my last two Linda's Blog posts you know where I'm going with this.  After making my paper dolls for "The Progressive Paper Dolly Party" on Facebook I thought - hmmmm - these would make for some adorable mixed media paper art dolls art pictures utilizing my paper doll designs.  

So, not only did I make a bunch of stand alone paper dolls to hang on my walls for the swap but decided they would make for adorable mixed media paper doll art pictures of my own images.  So, of course, I made some.

And, as always, I got carried away.  Moderation just isn't in my DNA and it's time I got used to that....lol.

I ended up making eleven of them.  Seven that can be up most of the year and four that are seasonal and holiday related. 

I had intended several to be gifts for others but, like the stand alone paper dolls I made, they are just so colorful on the walls and hubby just loves them.  So, none of them will make it out of our house.....lol.

As is my usual modus operandi I sponge painted all of the backgrounds of the art boards.  After I was happy with the backgrounds I started adding the paper dolls and the embellishments.


I have made a ton of decorations for the fall, halloween, thanksgiving, christmas, winter, and spring seasons and holidays.  I don't really have a lot of summer craft decorations so I decided to create a beach themed paper doll and though that a mermaid would be perfect.  After all, what's more summery than a mermaid.

Her embellishments were paper flowers, silk florals, paper reeds, ribbon bows, metallic paints, and stabilo pencil shadowing.

I loved how she came out so much she became my favorite mixed media paper doll art picture.  

>


I loved my beach themed stand alone paper doll so much I decided to create a beach themed mixed media paper doll art picture.  

She's wearing an early 1900's beach outfit and carrying an oar and sign.  She has a large headdress on with paper flower and coral embellishments, ribbon embellishments and fiber embellishments.  Metallic painted flip flops finish her feet.


I have always loved fairies, mother nature and nature fantasy art.  So, I decided to create a few faeries as I had a lot of scrapbook papers that I just loved.

The theme for the paper doll art picture above is "Magic Happens" and "She decided to start living the life she imagined."

I decided to make her more of a nature child as I couldn't find any images I thought would be suitable for faerie wings, so a nature love child she is.

Her embellishments were paper flowers, lace trims, a creative embroidery lace butterfly, fiber embellishments, metallic paints, and stabilo pencil shadowing.

I just love all her soft pink colors and love how she turned out. 


The second faerie I made was similar to the first except she was more 'Mother Nature" than faerie.

Her theme was "Anything Is Possible, You Just Have to Believe."

Her embellishments were paper flowers, silk florals, paper reeds, ribbons bows, a creative embroidery butterfly, metallic paints, and stabilo pencil shadowing.

I love her colors and love how her outfit turned out.


The third faerie I made was done all in my sister's favorite blue colors - just to drive her crazy.......lol.

Plus, she's really a blue butterfly faerie.

I know, I'm picking on her....lol.  Truth be told I love designing with my sister in mind.  Some times my creations make it out of the house and to her house.  Right now she's hanging up in my house as hubby just loves her.

Her embellishments were paper flowers, silk florals, paper reeds, fiber embellishments, metallic paints, and stabilo pencil shadowing.

She definitely is right out of a fairy tale.


My fourth fantasy art picture paper doll was similar to the steampunk stand alone paper doll I had made.  

Her theme is "The future belongs to those who believe in the beauty of their dreams."

Her embellishments were paper flowers, a creative embroidery lace fan, fringe trims, lace trims, fiber embellishments, metallic paints, and stabilo pencil shadowing.


My fifth fantasy art picture turned out to be a Victorian Cinderella like lady.

Her embellishments were paper flowers, lots of lace trims, silk florals, metallic paints, and stabilo pencil shadowing.

I just love how her Victorian dress turned out.  I was skeptical that all the lace would work for the dress and the art picture but it did. Yea!


Of course I couldn't create any mixed media paper art doll pictures without creating some with seasonal and holiday themes - could I?

I decided to create a Victorian lady for my Fall themed picture an utilize some of my own paper designs.  Her outfit consists of several of my fall themed scrapbook paper designs from my Linda Walsh Originals Fall Gallery.  Several of her pumpkin images were also from that collection.

Her embellishments were paper flowers, lace trims, silk florals, paper reeds, creative embroidery lace flowers, metallic paints, and stabilo pencil shadowing.

What I love about how she turned out is that all of her fall colors blend into the fall backgrounds in the picture.  Kind of like everything in the Fall does.


Of course I couldn't create any mixed media paper art doll pictures without creating a Halloween themed art picture with witches and ghosts and even a Frankenstein - could I?

For my Halloween themed art picture I decided to utilize some of my own digital images and scrapbook paper designs.  the scary house, scary witch, Frankenstein, ghosts, brown tree, and jack-o-lanterns all came from my Halloween scrapbook paper designs.

Her embellishments were paper flowers, fiber yarns for her braided hair, fiber embellishments, paper reeds, metallic paints, and stabilo pencil shadowing.

I love how this art picture came out and can't wait to put her up at Halloween.


You can't have holiday mixed media paper doll art pictures without including some for Christmas - can you?

Christmas is my favorite time of the year for decorating but I try not to forget the real reason for the holiday.  So I decided to create an angel, as shown in the picture above, and a nativity scene, as shown in my next Linda's Blog post.

My angels embellishments were paper flowers, fiber embellishments, lace trims, a creative embroidery lace and beaded embellishment, metallic paints, and stabilo pencil shadowing. Beautiful Victorian angel images surround her.

All in all I was very happy with the way all my mixed media paper doll art pictures turned out and hope you like them, too.

Copyright © 2004 - 2023 - All Rights Reserved - Designed and Written By Linda Walsh