Wednesday, July 01, 2015

Hawk Family


The "Egg Muff's" are a fun loving group of dolls that love to sneak around and maybe, every once in awhile, drop in unexpectedly. Toni E. Hawk and her brother, Tom A. Hawk, are the most fun loving of the group. You might find them peeking around a corner, peeking over the windowsill, peeking through a keyhole in a door, or sneaking into your room. You just never know. Sometimes you might just catch a glimpse of their eyes and hair as they try to sneak a peek. If you listen carefully, you might even hear them laughing, even chuckling away. Sometimes you might even catch them doing a little jig. You just never know what they may do. They love to laugh. They love to have fun. But, most of all they love to play hide and peek! No, not hide and seek! Hide and peek!


Toni E. Hawk and Tom A. Hawk are twins. She might seem shy and well-mannered, but she is anything but. She is highly intelligent and loves a good joke. She isn't afraid of taking on her twin brother, Tom A. Hawk, or his best friend, Spike A Peek. In fact, Toni E. Hawk actually comes up with the best thought out practical jokes around which makes her just a little bit intimidating to the other member's of the Egg Muff Series. However, when everyone gets to laughing at Toni E. Hawk's latest gag everyone soon forgets how intimidated they are by her intelligence.

Tom A. Hawk is anything but shy and well-mannered. He, too, is highly intelligent and loves a good joke and isn't afraid of taking on his twin sister, Toni E. Hawk, or his best friend, Spike A Peek. Unlike his sister, however, his intelligence isn't intimidating at all. In fact, Tom A Hawk does an exceptional job of hiding his intelligence while showcasing his wit, his charm, and his good looks. The girls just can't resist a charming, good looking, bit of a devil in him type of guy with a tomahawk hairdo.


Spike A Peek is actually the most rambunctious of the Egg Muffs and, generally, the least level headed. He always lets the fun get the better of him and finds that, more often then not, he's in the "Muff House" (the Egg Muff Series version of a doghouse) being "muffed!" This is also known as a "time-out!" Spike A Peek doesn't use his "time-out" and being "muffed" wisely. He uses it as an opportunity to think up his next prank. The one he's going to play on Tom A. Hawk.

Nancy Dew Drop is actually the most well behaved of the Egg Muffs and, generally, the most level headed. Sometimes, even Nancy lets the fun get the better of her and you might just hear her giggling in the background. Just listen for a sweet "tee-hee-hee" and that will be Nancy Dew Drop.


THE HAWK FAMILY


Over the years Mr. and Mrs. Hawk's family has grown to eleven so Tom A. Hawk and Toni E. Hawk have a lot of brothers and sisters to play jokes on.   With one short of a dozen the Hawk's thought it would be a good time to introduce them all to you.


Ditsy Daisy Hawk is the 3rd oldest and most assuredly the most "ditsy" of all the Hawk's. The 4th oldest is Dapper Devil Shamus Hawk and he is, well, a bit of a devil. He has a wicked sense of humor - in true Hawk fashion. The 5th oldest is Penelope Pinhead Hawk and she is every bit as lovely as as she is a pinhead. Common sense is not in her vocabulary.


The 3 middle children are Wild Irish Rose Hawk, Tangerine Lilly Hawk, and Henrietta Hawk. Wild Irish Rose Hawk is a "wild child" who is as carefree as she is wild. Tangerine Lilly Hawk takes after her father Tom A. Hawk. If someone is pulling a prank on someone else Lilly is the first person suspected. Henrietta is a little on the timid side and is always being taken by surprise.


The "babies" of the Hawk family are Devilish Cousin Andy Hawk, Cousin Reginald Reggie Pinhead Hawk, and Cousin Hillary's Secret Hawk. They are a trio of mischievous cousins that try their Aunt Nancy Dew Drops patience at times. After baby sitting them for a few hours Aunt Nancy has a migraine and has to go home to rest. That's when she leaves the baby sitting to Spike A Peek and that might actually be her mistake as he tends to put ideas into the mischievous cousins little heads. He is an "Egg Muff" after all.

Copyright © 2004 - 2023 - All Rights Reserved - Designed and Written By Linda Walsh

Fall, Scarecrow, Pumpkins, Thanksgiving and Pilgrims Free Tutorials, E-Patterns, Printables and E-Books


If you love "freebies" for creating crafts for the Fall and Thanksgiving holiday season you're going to love all our Fall, Scarecrow, Pumpkins, Thanksgiving and Pilgrims Free Tutorials, E-Patterns, Printables and E-Books.

I love to create free e-patterns, free e-printables, and free e-books for my customers and blog readers and have created several of each.


Please respect My Terms of Use:  All patterns, e-patterns, printables, e-printables, e-books, graphics, tutorials, how-to's, articles and other e-products © 2004-2023 Linda Walsh Originals-Designs by Linda Walsh. All rights reserved. Commercial selling or reselling by any means prohibited without the written consent of Linda Walsh.

Patterns, e-patterns, printables, e-printables, e-books, graphics, tutorials, how-to's, articles and other e-products are for personal use only. You may not modify, photocopy, download, upload, post, transmit, display, perform, publish, license, reprint, create derivative works from, mass duplicate, re-sell, digitize, and reproduce in any other form (print, digital or electric) or commercially apply, embed, share, Email, or redistribution in any other means. Use of any of the above is prohibited without the written permission of Linda Walsh.

However, you may link to my website(s)/blog(s) and the individual page(s)/blog post(s) (including 1 picture) but do not copy, reprint or duplicate my website(s)/blog(s) or individual page(s)/post(s ) without my permission.

Items made from Linda Walsh Originals E-Patterns are intended for personal use for fun or small scale personal and business profit as long as you credit us with the design. Large scale commercial use (i.e. mass production) of items made from Linda Walsh Originals E-Patterns are by permission only.

Please see my Terms and Conditions for additional information.

Copyright © 2004 - 2023 - All Rights Reserved - Written By Linda Walsh of Linda Walsh Originals and Linda's Blog. Linda is a doll maker and doll pattern designer.


Tuesday, June 30, 2015

A Regency Period Outfit - What Will This Doll Look Like? Hmmm...


Hmmm... a regency period dress - what will this doll look like?

I thought you'd like a little tease from my Bonnets and Beaus: A Regency Doll Project online class that I'm taking during the first session of Artful Gathering.  

The online class is being taught by Hally Levesque who is an exceptional art doll artist, photographer and a bit of a history buff. Not only are her video's easy to follow and beautifully taught but they are sprinkled with historical tidbits of life with Jane Austen - which I love.

As you know I love history and dolls so this is right up my alley.


Since I never do anything in moderation I, of course, couldn't just make one doll. I'm making two. It's a lot of work as these dolls are made out of cloth and paperclay, but I'm thoroughly enjoying Hally's class.

I hoping to paint the dolls tomorrow. Wish me luck.

Tuesday, June 16, 2015

Another New Addition - Peony - A Twin To Marigold


My sister has another new addition to her family.  Meet - Peony.


Isn't she beautiful?


Except for not having the white on her chest you really can't tell her apart from Marigold, shown in the picture below, who was born the end of May.


Here's what my sister had to say about Peony, "She is here! Rock Garden Alpacas Peony, born yesterday. This is our herd sire Cosmo's first cria - he is Full Accoyo white and her dam is our Gianna's Peruvian Ivy, Full Peruvian dark fawn. Isn't she beautiful.... Cosmo's second cria will be due in 3 weeks, can't wait to see that one!"

So now my sister has two adorable alpacas with what looks to be beautiful fiber colors.  I am definitely going to need lots of their fiber.  Hint... Hint...


Saturday, June 13, 2015

Linda’s How-Do-I Series? How To Make A Rose Silk Floral Large Topiary Free E-Book


I'm a huge fan of bright and cheery silk floral arrangements and love decorating my house with them all year long.  They never decay and look just as good as the day you created them 20 years later. What's not to love about that?

So, I thought you might enjoy a few free e-books on how I created some of my Spring silk floral arrangements.

My instructions on "How To Make A Rose Silk Floral  Large Topiary" of your own are shown below:

Supplies Needed For The Topiary

Terra Cotta Pot - 20” Circumference , 5” Tall, 6” Deep
Large Flora Topiary Form With Top, Dowel, and Base (to fit the terra cotta pot)
Green Spanish Moss
1/2” Small Silk Floral Roses With Leaves (yellow, blue, white, rose, cranberry) - 36 each
1” Large Silk Floral Roses With Leaves (yellow, blue, white, pink, cranberry) - 36 each
Rub-On Flower Stencils - 2
Patio Paint (blue)
Glue Sticks and Glue Gun

Instructions:  


1)  Paint the insides and outsides of the terra cotta pot with two coats of the blue patio paint. Let each coat dry completely before proceeding

2)  Rub the two rub-on flower stencils to the center front and center back of the terra cotta pot.


3)  Insert the large flora topiary form into the terra cotta pot to make sure it will fit.  Trim if necessary so the bottom fits easily within the terra cotta pot and the top is about 1” down from the lip of the terra cotta pot.  Remove the form.  Add hot glue to the inside bottom of the terra cotta pot and re-insert the large flora topiary form until the glue adheres.

4)  Lightly glue the green Spanish moss  to cover the top of the topiary form within the terra cotta pot. There should be 8” of the dowel showing.

5)  Set 10 of the 1/2” small silk floral roses aside for the top of the terra cotta pot.


6)  Cut the remaining 1/2” silk floral roses with leaves so you have one rose and one leaf together with a 2” long stem still attached.


7)  Cut the 1” silk floral roses with leaves so you have one rose and one leaf together with a 2” long stem still attached.


8)  Starting at the bottom of the top ball and alternating colors and sizes of roses and leaves insert the 2” stems into the foam ball and glue to hold with hot glue.


9)  Continue gluing and alternating the colors and sizes until the entire ball is covered.


10)  Insert the 10 floral stems you set aside into the foam on the bottom of the topiary and glue to hold.


I also created a .PDF "Linda’s How-Do-I Series? How To Make A Rose Silk Floral Large Topiary" free e-book for this as well.

To view and download my free e-book please CLICK HERE.  You'll be brought to Google Drive where you can view our free e-book. Then just download our free .pdf e-book from the File menu in the upper left hand corner.

For more information on all my free e-patterns, e-printables and e-books please CLICK HERE.

Please respect My Terms of Use:  All patterns, e-patterns, printables, e-printables, e-books, graphics, tutorials, how-to's, articles and other e-products © 2004-2023 Linda Walsh Originals-Designs by Linda Walsh. All rights reserved. Commercial selling or reselling by any means prohibited without the written consent of Linda Walsh.

Patterns, e-patterns, printables, e-printables, e-books, graphics, tutorials, how-to's, articles and other e-products are for personal use only. You may not modify, photocopy, download, upload, post, transmit, display, perform, publish, license, reprint, create derivative works from, mass duplicate, re-sell, digitize, and reproduce in any other form (print, digital or electric) or commercially apply, embed, share, Email, or redistribution in any other means. Use of any of the above is prohibited without the written permission of Linda Walsh.

However, you may link to my website(s)/blog(s) and the individual page(s)/blog post(s) (including 1 picture) but do not copy, reprint or duplicate my website(s)/blog(s) or individual page(s)/post(s ) without my permission.

Items made from Linda Walsh Originals E-Patterns are intended for personal use for fun or small scale personal and business profit as long as you credit us with the design. Large scale commercial use (i.e. mass production) of items made from Linda Walsh Originals E-Patterns are by permission only.

Please see my Terms and Conditions for additional information.

Copyright © 2004 - 2023 - All Rights Reserved - Written By Linda Walsh of Linda Walsh Originals and Linda's Blog. Linda is a doll maker and doll pattern designer.

Linda’s How-Do-I Series? How To Make A Roses In Ceramic Pot Floral Arrangement Free E-Book


I'm a huge fan of bright and cheery silk floral arrangements and love decorating my house with them all year long.  They never decay and look just as good as the day you created them 20 years later. What's not to love about that?

So, I thought you might enjoy a few free e-books on how I created some of my Spring silk floral arrangements.

My instructions on "How To Make A Roses In Ceramic Pot Floral Arrangement" of your own are shown below:

Supplies Needed For The Flower Arrangement

Ceramic Pot - 14” Square Circumference , 4” Tall, 3/12” Deep, 3 1/2” Wide
Green Spanish Mos
Silk Floral Roses With Leaves
2” Wired Ribbon - 3 Feet
Green Florist Foam
Glue Sticks and Glue Gun

Instructions:


1)  Cut a piece of the green florist foam to fit inside the square ceramic vase.  The top of the green florist foam should be 1” down from the top lip of the square ceramic vase


2)  Lightly glue the green Spanish moss  to cover the top of the green florist foam within the square ceramic base.


3)  You want the roses in your cluster of roses to be aligned side by side and arranged by color in a pleasing manner.  Starting in the center of the vase insert one of the roses into the foam.  Continue adding the roses side by side until you have inserted all 20 of the roses.


4)  Wrap the 2” wired ribbon around the top of the square ceramic vase and knot tightly in front.  Tie a bow after the knot and then trim the ends, if necessary.  Adjust the wired ribbon if necessary.  Glue the back and sides of the wired ribbon to the square ceramic pot with hot glue, if necessary.


5)  Your rose flower arrangement should look like the picture above.

Congratulations! Your roses in a ceramic vase flower arrangement is done.


I also created a .PDF "Linda’s How-Do-I Series?  How To Make A Roses In Ceramic Pot Floral Arrangement" free e-book for this as well.


To view and download my free e-book please CLICK HERE. You'll be brought to Google Drive where you can view our free e-book. Then just download our free .pdf e-book.

For more information on all my free e-patterns, e-printables and e-books please CLICK HERE.

Please respect My Terms of Use:  All patterns, e-patterns, printables, e-printables, e-books, graphics, tutorials, how-to's, articles and other e-products © 2004-2023 Linda Walsh Originals-Designs by Linda Walsh. All rights reserved. Commercial selling or reselling by any means prohibited without the written consent of Linda Walsh.

Patterns, e-patterns, printables, e-printables, e-books, graphics, tutorials, how-to's, articles and other e-products are for personal use only. You may not modify, photocopy, download, upload, post, transmit, display, perform, publish, license, reprint, create derivative works from, mass duplicate, re-sell, digitize, and reproduce in any other form (print, digital or electric) or commercially apply, embed, share, Email, or redistribution in any other means. Use of any of the above is prohibited without the written permission of Linda Walsh.

However, you may link to my website(s)/blog(s) and the individual page(s)/blog post(s) (including 1 picture) but do not copy, reprint or duplicate my website(s)/blog(s) or individual page(s)/post(s ) without my permission.

Items made from Linda Walsh Originals E-Patterns are intended for personal use for fun or small scale personal and business profit as long as you credit us with the design. Large scale commercial use (i.e. mass production) of items made from Linda Walsh Originals E-Patterns are by permission only.

Please see my Terms and Conditions for additional information.

Copyright © 2004 - 2023 - All Rights Reserved - Written By Linda Walsh of Linda Walsh Originals and Linda's Blog. Linda is a doll maker and doll pattern designer.

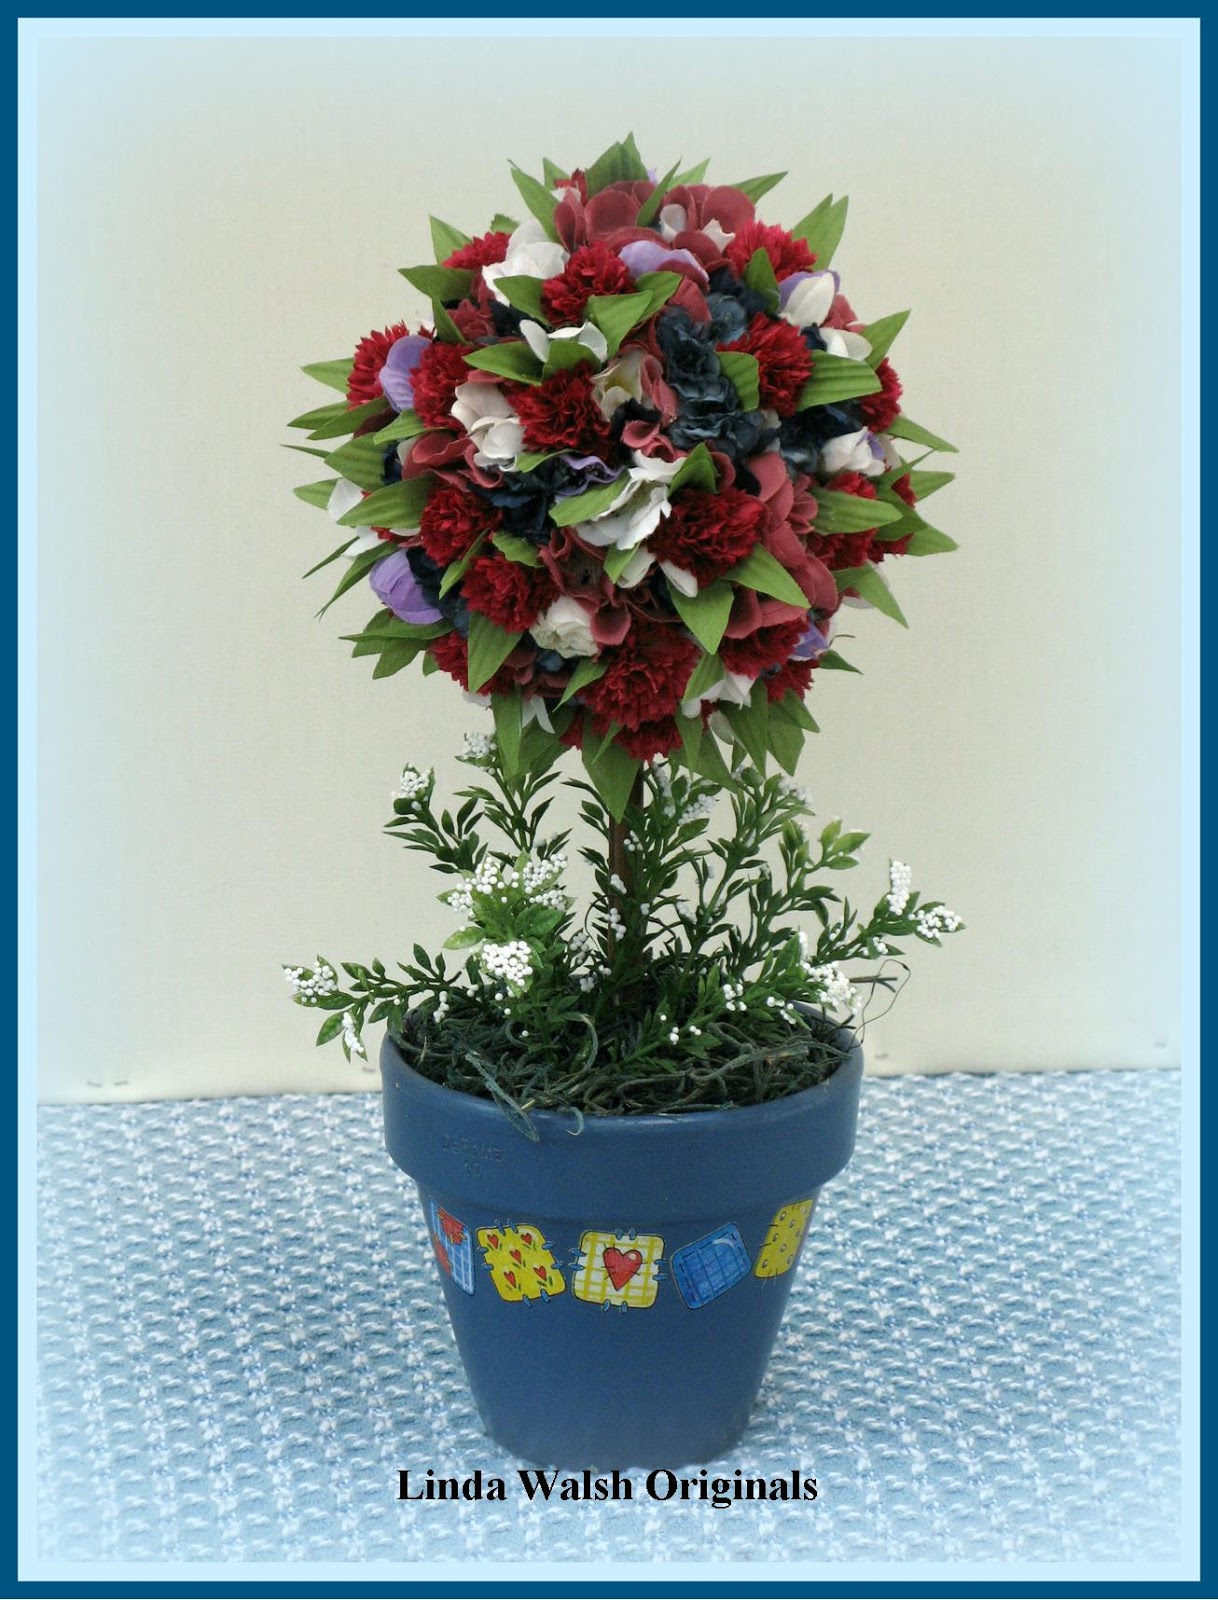
My Linda's How-Do-I Series? How To Make Small Carnation Silk Floral Topiary Free E-Book


I love working with terra-cotta and creating all sorts of crafts and floral arrangements. I also love topiaries and decided to create a large one and a small one several years ago.

I love how they both turned out and thought you might enjoy a few free e-book on how I created my "Small Carnation Silk Floral Topiary" so you could make one of your own.

To view and download my free e-book please CLICK HERE. You'll be brought to Google Drive where you can view our free e-book. Then just download our free .pdf e-book from the File menu in the upper left hand corner.

For more information on all my free e-patterns, e-printables and e-books please CLICK HERE.

Please respect My Terms of Use:  All patterns, e-patterns, printables, e-printables, e-books, graphics, tutorials, how-to's, articles and other e-products © 2004-2023 Linda Walsh Originals-Designs by Linda Walsh. All rights reserved. Commercial selling or reselling by any means prohibited without the written consent of Linda Walsh.

Patterns, e-patterns, printables, e-printables, e-books, graphics, tutorials, how-to's, articles and other e-products are for personal use only. You may not modify, photocopy, download, upload, post, transmit, display, perform, publish, license, reprint, create derivative works from, mass duplicate, re-sell, digitize, and reproduce in any other form (print, digital or electric) or commercially apply, embed, share, Email, or redistribution in any other means. Use of any of the above is prohibited without the written permission of Linda Walsh.

However, you may link to my website(s)/blog(s) and the individual page(s)/blog post(s) (including 1 picture) but do not copy, reprint or duplicate my website(s)/blog(s) or individual page(s)/post(s ) without my permission.

Items made from Linda Walsh Originals E-Patterns are intended for personal use for fun or small scale personal and business profit as long as you credit us with the design. Large scale commercial use (i.e. mass production) of items made from Linda Walsh Originals E-Patterns are by permission only.

Please see my Terms and Conditions for additional information.

Copyright © 2004 - 2023 - All Rights Reserved - Written By Linda Walsh of Linda Walsh Originals and Linda's Blog. Linda is a doll maker and doll pattern designer.


My Linda's How-Do-I Series? How To Make A Handle Floral Covered Basket Free E-Book


Several years ago I decided I wanted to create some decorative baskets that were just a little different. I wanted to create empty basket arrangements with the floral covering the handles.  So, I bought several large wicker baskets with handles and pretty floral garlands to decorate the handles.

I was pleased with the way the baskets came out and thought you might enjoy a few free e-book on how I created my "How To Make A Handle Floral Covered Basket" so you could make one of your own.

My instructions on "How To Make A Handle Floral Covered Basket" of your own are shown below:

Supplies Needed For The Basket

Handled Basket - 33” Around, 14” Tall, 11” Deep, 15” Wide
Spray Paint (Colonial Blue)
Spray Matte Varnish (Clear)
Silk Floral Garland - 4 Feet
Glue Sticks and Glue Gun

Instructions:


1)  Go outdoors and spray the inside and outside of the basket with the colonial blue spray paint.  Let dry.

2)  Go outdoors and spray the inside and outside of the basket with the matte varnish.  Let dry.


3)  Glue one end of the floral garland to the bottom inside of one side of the basket handle.


4 )  Wrap the floral garland around the basket handle until you reach the other end of the handle making sure the handle is completely covered.

5)  Glue the other end to the inside of the basket handle to hold it in place and trim the garland if necessary.


6)  Your handle floral basket should  look like the picture above.

Congratulations! Your handle floral basket is done.

I also created a .PDF "Linda’s How-Do-I Series? How To Make A Handle Floral Covered Basket" free e-book for this as well.

To view and download my free e-book please CLICK HERE. You'll be brought to Google Drive where you can view our free e-book. Then just download our free .pdf e-book from the File menu in the upper left hand corner.

For more information on all my free e-patterns, e-printables and e-books please CLICK HERE.

Please respect My Terms of Use:  All patterns, e-patterns, printables, e-printables, e-books, graphics, tutorials, how-to's, articles and other e-products © 2004-2023 Linda Walsh Originals-Designs by Linda Walsh. All rights reserved. Commercial selling or reselling by any means prohibited without the written consent of Linda Walsh.

Patterns, e-patterns, printables, e-printables, e-books, graphics, tutorials, how-to's, articles and other e-products are for personal use only. You may not modify, photocopy, download, upload, post, transmit, display, perform, publish, license, reprint, create derivative works from, mass duplicate, re-sell, digitize, and reproduce in any other form (print, digital or electric) or commercially apply, embed, share, Email, or redistribution in any other means. Use of any of the above is prohibited without the written permission of Linda Walsh.

However, you may link to my website(s)/blog(s) and the individual page(s)/blog post(s) (including 1 picture) but do not copy, reprint or duplicate my website(s)/blog(s) or individual page(s)/post(s ) without my permission.

Items made from Linda Walsh Originals E-Patterns are intended for personal use for fun or small scale personal and business profit as long as you credit us with the design. Large scale commercial use (i.e. mass production) of items made from Linda Walsh Originals E-Patterns are by permission only.

Please see my Terms and Conditions for additional information.

Copyright © 2004 - 2023 - All Rights Reserved - Written By Linda Walsh of Linda Walsh Originals and Linda's Blog. Linda is a doll maker and doll pattern designer.