Linda Walsh Originals Blog Pages

Sunday, September 23, 2018

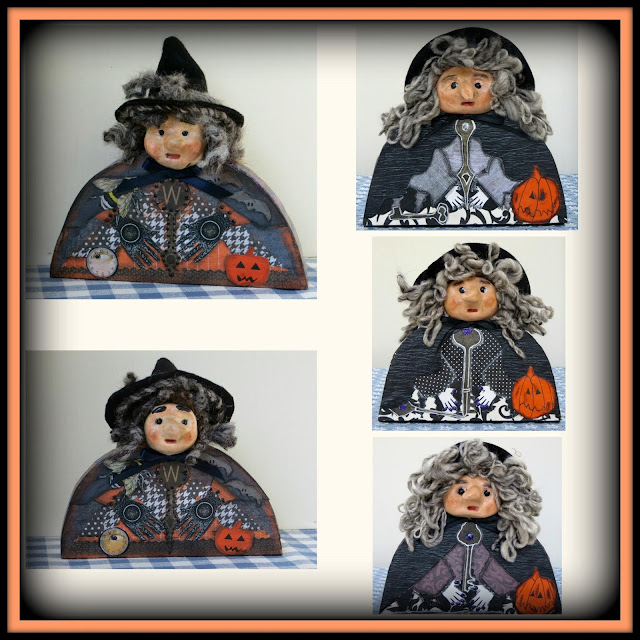
For The Love Of Mixed Media Witches


If you've been following me all these years you know that I absolutely LOVE Halloween and all the wonderful creatures that can be made like witches, ghosts, goblins, Dracula, Frankenstein, jack-o-lanterns, bats, spiders and spider webs, skeletons, mummies, and so much more. There's so much for crafters to work with surrounding Halloween - what's not to love.

You can make all sorts of Halloween creatures out of cloth, wood, cloth and wood, paper, clay, needle-craft, etc. I love them all but have a fondness for witches.

Several years ago, when I was doing a little cleaning of my craft area, I found some 3/4" wood shelf sitter shapes that my husband had cut out for me a years before.  I had intended to make a painted figure of some sort out of them.

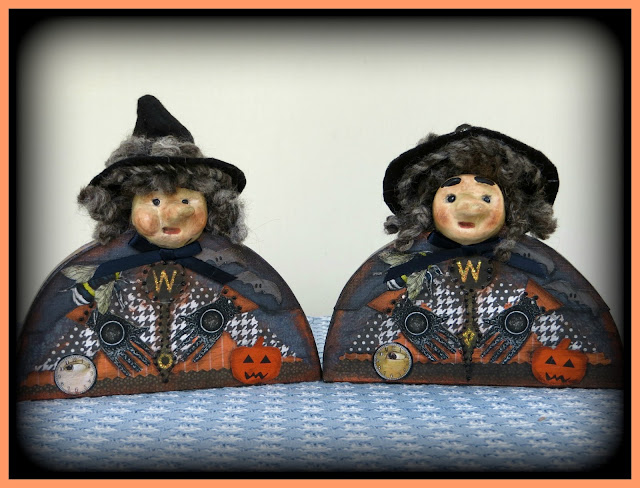
Well, in looking at the wood I thought they might make perfect mixed media shelf sitter witches with paper-clay faces and collage outfits.   So, I decided to make two of them, which are shown below.


Hildegarde Brie, who is pictured on the left, and her twin sister, Hildegarde Ann, who is pictured on the right, can hardly wait for Halloween.  Not because they love scaring people. but because they're good witches and love handing candy out to all the trick-or-treaters.  In fact, they're known in their neighborhood for having the best candy.

Both Hildegarde Ann and Hildegarde Brie are  6 1/2" x 6 1/2" x 3/4" mixed media shelf sitter wood dolls with painted paper-clay faces with black bead eyes, sponge painted wood bodies and paper collage embellished outfits. Their sides and back are sponge painted in their favorite Halloween colors and their outfits are embellished paper collages adorned with a jack-o-lanterns, clocks, bats,  scary insects, raised dots and ribbon bows. Their gray thick alpaca yarn hair is from my sister's alpaca Masquerade's Rock Garden Alpacas fiber and is barely controlled under their witches hats. Masquerade's yarn is also wrapped around the band of their witches hats and adorns the brim of the underside of their witches hats.


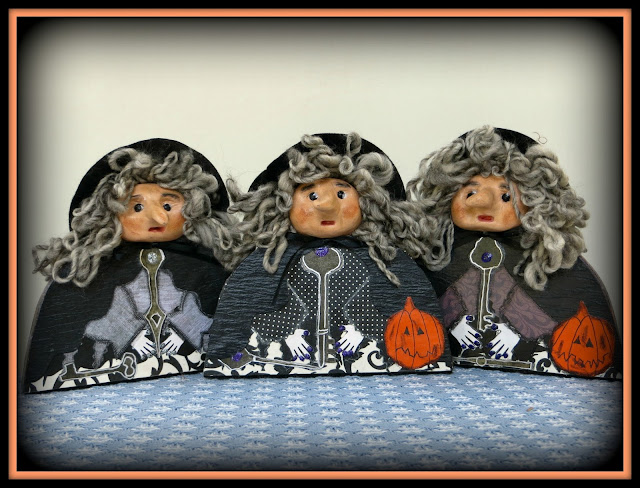
I had so much fun making Hildegarde Ann and Hildegarde Brie that I decided to make three more and this time decided to make a trio of mixed media Victorian collage shelf sitter witches.

Hazel, Hazlett, and Harem are a trio of witches are as ugly as they are confused.   Halloween is coming up and they have lost their witches brew recipe.  They've looked everywhere and cannot find it.  Without it Halloween will just not be the same.  Can you help them?

Hazel, pictured in the center above, Hazlett, pictured on the right, and Harem, pictured on the left, are 6" x 6" x 3/4" mixed media Victorian witch wood dolls with painted paper-clay faces with black bead eyes, red painted mouths, rosy blushed cheeks, black painted finger nails, sponge painted wood bodies, paper collage and embellished outfits. Their sides and back are sponge painted and their outfits are multi-layer embellished paper collages with black paper capes tied with ribbon bows under their necks. Their light gray curly alpaca yarn hair from Rock Garden Alpacas Fiber is barely controlled under their witches hats.  Paper jack-o-lanterns with painted faces and swords and key steam-punk paper images add charm to their collage outfits.

It's almost time for the witches to come out and they can hardly wait.


Wednesday, September 19, 2018

My Sunday Night Mill Hill Winter Holiday Cross-Stitch Ornament


It's the beginning of the Fall and my thoughts always turn to the upcoming holiday season and crafts I'd like to make to add to my already overflowing seasonal and holiday home decorations collection.  I like to think you can never have enough decorations, but that might be wishful thinking.  In reality you definitely can have to many and I am slowly approaching that.   I'll just have to swap them out from year to year.....haha

I tend to be drawn to cross-stitch kits that feature the word "Joy", which was my mother's name, or churches, especially those that remind me of the one my mother attended for so many years.  My mother loved to sing and sang in the church choir for several decades. So, when I saw the "Sunday Night" Mill Hill #MH18-1834 kit, which looks exactly like the church my mother attended,  I knew I would buy it.

The "Sunday  Night" ornament kit contained the presorted thread, 14 count perforated paper, needles (stitching and beading), beads and instructions.  It also included a magnet and instructions for adhering the magnet to the back of the ornament.  The pattern uses full counted cross-stitch, beads and outline stitching for emphasis and depth.


The pattern came with starting, stitching and 2 different back finishing instructions as well as samples of the various stitches required, beading instructions and color code chart (with code #'s, color names, and cross-stitch symbols) and a black and white chart with black and white coded symbols.  The colors and symbols on the keys and chart were easy to read and follow.

I had no problem cross-stitching the church ornament and then cutting the perforated paper close to the sides. This kit did come with instructions for finishing the back of the ornaments, as well as using the ornament for other uses.

I like to finish my ornaments with a felt backing.  I don't usually whip-stitch around the edges but decided to do so this time as I thought it would give the blue sky a more finished look.   So, I trimmed the edges, glued the felt to the back and then whip-stitched around the edges with 4 strands of the blue floss.


Instead of adding a floss hanger according to the instructions I opted to sew two strands of floss to the top of the ornament, securing the edge of the ornament with an additional stitch and then tying the ends at the top in a large knot.

I was very happy with the way my "Sunday Night" church turned out and decided to hang it along the side of a picture I have of my mother.  It looks beautiful there.


Monday, September 17, 2018

Gotta Love The Fall, Scarecrows and Pumpkins


I just LOVE the Fall season.  If you've been following my blog for awhile you know that the Fall, by far, is my favorite season for crafting.  The reasons have to do with scarecrows, pumpkins, witches, ghosts, goblins, Frankenstein's, pilgrims, etc. that can all be created for the September through November home decorating season.  If you'd like to see the products available for my scarecrow creations, including their e-patterns and fabric designs, just click on the dolls name or craft below:

Wednesday, September 12, 2018

My Haunted Mansion - Mill Hill Cross-stitch # MH14-1204


Halloween is one of my favorite holidays for crafting and decorating.  I love decorating my home with all sorts of Halloween creatures and pictures.  I don't have a lot of Halloween cross-stitch pictures so when I saw the Haunted Mansion Mill Hill #MH14-1204 cross-stitch kit I wasn't surprised that I was drawn to.  Haunted mansion, ghosts, Frankenstein, cross-stitch - what's not to love!

The Haunted Mansion Mill Hill #MH14-1204 pattern uses full cross-stitch and straight stitch highlighting as well as beads of various sizes for emphasis and depth. The Mill Hill patterns usually call for certain areas of the perforated paper to be left untouched like the background or border. In this case they were leaving sections of the light blue perforated paper border untouched.

In embroidering the cross-stitch I decided to once again utilize the rectangular wood frame jig that my darling husband built for me that I could tape the edges of my perforated paper to. The wood frame jig is a rectangular embroidery hoop of sorts, but without bending the perforated  paper. He had made it out of 1/2" x 1" pine wood strips with an adjustable center strip that I used for this 5.25 x 5.25 square design.

I had learned from previous mistakes that I needed to draw diagonal lines to locate the exact center of the perforated paper as in previous perforated paper cross-stitch picture I have done the picture was slightly off center by a few holes which caused a problem with inserting the needles in the holes along one of the edges of my frame. So, I lightly drew a diagonal line across each corner with a pencil to get the center point of the perforated paper.

A lot of the cross-stitch 5.25" by 5.25" pictures I have made were finished in small 6 1/2" by 6 1/2" shadowbox frames with 5" by 5" openings that I had gotten at Michaels when they went on sale one year.  I used up all the shadowbox frames I had gotten previously and have been looking for them ever since and hadn't been able to find that size again.

I did, however, find some 7" x 7" by 1 1/2" shadow  box frames with a 5 1/2" x 5 1/2" opening at Michaels last year and bought a few white ones and black ones when they were on sale.  I was hoping to use one of the black ones with this project.

The directions did not include any instruction for finishing the back.  I decided to finish mine with thin adhesive press-board paper.  I used an 8" by 10" Pres-On sheet that I cut 6" by 6"with kitchen scissors to fit my picture.  The shadow box came with a padded velvet sheet glued to the rigid back of the shadow box frame which was about 1/4" thick.  My cross-stitch picture glued to the thin adhesive press-board paper was about 1/8" thick so I knew this would be a good fit once I removed the black velvet padding fabric that had been glued to the rigid back of the shadowbox.

After adhering my cross-stitch picture to the 6" by 6" thin adhesive press-board paper I inserted it into the back of the frame and then inserted the 6" by 6" rigid back that came with the frame over it. The shadow box frame came with 8 metal clips to hold the rigid back inside the frame which I secured.  The press-board fit perfectly and was the right depth for the shadow box frame.

The pattern called for a blue colored wooden frame and for the border of the perforated paper to be left untouched like the picture shown below:


Personally, I don't like the dark blue perforated paper as I find it hard to count the holes and follow along as to where you are on your cross-stitch.    Since I always finish the background of all my cross-stitch pictures I decided to stitch my picture on the lighter brown colored side of the perforated paper.

However, I don't like seeing the perforated sections of the paper for the border as I think it makes the cross-stitch picture look unfinished and opted instead to finish the border with blue colored #3750 DMC embroidery floss sewn as a half cross-stitch using four strands of the floss. For the areas left blank within the picture I opted instead to finish them with blue colored #3750 DMC embroidery floss sewn as a half cross-stitch using two strands of the floss


The pattern called for some outlining.  Give I was putting this in a shadowbox I thought certain sections of the collage would benefit from some additional outlining so I decided to add more definition as follows:

1)  The pattern called for certain sides of some of the windows to be outlined.  I opted to outline all sides of all the windows instead.
2)  The pattern did not call for any outlining around the house.  I opted to back-stitch outline around all sides of the house using two strands of the dark gray floss.
3)  The pattern did not call for any outlining on the tree.  I opted to use two strands of the brown floss and back-stitch outlined along all sides of the tree and branches.
4)  The pattern did not call for any outlining definition around the roof of the house.  I opted to use two strands of the medium blue gray floss and back-stitch outlined the sides of all the roofs.


The pattern also called for a certain amount of beading within the grass, leaves, and trees.  I opted to use more beads in both the grass and leaves, as well as up within the tree.

While the end results of this design were wonderful some things in the kit and in the instructions could be improved upon so I'd like to offer the following constructive suggestions:

The cross-stitch chart was in black and white as was the floss color code and symbol key. Both were easy to read and very clear. While I had no problem with the chart and keys I did have a problem with the way the DMC floss was presented. All of the floss was tied together in one big knot so you had to separate the floss pieces yourself, sort them, and try to interpret which color belonged to which floss # and symbol key on the color chart.

If you only have a few colors to deal with this isn't a problem. However, if you have several different colors to choose from that are close in color then interpreting the chart can be tricky. You may assign the wrong color to the wrong symbol if the colors are too closely aligned. The key code chart should have contained the number of strands that were included in the kit so I would know how many strands I had for the different floss colors.

As I have done with other cross-stitch kits I've completed I had to design my own thread color sorter and symbol key. I took a piece of thin cardboard and cut a 1" x 9" long rectangular piece out to use as a thread sorter. I then punched holes in my cardboard strip in which to tie each of the different colors. Just above the hole I wrote the DMC floss # and just below the hole I added the respective cross-stitch symbol. I then inserted the floss threads that went with that # and symbol through the hole and tied them in a loose knot. This kit could be much improved if a thread sorter with respective #'s and symbols was provided.

The beads were contained within three small ziploc bags which was fine. The chart had footnote symbols to help distinguish which beads were within which bag.

My results with the totally finished background, border and frame is shown below:


Despite the relatively small issues I had encountered with the kit I was happy with the way my Haunted Mansion turned out.

As always, my comments are meant to be constructive to enable future purchasers to benefit from my experience and to enhance their ability to create a wonderful little cross-stitch design.
Monday, September 10, 2018

My Moonlit Treaters Mill Hill Cross-Stitch Picture


As you know I love the Fall, Halloween, and Thanksgiving season.   So, when I saw the Moonlit Treaters Mill Hill #MH14-1724 cross-stitch kit I wasn't surprised that I was drawn to.  Halloween, ghosts, witches, and Dracula - what's not to love!

The  Moonlit Treaters Mill Hill pattern uses full cross-stitch and straight stitch highlighting as well as beads of various sizes for emphasis and depth. The Mill Hill patterns usually call for certain areas of the perforated paper to be left untouched like the background or border. In this case they were leaving sections of the dark blue perforated paper border untouched.

Personally, I don't like the dark blue perforated paper as I find it hard to count the holes and follow along as to where you are on your cross-stitch.    Since I always finish the background of all my cross-stitch pictures I decided to stitch my picture on the lighter brown colored side of the perforated paper. 

In embroidering the cross-stitch I decided to once again utilize the rectangular wood frame jig that my darling husband built for me that I could tape the edges of my perforated paper to. The wood frame jig is a rectangular embroidery hoop of sorts, but without bending the perforated  paper. He had made it out of 1/2" x 1" pine wood strips with an adjustable center strip that I used for this 5.25 x 5.25 square design.

I had learned from previous mistakes that I needed to draw diagonal lines to locate the exact center of the perforated paper as in previous perforated paper cross-stitch picture I have done the picture was slightly off center by a few holes which caused a problem with inserting the needles in the holes along one of the edges of my frame. So, I lightly drew a diagonal line across each corner with a pencil to get the center point of the perforated paper.

A lot of the cross-stitch 5.25" by 5.25" pictures I have made were finished in small 6 1/2" by 6 1/2" shadowbox frames with 5" by 5" openings that I had gotten at Michaels when they went on sale one year.  I used up all the shadowbox frames I had gotten previously and have been looking for them ever since and hadn't been able to find that size again.

I did, however, find some 7" x 7" by 1 1/2" shadow  box frames with a 5 1/2" x 5 1/2" opening at Michaels last year and bought a few white ones and black ones when they were on sale.  I was hoping to use one of the white ones with this project.

The directions did not include any instruction for finishing the back.  I decided to finish mine with thin adhesive press-board paper.  I used an 8" by 10" Pres-On sheet that I cut 6" by 6"with kitchen scissors to fit my picture.  The shadow box came with a padded velvet sheet glued to the rigid back of the shadow box frame which was about 1/4" thick.  My cross-stitch picture glued to the thin adhesive press-board paper was about 1/8" thick so I knew this would be a good fit once I removed the black velvet padding fabric that had been glued to the rigid back of the shadowbox.

After adhering my cross-stitch picture to the 6" by 6" thin adhesive press-board paper I inserted it into the back of the frame and then inserted the 6" by 6" rigid back that came with the frame over it. The shadow box frame came with 8 metal clips to hold the rigid back inside the frame which I secured.  The press-board fit perfectly and was the right depth for the shadow box frame.

The pattern called for a blue colored wooden frame and for the border of the perforated paper to be left untouched like the picture shown below:


However, I don't like seeing the perforated sections of the paper for the border as I think it makes the cross-stitch picture look unfinished and opted instead to finish the border with black colored  DMC embroidery floss sewn as a half cross-stitch using three strands of the floss.

As I was inserting this into a black colored shadowbox, I wanted to differentiate the black background area around the picture from the picture itself so I inserted orange floss sewn in a back-stitch around the edge of the picture using 2 strands of bright orange DMC embroidery floss.


The pattern called for some outlining.  Given I was putting this in a black shadowbox I thought certain sections of the picture would benefit from some additional outlining so I decided to add more definition as follows:

1)  The pattern called for one strand of the black floss to be back-stitched around all the bats and chimney pipe of the house.  I opted to use two strands of the black floss instead.
2)  The pattern called for one strand of the black floss to be back-stitched around certain borders around the windows.  I opted to use two strands of the black floss and back-stitch outlined around all sides of the windows and the middle sections.
3)  The pattern did not call for any outlining definition around the frame and sides of the house.  I opted to use two strands of the black floss and back-stitch outlined the frame and sides of both houses.  I also added two strands of the black floss along the left hand side of the walkway.
4)  The pattern did not call for any outlining around the Halloween trick-or-treaters.  I opted to use two strands of the black floss and back-stitch outlined around the left hand sides of all three individuals, as well as around the ghost hat.  I also added two strands of medium gray floss along the right hand side of the ghost.
5) The pattern called for one strand of the black floss to be back-stitched to create the metal fence.  I opted to use two strands of the black floss instead.
6)  The pattern called for one strand of the black floss to be back-stitched around the witches hands, handle of the pumpkin bag, and Dracula hand.  I opted to use two strands of the black floss instead.
7)  The pattern called for one strand of the white floss to be back-stitched for the stars in the sky.  I opted to use two strands of the white floss instead.


While the end results of this design were wonderful some things in the kit and in the instructions could be improved upon so I'd like to offer the following constructive suggestions:

The cross-stitch chart was in black and white as was the floss color code and symbol key. The color code and symbol key was easy to read. The chart was basically easy to read except there was a symbol used in several sections under the metal fence highlighting that was not included in the symbol key.  I thought I could see what color they wanted from the picture on the front but it was too small to determine what to do there.  I opted to use two strands of the orange floss and cross-stitch those sections.

While I basically had no problem with the chart and keys I did have a problem with the way the DMC floss was presented. All of the floss was tied together in one big knot so you had to separate the floss pieces yourself, sort them, and try to interpret which color belonged to which floss # and symbol key on the color chart.

If you only have a few colors to deal with this isn't a problem. However, if you have several different colors to choose from that are close in color then interpreting the chart can be tricky. You may assign the wrong color to the wrong symbol if the colors are too closely aligned. The key code chart should have contained the number of strands that were included in the kit so I would know how many strands I had for the different floss colors.

As I have done with other cross-stitch kits I've completed I had to design my own thread color sorter and symbol key. I took a piece of thin cardboard and cut a 1" x 9" long rectangular piece out to use as a thread sorter. I then punched holes in my cardboard strip in which to tie each of the different colors. Just above the hole I wrote the DMC floss # and just below the hole I added the respective cross-stitch symbol. I then inserted the floss threads that went with that # and symbol through the hole and tied them in a loose knot. This kit could be much improved if a thread sorter with respective #'s and symbols was provided.

The beads were contained within three small ziploc bags which was fine. The chart had footnote symbols to help distinguish which beads were within which bag.

The kit included a cat button was to be sewn to the bottom right hand section on the bottom of the picture.  I didn't like the cat button so I decided not to use it.

My results with the totally finished background, border and frame is shown below:


Despite the relatively small issues I had encountered with the kit I was happy with the way my picture turned out.

As always, my comments are meant to be constructive to enable future purchasers to benefit from my experience and to enhance their ability to create a wonderful little cross-stitch design.