Linda Walsh Originals Blog Pages

Tuesday, January 24, 2012

Eye Candy For The Soul


It's always nice when in the middle of a somewhat blah day you get pleasantly surprised. It's equally as nice when it's something that lifts your spirits.


As I was getting ready to take an afternoon walk with hubby several days ago I walked into the kitchen and saw my darling hubby standing there beaming.


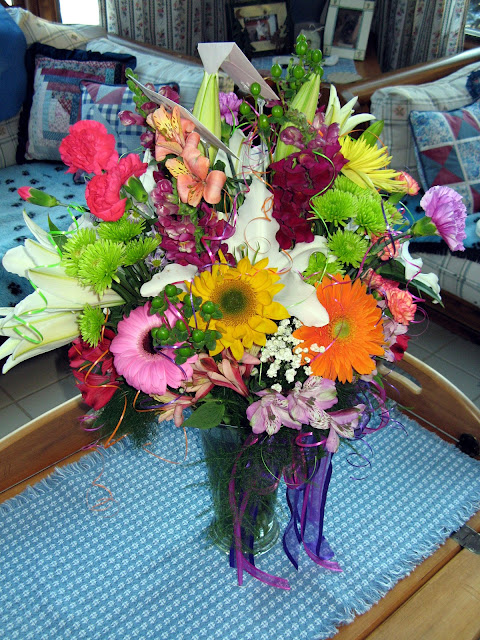
Right next to him was a HUGE bouquet of flowers. And, I do mean HUGE!


They were beautiful, glorious, stunning, exquisite and, quite literally, took my breath away. If I had been in a somewhat blah mood before seeing them I certainly wasn't after that.


Not only were the colors absolutely beautiful, but and the size of the lilies and daisies were astounding.


They were amazing. A wonderful example of the beauty of nature.


Something that cannot be replicated. Something that has the ability to change ones mood, ones frame of mind, to lift them up. To fill the air with a sweet scent of nature.

.

And something hubby and I have been pleasantly enjoying for several days on end.


I don't think the pictures really do them justice. You can't really tell from the pictures how beautiful and BIG they were.


Of course, to a flower lover (which I certainly am) there is nothing quite as beautiful as the sheer elegance of a flower. And, there is nothing quite as wonderful as being pleasantly surprised. Especially when that surprise has the ability to change ones mood. To make everything seem possible.


Even though the natural beauty of cut flowers can only be enjoyed for a few short days they are still beautiful to behold.


They are quite literally - eye candy for the soul.


Sunday, January 15, 2012

Christmas Pin 2011


I was surprised when I went to write this blog post as I was sure I had written about it every Christmas since 2005.    Obviously what I had remembered and what actually happened were two different things.  It seems the last time I had written about this was December 2008.  It's not fun when your mind starts to play tricks on you as you get older.  It's either that or I just have too many fires going at the same time and can't keep track of all of them.  Probably the latter!

If you're a reader of my Linda's Blog then you know that I love Christmas traditions and have been posting for a couple of years about a Christmas tradition my Dad started a very long time ago.  Or, so I thought!

Many, man years ago my Dad wanted to give "his girls" meaning my Mother, myself, and my sister something special for Christmas. Back then the term "his girls" did not imply the possessive chauvinistic implications that it does today. To my Dad it was nothing more than a term of endearment. One that separated us from "his boys", my brothers.

So my Dad decided to buy each of "his girls" a special Christmas pin to wear during the holidays. He bought us pins the first year, and then the second, and so on and so on and so on. My wonderful husband decided to carry my Dad's tradition on after he passed away. So, every year he gives me a Christmas pin. Sometimes he can't decide which one he likes best so I get two special Christmas pins. That's okay with me as I cherish each and every one of them.

This year hubby gave me the Christmas Santa & reindeer pin shown above. It's an adorable and cheery little pin and totally unlike any of the others I have in my collection.  I just LOVE it.

Friday, January 13, 2012

More Christmas Gifts - Noel Ornament Cross-Stitch


Hubby liked the cross-stitch bird stamp that I had created for my sister-in-law so much that he asked if I was going to do one for us.  I, of course, said "SURE!" After all if you're a cross-stitch junkie who can resist an invitation to create another cross-stitch. Definitely not me!

I only had two bird stamps left and decided to go with the "Noel Ornament" as it was also very festive and cheery.  Plus, since the Dimensions Gold Collection Petites were all  4 1/4" squares I knew I could make a small picture for us as well.

Like the other Dimensions Gold Collection kits I had bought the   "Noel Ornament"   kit included the pattern, pre-sorted cotton thread, 18 count ivory cotton Aida, felt, needle and instructions.  They also said that thick craft glue and quilt batting would be needed.

The  "Noel Ornament"   pattern uses full counted cross-stitch, half cross-stitch and outline stitching  for emphasis and depth and this detailing really makes the picture stand out. The design of this cross-stitch gives the finished picture a 3 dimensional aspect with the half cross stitch and outlining being used for artistic effect.

The pattern came with starting, stitching, finishing and even cleaning instructions as well as samples of the various stitches required, and color coded keys (with code #'s, lengths, color names, and cross-stitch symbols) and a chart with color coded symbols. The colors and symbols on the keys and chart were easy to read and follow.

While I was very pleased with the end results of this design there are some things in the kit and in the instructions that can be improved upon.

As was the case with previous Dimensions kits the thread sorter was poorly designed. The embroidery threads were glued to two foam backed 6" by 1 1/4" strips of cardboard that had a picture of the color of the thread and it's number. In order to get to the threads you had to separate the foam back from the cardboard strip. Very quickly the threads separated from their section and then you no longer knew what the thread number was to tie to your symbols & legends. I had to punch a hole in the thread sorter cardboard strip just below the color of the thread & it's number and then insert the threads through the hole and tie them in a loose knot so my threads, colors, and numbers would stay together.

I also added the symbols to the strip to make reading the chart easier.  To make things even easier for the user the color symbol should have been shown on the thread sorter strip of cardboard as well. That way you would only need to use the thread sorter strip of cardboard to follow your chart.

The pattern also calls for certain areas of the picture to be left untouched so the white linen color could show through for that area:  It's the white section in the picture below surrounding the stamp border:


However, I don't like the fabric showing in different sections of the background so I opted instead to finish the white sections with half cross-stitching. My results with the totally finished white sections are shown below:


The finishing calls for squaring the back and then sewing felt onto to the back to finish the ornament.  Instead of doing that I decided I wanted to finish my stamp as a small picture.  So, I decided to add 4 additional rows of dark green floss in half-stitch around the entire picture to create the effect of a mat border and then to glue the entire picture flat to a cardboard square.   I had chosen a white frame to finish it which I think really brought out the festive colors of the stamp and really looked nice next to my green floss mat.

It took me 36 hours to complete this picture not including the framing.  Despite the problems I encountered with the thread sorter I was very happy with the way my   "Noel Ornament"  turned out. There is a lot going on in a very small cross-stitch picture and it is amazing to see.

Well, hubby liked it so much he said, "So, when are you going to finish the next one?" I, of course, was tempted to drop everything I was doing and start it right then and there, but decided I had other crafty things I needed to do to get ready for the holidays so this would have to wait. So, I said, "Maybe after the holidays, dear." I'm sure that came as a surprise to him! Gotta keep him guessing!


Thursday, January 12, 2012

More Christmas Gifts - Wish Ornament Cross-Stitch Kit From Mill Hill


When trying to decide on which small cross-stitch kits I wanted to try this year for a Christmas present for my sister-in-law I knew I wanted to create something with a bird theme. You see, she's a bird lover and every year I try to give her something with a "bird" in it. So, this year I decided to buy some adorable counted cross-stitch kits that were historic copies of old bird stamps - with postage markings and all. So, I choose three and ended up making two of them.

All of the bird stamps were Dimensions Gold Collection Petites that were 4 1/4" squares. As I intended to frame this as a little picture the 4 1/2" size was perfect. So, of the three I chose the "Wish Ornament," shown below, as I thought it would make a wonderful miniature picture and was so bright and festive.


Like the other Dimensions Gold Collection kits I had bought the  "Wish Ornament"  kit included the pattern, pre-sorted cotton thread, 18 count ivory cotton Aida, felt, needle and instructions.  They also said that thick craft glue and quilt batting would be needed.

The  "Wish Ornament"  pattern uses full counted cross-stitch, half cross-stitch and outline stitching  for emphasis and depth and this detailing really makes the picture stand out. The design of this cross-stitch gives the finished picture a 3 dimensional aspect with the half cross stitch and outlining being used for artistic effect.

The pattern came with starting, stitching, finishing and even cleaning instructions as well as samples of the various stitches required, and color coded keys (with code #'s, lengths, color names, and cross-stitch symbols) and a chart with color coded symbols. The colors and symbols on the keys and chart were easy to read and follow.

While I was very pleased with the end results of this design there are some things in the kit and in the instructions that can be improved upon.

As was the case with previous Dimensions kits the thread sorter was poorly designed. The embroidery threads were glued to a foam backed 6" by 1 1/4" strip of cardboard and 4 1/4" by 1 1/4" strip of cardboard that had a picture of the color of the thread and it's number. In order to get to the threads you had to separate the foam back from the cardboard strip. Very quickly the threads separated from their section and then you no longer knew what the thread number was to tie to your symbols & legends. I had to punch a hole in the thread sorter cardboard strip just below the color of the thread & it's number and then insert the threads through the hole and tie them in a loose knot so my threads, colors, and numbers would stay together.

I also added the symbols to the strip to make reading the chart easier.  To make things even easier for the user the color symbol should have been shown on the thread sorter strip of cardboard as well. That way you would only need to use the thread sorter strip of cardboard to follow your chart.

The pattern also calls for certain areas of the picture to be left untouched so the white linen color could show through for that area:  It's the white section in the picture below surrounding the stamp border:

However, I don't like the fabric showing in different sections of the background so I opted instead to finish the white sections with half cross-stitching. My results with the totally finished white sections are shown below:


As I wanted to frame this in a small picture frame I opted to finish it by squaring the back and then gluing that to a complimentary colored background.  I had chosen a white frame to finish it which I think really brought out the festive colors of the stamp.

It took me 31 hours to complete this picture not including the framing.  Despite the problems I encountered with the thread sorter I was very happy with the way my  "Wish Ornament"  turned out. There is a lot going on in a very small cross-stitch picture and it is amazing to see.

And, best of all, my sister-in-law just LOVED it which, certainly, made me happy indeed.


Wednesday, January 11, 2012

More Christmas Gifts - Rocky Mountain Santa Cross-Stitch Kit #MH20-8303 Beartooth Santa From Mill Hill


If you haven't already been able to guess - Christmas gifts this year were of the cross-stitch variety. Actually this year and last year and maybe even a few the year before.  What are you going to do when you're a cross-stitch junkie?

As usual, I found several kits I liked earlier in the year so, I bought a few. Unlike last year, this year I bought  a few cross-stitch patterns that utilized perforated paper.

If your remember, the 1st counted cross-stitch perforated paper pattern that I had tried was a Spirit of Quilting Angel Ornament from Brooke's Books Publishing. It was an angel counted cross-stitch ornament design by Brooke Nolan. As I was going to be giving these as Christmas gifts this year I was glad I had already learned a few tricks to working with perforated paper from my previous project.

The first perforated paper counted cross-stitch kit I chose to work on was "Arctic Circles Santa Cross-Stitch Kit #MH20-9303 Nunavut Santa From Mill Hill."  The 2nd cross-stitch kit I chose to work on was Beartooth Santa Bead Counted Cross Stitch Kit MH20-8303 Mill Hill 2008 Rocky Mountain Santas.

The Beartooth Santa pattern and kit came with DMC floss, antique brown perforated paper, glass beads, needles, and a chart with instructions. The Beartooth Santa was to be a 3.25"w x 4.75"h ornament when completed. The pattern suggested finishing the back of the ornament with craft paper or felt - both of which would be glued to the back. Instead of creating this as an ornament I wanted to create a small picture that I could insert into a 5" x 7" frame when completed.

Given my previous experience with perforated paper I knew that you couldn't put it into an embroidery hoop or square frame. The paper was stiff but, not stiff enough to be working on and holding at the same time. In other words, you couldn't just hold it in your hand and cross-stitch at the same time.

The last time I had worked with perforated paper my darling husband had come up with a wonderful solution and had built me a rectangular wood frame jig that I could tape the edges of my perforated paper to. It was a rectangular embroidery hoop of sorts, but without bending the paper. He made it out of 1/2" x 1" pine wood strips. It also has an adjustable center strip that I could use for the smaller counted cross-strip projects I would be doing using perforated paper. It was perfectly suited for this kit.

My frame had worked well for my "Nunavut Santa" which was similar in size to my   Beartooth Santa  so I knew it would work well for this one as well.

My past experience with cross-stitch and perforated paper had taught me that it can tear so you have to be careful with it. Especially when threading the ends of the thread or in the size of the needle you are using. So, before I began I covered the back of the perforated paper with masking tape

Also, based upon my previous experience with perforated paper I decided that I also needed to draw diagonal lines across each corner to get the center point of the perforated paper.

The pattern came with a black and white cross-stitch chart and black and white color code chart with symbols for the floss and beads. I had no problem reading and following the different black and white symbols.

While the end results of this design were wonderful some things in the kit and in the instructions could be improved upon. I'd like to offer the following constructive suggestions:

The cross-stitch chart was in black and white as was the floss color code and symbol key. Both were easy to read and very clear. While I had no problem with the chart and keys I did have a problem with the way the DMC floss was presented. All of the floss was tied together in one big knot so you had to separate the floss pieces yourself, sort them, and try to interpret which color belonged to which floss # and symbol key on the color chart. If you only have a few colors to deal with this isn't a problem. However, if you have several different colors of say gray to choose from that are close in color then interpreting the chart can be tricky. You may assign the wrong color to the wrong symbol if the colors are too closely aligned.

The beads were all combined in a bag so you had to sort the beads and then determine which beads belonged to which symbol. This is fine if the beads are easily distinguishable from one another. When there are several colored beads similar in nature trying to decide which is which can be very annoying. They should have put the beads in separate bags and marked them with their respective color number and symbol.

As I have done with other cross-stitch kits I've completed I had to design my own thread color sorter and symbol key. I took a piece of thin cardboard and cut a 1" x 9" long rectangular piece out to use as a thread sorter. I then punched holes in my cardboard strip in which to tie each of the different colors. Just above the hole I wrote the DMC floss # and just below the hole I added the respective cross-stitch symbol. I then inserted the floss threads that went with that # and symbol through the hole and tied them in a loose knot. This kit could be much improved if a thread sorter with respective #'s and symbols was provided.

I love using beads in cross-stitch designs as I think they really enhance the designs, as was the case with this kit. However, I had a tough time trying to thread the really tiny needle that came in this kit for beading purposes. I know the head of the needle has to fit through the tiny bead openings, but these needles were really, really difficult to thread and trying to do so was not only frustrating, but time consuming. Plus, these tiny needles tend to easily pierce your skin so using them was not only a challenge, but downright painful at times.

The pattern called for certain areas of the perforated paper to be left untouched as the background like the picture shown below:


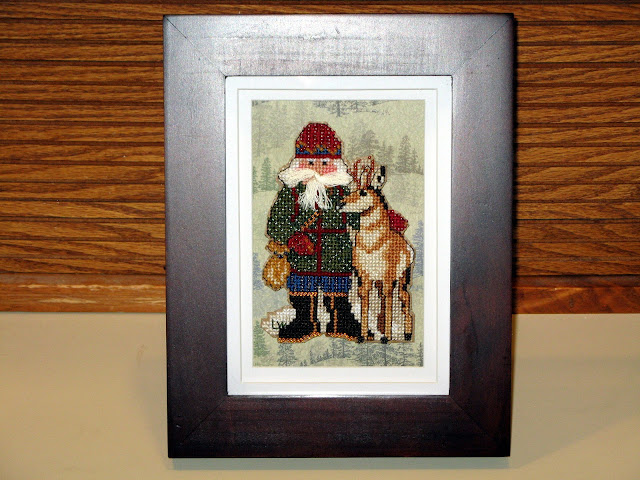
I do not like any of the perforated paper sections to remain untouched as I think it takes away from the beauty of the creation so I opted instead to cross-stitch all the untouched areas with a non-obtrusive background color. It took me 13 hours (excluding the framing) to complete the Santa. My completed Santa came out as follows:


I had decided that I wanted to enclose my Santa in a 5" x 7" frame with a double layered mat and background paper. I could not use a foam board as it was too deep for my frame despite the double thickness of the mat. I covered the back of the Santa with another layer of wide masking tape to secure all the threads and then cut it out of the perforated paper. I then glued the back of the Santa to my background paper and inserted it into my frame.  For this Santa I choose a wooded tree scene for the background paper.

I was pleased with the way my Beartooth Santa Bead Counted Cross Stitch Kit MH20-8303 Mill Hill 2008 Rocky Mountain Santas came out and even happier when I gave it to my sister. She absolutely loved it and the smile on her face was all I needed to see.