I don't know if you remember or not, but last December I wrote a blog post entitled "You Spent How Many Hours On That Cross-Stitch?" that talked about my spending over 250 hours on a cross-stitch picture. Back then you may have thought that 250 hours is a long time to spend on one project. Well, if I told you that I just spent 315 hours on another cross-stitch picture you might think I really have lost my mind.
I started this Dimensions Needlecrafts Counted Cross Stitch, In Her Garden
So, was the 315 hours worth it? Absolutely! I'd do it again as the cross-stitch picture framed (shown in the picture above) is absolutely stunning.
To give you a little background on why I would create yet another massive cross-stitch picture I have to take you back to the rationale for my previous cross-stitch picture. In July, 2010 I wrote a Linda's Blog post about my pressed flower pictures entitled "My Pressed Flower Pictures - Now That's A Great Idea!" In that post I told you about a large pressed flower picture I had made that was hanging in our master bedroom and, sadly, was fading which meant it needed to be replaced.
Well, my husband thought a needlepoint picture like the one I had done in the dining room but much bigger would be nice. I wrote about this needlepoint picture awhile ago in a Linda's Blog post entitled "Needlecraft Picture From A Decade Ago - Or So!"
So, since our house is filled with dolls and pictures of buildings & houses I thought a cross-stitch Victorian scene might be just the thing. So, I set out to find some large cross-stitch kits that would be suitable.
Well, I found several that I liked, but couldn't decide which one would be best suited so, as usual, I bought a couple of kits.

While I liked all of them I decided to go with the Dimensions Counted Cross Stitch M Lady's Chateau for our bedroom as it was a beautiful Victorian scene and would fit perfectly in our bedroom. My finished and framed picture is shown above.
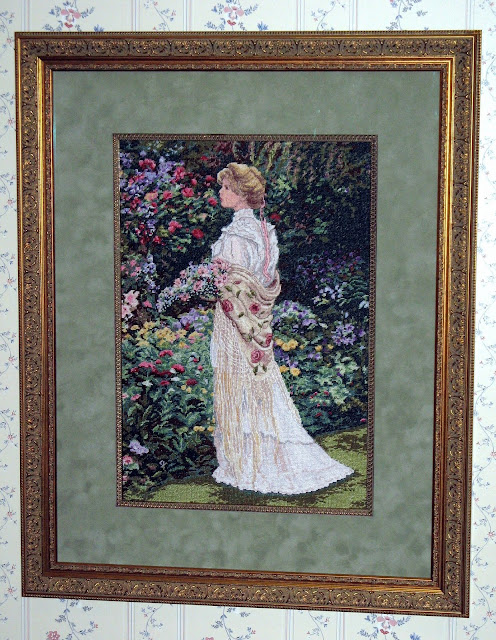
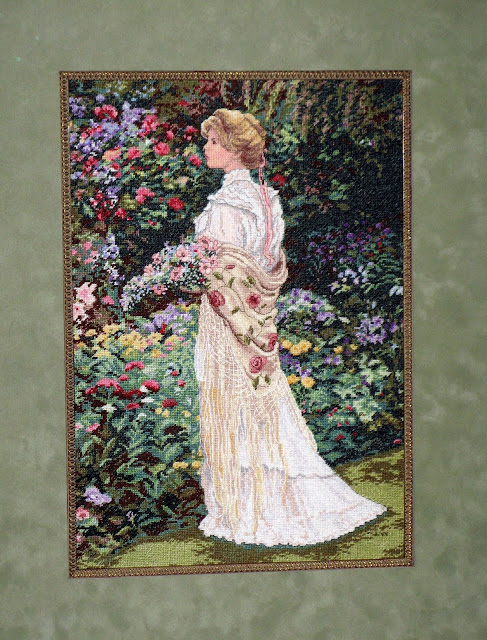
Well, during that shopping trip I also bought Dimensions Gold Collection In Her Garden Counted Cross-Stitch Kit which is a wonderful picture of a Victorian woman in a garden. It's a 9 1/2" x 13.2" picture so it isn't quite as big as the one I had just finished. The finished cross-stitch is shown below and my finished picture, which I had framed, is shown in the picture at the beginning of this post.
My husband and I had been so pleased with the way our Dimensions Counted Cross Stitch M Lady's Chateau picture had turned out that we thought it would be nice to use the Dimensions Needlecrafts Counted Cross Stitch, In Her Garden in our dining room.
In our dining room we have a large print picture of a Victorian woman in her garden and thought it would be nice to create a three picture scene of three Victorian woman in their gardens. We decided that the Dimensions Gold Collection In Her Garden Counted Cross-Stitch Kit would look great on the left and that the Dimensions Needlecrafts Counted Cross Stitch, A Summer Stroll shown below would be a good picture to put on the right hand side.

I have been a fan of the Dimensions cross-stitch and punch-needle kits for quite some time and have written about them several times on my The Book Review Corner blog before.
The Dimensions Needlecrafts Counted Cross Stitch, In Her Garden
The Dimensions Gold Collection In Her Garden Counted Cross-Stitch Kit pattern uses full cross-stitch, half cross-stitch, and outline stitching for emphasis and depth and this detailing really makes the picture stand out. The design of this cross-stitch gives the finished picture a 3 dimensional aspect with the half cross stitch and outlining being used for artistic effect.
While the end results of this design were absolutely stunning some things in the kit and in the instructions could be improved upon. I'd like to offer the following constructive criticism:
First of all the the chart was so big that it actually fit on four pages which meant that you had to tape one section to the other to get the full chart picture. This would have been okay had the chart sheets been printed one-sided. Unfortunately, the instructions and English symbol list was printed on the back sides so when you taped the chart together you lost some of the information. You could photocopy the instructions and symbol list ahead of time but you'd have to do that on a color photocopy machine or you'd lose the colored symbols with a black and white photocopy. Since I didn't have a color copy machine I photocopied the chart in black and white and then used markers to color over the symbols.
I did not run into the same problem that I had the last time with the colors of the symbols and their placement or the English and French symbol list containing different information. Last time several of the colors and symbols ( like the blue heart and green heart, or blue "e" and green "e") used in the chart were too close in color and when they were placed next to each other in the chart you could not distinguish one from the other - even with a magnifying glass. This time there was no issue. The colors and symbols on the chart were easy to read and follow.
With this kit there were a lot of flowers with different colors. This meant either constantly changing the threads or stretching the threads from one section to the other. If you choose the latter, like I did sometimes, you tend to run out of threads. I ran out of several of the flower colors, but did not make a note as to which ones they were. I did, however, make a note of running out of some of the background colors. Most notably, the black (#18403), dark green (#16880) and blue green (#16878) threads.
As was the case with my last Dimensions kit the thread sorter was poorly designed. This was a large cross-stitch kit which meant it contained a lot of threads. The embroidery threads were glued to a foam backed 11 3/4" by 1 1/4" strip of cardboard that had a picture of the color of the thread and it's number. In order to get to the threads you had to separate the foam back from the cardboard strip. Very quickly the threads separated from their section and then you no longer knew what the thread number was to tie to your symbols & legends. I had to punch a hole in the thread sorter cardboard strip just below the color of the thread & it's number and then insert the threads through the hole and tie them in a loose knot so my threads, colors, and numbers would stay together. To make things even easier to understand the color symbol should have been shown on the thread sorter strip of cardboard as well. That way you would only need to use the thread sorter strip of cardboard to follow your taped together chart.
Despite the problems I encountered after all is said and done the design of Dimensions Gold Collection In Her Garden Counted Cross-Stitch Kit is absolutely beautiful. The outlining of just the Victorian woman really makes her stand out from the flowers and really makes her fringed shawl seem intricate. Would I invest 315+ hours again to get this type of result? Absolutely.
However, some things can be improved upon. My comments are meant to be constructive to enable future purchasers to benefit from my experience and to enhance their ability to create an astonishing piece of work from an incredible design.
Like the picture I just finished it will take me a long time to complete the final picture for our series. However, I don't plan on starting that until next winter. I've just got too many other things that I need to get done and don't have the time to devote to such a lengthy project right now. I will complete my series as I just love to cross-stitch and, once I start a project, I do see it through to its completion.
I was very pleased with the results of my 315 hours of blood, sweat, and tears. The Cross-stitch itself was absolutely gorgeous. So, once again, we decided that it would need a nice mat and frame to really finish the piece. After all the hard labor put into creating the cross-stitch picture we decided it needed to be finished properly.
So, once again, we took it to a little local shop called Art & Frame Emporium. Their website is at http://www.artandframeemporium.com/.
This shop has been in business since 1982 and we have been buying things from them for over 20 years. They may be a little art shop, but it is filled with wonderful art supplies, kits, picture frames, etc. But, best of all, it's the staff there that makes the difference. The owner, Ed Turner, and several of the employees like Jean Pellerin, James McAlice, and Mickie Ayleward are all gifted artists in their own right. Over the years we have found that all of the members of the staff always offer terrific advice or suggestions. That's why we keep going back and why a small shop can remain in business all these years. You get quality products, quality advice, and quality service.
This time we talked to Jean about the framing for our cross-stitch. The large print picture in our dining has an ornate gold frame so we wanted something to compliment it as well as compliment the cross-stitch picture. Jean made excellent suggestions and we decided to use a green velour mat, gold brocade trim framing the cross-stitch to give the picture depth and to draw you in, and a gold ornate frame. We also decided to use museum glass instead of regular glass - which makes an enormous difference in the viewing of the picture.
When Jean called to tell us that our picture was ready she said it was "gorgeous!" and the "guys" thought it was "gorgeous, too!" I could tell that she was very proud of her work and she should be. When we saw it - it was stunning. Just beautiful. I put a lot of labor into my cross-stitch and Jean put a lot of labor into finishing it properly for me.
Both my husband and I were thrilled with the way it turned out and have it hanging in the dinning room as we had planned. It compliments the large print picture in the room and is just breath taking to view. The pictures in this post don't really do it justice.