

I like to showcase my little (i.e. 5" by 5" or 5" by 7") cross-stitch pictures in shadow boxes or frames on my family room fireplace mantel. I arrange them by season or holiday. For the most part I have plenty of Christmas cross-stitch pictures. I have several Halloween and Fall pictures. Only a few for the Winter season and until finishing my 2 recent beach scenes I only had one for the Spring and Summer seasons. So, I decided to complete another Summer seasonal cross-stitch picture kit that I had previously purchased.
The cross-stitch kit I just finished was a counted cross-stitch kit from Dimensions Gold Collection Petites entitled "Beacon At Rocky Point."
Like the other Dimensions Gold Collection Petites kits I had bought the kit included the pattern, pre-sorted cotton thread, 18 count white cotton Aida, needle and instructions.
The "Beacon At Rocky Point" pattern uses full counted cross-stitch, half cross-stitch, french knots and outline stitching for emphasis and depth and this detailing really makes the picture stand out. It also varies the number of threads used with the various stitches to add to the depth emphasis. The design of this cross-stitch gives the finished picture a 3 dimensional aspect with the half cross stitch, french knots and outlining being used for artistic effect.
The pattern came with starting and working order instructions as well as samples of the various stitches required, color coded keys (with code #'s, lengths, color names, and cross-stitch symbols) and a chart with color coded symbols. The kit came with instructions for finishing the back of the picture.
While I was very pleased with the end results of this design there are some things in the kit and in the instructions that can be improved upon.
Unlike the problem I had with the "Cliffside Beacon" cross-stitch color chart that was way too small and difficult to read this color chart was large enough and easy to follow.
As was the case with previous Dimensions kits the thread sorter was poorly designed. The embroidery threads were glued to foam backed 6" by 1 1/4" strips of cardboard that had a picture of the color of the thread and it's number. In order to get to the threads you had to separate the foam back from the cardboard strip. Very quickly the threads separated from their section and then you no longer knew what the thread number was to tie to your symbols & legends.
As I have done with other cross-stitch kits I've completed I had to alter the thread sorter to suit my needs. I pulled the thread sorter apart to get rid of the foam and then punched holes in the cardboard strip just above each color and color #. I inserted the floss threads that went with that color and color # through the hole and tied them in a loose knot. I then added color coded symbols with colored pens beneath each color so I would know what symbols went with what color.
Short of changing the thread sorter all together to make things even easier for the user the color symbol should at the very least have been shown on the thread sorter strip of cardboard as well. That way you would only need to use the thread sorter strip of cardboard to follow your chart.
I also decided to once again utilize the rectangular wood frame jig that my darling husband built for me that I could tape the edges of the 18 count ivory cotton Aida to. The wood frame jig is a rectangular embroidery hoop of sorts and can accommodate a 5" by 5" cross-stitch picture kit or 5" by 7" cross-stitch picture kit. He had made it out of 1/2" x 1" pine wood strips with an adjustable center strip that I use for the 5 x 5 square designs.
The instructions called for using 1-strand of the dark grey embroidery floss to be back stitched in various sections of the rock cliffs to highlight the 3-dimensional aspects of the picture. Instead of using 1 strand of dark grey embroidery floss I decided to use 2 strands for more emphasis. For the most part I followed the instructions for this kit. I may have added a few extra french knots for the red, blue, and white flowers but basically didn't change the kit, as shown in the picture above.
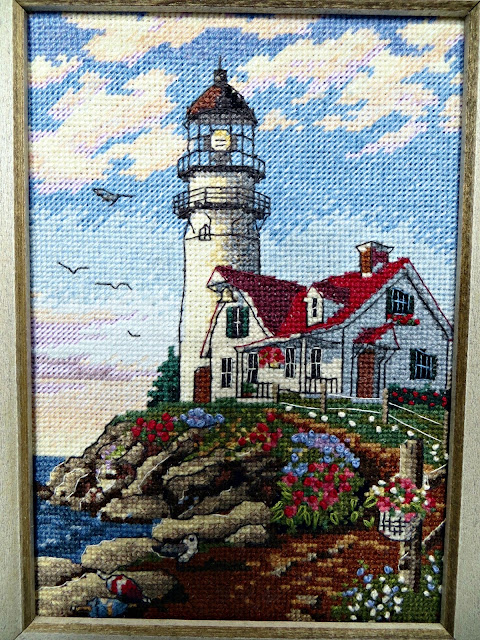
The kit came with instructions for finishing the back of the picture. I had chosen an off white glass-less Mill Hill 7" by 9" frame with a 5" by 7" opening instead of a standard glass frame which utilizes a mat to finish it which I think really brought out the beautiful colors of the cottage scene. Plus without the glass you could really see the 3-dimensional aspects of the picture.
When using the glass-less frames I tend to favor 1/4" foam backed adhesive mounting boards for the cross-stitch pictures I'm inserting into the picture frame as they perfectly fill the space between the front ridge and back of the frame. So, I stretched and mounted my picture on a 5" by 7" foam backed adhesive 1/4" mounting board, taped the four corners so I could sew them with nylon thread in a "V" to make the corners taut with the adhesive board and then taped the remaining vertical and horizontal sides with masking tape.
I added the back that was included with the frame and taped it to the back of the frame to hold my picture within the frame. Then using paper glue I cut a piece of thick decorative paper to fit the 7" by 9" back of the frame and glued it on to totally finish the back of the frame.

It took me 64 hours to complete this picture including the framing. Despite the problems I encountered I love the way my "Beacon At Rocky Point" picture turned out. It's absolutely beautiful and the 3-dimensional aspects of the beach scene are amazing. Plus, now I have 3 beautiful cross-stitch pictures for the Spring and Summer season for my family room mantle. Progress!
No comments:
Post a Comment