I've always liked adorning my presents with big bows and other accessories - silk florals, stuffed animals, and cute little decorations for kids like bendies, softies, etc. My grandchildren loved getting gifts with little creatures attached.
During the holidays one of my favorites things to do is decorate the presents. Hubby does all the wrapping. I do all the decorating and, when I doing this, I'm in my glory. Storing all the different accessories needed for decorating presents all year can be a bit of a challenge, but the end result is always worth it.
So, of course, I love it when I find beautiful, creative ways to decorate presents, gift baskets or gifts in a jar. If you love decorating as much as I do I hope you find the tutorials, video's, patterns and how-to's on my Pinterest board helpful.
If you love my Gift Baskets & Bags Tutorials, Gift Boxes Video's, Patterns, and How-To's board please follow my board by clicking on the link above.
According to the Apple-Head Trioillustration shown above from the Dolls from the Index of American Design Collection at The National Gallery of Art: This apple-head trio was designed and made in North Carolina about 1892. Apple-head dolls probably originated with the Iroquois Indians. The expression on the face was produced by pinching the surface of the apple when it began to shrink. Jane Iverson (artist), American, active c. 1935, Mrs. Almira Smith (object maker), Wenham Historical Society (object owner), American Dolls, c. 1936, watercolor, graphite, and pen and ink on paper, Index of American Design, 1943.8.15576
Viewing this illustration got me to thinking about apple head dolls and their history. So, of course, I had to do a little research.
While doing my research on the "History of Faceless Dolls" I ran across the Wisconsin Historical Society website that had an amazing collection of 23 apple head dolls, including the beautiful apple head doll shown in the screenshot above.
She is described as, "Applehead doll, woman, black dress, white apron, USA, 1952-1956." I loved all the dolls in the collections and think it is well worth seeing. If you would like to see all 23 of the apple head dolls in their collection please click here.
According to Wikipedia.org, "An apple doll is a North American cultural phenomenon where the doll's head is made from dried apples. The apple is peeled, then carved with the facial features of the doll. Next the apple is left to dry for several days or weeks. When completely dry, the apple is positioned on the top of a wire frame which is shaped into the rest of the doll's body. The rest of the wire frame is covered up by the doll's clothing, which is usually sewn by hand. In modern times, apple dolls are mostly used as decorations or to display craftsmanship, rather than as children's toys. Because of the different effects drying produces, no two dolls are alike."
That latter statement is definitely true and all you have to do is look at the 23 apple head dolls in the Wisconsin collection above to see that no two dolls are alike.
According to theEncyclopedia of American Folk Art, "Unlike corn hisk dolls, which have dual origins in the European and Native American cultures, nuts and apple dolls were largely indigenous to American soil."
"Americans made the first apple-head dolls. As pioneers came into contact with various tribes, they began to copy their dolls. Traders persuaded Native Americans to dress their apple-head dolls in bright costumes with elaborate ornamentation, for sale to tourists. Their apple faces were either carved or pinched in, to create the features before they shrunk as they dried."
According to Verna's article, "Dolls are one of the oldest forms of entertainment in the world. Now they are made with fancy clothes and delicate hair, with mechanical insides that enable them to walk, talk and drink. But when times were not as affluent and parents could not afford to buy them, they made their own from whatever their ingenuity could devise--from rags to walnut shells. A unique, yet humble, homemade doll is the applehead doll. Nona King who has been making applehead dolls for fifteen years showed us how to make them."
"The applehead doll is made in two parts, the head and the body. For the head all you need are a solid apple, potato peeler, paring knife, a small piece of wire about 8 to 10 inches long, a teaspoon and some lemon juice."
The apple head doll in the picture above is from that article. If you would like to read that article please click here.
Image Courtesy of The Skookum News - An Online Newsletter for Collectors
A lot of the websites and articles I read referenced the "Mary Skookum Indian Doll" like the doll in the picture above. The Skookum News - An Online Newsletter for Collectors had an article about these dolls which is very interesting to read.
It seems Mary Dwyer McAboy was the originator of the Skookum Indian Doll in 1913. She was the first to make apple head Indian dolls wrapped in blankets. The dolls became so popular Mary filed a trademark on April 19, 1917 claiming use of the word "Skookum" since the fall of 1913 and she applied for a design patent for the dolls on November 29, 1913, which was granted on Februay 17, 1914. The patent was for three apple head doll designs: male, female, and female with baby.
At the end of 1914 Mary merged her doll business with Harry Heye Tammen, founder of H.H. Tammen Company which began mass production of Mary's dolls.
If you would like to read the article about Mary's Skookum Indian Dolls please click here.
Image Courtesy of Wikipedia.com
Wikipedia.org has a section on the Skookum Doll, like the doll shown in the picture above, as well.
According to their article, "She had difficulty processing large numbers of apples, as excessive moisture led to rotting. She consulted with chemists at Montana State University in an attempt to control the problem. But demand grew so rapidly that she moved to mass production techniques within a year, and soon almost all of the doll heads were made out of composition. A product that began as women's handicraft had rapidly shifted to factory production with mostly male workers. From that time on, the dolls were manufactured by the H.H. Tammen Company in Los Angeles, and distributed in the east by the Arrow Novelty Company in New York City. Starting in the 1940s, the faces were made of plastic. McAboy supervised production of the dolls until she retired in 1952."
If you would like to read the whole article please click here.
There is a delightful "Vincent Price Shrunken Apple Head Sculpture" video on the Choclodite Lensman YouTube channel from 2011 which is a short documentary about the apple head dolls made by Melinda Henning. If you would like to view that video please click here or click the go arrow above.
Most of the apple head dolls are delightful creations. However, some apple head dolls have been created as "shrunken heads" for children to hang during Halloween.
Image Courtesy of Martha Stewart website.
The shrunken head shown in the picture above is from a how-to project on the Martha Stewart website describing how to make shrunken apple heads.
According to Martha's website, "These shrunken heads, made from peeled, carved, and dried apples, are as spooky as the scariest Halloween masks -- and just as much fun to create. Martha transforms a Granny Smith apple into a truly frightening fruit; although any variety of apple will work, Granny Smiths are ideal for this project because of their round shape."
If you would like to read that article please click here.
According to their article, "The Seneca Indians were reportedly the first people to make dolls out of apples ... but the craft was later adopted by mountaineers in Appalachia, where such handmade toys are still produced as part of the area's cottage industry. The miniature figures command a surprisingly high price, too! We've seen applehead dolls on sale in Virginia's Blue Ridge Mountains for as much as $20 each ... which amounts to quite a tidy profit from a toy that requires an initial investment of perhaps 50¢!"
If you would like to read their article and watch the slideshow please click here.
There are thousands of websites showing how to make apple heads dolls.
The Apple Dollis a delightful children's book written in 2007 by Elisa Kleven. The description is as follows:"Lizzy loves the big apple tree in her yard more than anything. So when the first day of school comes, she picks a beautiful apple, turns it into a makeshift doll she names Susanna, and takes it along to keep her company. But her teacher tells her that dolls aren't allowed at school. Even worse, her sister says that Susanna won't last forever. Then Lizzy's mom shows her a way to turn Susanna into a real apple doll. And with the help of Susanna the Apple Doll, Lizzy overcomes her shyness at school and makes plenty of new friends to bring home to play in her beloved apple tree." "Detailed, delightful collage illustrations accompany this sweet story about one girl's success in bringing together her home world and her school world. Instructions for making an apple doll just like Susanna are included!"
If you would like to read the "How To make An Apple Doll" .PDF instructions from The Apple Doll book for making an apple doll like Susanna's please click the picture above or click here.
Of all the dolls I've made I have yet to make an apple head doll. Perhaps it's time I did. Maybe she'll have a Victorian outfit. Now wouldn't that be a surprise.....
When I was doing my "History of Faceless Dolls" research I ran across another doll that I was intrigued with and wanted to know more. She was also around in the colonial times and had an amazing history. It seems she was loved so much she was buried in a chest by her owners with other cherished possessions when the British invaded Long Island and then dug up later when the war was over.
Can you imagine loving a doll so much you want to safeguard her during a war? I certainly can.
While she wasn't pertinent to my research on "faceless" dolls I just had to know more. While there wasn't a lot of information on her there was some. Here's what I found.
In their article they mentioned the Molly Brinkerhoff doll and said: "YOU will not find the name of Molly Brinkerhoff in American history, and that is a pity, for she was a heroine of the Revolutionary War who merits our sympathy and respect. One of the oldest rag dolls in the United States, she has come down the years in fair condition, all things considered, and now lives in Vermont - aged perhaps 175 years - with her present owner, Mrs. Richard G. Miller of White River Junction." "Molly is mother made of old homespun linen stuffed with flax. Her hair and features are embroidered. One arm now is missing, and her clothing has long since vanished: but with care she may last another century or two and survive seven more wars." "Her adventures have already been notable. Certain colonial Brinkerhoff kids loved her and wept to leave her when the British army swept toward their Long Island home. They hid her in a chest, with other treasures, and buried her in the sands of Long Island, then fled with their parents before the tide of war. Later, when the war was over, she was resurrected and restored to her adoring family."
"After her mother's death, Mrs. Miller -a direct descendant of two colonial famiies - found Molly in her attic, together with a plaque that had accompanied her to some fund-raising fair in Civil War times. The plaque reads:"
Molly Brinkerhoff
I am not made of dust or wax,
But homespun linen stuffed with flax,
No human being treads the earth
That was alive at Molly's birth.
Many scores have I, old Molly,
Kept the Brinkerhoff children jolly.
During the war of '76
I ofken chest deep in the sand
I was buried on Long Island strand.
There safe from British and Tories I lay
Til the last of the redcoats skedaddled away.
"There is no signature, but the poet is obviously Molly herself, writing perhaps on her hudreth birthday. The note of quiet authority is unmistakable."
In the book "Cloth Dolls From Ancient to Modern - A Collector's Guide With Values by Linda Edward"there is a mention of the Molly Brinkerhoff doll on page 8 that said, "A Revolutionary America period doll known as Molly Brinkerhoff was oened by the Brinkerhoff children. She is 25 inches (63.5cm) tall and made of linen stuffed with flax. Her hair and features are neatly embroidered. She was held in such hig esteem by her owners that when the British troops advanced on Long Island, New York, she was buried in a chest on the Long Island Strand along with the other family valuables to protect her from the "Redcoats and torries." When the family returned home after the wa she was dug up again safe and sound to become a cherished family heirloom."
Also, according to The Information Please Girls' Almanac By Alice Siegel - Page 146, "Molly Brinkeroff - Molly was a doll that was buried by her owners along with their household goods when the British invaded Long Island in the days before the American revolution. When Molly was dug up she became a keepsake for generations of Brinkeroffs, who associated her with that period in history."
I wish I had found more information on her and had found a picture. I haven't yet, but I'll keep trying.
When it comes to melting my heart an adorable smile from a little baby will get me every time. I can't resist babies - especially smiling babies.
One of my all time favorite doll designs is my "Baby Nicky" doll. He's a baby shower centerpiece doll that I designed based upon my grandson "Nicky" who had the most wonderful, curly head of hair as a baby that you could ever imagine. I just LOVED it and would love to swap hair with him.
If you've been following myLinda's Blog you know that "Baby Nicky" has been involved in a lot of what goes on in "The Dollie Storage Room." That's not hard to understand as he's a fun loving doll and is very popular among the other "dollies."
When I was designing new patterns a couple of years ago I wanted to design some more baby shower centerpieces and favors or ornaments to compliment "Baby Nicky." So, I ended up designing a bunch of centerpieces and favors.
I wanted something for the centerpieces that would capture the guests attention at a baby shower and decided that a baby boy and baby girl doll around 16" tall each would be perfect. Something that could stand alone on a center table or individual tables and be easy to make.
I also wanted the centerpiece to look soft, cuddly, warm and inviting so I decided to create my dolls out of some old flannel pillowcases that my sister had given me. You see, in our family we never throw anything away that could be used in sewing or crafts. So, as you might expect I get a LOT of stuff. In any event, the old flannel pillowcases were perfect for the two baby centerpiece dolls I had in mind.
After the centerpieces were designed I decided that I wanted to design some FUN baby shower favors. Again, the key was they would be easy to make and could end up being ornaments for the guests to bring home. Plus, I wanted a variety of different kinds of favors that could be made.
While thinking about what to make for favors I again thought about my grandson, Nicky, who was born 31 weeks premature. He had spent 9 weeks in a special care nursery and I remembered that the nurses would wrap him in a swaddling blanket which allowed them to easily carry him around. They always looked like they were carrying him around like a football.
The nurses taught all the family members how to bathe, feed, and dress Nicky so I learned how to wrap my grandson in a swaddling blanket. So, I thought maybe a baby shower favor with a baby head sticking out of a swaddling blanket would be cute.
Then I decided I wanted to create baby head favors that could stand alone and decided to use wooden spools and terracotta pots as the base.
I have to admit that I just LOVED making the baby heads on pink and blue spools. I had wanted something that would make everyone smile and when you're looking down on them you can't help but laugh. I was laughing my head off while creating them and when my husband saw the finished heads lined up on the table he started laughing as well.
I thought they would definitely make for a very enjoyable baby shower and could picture a room filled with tables and a baby head favor holding the place setting for each guest. I figured the guests could take them home to function not only as a pincushion but as a nostalgic reminder of a wonderful baby shower.
So, my baby shower line of patterns and e-patterns was born. Ever since then I have wanted to create a line of baby shower decoration products. Coordinated decorations that would fun and easy to make. Cozy and intimate - just like an old fashioned baby shower.
I can remember baby showers that I went to years ago that were held at a neighbors house or a girlfriends house. We would decorate the living room and invite between ten and 20 guests, We'd make all the decorations and all the finger food and would sit around while our "mother-to-be" opened the presents. We'd play a few games and some of the experienced mothers would tell stories of their various pregnancies. There was always a LOT of teasing going on and you could hear us laughing for hours on end. It was always a delightful time.
I wanted to re-create that atmosphere. To design baby shower decorations that would all compliment each other. That were fun and easy to make. I also wanted to combine my dolls with graphics of my dolls, as well as create baby shower graphics I could use for printables and fabric. And, for baby products.
So, I designed centerpiece doll patterns, easy to make e-printables using graphics of my baby shower dolls and favors, cut and sew doll and favor ornaments using the baby shower graphics, coordinating fabrics using the baby shower graphics for baby shower decorations as well as for making baby shower presents. Just about everything you could think of for a delightful baby shower except the food.
With all I've done by now you'd have to agree I LOVE babies. I also LOVE finding all sorts of ideas for creating baby shower decorations as well as gifts for babies and mothers-to-be. As a result, I set up two Pinterest boards for all the wonderful baby ideas I've found. One is for baby showers and one is for baby gifts.
Who doesn't love weddings and beautiful brides? I know I do. So much so that I've designed and made several bridal dolls. Some are "faceless" and some have embroidered faces.
You could say I have a bridal doll obsession. Truth be told I have a serious DOLL obsession, but I do like designing and creating bridal dolls - especially if they're Victorian like the one pictured above.
I also like collecting bridal dolls like the one in the picture above that my mother and sister gave me. She's very "Gibson" like - don't you think? I just love her.
I also love decorating for wedding events, like bridal showers and spent a couple glorious days years ago preparing for my nieces bridal shower. My sister, sister-in-law and I were throwing the shower and divvying up the tasks to be done. It should come as not surprise to any of you that I was in charge of the decorations.
Several years ago I decided to create a free e-book on what we did for this bridal shower entitled, "How To Host A Folksy, Family & Friends Bridal Shower." If you'd like to read that e-book please click hereor on the picture above.
I personally love handmade decorations and wedding gifts sewn with love - like a beautiful silk floral bouquet, wall quilt, cross-stitch wedding picture, wedding collage memory book, wedding wreath, customized scrapbook, etc.
As a result I find myself looking at all the wonderful wedding and bridal shower tutorials on the web. There are just so many fun ways to decorate now that it's hard to chose.
Over 43 years ago, when my sister and I shared a bedroom, we decided to re-decorate our bedroom which involved painting the furniture, making new bedspreads and curtains, and adding a collage to one of the walls.
At the time it was quite the undertaking as we were making the bedspreads and curtains from scratch. I know we did a lot of measuring and were really picky about the fabric we would be using and the design we were trying to achieve. Sisters always have different likes and opinions so there was a lot of discussion as to what we were going to do. There was never any dispute as to what color paints we would be using or the color of the fabrics. They would be various shades of blue. The overall color scheme was dark blue, medium blue, light blue, cream, and white.
I'm pretty sure the curtains were rod pocket gathered type of curtains with a ruffled valance, full length curtains with ruffled edges and half curtain panels with ruffled bottoms. The bedspreads were somewhat quilted with gathered ruffles down the sides. The bureaus were painted white with each of the drawers being a different color blue.
We had collected a whole bunch of pictures from different magazines we liked and stapled them to the wall in one very large collage. Our father wasn't too happy with all the staples in the wall, but let us do our thing.
When the room was done both my sister and I were pleased with it, but unfortunately didn't take a picture of it.
Over the years both my sister and I, as well as our mother, honed our sewing skills and, as a result, ended up making many, many things including our own clothes, large quilts, small quilts, mini quilts, quilted pillows. placemats and runners.
The first time I made a quilt I thought, "This is fun!" However, like making clothes I very quickly learned that I didn't want to spend a lot of time on large quilts and outfits to wear. I much preferred mini quilts and doll clothes, both of which were smaller and took a lot less time. I know, I know - I get bored easily and large quilts are very time consuming.
I got to the point where instead of making a full size log cabin quilt with multiple log cabin sections I made a full size quilt with very LARGE sections - which were no where near as time consuming to finish. In fact, the quilt in the picture above was a quilt that started as a traditional log cabin that was covered over by another quilt I had designed and made and which I subsequently covered again. With all those covers it turned out to be the warmest and HEAVIEST quilt I had ever made.
My mother liked making log cabin quilts, traditional type quilts and folded mini quilts, pillows, placemats and runners like those shown in the pictures above.
My sister went further with her quilting by creating beautiful quilted and appliqued wall art. In 2011 she started Inspired Creations By Dwhere she sells "FRAME or QUILT - ART QUILTS Fusible Applique E-Patterns & Quilt Kits."
I just love her latest pattern "Tis The Season", which is shown in the picture above, and think it's stunning. I hope you would agree.
I personally don't like making large traditional quilts but do however, like making small wall quilts, doll quilts, mini quilts and, my latest obsession, mug rugs.
I also like looking at some of the beautiful quilted creations out there as there are a lot of exceptional quilters on the web. A lot of quilting inspiration.
As a result I've collected a lot of pins on my quilting Pinterest board. At last count I had nearly 1,000 quilted tutorial pins. Definitely a lot of wonderful quilted eye candy to see and so much to learn.
I love learning new quilting techniques, watching quilting video how-to's, and reading quilting tutorials. I hope you do, too and hope you like my selection of quilt making how-to's, video's and tutorials.
If you love my Quilting Tutorials, Video's, Patterns and How-To's board please follow my board by clicking on the link above.
Four years ago when my sister and her husband became alpaca farmers and started Rock Garden Alpacas they and I had no idea what a big impact that would have on my art doll making.
With the alpacas came Rock Garden Alpacas Fiber for selling all their alpaca fiber products, including roving, raw fiber, carded batts, handspun yarn, hand dyed roving, and doll hair fibers and with this came my desire to create needle felted art dolls using their products.
My sister and I were looking for ways to show her customers how to use her products when the idea for needle felted dolls came into being. Hmmm... Lets do needle felted art dolls. Hmmm... Now why would I think of that? Hmmm....
My sister gave me several large (make that HUGE) bags of roving and several carded batts (which I loved) from her alpacas Sunflower, Ivy, Cosmo, Zinnia and Masquerade which I used to make my needle felted art dolls, like those shown in the picture collage above. I loved working with the natural alpaca roving and carded batts - especially Masquerade's gray fiber batts. It was fabulous for making the needle felted dolls.
Several years ago I was visiting my sister and learned how to card batts and dye roving. It was a lot of fun and I came home with some wonderful carded batts and lots of bright and cheery dyed roving packs. I had Fall combination colors, beautiful blues and purples, Christmas colors and so much more.
Two years ago my sister started spinning her alpaca roving into yarn. She subsequently learned how to hand dye her yarn and utilize several methods for plying it. Last year she sent me a surprise package in the mail that contained some of her handspun alpaca yarn. I was thrilled and put this to good use with some of my mixed media art dolls - especially the witches. I've used her raw alpaca fiber, alpaca roving (natural and hand dyed) and handspun alpaca yarn for some of my dolls hair and have to tell you it's just wonderful.
I keep looking for various ways to use her alpaca fiber products and have to tell you that the possibilities seem endless. When I first started researching needle felting there wasn't a lot online or in the craft stores.. It was in it's infancy. Then all of a sudden it seemed to explode with crafters creating tutorials and video's for showing their techniques. I couldn't be happier.
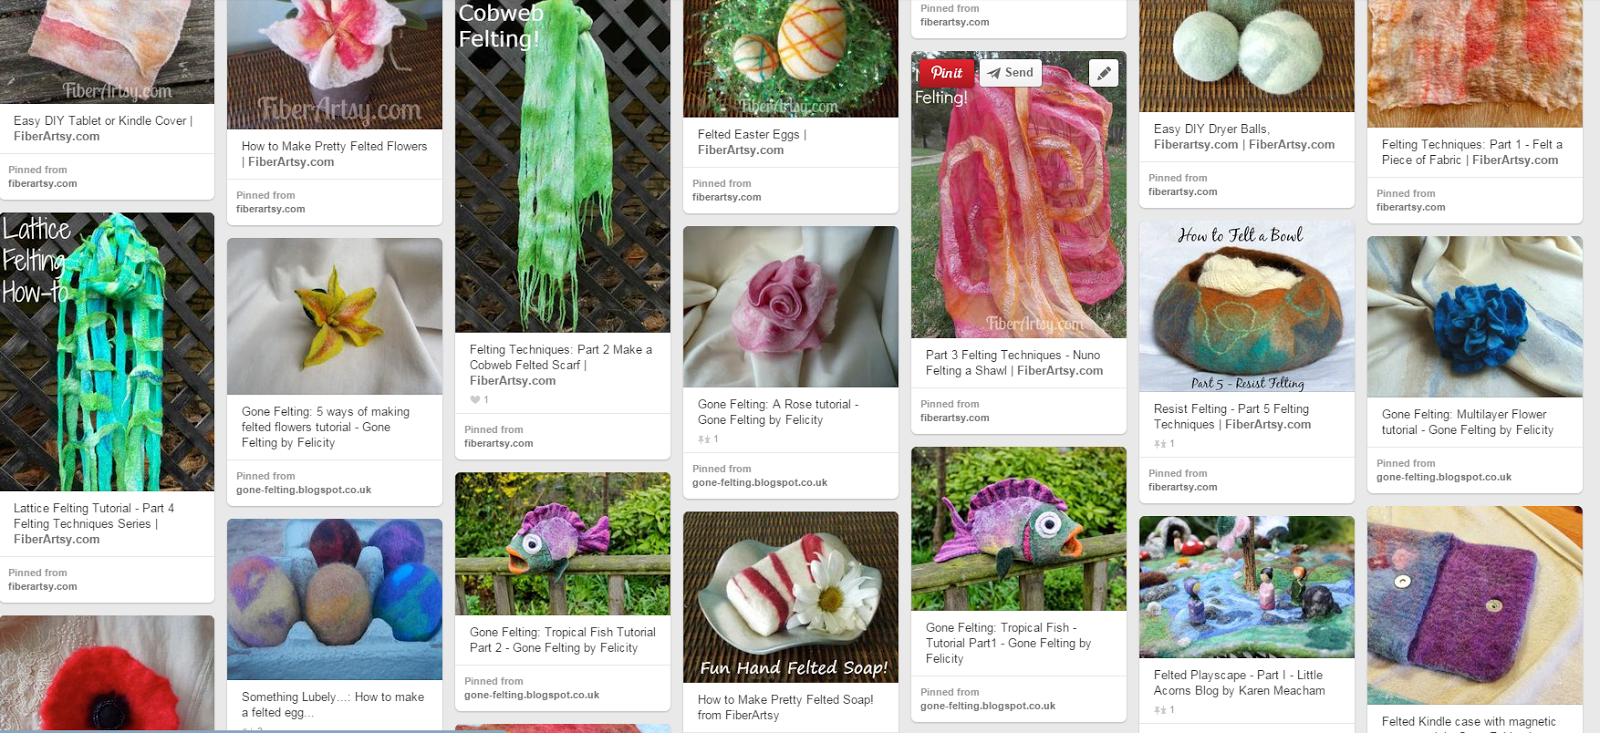
I just love needle felting and watching needle felting, wet felting, and knit & then wet video's and reading tutorials or how-to's. As a result I' have collected close to 300 pins on my needle felted Pinterest board. I hope you enjy needle felting as much as I do.
Here's a few of the tutorials I like like to watch or read and needle felted projects I'd like to try..
If you love my Needle Felt Tutorials & Wet Felt, Knit & Wet Tutorials, Video's, Patterns and How-to's board please follow my board by clicking on the link above.
Ever since I can remember I've been in love with flowers, real and silk floral. I created many gardens as a child just so I could plant dahlias. Big, small, gigantic - it's didn't matter. I just loved the flowers.
Over the years I dabbled with real flower arrangements, dried floral arrangements from flowers I'd dried from my garden, pressed flower pictures, wreaths, topiaries, sprays, natural preserved florals, and silk florals. While I like working with all types of florals I tend to gravitate more towards the silk floral. They're just so versatile and last forever.
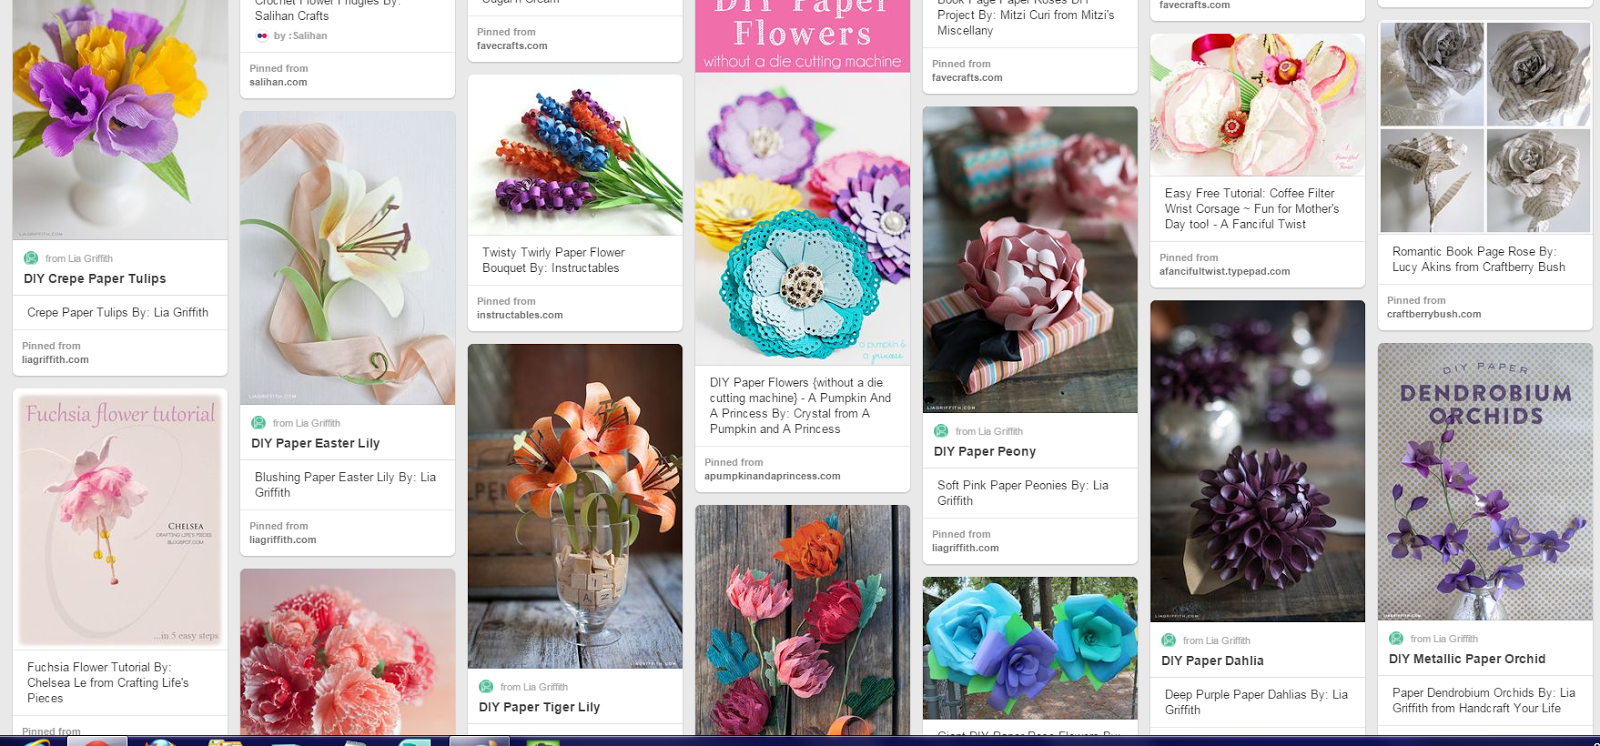
I also love silk floral, natural flower arranging, and dried floral tutorials, videos, and how-to's and have found many online. Here's a few I've found.
If you love my Flower Tutorials, Video's, Patterns & How-To's for Silk & Dried & Natural Florals board please follow my board by clicking on the link above.
I also LOVE flower crafts of all sorts of media and have made many, many flower craft creations over the years so, of course, I've collected tons of flower craft tutorials, videos, and how-to's. Here's a few I've found.
If you love my Flower Crafts Tutorials, Video's, Patterns and How-To's board please follow my board by clicking on the link above.