Tuesday, April 16, 2013

My Flowers and Hummingbird Cross-Stitch - Dimensions The Gold Collection Petites


This winter proved to be a particularly productive season for me as far as my cross-stitch creations were concerned as I was able to finish 5 of the cross-stitch kits I had previously purchased.   In total I spent 200 hours creating my  5 cross-stitch pictures but it was well worth it.  That amounts to a few hours a day over 70 days or so.  Enough to cover the winter season.

The cross-stitch kit I just finished was a counted cross-stitch kit from Dimensions The Gold Collection Petites entitled Flowers and Hummingbird. Like the other Dimensions Gold Collection kits I had bought the Dimensions Needlecrafts Counted Cross Stitch, Flowers & Hummingbird kit included the pattern, pre-sorted cotton thread, 18 count ivory cotton Aida, needle and instructions.

The Flowers and Hummingbird pattern uses full counted cross-stitch, half cross-stitch and outline stitching for emphasis and depth and this detailing really makes the picture stand out. The design of this cross-stitch gives the finished picture a 3 dimensional aspect with the half cross stitch and outlining being used for artistic effect.

The pattern came with starting, stitching, finishing and even cleaning instructions as well as samples of the various stitches required, and color coded keys (with code #'s, lengths, color names, and cross-stitch symbols) and a chart with color coded symbols. The colors and symbols on the keys and chart were easy to read and follow.

While I was very pleased with the end results of this design there are some things in the kit and in the instructions that can be improved upon.

As was the case with previous Dimensions kits the thread sorter was poorly designed. The embroidery threads were glued to two foam backed 6" by 1 1/4" strips of cardboard that had a picture of the color of the thread and it's number. In order to get to the threads you had to separate the foam back from the cardboard strip. Very quickly the threads separated from their section and then you no longer knew what the thread number was to tie to your symbols & legends. I had to punch a hole in the thread sorter cardboard strip just below the color of the thread & it's number and then insert the threads through the hole and tie them in a loose knot so my threads, colors, and numbers would stay together.


I also added the symbols to the strip to make reading the chart easier.  To make things even easier for the user the color symbol should have been shown on the thread sorter strip of cardboard as well. That way you would only need to use the thread sorter strip of cardboard to follow your chart.

The Flowers and Hummingbird  kit creates a 5" by 7" hydrangea picture using the 18 count ivory cotton Aida cloth which was included in the kit.  However, the piece wouldn't fit into the 10" round embroidery hoop that I wanted to use so I could cross-stitch the whole 5" by 7" picture without having to move the cloth within the hoop or create creases in my picture from the hoop.  I could have used a smaller hoop but that would have required moving the cloth within the hoop which would create creases where the hoop was.  I hate that as no matter how hard you try it is very difficult ironing out creases caused by embroidery hoops.

So, I decided to sew cloth strips to the edges of  my cloth so it would easily fit within my 10" round embroidery frame as shown in the picture below:


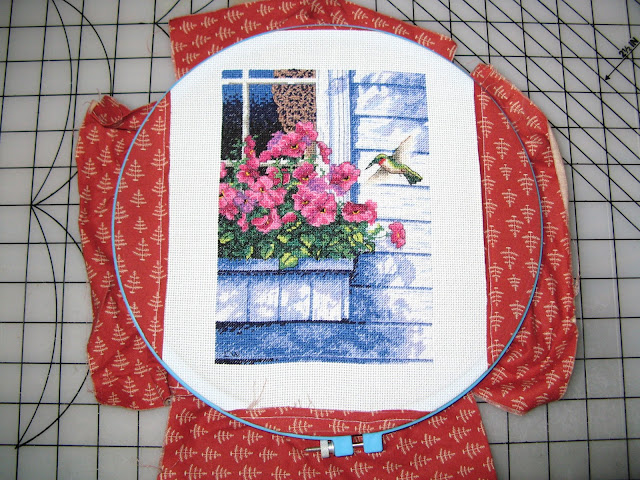
The kit should have included a  larger piece of the 18 count ivory cotton Aida cloth in order to avoid this problem.

The design also called for leaving some of the sections of the white Aida cloth showing.  I don't like doing this as I don't feel the picture really looks finished unless the whole picture is cross-stitched.  So, I opted to use 2 strands of white thread in a half cross-stitch where the white Aida was to show.  I think this really enhanced the finished look of the picture.

The finishing calls for centering your design on a 5" by 7" piece of cardboard and folding the excess fabric around the cardboard and mitering the corners.  As I as going to put my picture in an 8"  by 10" double matted frame I decided to mount my picture on an 8" by 10" press and seal board that I would fit the inside of my frame.


I had chosen a white frame with royal blue and cream double matting to finish it which I think really brought out the beautiful colors of the flowers and white color of the houses clapboard.  Plus the double matting allowed for enough room for the press and seal adhesive board that I was using to mount my finished cross-stitch.


It took me 50 hours to complete this picture including the framing.  Despite the problems I encountered with the thread sorter and Aida cloth I was very happy with the way my Dimensions Needlecrafts Counted Cross Stitch, Flowers & Hummingbird kit turned out.

Saturday, April 13, 2013

Fun With Puzzles and Noodles


Two of the products I created for my "It's Raining Doll Parties Products Gallery" included three jigsaw puzzles with graphics that I had designed of the Hawk Family. One of the puzzles had the Hawk family children graphics on hearts, one had their square fabric images on it, and one had the Hawk Family graphics with the words "It's Raining Doll Parties" on it.

The jigsaw puzzles come in two sizes: 8" by 10" puzzle in gift box and 10" by 14" puzzle with 252 pieces. The pieces are made of sturdy cardboard and mounted on chipboard and are printed in vivid colors with easy wipe clean surfaces. I decided to try two of the 10" by 14" size puzzles and ordered two of them.


When they arrived I was anxious to try them as I LOVE puzzles of all sorts and have since I was a child. Give me a puzzle to put together, a crossword puzzle to solve, Rubik's cube, three dimensional puzzle of the Empire State Building, etc. and I will work on it until I've finished it or solved it. I spent hours one weekend when I was a teenager solving the Rubik's cube. I worked on it and worked on it and worked on it until I solved it. Sounds a little obsessive compulsive doesn't it?

When I was a child I also adored spending hours on end putting jigsaw puzzles together. My mother did too and we spent many hours over the years sitting side by side doing our jigsaw puzzles. I was thrilled when the Monet impressionist paintings jigsaw puzzles first came out as they were harder to do. I was so in love with puzzles I even glued and mounted some of them on cardboard to hang on the walls in my room. I can't remember what the puzzles were - probably images of movie stars like Robert Goulet or Doris Day or the early rock bands like Herman's Hermits, Dave Clark Five, etc. Who knows. I'm definitely dating myself here.

In any event I've never outgrown my LOVE of puzzles. Kind of like my LOVE of dolls -something else I've never outgrown a love for. I could go on and on but need to get back to the story.


So, I was anxious to try my new puzzles but decided to wait until this weekend as I knew my grandson 'Noodles" was visiting this weekend and thought it would be fun to put them together with him. Noodles and I always have a wonderful time and a lot of fun when he visits. We do a lot of shopping and eating, shopping and eating, shopping and eating, and shopping with more eating. Come on now --- with all that shopping one does get hungry. At least that's what I tell myself after stopping for cookies.

When we got home from all that shopping and eating I asked Noodles if he wanted to help me put the puzzles together as I needed to make sure the products would work for my 'It's Raining Doll Parties."  Yeah, sure Nana - make sure the products work???  Fess up - you just want to do the puzzles.

He said, "sure" but warned me that he had never done a jigsaw puzzle before which surprised me at first. I thought for sure he would finish his before I even got my out of the box. Then, when I thought about it I realized he's from the Millennial generation where their scrolling phones are attached to their fingers shortly after birth and they have X-Boxes or Wii's in the corner of their cribs. The Millennial generation wouldn't be familiar with such an old school dinosaur toy as a jigsaw puzzle. So, I shouldn't have been surprised.

Since he had never done a jigsaw puzzle before I explained to him that I liked to build my puzzles from the outside in. Start with the straight pieces and built to the inside. Everyone has their own method - that's the one I've always used. So we set to sorting the puzzle pieces and finding the edges.


To my surprise the puzzles were a little harder than I had thought. We didn't have enough time to finish ours before we went out to eat. Come one now with all that puzzle work I got hungry.....

We ended up finishing our puzzles the following morning. I actually finished mine before Noodles did. YIPPEE for Nana. He didn't know it but I had secretly given him the harder of the two. Bad Nana! Bad Nana!

Hey, come on now...... He can run circles around me when it comes to our phones. I won't even mention the video games he's been able to trounce me on since he was born. At two he was on the last level of the Mario video game before I had even figured out how to use the joystick. So, I cheated a little this weekend. In all fairness Nana has to win at something - don't she?

Fun with puzzles and Noodles this weekend. I LOVED it.

Monday, April 08, 2013

My Winter Woods - Mill Hill Buttons & Beads Cross-Stitch


One of the cross-stitch I had bought for creating this winter was a little different than some of the others I had completed. Usually I'm drawn to cross-stitch pictures of houses.  This one was a picture of a red cardinal sitting on the limb of a birch tree surrounded by other birch trees and large snowflakes. It was really pretty so I decided to try it.

Like the other Mill Hill  - Buttons & Beads Series patterns I had bought the Winter Woods kit included the pattern, embroidery thread, perforated paper, beads, red cardinal button, 2 needles and instructions.

The Winter Woods  pattern uses full counted cross-stitch and outline stitching as well as beads and buttons for emphasis and depth. The pattern also calls for certain areas of the perforated paper to be left untouched as the background.  In this case they were leaving sections of the blue perforated paper background untouched.


I, once again, decided to frame my finished cross-stitch picture in a 5" by 5" white shadow box frame that is 1 1/2" deep and can stand on it's own (like the picture at the top of this post) or with its back picture stand (like the picture above) as I've been really happy with the way all my other cross-stitch shadowbox pictures have come out.


I also decided to once again utilize the rectangular wood frame jig that my darling husband built for me (pictured above) that I could tape the edges of my perforated paper to. The wood frame jig is a rectangular embroidery hoop of sorts, but without bending the perforated  paper. He had made it out of 1/2" x 1" pine wood strips with an adjustable center strip that I used for this 5 x 5 square design.

I had learned from previous mistakes that I needed to draw diagonal lines to locate the exact center of the perforated paper as in the last perforated paper cross-stitch picture I had done was slightly off center by a few holes which caused a problem with inserting the needles in the holes along one of the edges of my frame. So, I drew a diagonal line across each corner to get the center point of the perforated paper.

I had also run into a slight problem with one of the perforated paper cross-stitch pictures I had previously created with the beads along the edge causing a problem when framing so this time I also drew squares on the perforated paper to show me where the 5" x 5" square was. Plus, I knew I wanted to square my picture so I needed to know where to end my stitching.

While the end results of this design were wonderful some things in the kit and in the instructions could be improved upon so I'd like to offer the following constructive suggestions:

The cross-stitch chart was in black and white as was the floss color code and symbol key. Both were easy to read and very clear. While I had no problem with the chart and keys I did have a problem with the way the DMC floss was presented. All of the floss was tied together in one big knot so you had to separate the floss pieces yourself, sort them, and try to interpret which color belonged to which floss # and symbol key on the color chart.  If you only have a few colors to deal with this isn't a problem. However, if you have several different colors of say beige to choose from that are close in color then interpreting the chart can be tricky. You may assign the wrong color to the wrong symbol if the colors are too closely aligned.

As I have done with other cross-stitch kits I've completed I had to design my own thread color sorter and symbol key. I took a piece of thin cardboard and cut a 1" x 9" long rectangular piece out to use as a thread sorter. I then punched 9 holes in my cardboard strip in which to tie each of the different colors. Just above the hole I wrote the DMC floss # and just below the hole I added the respective cross-stitch symbol. I then inserted the floss threads that went with that # and symbol through the hole and tied them in a loose knot. This kit could be much improved if a thread sorter with respective #'s and symbols was provided.

This time I had no problem with the beads as there were only two types being used and they were easy to distinguish from each other.  Also, I had my handy needle threader now so threading the needle wasn't an issue any longer.

The pattern called for certain areas of the perforated paper to be left untouched as the background like the picture shown below:


However, I don't like seeing the different perforated sections in the background and opted instead to finish all of the background with a blue DMC embroidery floss color that closely matched the color of the blue perforated paper.   And, once again, I had decided to square the edges of my picture.

As I was going along I decided to add more white single thread straight stitch emphasis lines than the pattern had called for with the snowflakes and under the snow patches on the branches.  I also decided to add more gray and beige double thread straight stitches and running stitches along the sides of the trees and below more of the tree branches for more dimension than the pattern had called for.   My results with the totally finished background, square edges, and added emphasis are shown below:

.

Both hubby and I were unhappy with the quality of the red cardinal button.  From a distance it looks fine but, close up, its' quality could be improved upon.

Despite the relatively small issues I had encountered with the kit I was thrilled with the way my Winter Woods  turned out. There is a lot going on in a very small cross-stitch picture and it is amazing to see all the details.

It took me 29  hours to complete this picture including the framing. As always, my comments are meant to be constructive to enable future purchasers to benefit from my experience and to enhance their ability to create a wonderful little cross-stitch design.

Tuesday, April 02, 2013

My Mill Hill Buttons & Beads Home For Christmas Cross-Stitch


When trying to decide on which small cross-stitch kits I wanted to buy for this winter I saw a charming cross-stitch Christmas picture kit that had an adorable terrier in it.  So, of course, I just had to buy it and was anxious to make it.

Like the other Mill Hill  - Buttons & Beads Series patterns I had bought the Home for Christmas - Cross Stitch Kit included the pattern, embroidery thread, perforated paper, beads, terrier button, 2 needles and instructions.

The Home For Christmas pattern uses full counted cross-stitch and outline stitching as well as beads and buttons for emphasis and depth. The pattern also calls for certain areas of the perforated paper to be left untouched as the background.

I, once again, decided to frame my finished cross-stitch picture in a 5" by 5" white shadow box frame that is 1 1/2" deep and can stand on it's own (like the picture above) or with its back picture stand (like the picture below) as I've been really happy with the way all my other cross-stitch shadowbox pictures have come out.

I also decided to once again utilize the rectangular wood frame jig that my darling husband built for me that I could tape the edges of my perforated paper to. The wood frame jig is a rectangular embroidery hoop of sorts, but without bending the perforated  paper. He had made it out of 1/2" x 1" pine wood strips with an adjustable center strip that I used for this 5 x 5 square design.

I had learned from previous mistakes that I needed to draw diagonal lines to locate the exact center of the perforated paper as the last perforated paper cross-stitch picture I had done was slightly off center by a few holes which caused a problem with inserting the needles in the holes along one of the edges of my frame. So, I drew a diagonal line across each corner to get the center point of the perforated paper.

I had also run into a slight problem with one of the perforated paper cross-stitch pictures I had previously created with the beads along the edge causing a problem when framing so this time I also drew squares on the perforated paper to show me where the 5" x 5" square was. Plus, I knew I wanted to square my picture so I needed to know where to end my stitching.


While the end results of this design were wonderful some things in the kit and in the instructions could be improved upon so I'd like to offer the following constructive suggestions:

The cross-stitch chart was in black and white as was the floss color code and symbol key. Both were easy to read and very clear. While I had no problem with the chart and keys I did have a problem with the way the DMC floss was presented. All of the floss was tied together in one big knot so you had to separate the floss pieces yourself, sort them, and try to interpret which color belonged to which floss # and symbol key on the color chart.  If you only have a few colors to deal with this isn't a problem. However, if you have several different colors of say beige to choose from that are close in color then interpreting the chart can be tricky. You may assign the wrong color to the wrong symbol if the colors are too closely aligned.

As I have done with other cross-stitch kits I've completed I had to design my own thread color sorter and symbol key. I took a piece of thin cardboard and cut a 1" x 9" long rectangular piece out to use as a thread sorter. I then punched 18 holes in my cardboard strip in which to tie each of the different colors. Just above the hole I wrote the DMC floss # and just below the hole I added the respective cross-stitch symbol. I then inserted the floss threads that went with that # and symbol through the hole and tied them in a loose knot. This kit could be much improved if a thread sorter with respective #'s and symbols was provided.

The beads were contained within two small Ziploc bags which was fine. However, when several different beads of similar color or size are included within the bags it can be very difficult to distinguish between the colors or between the petite and regular size beads.  Labeling the Ziploc bags as to which bead numbers they contained would enhance this kit and allow you to tie the bead # to the symbol number on the charts.

I love using beads in cross-stitch designs as I think they really enhance the designs, as was the case with this kit. Previously I had  a tough time trying to thread the really tiny needles that had come in the kits I had bought and decided this time to buy some needle threaders which were of immense help.

The pattern called for certain areas of the perforated paper to be left untouched as the background like the picture shown below:


However, I don't like seeing the different perforated sections in the background and opted instead to finish all of the background with beige cross-stitching and to square the edges of my picture. My results with the totally finished background and square edges are shown below:

.

Despite the problems I encountered I was thrilled with the way my Home for Christmas - Cross Stitch Kit  turned out. There is a lot going on in a very small cross-stitch picture and it is amazing to see all the details.  Plus, the little terrier button just looked so cute!

It took me 35 1/2  hours to complete this picture including the framing. As always, my comments are meant to be constructive to enable future purchasers to benefit from my experience and to enhance their ability to create a wonderful little cross-stitch design.