

I know I've told you many times that I LOVE creating with wool felt. Whether it's an ornament, a pillow, a wall-hanging, or a penny rug - I just LOVE it.
Several years ago I was introduced to penny rugs during a shopping trip with my Mother in Sturbridge. One of the shops we liked to visit carried penny rug patterns. As I was looking through the patterns one of the shop owners told me she'd be happy to put a few kits together for me. She suggested we go to lunch at a restaurant down they street that she liked and come back after lunch to pick up our purchase.
So, I picked out three that I liked, went to lunch with my Mom, and returned after lunch to pick up my kits. Thinking about that now I have to say that was one "savvy" shop owner. What a great way to get not only a pattern sale, but sales of wool fabric and embroidery floss.
Unfortunately, that store is no longer in Sturbridge so I've been forced to shop online for penny rug patterns and kits. Oh, what a hardship! LOL Having to shop online for patterns and kits! LOL
Last year I decided to buy a penny rug kit from one of the online stores that I like. The pattern I bought was #195 Puppy Love (shown in the picture below) by Barrie Sue Gaudet of Bareroots.com. It's a pattern to create a small 8" round candle mat. The kit contained the wool felt and embroidery floss needed to complete the candle mat.
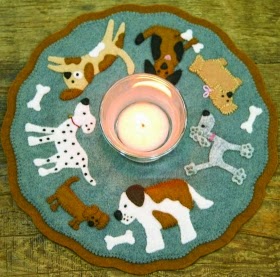
I decided not to use this as a candle mat, but as a picture mat. I wanted a mat to put underneath one of he pictures I have of my beloved fur baby "Bud" and the candle mat was not large enough. I needed to enlarge the design to create a 12" round picture mat which meant adding more dog appliques. I didn't have enough wool fabric from the kit for the backgrounds of the enlarged mat so I had to add some wool fabric from my stash.
The pattern contained one double sided page which contained a layout of the design, general directions for working with wool felt and applique pieces, and directions to complete the candle mat. It also contained 4 illustrations for a whip stitch, back stitch, lazy daisy stitch and french knot. A necessities list was included on the pattern back cover.
The pattern was very easy to follow, but I have a few suggestions that would be helpful to anyone completing this project.
I have to admit I have a few pet peeves when it comes to pattern design. I don't like patterns that contain double sided pattern layout sheets and that don't contain individual pattern pieces as it requires too many photocopies by the user to get the separate pattern pieces needed to complete the project. This is compounded when the pattern layout contains several layers and tiny little applique sections as was the case with this pattern.
White DMC embroidery floss is needed to stitch the two white dogs, the white bones, and white spot on one of the dogs. This was not listed on the necessities list on the pattern back cover. So, be sure to include white DMC if you're going to complete this project.

I noticed after I had cut out my dogs that I had actually mixed up two of the dogs colors when cutting the dogs out. The Dachshund was supposed to be dark brown not yellow and the Pomeranian was supposed to be yellow not dark brown. Oh well. Mistakes happen. My Dachshund and Pomeranian are the wrong colors.
I was pleased with the way my picture mat came out despite my mistake with the two colors. I think it looks great with "Buds" picture.
No comments:
Post a Comment