Anyone who has ever created a doll knows that "sometimes it works - and, sometimes it doesn't!" Well, yesterday I had one of those "sometimes it doesn't work" days.
I don't know if i mentioned this, but I'm in the middle of sewing the dolls for all 150+ of my new designs.
150+????
Yes, I do like to do things in large quantities. First I design for days on end. Then I cut-out the dolls for days on end. Then I sew all the bodies and clothes for days on end. Then I put all the dolls together - which I absolutely love to do - for days on end. Then I create the e-pattern for days on end. And, finally I add the new doll pattern to my website for days on end.
Some designers do it one doll at a time. I tend to go overboard (you think!!!!) and do large quantities at a time. That's me!
In any event, I had designed a a "sunshine type Annie" on paper and thought she'd make a cute, sunny doll. Everything was going fine until it came to embroidering her face. I thought I might give her blue eyes - MISTAKE. She looked like a - I don't know - a monster of some sort. Certainly not friendly.
So, I ripped the blue eyes out, drew new eyes that I liked on paper, and changed them to match on the doll. Now they were black and, sort of, looked okay. I wasn't sure they were an improvement, but I told myself to relax and wait to see what she looked like with her hair.
Well, I had intended her hair to be spiked, but didn't like it when it came to adding it to her head. She kind of looked like a "zombie." So, I changed it to using a multi-colored angora yarn that I added to her head in a kind of "loopy" fashion.
Hair wise she kind of looks like a "Gibson" girl, except she still looks - well, not sunny. More like - a "Gibson" girl type zombie. Her eyes are better, but she'd definitely scare my grandchildren.
So, I decided to make her primitive and coffee stained her last night.
Why, primitive?
I don't know. Sometimes adding the coffee stain helps and sometimes you end up with the most beautiful coffee stained dolls. It's always a surprise with coffee-staining. You just never totally know how the doll will look until it's dried.
When I went to bed she was still drying and I haven't looked at her this morning. I'm afraid to.
Wonder what I'll find?
Zombie?
Primitive Gibson girl?
Gibson girl nightmare?
Primitive Gibson girl zombie doll?
Now that would definitely be a best seller - don't you think?

Sunday, January 28, 2007
Thursday, January 25, 2007
Linda's Dolls and Craft Book Review Series - Book #5 Sewing & Sculpting Dolls

If you are familiar with me then you know that I am a cloth doll maker and doll pattern designer. You also know that I love dolls of any kind, shape, or size. It doesn't matter if they are plain, elaborately costumed, ugly (sometimes the uglier the better), made of wood, cloth or clay, or even paper. It doesn't matter if they have faces or are faceless. They can be boys, girls, animals, creatures, ghosts, goblins, witches, angels, etc. It doesn't matter to me. I just love dolls.
Well, several years ago I bought a delightful book on cloth doll making by Eloise Piper. It was for making dolls from cloth, modeling paste, and polymer clay. But, what caught my eye was that it looked like it would be a "fun" book with a "sense of humor" contained within.
The books title is Sewing and Sculpting Dolls: Easy-To-Make Dolls from Fabric, Modeling Paste, and Polymer Clay and the author is Eloise Piper. Eloise is an artist, teacher, and doll maker.
"Sewing & Sculpting" Chapter One starts with information, patterns, and examples for sewing and making the basic rag doll body. Throughout the pages are whimsical doll illustrations to delight you as you read through it. Basic doll design is followed by customizing the basic pattern, then body proportions. And, of course, all the pages have the whimsical doll illustrations.
In Chapter Two you learn about materials and processes. Here you might learn about doll making materials, tea staining, spatter painting, gessoing, painting, crackling, stain buffing, needle sculpting, sculpting with modeling paste, and sculpting with polymer clay. You also learn about additional surface embellishing techniques.
In Chapter Three you get instructions for making plain and fancy dolls using the basic doll body pattern that Eloise provides. You can make plain Amish children, play pals, fancy dolls, creating a wig, and sewing the basic wardrobe.
Chapter Four is for the intermediate doll maker and is titled "Dolls of a New Dimension." It includes intermediate cloth doll projects with sculpted modeling paste faces. It is a wonderful chapter with details and pictorials throughout.
Chapter Five is for the advanced doll maker and has advanced doll projects for cloth bodied dolls with polymer clay heads, feet, and hands. It, too, is a wonderful chapter with pictures of some of Eloise's finished dolls.
All throughout the book you are presented with whimsical drawings and caricatures. Each and every one is delightful and is what makes this book so much fun to read. For the cloth doll making enthusiast there is a lot to learn in Elosie's Sewing and Sculpting Dolls: Easy-To-Make Dolls from Fabric, Modeling Paste, and Polymer Clay book. If you're just starting out making cloth dolls or are an intermediate or advanced doll maker Elosie's "Sewing & Sculpting Dolls" is a great book to have.
Saturday, January 20, 2007
Linda's Dolls and Craft Book Review Series - Book#3 - New Complete Guide To Sewing

I was very fortunate to learn how to sew from my mother and my mother's best friend when I was 9 years old. They showed me how to use the sewing machine, explained how to read a pattern, showed me how to cut out the pieces, and explained what the various sewing terms meant, etc. I learned the basics from them - the rest I learned through trial and error. And, I have been sewing now for over 50 years.
At times I wished I had a comprehensive sewing book that would explain everything there is to know about sewing with detailed illustrations and pictorials. Well, in 1976 my mother bought one that I just loved.
So, I decided to review "The New Complete Guide to Sewing: Step-by-Step Techniques for Making Clothes and Home Accessories Updated Edition with All-New Projects and Simplicity Patterns (Reader's Digest)"from Reader's Digest.
In 1976 Reader's Digest published their first "Complete Guide To Sewing" and it became the standard reference book for beginners and sewers. It had everything but the kitchen sink in it. And, best of all it had detailed step-by-step instructions to explain everything, including the kitchen sink. I was thrilled when my mother bought her copy and I borrowed it multiple numbers of times over the years.
Well, I decided several years ago that it was time for me to have my own copy so I bought the Reader's Digest "New Complete Guide to Sewing - Step-by-Step Techniques for Making Clothes and Home Accessories."
If you want to learn how to sew then you don't need any other book but this one. It has so many detailed directions, so many illustrations, so many pictorials, so many work saving tips, and practical advice that it's hard to comprehend it all in one sitting. Plus, it also has 20 fun projects for you to try. It is a virtual smorgasbord of a sewing encyclopedia.
There are eleven chapters, which cover: Sewing Equipment and Fabrics, Cutting, Stitches and Seams, Neckline Finishes and Collars, Waistlines and Belts, Sleeves and Sleeve Finishes, Pockets, Fastenings, Tailoring, and Patchwork and Quilting.
The projects include an evening blouse, dress pants, pleated skirt, christening dress, curtains, summer dress, tailored jacket, short blouse, sheer curtains, Bermuda shorts, skirt, girl's skirt, boy's short, safari jacket, pillow cover, beach towel, lace blouse, bench cushion cover, patchwork vest, and baby blanket.
I've only had my copy for a few years but the pages show evidence of a lot of use. Even an old dog can learn new tricks and I find that every time I pick this book up to look at something that I learn something new or re-learn something I obviously had forgotten.
There's a lot to digest in this book. But, if you want one book to teach you how to sew this is the book you should have. Best of all it's a book that can be used by beginners and expert seamstresses alike.
Wednesday, January 17, 2007
Linda's Dolls and Craft Book Review Series - Book#2 - Tasha Tudor's Heirloom Crafts


I doubt there is anyone who is involved with primitive or heirloom crafts, makes primitive or heirloom crafts, or loves primitive decor who does not know who Tasha Tudor is. I certainly know who she is and just love all the children's books illustrated by her, and books written about her and her life in New Hampshire and Vermont.
So, I thought I'd tell you about one of the books about her that I just love.
The book's title is Tasha Tudor's Heirloom Crafts and the Author is Tovah Martin. Photographs are by Richard W. Brown. The book comes in hardcover with the first picture that is shown above as its' cover and in softcover with the second picture shown above as its' cover.
Just to give you a little biography on Tasha Tudor she is a world renown illustrator. She was 92 when she passed away in 2008 and her first book "Pumpkin Moonshine" was published in 1938.

I became aware of her as a child due to the beautiful children's books she illustrated including The Secret Garden, Mother Goose, and The Little Princess. Tasha raised her family in New Hampshire and then moved to Vermont 36 years ago into a home built by her son Seth using hand tools.
Previous to that she lived in New Hampshire in a 17-room brick farm house that was filled with antiques. One room of her house (which I would have loved to see) housed her antique doll collection.
Tasha is an expert at cooking, canning, candle dipping, soap making, weaving, knitting, spinning, basketry, gardening, quilting, lace making, sewing, pottery, dried florals, and doll making.
Tasha Tudor's Heirloom Crafts book is filled with beautiful pictures of Tasha and her life in Vermont. We get to read about and see pictures of the interior of her beautiful primitive house, her antique loom, her dolls, her puppets, basketry, woodworking and pottery. We also get to read about and see pictures of her gardens and her dried florals. There are chapters on dyeing wool, spinning flax, dairying, soap making, candle making, canning, cider making, and open hearth cooking. And, my favorite chapter is the one on "The World in Miniature" which includes her marionettes, toys, dolls, and her dollhouse.
If you love primitive or heirloom crafting and want to learn about primitive life in Vermont and heirloom crafting from an astonishing woman than you need look no further than Tasha Tudor's books.
Books about her and her life in New Hampshire and Vermont are a MUST READ for the primitive and heirloom crafting enthusiast. Her family currently handles her business and the Tasha Tudor website at http://www.tashatudorandfamily.com/.
I hope you enjoy browsing through Tasha Tudor's Heirloom Crafts, reading the wonderful chapters, and viewing the beautiful pictures as much as I did.
Monday, January 15, 2007
New - The Book Review Corner Blog!

You might be wondering what I'm going to do with "The Book Review Corner " blog?
Well, all sorts of things. I'll be reviewing my favorite books, of course, and might even throw in a few surprises for our readers. I might even show you pictures of some of the creations I've made from some of these books.
For the most part I will be reviewing books on dolls, doll making, crafts, craft making, florals, and all of the various sewing and crafting book subjects out there. It's a huge umbrella, but I have a lot of books and I just LOVE TO READ. Plus, I did mention I have a few surprises so my book review subjects won't always fall under our huge umbrella. I plan on having fun doing this and hope you will too.
Please come and see my NEW "The Book Review Corner" blog. Bring a cup of tea so you can stay awhile.
Sunday, January 14, 2007
Linda's Dolls and Craft Book Review Series - Book#1 - Creative Cloth Doll Making

I'm just so excited that I could barely get my new "The Book Review Corner" blog finished when I just had to tell you about the most wonderful doll making book that my husband gave me for Christmas.
This is the first book that I will be reviewing for my "Linda's Dolls and Craft Book Review Series" and it is Book#1.
The books title is Creative Cloth Doll Making: New Approaches for Using Fibers, Beads, Dyes, and Other Exciting Techniques and the Author is Patti Medaris Culea. If you are into dolls and doll making then I'm sure you have heard of Patti Medaris Culea and her wonderful cloth dolls. They are just unbelievable.
In the book Patti explains the basics of doll making and provides everything you need to know to make 5 of her dolls. She shows you how to measure, draw, create, and paint a face. She also explains how to lay out patterns, turn tiny fingers, and stuff the cloth dolls. Each doll is contained within a specific chapter as an example for that particular technique she is discussing. And, within each chapter are pictures of other doll makers cloth doll creations that are examples of that chapter's technique.
Her first chapter contains all the information needed to make a basic painted cloth doll. Chapter two elaborates more on the more intricate details of painting and finishing your basic painted cloth doll. Chapter three's doll shows you how to work with Tyvek, liners and machine embroidery. Chapter four contains and advance doll and showcases beading techniques. Chapter five contains "The Collage Doll" and highlights working with fabric, beading and photo transfers. And, finally, "The Gallery" at the back of the book showcases some elaborately decorated and exquisite cloth dolls from various cloth doll makers.
If you love to make cloth dolls and want to learn from the best then Patti Medaris Culea's Creative Cloth Doll Making: New Approaches for Using Fibers, Beads, Dyes, and Other Exciting Techniques book is a MUST READ.
I hope you enjoy this book as much as I did. If you should buy the book and make a doll please send us a picture. We'd love to show everyone your doll. Happy doll making. I'm off to start mine.
Wednesday, January 10, 2007
That's TOO MUCH WORK! It's Not Worth IT!
For all of us who have had Blogger.com blogs for a long time and who never worried about "labels" before and who, with the conversion of our blogs to the new beta.blogger.com, now have the ability to add "labels" to our posts you're going to think what I'm about to say is "nuts."
Have I got you wondering what I'm going to say, yet?
Well, if you converted your old blogger.com blog to the new beta.blogger.com layout format or if you kept your old blogger.com template and just had your blog transferred to the new beta.blogger.com you should not only add labels to all your new posts going forward but, you should go backwards and add labels to your old posts.
I can already hear your response. You're going to say; "WHAT? ARE YOU CRAZY? ADD LABELS TO MY OLD POSTS? ARE YOU NUTS? THAT'S A LOT OF WORK!!!!"
Well, it is a lot of work, but I'm not nuts and here's why I think you should do this.
For those of you who have converted your old blogs to the new beta.blogger.com layout format you have the ability to not only label all your posts but, to have a column on the sidebar of your blog for all your labels. So, for all of you who wished for labels before but didn't understand the HTML coding to add them to the sidebars of your blogs before you can now have labels.
Since, labels make it so much easier for your blog readers to find your posts about subjects that they are interested in and since you want to keep your blog readers coming back you might want to consider spending the time to go backwards and add labels to all your old posts. That way, all your posts will show up when your blog readers click on that particular label in the sidebar or when they click on that label in your post.
Now, the latter statement is where all of the old blogger.com blogs that were transferred to the new beta.blogger.com but, who are choosing not to convert their templates to the new beta.blogger.com layout template, come in.
Even if you are still using your old template all of your posts now have the ability to have labels and, ALL OF THE LABELS ARE CLICKABLE AND WILL BRING UP THE ALL POSTS WITH THAT LABEL. If you kept your old template you don't have the ability to add the "label" box column to your sidebar, but you do have the ability to utilize labels. Every label added to a post becomes CLICKABLE and will bring up every post with that label. So, if you've wanted to utilize labels before but didn't know how you can do so now - even if you didn't convert your template.
Is it worth all the time to go backwards and re-label old posts. I think so as it makes it much easier for your blog readers to find all your posts about a particular subject and it helps with the search engines. Remember, search engines love to follow links. Labels, in essence, are links.
If you're like me and have hundreds of old posts going backwards will take time to do. Do it a little bit here and there, a few old posts at a time. You'd be surprised how quickly you can get this accomplished. And, make sure that going forward all of your posts are labelled.
Plus, in the "Edit Posts" menu of Beta.blogger.com there are a lot of new features that you can utilize for labels now.
You don't have to go into each individual post to add a label if you don't want to. You can add labels to specific posts you've checked "en masse" from the "Edit Posts" screen. Plus, you can CLICK on the labels listed in the left hand column and see what articles you have already posted and what "draft" articles contain that label. And, you can easily see what labels you've assigned to each post from the "Edit Posts" screen. Quite a few nice features for handling labels.
So, am I nuts? I don't think so.
Ask me again next summer when I'm finally finished labelling all the old posts from all my blogs.
Maybe I'll be singing a different tune.
Maybe, but, I doubt it.
I think its worth the time and effort to go backwards.
Friday, January 05, 2007
Yet Some More Projects From This Year - This Time It's Cards
In a previous post entitled "I Just Love These Cards" on my Linda's Blog I told you about some "Quilt-A-Cards" kits that my mother and I had found at a sewing and expositions show we had gone to one spring.
I decided that this year that I would finally make some of those "Quilt-A-Cards" as some of the handmade gifts that I would be giving to different family members this holiday season. The "Quilt-A-Cards" are from a website called "Paper Creations and Atlas Coffee Mill" and it is at www.papercreations.com .
The cards are basically paper stock cards that you zig-zag embroider fabric onto to create a specific design. Then you add various other decorations either by sewing them on or gluing them on.
Here are some of my results:

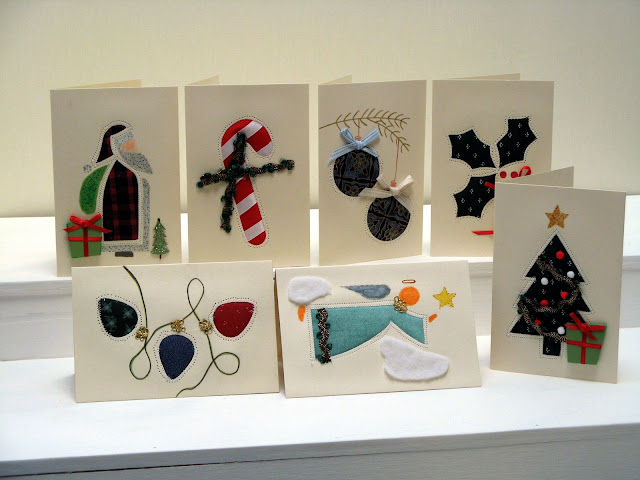

The last time I gave some of these as gifts to my sister she told me that they were just to nice to send to anyone else. She wanted to keep them for herself. That's okay if she likes them that much.
Maybe this year some of them might actually be used as intended and sent out in the mail. Wouldn't that be exciting.
Maybe this year some of them might actually be used as intended and sent out in the mail. Wouldn't that be exciting.
Subscribe to:
Posts (Atom)